
Setup Guide
Page 2
...owners. © 2003 Lexmark International, Inc. Improvements or changes in the products or the programs described may be made to make any electrical or cabling connections, such as the power cord or telephone, during a lightning storm. • The power cord must accept any accompanying ...conventions used in hazardous radiation exposure. • Your product uses a printing process that may be directed to: Director of Lexmark Technology & Services Lexmark International, Inc. 740 West New Circle Road Lexington, KY 40550 (859) 232-3000 Refer to avoid the possibility of harmful...
...owners. © 2003 Lexmark International, Inc. Improvements or changes in the products or the programs described may be made to make any electrical or cabling connections, such as the power cord or telephone, during a lightning storm. • The power cord must accept any accompanying ...conventions used in hazardous radiation exposure. • Your product uses a printing process that may be directed to: Director of Lexmark Technology & Services Lexmark International, Inc. 740 West New Circle Road Lexington, KY 40550 (859) 232-3000 Refer to avoid the possibility of harmful...
Setup Guide
Page 10
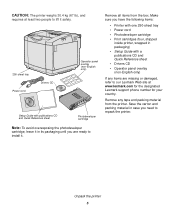
... overlay (non-English only) Setup Guide with one 250-sheet tray • Power cord • Photodeveloper cartridge • Print cartridges (four, shipped inside printer, wrapped in case you are missing or damaged, refer to our Lexmark Web site at least two people to lift it . Unpack the printer 5 ...CAUTION: The printer weighs 30.4 kg (67 lb), and requires at www.lexmark.com for the designated Lexmark support phone number for your country.
... overlay (non-English only) Setup Guide with one 250-sheet tray • Power cord • Photodeveloper cartridge • Print cartridges (four, shipped inside printer, wrapped in case you are missing or damaged, refer to our Lexmark Web site at least two people to lift it . Unpack the printer 5 ...CAUTION: The printer weighs 30.4 kg (67 lb), and requires at www.lexmark.com for the designated Lexmark support phone number for your country.
Setup Guide
Page 16
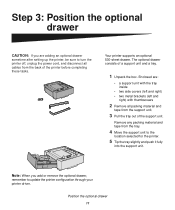
... before completing these tasks. Enclosed are adding an optional drawer sometime after setting up the printer, be sure to turn the printer off, unplug the power cord, and disconnect all packing material and tape from the tray. 4 Move the support unit to the location selected for the printer. 5 Tip the tray slightly...
... before completing these tasks. Enclosed are adding an optional drawer sometime after setting up the printer, be sure to turn the printer off, unplug the power cord, and disconnect all packing material and tape from the tray. 4 Move the support unit to the location selected for the printer. 5 Tip the tray slightly...
Setup Guide
Page 22
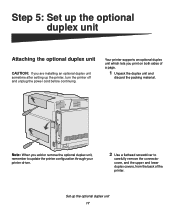
..., from the back of a page. 1 Unpack the duplex unit and discard the packing material. Set up the printer, turn the printer off and unplug the power cord before continuing. Note: When you print on both sides of the printer. Step 5: Set up the optional duplex unit Attaching the optional duplex unit CAUTION...
..., from the back of a page. 1 Unpack the duplex unit and discard the packing material. Set up the printer, turn the printer off and unplug the power cord before continuing. Note: When you print on both sides of the printer. Step 5: Set up the optional duplex unit Attaching the optional duplex unit CAUTION...
Setup Guide
Page 27
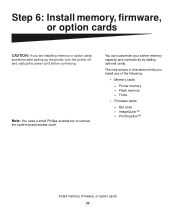
... instructions in this section help you are installing memory or option cards sometime after setting up the printer, turn the printer off and unplug the power cord before continuing. Fonts • Firmware cards - Flash memory - You can customize your printer memory capacity and connectivity by adding optional cards. ImageQuick™ - Step 6: Install...
... instructions in this section help you are installing memory or option cards sometime after setting up the printer, turn the printer off and unplug the power cord before continuing. Fonts • Firmware cards - Flash memory - You can customize your printer memory capacity and connectivity by adding optional cards. ImageQuick™ - Step 6: Install...

Setup Guide
Page 40
.... Local attachment Network attachment Go to receive jobs. If you have attached your printer locally, turn your printer on. 1 Plug one end of the printer power cord into the socket at the back of the printer and the other end into a properly grounded outlet. 2 Turn on page 44 Attach cables 35
.... Local attachment Network attachment Go to receive jobs. If you have attached your printer locally, turn your printer on. 1 Plug one end of the printer power cord into the socket at the back of the printer and the other end into a properly grounded outlet. 2 Turn on page 44 Attach cables 35
Setup Guide
Page 50
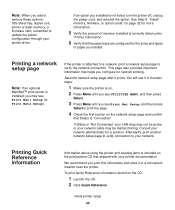
... that helps you loaded. Printing Quick Reference information Information about using the printer and clearing jams is not listed, turn the printer off, unplug the power cord, and reinstall the option. Printing a network setup page Note: If an optional MarkNet™ print server is installed, you installed is included on the network...
... that helps you loaded. Printing Quick Reference information Information about using the printer and clearing jams is not listed, turn the printer off, unplug the power cord, and reinstall the option. Printing a network setup page Note: If an optional MarkNet™ print server is installed, you installed is included on the network...
User's Reference
Page 10
... do not provide you any electrical or cabling connections, such as the power cord or telephone, during a lightning storm. • The power cord must be connected to a professional service person. CAUTION: Do not set up this product or make any rights to the Lexmark copyrighted software in the operating instructions, to an electrical outlet that...
... do not provide you any electrical or cabling connections, such as the power cord or telephone, during a lightning storm. • The power cord must be connected to a professional service person. CAUTION: Do not set up this product or make any rights to the Lexmark copyrighted software in the operating instructions, to an electrical outlet that...

User's Reference
Page 81
...all of the above and still have a problem, first make sure that : • The printer power cord is plugged into the printer and a properly grounded electrical outlet. • The printer power switch is on. • The electrical outlet is not turned off by any switch or breaker. .... If you consult Understanding printer messages. • The printer power cord is plugged into the printer and a properly grounded electrical outlet. • The printer power switch is on . When you have a problem, turn the printer power off by any switch or breaker. • Other electrical equipment...
...all of the above and still have a problem, first make sure that : • The printer power cord is plugged into the printer and a properly grounded electrical outlet. • The printer power switch is on. • The electrical outlet is not turned off by any switch or breaker. .... If you consult Understanding printer messages. • The printer power cord is plugged into the printer and a properly grounded electrical outlet. • The printer power switch is on . When you have a problem, turn the printer power off by any switch or breaker. • Other electrical equipment...

User's Reference
Page 112
... after you touch any system board electronic components or connectors. Touch something metal before completing this procedure. 1 Turn the printer off and unplug the printer power cord. 2 Disconnect all cables from the back of optional cards that can be removed. See the following sections of instructions on page 10 before you remove...
... after you touch any system board electronic components or connectors. Touch something metal before completing this procedure. 1 Turn the printer off and unplug the printer power cord. 2 Disconnect all cables from the back of optional cards that can be removed. See the following sections of instructions on page 10 before you remove...

User's Reference
Page 117
... handling options must be shipped to avoid damage. Removing the printer from the optional 530-sheet drawer 1 Turn the printer off and unplug the printer power cord. 2 Disconnect all cables at the corners of the system board. 3 Reconnect all cables from the printer. Administration 2 Replace the four screws at the back of... printer location needs to change or the printer and media handling options need to be removed from the back of the printer. 4 Plug the printer power cord in and turn the printer on. Removing options 117
... handling options must be shipped to avoid damage. Removing the printer from the optional 530-sheet drawer 1 Turn the printer off and unplug the printer power cord. 2 Disconnect all cables at the corners of the system board. 3 Reconnect all cables from the printer. Administration 2 Replace the four screws at the back of... printer location needs to change or the printer and media handling options need to be removed from the back of the printer. 4 Plug the printer power cord in and turn the printer on. Removing options 117

User's Reference
Page 121
Administration Removing the optional duplex unit 1 Turn the printer off and unplug the printer power cord. 2 Press the release tab and pull the duplex connector from the printer duplex connection. Removing options 121 Release tab 3 Turn the mounting screw counterclockwise to loosen it.
Administration Removing the optional duplex unit 1 Turn the printer off and unplug the printer power cord. 2 Press the release tab and pull the duplex connector from the printer duplex connection. Removing options 121 Release tab 3 Turn the mounting screw counterclockwise to loosen it.

User's Reference
Page 128
Removing options 128 Administration 15 Align the connector cover with its opening on the printer and push it into place. 16 Plug the printer power cord in and turn the printer on.
Removing options 128 Administration 15 Align the connector cover with its opening on the printer and push it into place. 16 Plug the printer power cord in and turn the printer on.

Service Manual
Page 167
...does operator panel display anything displays. Is RIP board installed correctly? 3 Replace RIP board. panel cable removal" on board. any activation of power cord. properly installed. Diagnostic information 2-89 See page 4-45. Look at operator panel to see if anything ? 2 Ensure RIP board is ... board. Is voltage present and correct? 5 Disconnect and check Go to step 3. No Go to step 6. Replace power cord. 5021-0XX Printer no power service check Note: If secondary paper feed assembly or duplex unit is present and correct. Does problem "Operator persist?
...does operator panel display anything displays. Is RIP board installed correctly? 3 Replace RIP board. panel cable removal" on board. any activation of power cord. properly installed. Diagnostic information 2-89 See page 4-45. Look at operator panel to see if anything ? 2 Ensure RIP board is ... board. Is voltage present and correct? 5 Disconnect and check Go to step 3. No Go to step 6. Replace power cord. 5021-0XX Printer no power service check Note: If secondary paper feed assembly or duplex unit is present and correct. Does problem "Operator persist?

Service Manual
Page 232
.... During replacement: • Before you unplug connectors from the circuit boards, be sure the power cord has been unplugged from the power outlet. • When you plug connectors into the board, be sure the power cord has been unplugged from its conductive bag or case, always place it is necessary to ground your bare hands...
.... During replacement: • Before you unplug connectors from the circuit boards, be sure the power cord has been unplugged from the power outlet. • When you plug connectors into the board, be sure the power cord has been unplugged from its conductive bag or case, always place it is necessary to ground your bare hands...

Service Manual
Page 306
...assembly Release lever (rear cover assembly) Release lever (top cover assembly) Right cover Front cover Paper tray Upper duplex cover Left cover Power switch AC input inlet Lower duplex cover Description Stopper for exited papers. Upper enclosure and also the paper exit tray. Covers a portion... toner bottle replacement. Turns the printer on and off. Opening the top cover assembly allows access to the printer. Connects the power cord that opens allowing clearing of the lower duplex unit also gives access to installation of printer operation. Releases the opening portion of ...
...assembly Release lever (rear cover assembly) Release lever (top cover assembly) Right cover Front cover Paper tray Upper duplex cover Left cover Power switch AC input inlet Lower duplex cover Description Stopper for exited papers. Upper enclosure and also the paper exit tray. Covers a portion... toner bottle replacement. Turns the printer on and off. Opening the top cover assembly allows access to the printer. Connects the power cord that opens allowing clearing of the lower duplex unit also gives access to installation of printer operation. Releases the opening portion of ...

Service Manual
Page 381
..., USA, APG, Bolivia, Canada, Columbia, Costa Rica, Ecuador, El Salvador, Guatemala, Honduras, Mexico, Nicaragua, Panama, Peru, Venezuela 7-3 1339518 Power cord, HV, Argentina 7-3 1339520 Power cord, HV, Brazil 7-3 1339524 Power Cord, HV, Chile 7-3 1339528 Power cord, HV, UK, Ireland 7-3 1339529 Power cord, HV, Austria, Belgium, Euro English, Finland, France, Germany, Greece, Netherlands, Norway, Poland, Portugal, Russia, Slovakia/Czech/ Hungary, Spain, Sweden...
..., USA, APG, Bolivia, Canada, Columbia, Costa Rica, Ecuador, El Salvador, Guatemala, Honduras, Mexico, Nicaragua, Panama, Peru, Venezuela 7-3 1339518 Power cord, HV, Argentina 7-3 1339520 Power cord, HV, Brazil 7-3 1339524 Power Cord, HV, Chile 7-3 1339528 Power cord, HV, UK, Ireland 7-3 1339529 Power cord, HV, Austria, Belgium, Euro English, Finland, France, Germany, Greece, Netherlands, Norway, Poland, Portugal, Russia, Slovakia/Czech/ Hungary, Spain, Sweden...


