
Setup Guide
Page 2
... diamond design, and MarkNet are trademarks of the FCC Rules. Any questions on this statement should be directed to: Director of Lexmark Technology & Services Lexmark International, Inc. 740 West New Circle Road Lexington, KY 40550 (859) 232-3000 Refer to the online documentation for a Class... that could damage your point of procedures other countries, contact your product hardware or software. CAUTION: Do not set of specific Lexmark components. You must understand the section in its software products. CAUTION: A caution identifies something that could cause you to recognize the...
... diamond design, and MarkNet are trademarks of the FCC Rules. Any questions on this statement should be directed to: Director of Lexmark Technology & Services Lexmark International, Inc. 740 West New Circle Road Lexington, KY 40550 (859) 232-3000 Refer to the online documentation for a Class... that could damage your point of procedures other countries, contact your product hardware or software. CAUTION: Do not set of specific Lexmark components. You must understand the section in its software products. CAUTION: A caution identifies something that could cause you to recognize the...
Setup Guide
Page 3
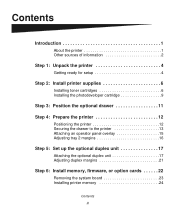
Contents Introduction 1 About the printer 1 Other sources of information 2 Step 1: Unpack the printer 4 Getting ready for setup 4 Step 2: Install printer supplies 6 Installing toner cartridges 6 Installing the photodeveloper cartridge 9 Step 3: Position the optional drawer 11 Step 4: Prepare the printer 12 Positioning the printer 12 Securing the drawer to the printer 13 Attaching an operator panel overlay 15 Adjusting tray 2 margins 16 Step 5: Set up the optional duplex unit 17 Attaching the optional duplex unit 17 Adjusting duplex margins 21 Step 6: Install memory, firmware, ...
Contents Introduction 1 About the printer 1 Other sources of information 2 Step 1: Unpack the printer 4 Getting ready for setup 4 Step 2: Install printer supplies 6 Installing toner cartridges 6 Installing the photodeveloper cartridge 9 Step 3: Position the optional drawer 11 Step 4: Prepare the printer 12 Positioning the printer 12 Securing the drawer to the printer 13 Attaching an operator panel overlay 15 Adjusting tray 2 margins 16 Step 5: Set up the optional duplex unit 17 Attaching the optional duplex unit 17 Adjusting duplex margins 21 Step 6: Install memory, firmware, ...
Setup Guide
Page 4
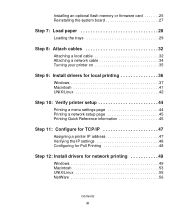
Installing an optional flash memory or firmware card 25 Reinstalling the system board 27 Step 7: Load paper 28 Loading the trays 29 Step 8: Attach cables 32 Attaching a local cable 32 Attaching a network cable 34 Turning your printer on 35 Step 9: Install drivers for local printing 36 Windows 37 Macintosh 41 UNIX/Linux 42 Step 10: Verify printer setup 44 Printing a menu settings page 44 Printing a network setup page 45 Printing Quick Reference information 45 Step 11: Configure for TCP/IP 47 Assigning a printer IP address 47 Verifying the IP settings 48 Configuring for Pull ...
Installing an optional flash memory or firmware card 25 Reinstalling the system board 27 Step 7: Load paper 28 Loading the trays 29 Step 8: Attach cables 32 Attaching a local cable 32 Attaching a network cable 34 Turning your printer on 35 Step 9: Install drivers for local printing 36 Windows 37 Macintosh 41 UNIX/Linux 42 Step 10: Verify printer setup 44 Printing a menu settings page 44 Printing a network setup page 45 Printing Quick Reference information 45 Step 11: Configure for TCP/IP 47 Assigning a printer IP address 47 Verifying the IP settings 48 Configuring for Pull ...

Setup Guide
Page 5
Step 13: Using the publications CD 57 Viewing the CD contents 57 Distributing the information 58 Storing Quick Reference information 58 Statement of Limited Warranty 59 Contents iv
Step 13: Using the publications CD 57 Viewing the CD contents 57 Distributing the information 58 Storing Quick Reference information 58 Statement of Limited Warranty 59 Contents iv

Setup Guide
Page 6
...Options Printer Page 4 Optional duplex unit Page 17 Your printer is available in three models: • Lexmark C510, with 64MB of standard memory, one 250-sheet tray, and USB and parallel connectors. • Lexmark C510n, which has 128MB of standard memory, as well as an Ethernet 10BaseT/ 100BaseTX print server installed..., with an Ethernet connector. • Lexmark C510dtn, which has the same features as the C510n, as well as a duplex unit and a 530-sheet drawer. Look for your printer....
...Options Printer Page 4 Optional duplex unit Page 17 Your printer is available in three models: • Lexmark C510, with 64MB of standard memory, one 250-sheet tray, and USB and parallel connectors. • Lexmark C510n, which has 128MB of standard memory, as well as an Ethernet 10BaseT/ 100BaseTX print server installed..., with an Ethernet connector. • Lexmark C510dtn, which has the same features as the C510n, as well as a duplex unit and a 530-sheet drawer. Look for your printer....
Setup Guide
Page 7
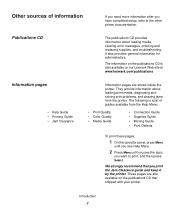
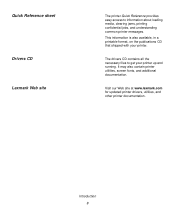
... it by the printer. They provide information about loading media, clearing error messages, ordering and replacing supplies, and troubleshooting. The information on our Lexmark Web site at www.lexmark.com/publications. Other sources of guides available from the printer. The following is also available on the publications CD is a list of information...
... it by the printer. They provide information about loading media, clearing error messages, ordering and replacing supplies, and troubleshooting. The information on our Lexmark Web site at www.lexmark.com/publications. Other sources of guides available from the printer. The following is also available on the publications CD is a list of information...
Setup Guide
Page 8
... for updated printer drivers, utilities, and other printer documentation. Quick Reference sheet Drivers CD Lexmark Web site The printer Quick Reference provides easy access to get your printer. The drivers CD contains all the necessary files to information about loading ...
... for updated printer drivers, utilities, and other printer documentation. Quick Reference sheet Drivers CD Lexmark Web site The printer Quick Reference provides easy access to get your printer. The drivers CD contains all the necessary files to information about loading ...

Setup Guide
Page 9
Step 1: Unpack the printer Getting ready for setup 20 cm (8 in.) 58.5 cm (23 in .) Unpack the printer 4 Choose a firm, level surface away from direct airflow and temperature extremes. 50 cm (20 in.) 70 cm (28 in.) 25 cm (10 in.) Total clearance needed with options Optional 530-sheet tray Height 73.5 cm (29 in.) Rear 25 cm (10 in.) Optional duplex unit 63.8 cm (25.1 in.) 35 cm (14 in.) Both 73.5 cm (29 in.) 35 cm (14 in .) Select a well ventilated location for your printer that provides room for the trays, cover, and doors.
Step 1: Unpack the printer Getting ready for setup 20 cm (8 in.) 58.5 cm (23 in .) Unpack the printer 4 Choose a firm, level surface away from direct airflow and temperature extremes. 50 cm (20 in.) 70 cm (28 in.) 25 cm (10 in.) Total clearance needed with options Optional 530-sheet tray Height 73.5 cm (29 in.) Rear 25 cm (10 in.) Optional duplex unit 63.8 cm (25.1 in.) 35 cm (14 in.) Both 73.5 cm (29 in.) 35 cm (14 in .) Select a well ventilated location for your printer that provides room for the trays, cover, and doors.
Setup Guide
Page 10
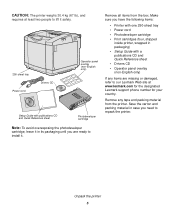
... tray • Power cord • Photodeveloper cartridge • Print cartridges (four, shipped inside printer, wrapped in case you are missing or damaged, refer to our Lexmark Web site at least two people to lift it safely. 250-sheet tray Power cord Drivers CD Operator panel overlay (non-English only) Setup Guide... photodeveloper cartridge, leave it in its packaging until you need to install it. CAUTION: The printer weighs 30.4 kg (67 lb), and requires at www.lexmark.com for the designated Lexmark support phone number for your country.
... tray • Power cord • Photodeveloper cartridge • Print cartridges (four, shipped inside printer, wrapped in case you are missing or damaged, refer to our Lexmark Web site at least two people to lift it safely. 250-sheet tray Power cord Drivers CD Operator panel overlay (non-English only) Setup Guide... photodeveloper cartridge, leave it in its packaging until you need to install it. CAUTION: The printer weighs 30.4 kg (67 lb), and requires at www.lexmark.com for the designated Lexmark support phone number for your country.
Setup Guide
Page 11
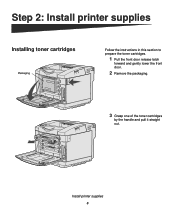
Step 2: Install printer supplies Installing toner cartridges Packaging Follow the instructions in this section to prepare the toner cartridges. 1 Pull the front door release latch forward and gently lower the front door. 2 Remove the packaging. 3 Grasp one of the toner cartridges by the handle and pull it straight out. Install printer supplies 6
Step 2: Install printer supplies Installing toner cartridges Packaging Follow the instructions in this section to prepare the toner cartridges. 1 Pull the front door release latch forward and gently lower the front door. 2 Remove the packaging. 3 Grasp one of the toner cartridges by the handle and pull it straight out. Install printer supplies 6
Setup Guide
Page 12
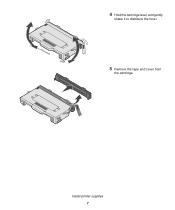
4 Hold the cartridge level, and gently shake it to distribute the toner. 5 Remove the tape and cover from the cartridge. Install printer supplies 7
4 Hold the cartridge level, and gently shake it to distribute the toner. 5 Remove the tape and cover from the cartridge. Install printer supplies 7
Setup Guide
Page 13
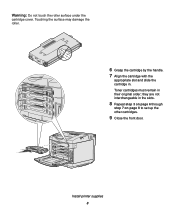
Touching the surface may damage the roller. 6 Grasp the cartridge by the handle. 7 Align the cartridge with the appropriate slot and slide the cartridge in their original order; Toner cartridges must remain in . Install printer supplies 8 they are not interchangeable in the slots. 8 Repeat step 3 on page 6 through step 7 on page 8 to set up the other cartridges. 9 Close the front door. Warning: Do not touch the roller surface under the cartridge cover.
Touching the surface may damage the roller. 6 Grasp the cartridge by the handle. 7 Align the cartridge with the appropriate slot and slide the cartridge in their original order; Toner cartridges must remain in . Install printer supplies 8 they are not interchangeable in the slots. 8 Repeat step 3 on page 6 through step 7 on page 8 to set up the other cartridges. 9 Close the front door. Warning: Do not touch the roller surface under the cartridge cover.
Setup Guide
Page 14
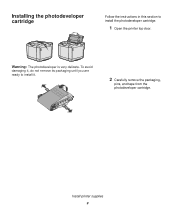
Warning: The photodeveloper is very delicate. To avoid damaging it, do not remove its packaging until you are ready to install the photodeveloper cartridge. 1 Open the printer top door. Install printer supplies 9 Installing the photodeveloper cartridge Follow the instructions in this section to install it. 2 Carefully remove the packaging, pins, and tape from the photodeveloper cartridge.
Warning: The photodeveloper is very delicate. To avoid damaging it, do not remove its packaging until you are ready to install the photodeveloper cartridge. 1 Open the printer top door. Install printer supplies 9 Installing the photodeveloper cartridge Follow the instructions in this section to install it. 2 Carefully remove the packaging, pins, and tape from the photodeveloper cartridge.
Setup Guide
Page 15
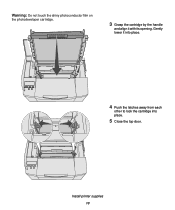
Install printer supplies 10 Gently lower it with its opening. Warning: Do not touch the shiny photoconductor film on the photodeveloper cartridge. 3 Grasp the cartridge by the handle and align it into place. 4 Push the latches away from each other to lock the cartridge into place. 5 Close the top door.
Install printer supplies 10 Gently lower it with its opening. Warning: Do not touch the shiny photoconductor film on the photodeveloper cartridge. 3 Grasp the cartridge by the handle and align it into place. 4 Push the latches away from each other to lock the cartridge into place. 5 Close the top door.
Setup Guide
Page 16
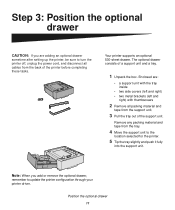
Note: When you are : • a support unit with the tray inside • two side covers (left and right) • two metal brackets (left and right) with thumbscrews 2 Remove all cables from the support unit. 3 Pull the tray out of the support unit. Enclosed are adding an optional drawer sometime after setting up the printer, be sure to turn the printer off, unplug the power cord, and disconnect all packing material and tape from the back of the printer before completing these tasks. Step 3: Position the optional drawer CAUTION: If you add or remove the optional drawer, ...
Note: When you are : • a support unit with the tray inside • two side covers (left and right) • two metal brackets (left and right) with thumbscrews 2 Remove all cables from the support unit. 3 Pull the tray out of the support unit. Enclosed are adding an optional drawer sometime after setting up the printer, be sure to turn the printer off, unplug the power cord, and disconnect all packing material and tape from the back of the printer before completing these tasks. Step 3: Position the optional drawer CAUTION: If you add or remove the optional drawer, ...
Setup Guide
Page 17
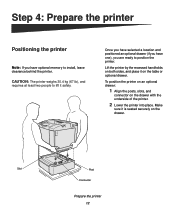
Slot Post Connector Prepare the printer 12 Step 4: Prepare the printer Positioning the printer Note: If you have one), you have optional memory to position the printer. To position the printer on an optional drawer: 1 Align the posts, slots, and connector on the table or optional drawer. Lift the printer by the recessed handholds on both sides, and place it is seated securely on the drawer. Once you have selected a location and positioned an optional drawer (if you are ready to install, leave clearance behind the printer. Make sure it on the drawer with the ...
Slot Post Connector Prepare the printer 12 Step 4: Prepare the printer Positioning the printer Note: If you have one), you have optional memory to position the printer. To position the printer on an optional drawer: 1 Align the posts, slots, and connector on the table or optional drawer. Lift the printer by the recessed handholds on both sides, and place it is seated securely on the drawer. Once you have selected a location and positioned an optional drawer (if you are ready to install, leave clearance behind the printer. Make sure it on the drawer with the ...
Setup Guide
Page 18
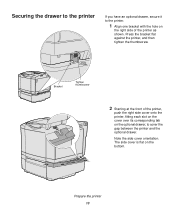
Prepare the printer 13 Securing the drawer to the printer If you have an optional drawer, secure it to cover the gap between the printer and the optional drawer. Press the bracket flat against the printer, and then tighten the thumbscrew. The side cover is flat on the right side of the printer, push the right side cover onto the printer, fitting each slot on the cover over its corresponding tab on the optional drawer, to the printer. 1 Align one bracket with the hole on the bottom. Bracket Tighten thumbscrew 2 Starting at the front of the printer as shown. Note the side ...
Prepare the printer 13 Securing the drawer to the printer If you have an optional drawer, secure it to cover the gap between the printer and the optional drawer. Press the bracket flat against the printer, and then tighten the thumbscrew. The side cover is flat on the right side of the printer, push the right side cover onto the printer, fitting each slot on the cover over its corresponding tab on the optional drawer, to the printer. 1 Align one bracket with the hole on the bottom. Bracket Tighten thumbscrew 2 Starting at the front of the printer as shown. Note the side ...
Setup Guide
Page 19
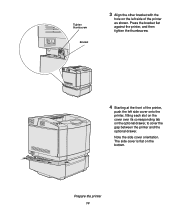
Prepare the printer 14 Note the side cover orientation. Press the bracket flat against the printer, and then tighten the thumbscrew. 4 Starting at the front of the printer, push the left side of the printer as shown. The side cover is flat on the optional drawer, to cover the gap between the printer and the optional drawer. Tighten thumbscrew Bracket 3 Align the other bracket with the hole on the left side cover onto the printer, fitting each slot on the cover over its corresponding tab on the bottom.
Prepare the printer 14 Note the side cover orientation. Press the bracket flat against the printer, and then tighten the thumbscrew. 4 Starting at the front of the printer, push the left side of the printer as shown. The side cover is flat on the optional drawer, to cover the gap between the printer and the optional drawer. Tighten thumbscrew Bracket 3 Align the other bracket with the hole on the left side cover onto the printer, fitting each slot on the cover over its corresponding tab on the bottom.
Setup Guide
Page 20
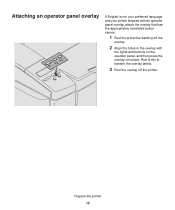
Rub firmly to transfer the overlay labels. 3 Peel the overlay off the overlay. 2 Align the holes in the overlay with an operator panel overlay, attach the overlay that has the appropriately translated button names: 1 Peel the protective backing off the printer. Attaching an operator panel overlay If English is not your preferred language and your printer shipped with the lights and buttons on the operator panel, and then press the overlay into place. Prepare the printer 15
Rub firmly to transfer the overlay labels. 3 Peel the overlay off the overlay. 2 Align the holes in the overlay with an operator panel overlay, attach the overlay that has the appropriately translated button names: 1 Peel the protective backing off the printer. Attaching an operator panel overlay If English is not your preferred language and your printer shipped with the lights and buttons on the operator panel, and then press the overlay into place. Prepare the printer 15
Setup Guide
Page 21
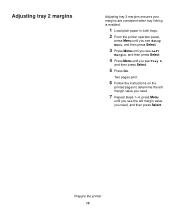
Adjusting tray 2 margins Adjusting tray 2 margins ensures your margins are consistent when tray linking is enabled. 1 Load plain paper in both trays. 2 From the printer operator panel, press Menu until you see Setup Menu, and then press Select. 3 Press Menu until you see Left Margin, and then press Select. 4 Press Menu until you see the left margin value you need . 7 Repeat steps 1-4, press Menu until you need , and then press Select. Two pages print. 6 Follow the instructions on the printed pages to determine the left margin value you see Tray 2, and then press Select. 5 Press Go. ...
Adjusting tray 2 margins Adjusting tray 2 margins ensures your margins are consistent when tray linking is enabled. 1 Load plain paper in both trays. 2 From the printer operator panel, press Menu until you see Setup Menu, and then press Select. 3 Press Menu until you see Left Margin, and then press Select. 4 Press Menu until you see the left margin value you need . 7 Repeat steps 1-4, press Menu until you need , and then press Select. Two pages print. 6 Follow the instructions on the printed pages to determine the left margin value you see Tray 2, and then press Select. 5 Press Go. ...
