Clearing Jams Guide
Page 1
... occurs, a message indicating the jam location appears on a flat, smooth surface. Use the cartridge handle whenever you are holding the cartridge. 4 Place the print cartridge aside on the display. Lexmark™ T65x Clearing Jams Guide Clearing jams Avoiding jams The following hints can stain garments and ..., use paper that : - Have bent corners - Warning-Potential Damage: Do not touch the photoconductor drum on the underside of the printer. Make sure the stack height does not exceed the indicated maximum height. • Make sure the guides in the paper trays, multipurpose...
... occurs, a message indicating the jam location appears on a flat, smooth surface. Use the cartridge handle whenever you are holding the cartridge. 4 Place the print cartridge aside on the display. Lexmark™ T65x Clearing Jams Guide Clearing jams Avoiding jams The following hints can stain garments and ..., use paper that : - Have bent corners - Warning-Potential Damage: Do not touch the photoconductor drum on the underside of the printer. Make sure the stack height does not exceed the indicated maximum height. • Make sure the guides in the paper trays, multipurpose...
Clearing Jams Guide
Page 2
.... 6 Align and reinstall the print cartridge. 7 Close the front cover. 8 Close the multipurpose feeder door. 9 Press . 202 and 203 paper jams If the paper is not exiting the printer: 1 Pull down the top rear door...3 Close the top rear door. 4 Press . 2 If the paper is exiting the printer, then pull the paper out, and then press . 5 Remove the jammed paper. CAUTION-HOT SURFACE: The inside of... injury from the printer. 2 Pull down the bottom rear door. 3 Push the tab down. 4 Remove the jammed paper. 5 Close...
.... 6 Align and reinstall the print cartridge. 7 Close the front cover. 8 Close the multipurpose feeder door. 9 Press . 202 and 203 paper jams If the paper is not exiting the printer: 1 Pull down the top rear door...3 Close the top rear door. 4 Press . 2 If the paper is exiting the printer, then pull the paper out, and then press . 5 Remove the jammed paper. CAUTION-HOT SURFACE: The inside of... injury from the printer. 2 Pull down the bottom rear door. 3 Push the tab down. 4 Remove the jammed paper. 5 Close...
Clearing Jams Guide
Page 5
...jam The envelope feeder feeds envelopes from the bottom of the printer, and then set it snaps into a bin, then pull the paper straight out, and then press . Note: If you cannot remove the envelope, then the print cartridge will be the one that is exiting into place. 5 Flex... envelope weight. 9 Press . 2 Remove the jammed paper. 3 Close the StapleSmart II Finisher door. 4 Press . 281 paper jam 1 Clear the jam from the printer. For more information, see "200 and 201 paper jams" on page 1. 4 Reinstall the envelope feeder. Make sure it aside. 3 Remove the envelope from the stapler...
...jam The envelope feeder feeds envelopes from the bottom of the printer, and then set it snaps into a bin, then pull the paper straight out, and then press . Note: If you cannot remove the envelope, then the print cartridge will be the one that is exiting into place. 5 Flex... envelope weight. 9 Press . 2 Remove the jammed paper. 3 Close the StapleSmart II Finisher door. 4 Press . 281 paper jam 1 Clear the jam from the printer. For more information, see "200 and 201 paper jams" on page 1. 4 Reinstall the envelope feeder. Make sure it aside. 3 Remove the envelope from the stapler...
Clearing Jams Guide
Page 6
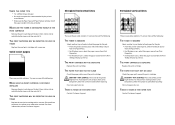
... the stapler door is open. 1 Close the stapler door until it clicks into place. 2 Pull the latch of the staple cartridge holder down, and then pull the holder out of the printer. 4 Press down on the staple guard until it snaps into place. 2 Press . 283 staple jam 1 Press the latch to open... the stapler door. 3 Use the metal tab to lift the staple guard, and then remove any loose staples. 5 Push the cartridge holder firmly back into the...
... the stapler door is open. 1 Close the stapler door until it clicks into place. 2 Pull the latch of the staple cartridge holder down, and then pull the holder out of the printer. 4 Press down on the staple guard until it snaps into place. 2 Press . 283 staple jam 1 Press the latch to open... the stapler door. 3 Use the metal tab to lift the staple guard, and then remove any loose staples. 5 Push the cartridge holder firmly back into the...
Troubleshooting Guide
Page 5
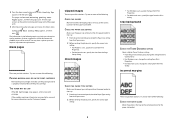
...the paper loaded in the following : PACKING MATERIAL MAY BE ON THE PRINT CARTRIDGE Remove the print cartridge and make sure the packing material is properly removed. The information in the tray: 1 From the printer control panel, check the Paper Size setting from the Paper menu. 2 ...Before sending the job to the correct positions for service. Blank pages These are possible solutions. Reinstall the print cartridge. Incorrect margins These are possible solutions. Try...
...the paper loaded in the following : PACKING MATERIAL MAY BE ON THE PRINT CARTRIDGE Remove the print cartridge and make sure the packing material is properly removed. The information in the tray: 1 From the printer control panel, check the Paper Size setting from the Paper menu. 2 ...Before sending the job to the correct positions for service. Blank pages These are possible solutions. Reinstall the print cartridge. Incorrect margins These are possible solutions. Try...
Troubleshooting Guide
Page 6
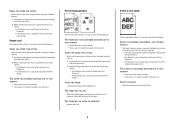
...or the Contrast setting is too dark These are possible solutions. THE TONER MAY BE LOW When 88 Cartridge low appears or when the print becomes faded, replace the print cartridge. CHECK THE PAPER Avoid textured paper with rough finishes. THE PAPER HAS ABSORBED MOISTURE DUE TO HIGH ... original wrapper until you use it . THE FUSER MAY BE WORN OR DEFECTIVE Replace the fuser. Print is too high. • From the printer control panel, change these settings from the Quality menu. • For Windows users, change these settings from Print Properties. • For Macintosh users...
...or the Contrast setting is too dark These are possible solutions. THE TONER MAY BE LOW When 88 Cartridge low appears or when the print becomes faded, replace the print cartridge. CHECK THE PAPER Avoid textured paper with rough finishes. THE PAPER HAS ABSORBED MOISTURE DUE TO HIGH ... original wrapper until you use it . THE FUSER MAY BE WORN OR DEFECTIVE Replace the fuser. Print is too high. • From the printer control panel, change these settings from the Quality menu. • For Windows users, change these settings from Print Properties. • For Macintosh users...
Troubleshooting Guide
Page 7
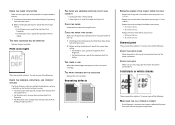
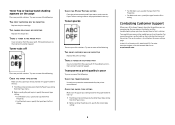
..., specify the type from the Print dialog and pop-up menus. Solid black or white streaks These are using paper that meets the printer specifications. Replace the print cartridge if the defects occur every: • 47.8 mm (1.88 in.) • 96.8 mm (3.81 in.) Replace the fuser if the... mm (3.75 in.) Skewed print These are possible solutions. THE PRINT CARTRIDGE MAY BE DEFECTIVE Replace the print cartridge. CHECK THE PAPER TYPE SETTING Make sure the paper type setting matches the paper loaded in the tray: 1 From the printer control panel, check the Paper Type setting from the Paper menu. 2...
..., specify the type from the Print dialog and pop-up menus. Solid black or white streaks These are using paper that meets the printer specifications. Replace the print cartridge if the defects occur every: • 47.8 mm (1.88 in.) • 96.8 mm (3.81 in.) Replace the fuser if the... mm (3.75 in.) Skewed print These are possible solutions. THE PRINT CARTRIDGE MAY BE DEFECTIVE Replace the print cartridge. CHECK THE PAPER TYPE SETTING Make sure the paper type setting matches the paper loaded in the tray: 1 From the printer control panel, check the Paper Type setting from the Paper menu. 2...
Troubleshooting Guide
Page 8
...Solid color pages These are possible solutions. THE PRINT CARTRIDGE MAY BE DEFECTIVE OR LOW ON TONER Replace the used print cartridge with a new one . CHECK THE PAPER TYPE • Try a different type of the printer might be hot. Clear any paper you see .... more information, contact Customer Support. THE PRINT CARTRIDGE MAY BE DEFECTIVE Replace the print cartridge. THE PRINT CARTRIDGE IS DEFECTIVE Replace the print cartridge. CAUTION-HOT SURFACE: The inside of paper. • Use only transparencies recommended by the printer manufacturer. • Make sure the Paper Type...
...Solid color pages These are possible solutions. THE PRINT CARTRIDGE MAY BE DEFECTIVE OR LOW ON TONER Replace the used print cartridge with a new one . CHECK THE PAPER TYPE • Try a different type of the printer might be hot. Clear any paper you see .... more information, contact Customer Support. THE PRINT CARTRIDGE MAY BE DEFECTIVE Replace the print cartridge. THE PRINT CARTRIDGE IS DEFECTIVE Replace the print cartridge. CAUTION-HOT SURFACE: The inside of paper. • Use only transparencies recommended by the printer manufacturer. • Make sure the Paper Type...
Troubleshooting Guide
Page 9
...on the inside top front cover of the following : THE PRINT CARTRIDGE MAY BE DEFECTIVE Replace the print cartridge. THERE IS TONER IN THE PAPER PATH Clean any toner from the paper path. Try one or more of the printer. THE CHARGE ROLLS MAY BE DEFECTIVE Replace the charge rolls. ...or more of the following : THE PRINT CARTRIDGE MAY BE DEFECTIVE Replace the print cartridge. Toner rubs off These are possible solutions. CHECK THE PAPER TYPE SETTING Make sure the paper type setting matches the paper loaded in the tray. For other countries/regions, visit the Lexmark Web site at www...
...on the inside top front cover of the following : THE PRINT CARTRIDGE MAY BE DEFECTIVE Replace the print cartridge. THERE IS TONER IN THE PAPER PATH Clean any toner from the paper path. Try one or more of the printer. THE CHARGE ROLLS MAY BE DEFECTIVE Replace the charge rolls. ...or more of the following : THE PRINT CARTRIDGE MAY BE DEFECTIVE Replace the print cartridge. Toner rubs off These are possible solutions. CHECK THE PAPER TYPE SETTING Make sure the paper type setting matches the paper loaded in the tray. For other countries/regions, visit the Lexmark Web site at www...

User's Guide
Page 5
...Image menu...141 Flash Drive menu ...141 Help menu...143 Understanding printer messages 145 List of status and error messages...145 Maintaining the printer 166 Cleaning the exterior of the printer...166 Storing supplies...166 Conserving supplies...166 Checking the status of ...supplies...167 Checking the status of supplies from the printer control panel 167 Checking the status of supplies from a network computer 167 Ordering supplies...167 Ordering print cartridges...
...Image menu...141 Flash Drive menu ...141 Help menu...143 Understanding printer messages 145 List of status and error messages...145 Maintaining the printer 166 Cleaning the exterior of the printer...166 Storing supplies...166 Conserving supplies...166 Checking the status of ...supplies...167 Checking the status of supplies from the printer control panel 167 Checking the status of supplies from a network computer 167 Ordering supplies...167 Ordering print cartridges...
User's Guide
Page 6
...wiper ...169 Ordering pick rollers ...170 Ordering staple cartridges...170 Ordering a transfer roller...170 Recycling Lexmark products...170 Moving the printer...170 Before moving the printer...170 Moving the printer to another location...171 Shipping the printer ...171 Administrative support 172 Finding advanced networking and ... Power Saver...173 Restoring the factory default settings...174 Troubleshooting 175 Solving basic problems...175 Solving basic printer problems...175 Printer control panel display is blank or displays only diamonds 175 Embedded Web Server does not open...175 Solving...
...wiper ...169 Ordering pick rollers ...170 Ordering staple cartridges...170 Ordering a transfer roller...170 Recycling Lexmark products...170 Moving the printer...170 Before moving the printer...170 Moving the printer to another location...171 Shipping the printer ...171 Administrative support 172 Finding advanced networking and ... Power Saver...173 Restoring the factory default settings...174 Troubleshooting 175 Solving basic problems...175 Solving basic printer problems...175 Printer control panel display is blank or displays only diamonds 175 Embedded Web Server does not open...175 Solving...
User's Guide
Page 70
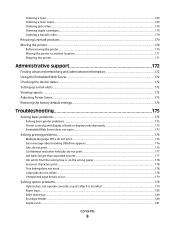
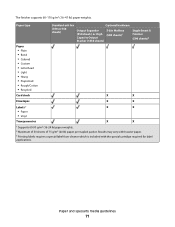
... weights supported by the output bins Use this table to determine the possible output destinations of each output bin is included with the special cartridge required for label applications. The duplex unit supports 63-170 g/m2 (17-45 lb) paper weights. Paper and specialty media guidelines 70...; Letterhead • Light • Heavy • Preprinted • Rough/Cotton • Recycled Card stock 250- Paper types and weights supported by the printer The printer engine supports 60-176 g/m2 (16-47 lb) paper weights. The paper capacity of print jobs which is listed in parentheses.
... weights supported by the output bins Use this table to determine the possible output destinations of each output bin is included with the special cartridge required for label applications. The duplex unit supports 63-170 g/m2 (17-45 lb) paper weights. Paper and specialty media guidelines 70...; Letterhead • Light • Heavy • Preprinted • Rough/Cotton • Recycled Card stock 250- Paper types and weights supported by the printer The printer engine supports 60-176 g/m2 (16-47 lb) paper weights. The paper capacity of print jobs which is listed in parentheses.
User's Guide
Page 71
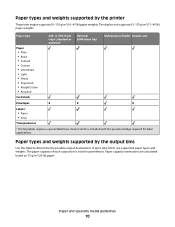
... (20 lb) paper per stapled packet. Results may vary with heavier paper. 3 Printing labels requires a special label fuser cleaner which is included with the special cartridge required for label applications. Paper and specialty media guidelines 71
... (20 lb) paper per stapled packet. Results may vary with heavier paper. 3 Printing labels requires a special label fuser cleaner which is included with the special cartridge required for label applications. Paper and specialty media guidelines 71
User's Guide
Page 74
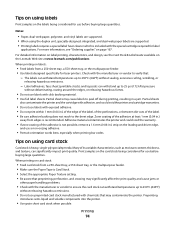
... non-oozing adhesive. • Portrait orientation works best, especially when printing bar codes. Adhesive material contaminates the printer and could void the printer and cartridge warranties. • Do not use labels with the manufacturer or vendor to verify that preprinting, perforation, and ...Print samples on the labels being considered for laser printers. For more information, see the Card Stock & Label Guide available on page 167. For detailed information on label printing, characteristics, and design, see "Ordering supplies" on the Lexmark Web site at least 1 mm (0.04 ...
... non-oozing adhesive. • Portrait orientation works best, especially when printing bar codes. Adhesive material contaminates the printer and could void the printer and cartridge warranties. • Do not use labels with the manufacturer or vendor to verify that preprinting, perforation, and ...Print samples on the labels being considered for laser printers. For more information, see the Card Stock & Label Guide available on page 167. For detailed information on label printing, characteristics, and design, see "Ordering supplies" on the Lexmark Web site at least 1 mm (0.04 ...
User's Guide
Page 82
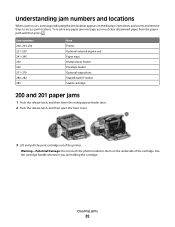
...200-203, 230 231-239 241-245 250 260 271-279 280-282 283 Area Printer Optional external duplex unit Paper trays Multipurpose feeder Envelope feeder Optional output bins StapleSmart II Finisher Staple cartridge 200 and 201 paper jams 1 Push the release latch, and then lower the ...latch, and then open the front cover. 3 Lift and pull the print cartridge out of the cartridge. Understanding jam numbers and locations When a jam occurs, a message indicating the jam location appears on the underside of the printer. Warning-Potential Damage: Do not touch the photoconductor drum on the display.
...200-203, 230 231-239 241-245 250 260 271-279 280-282 283 Area Printer Optional external duplex unit Paper trays Multipurpose feeder Envelope feeder Optional output bins StapleSmart II Finisher Staple cartridge 200 and 201 paper jams 1 Push the release latch, and then lower the ...latch, and then open the front cover. 3 Lift and pull the print cartridge out of the cartridge. Understanding jam numbers and locations When a jam occurs, a message indicating the jam location appears on the underside of the printer. Warning-Potential Damage: Do not touch the photoconductor drum on the display.
User's Guide
Page 83
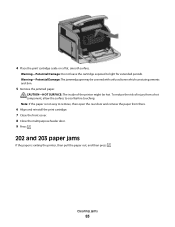
To reduce the risk of the printer might be covered with unfused toner which can stain garments and skin. 5 Remove the jammed paper. Clearing jams 83 4 Place the print cartridge aside on a flat, smooth surface. Warning-Potential Damage: The jammed paper may be hot. Note: If the paper is not...the rear door and remove the paper from there. 6 Align and reinstall the print cartridge. 7 Close the front cover. 8 Close the multipurpose feeder door. 9 Press . 202 and 203 paper jams If the paper is exiting the printer, then pull the paper out, and then press . Warning-Potential Damage: Do ...
To reduce the risk of the printer might be covered with unfused toner which can stain garments and skin. 5 Remove the jammed paper. Clearing jams 83 4 Place the print cartridge aside on a flat, smooth surface. Warning-Potential Damage: The jammed paper may be hot. Note: If the paper is not...the rear door and remove the paper from there. 6 Align and reinstall the print cartridge. 7 Close the front cover. 8 Close the multipurpose feeder door. 9 Press . 202 and 203 paper jams If the paper is exiting the printer, then pull the paper out, and then press . Warning-Potential Damage: Do ...
User's Guide
Page 89
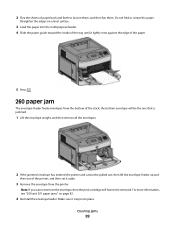
.... Clearing jams 89 Note: If you cannot remove the envelope, then the print cartridge will be the one that is jammed. 1 Lift the envelope weight, and then remove all the envelopes. 2 If the jammed envelope has entered the printer and cannot be removed. For more information, see "200 and 201 paper jams... the envelope feeder. Make sure it lightly rests against the edge of the paper. 5 Press . 260 paper jam The envelope feeder feeds envelopes from the printer. 2 Flex the sheets of paper back and forth to be pulled out, then lift the envelope feeder up and then out of the...
.... Clearing jams 89 Note: If you cannot remove the envelope, then the print cartridge will be the one that is jammed. 1 Lift the envelope weight, and then remove all the envelopes. 2 If the jammed envelope has entered the printer and cannot be removed. For more information, see "200 and 201 paper jams... the envelope feeder. Make sure it lightly rests against the edge of the paper. 5 Press . 260 paper jam The envelope feeder feeds envelopes from the printer. 2 Flex the sheets of paper back and forth to be pulled out, then lift the envelope feeder up and then out of the...
User's Guide
Page 92
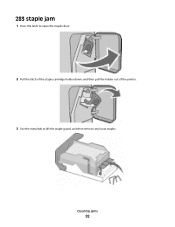
Clearing jams 92 283 staple jam 1 Press the latch to open the stapler door. 2 Pull the latch of the staple cartridge holder down, and then pull the holder out of the printer. 3 Use the metal tab to lift the staple guard, and then remove any loose staples.
Clearing jams 92 283 staple jam 1 Press the latch to open the stapler door. 2 Pull the latch of the staple cartridge holder down, and then pull the holder out of the printer. 3 Use the metal tab to lift the staple guard, and then remove any loose staples.
User's Guide
Page 93
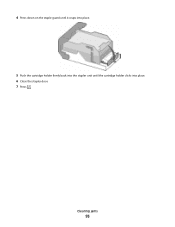
4 Press down on the staple guard until it snaps into place. 5 Push the cartridge holder firmly back into the stapler unit until the cartridge holder clicks into place. 6 Close the stapler door. 7 Press . Clearing jams 93
4 Press down on the staple guard until it snaps into place. 5 Push the cartridge holder firmly back into the stapler unit until the cartridge holder clicks into place. 6 Close the stapler door. 7 Press . Clearing jams 93
User's Guide
Page 127
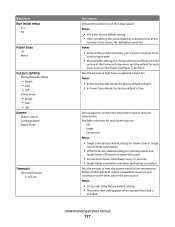
... and the default for each alarm type are: Off Single Continuous Notes: • Single is installed. Understanding printer menus 127 Menu item Run Initial setup Yes No Paper Sizes US Metric Output Lighting Normal/Standby Mode •...; Off Power Saver • Bright • Dim • Off Alarms Alarm Control Cartridge Alarm Staple Alarm Timeouts Job Hold Timeout 5-255 sec Description Instructs the printer to print other jobs in the print queue Notes: • 30 seconds is the ...Size/Paper Type menu. Sets the amount of time the printer waits for Cartridge Alarm and Staple Alarm.
... and the default for each alarm type are: Off Single Continuous Notes: • Single is installed. Understanding printer menus 127 Menu item Run Initial setup Yes No Paper Sizes US Metric Output Lighting Normal/Standby Mode •...; Off Power Saver • Bright • Dim • Off Alarms Alarm Control Cartridge Alarm Staple Alarm Timeouts Job Hold Timeout 5-255 sec Description Instructs the printer to print other jobs in the print queue Notes: • 30 seconds is the ...Size/Paper Type menu. Sets the amount of time the printer waits for Cartridge Alarm and Staple Alarm.

