User's Guide
Page 3
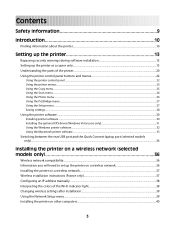
... Using the Setup menu ...27 Saving settings...28 Using the printer software...30 Installing printer software ...30 Installing the optional XPS driver (Windows Vista users only 31 Using the Windows printer software...32 Using the Macintosh printer software...33 Switching between the rear USB port and the Quick Connect laptop port (selected...
... Using the Setup menu ...27 Saving settings...28 Using the printer software...30 Installing printer software ...30 Installing the optional XPS driver (Windows Vista users only 31 Using the Windows printer software...32 Using the Macintosh printer software...33 Switching between the rear USB port and the Quick Connect laptop port (selected...

User's Guide
Page 6
...95 Maintaining print cartridges...95 Installing print cartridges...95 Removing a used print cartridge ...96 Refilling print cartridges...97 Using genuine Lexmark print cartridges...97 Aligning print cartridges ...98 Cleaning the print cartridge nozzles...98 Checking ink levels...99 Wiping the print cartridge ... ...102 Ordering paper and other supplies...103 Resetting to factory settings...103 Troubleshooting 104 Using the printer troubleshooting software (Windows only 104 Setup troubleshooting...104 Incorrect language appears on the display...104 Power button is not lit ...105 Software did...
...95 Maintaining print cartridges...95 Installing print cartridges...95 Removing a used print cartridge ...96 Refilling print cartridges...97 Using genuine Lexmark print cartridges...97 Aligning print cartridges ...98 Cleaning the print cartridge nozzles...98 Checking ink levels...99 Wiping the print cartridge ... ...102 Ordering paper and other supplies...103 Resetting to factory settings...103 Troubleshooting 104 Using the printer troubleshooting software (Windows only 104 Setup troubleshooting...104 Incorrect language appears on the display...104 Power button is not lit ...105 Software did...
User's Guide
Page 10
... view context-sensitive information. 10 Additional instructions for Macintosh and may not come with the programs. 1 Do one of the following: • In Windows Vista, click . • In Windows XP and earlier, click Start. 2 Click All Programs or Programs, and then select the printer program folder from the list. 3 From the program...
... view context-sensitive information. 10 Additional instructions for Macintosh and may not come with the programs. 1 Do one of the following: • In Windows Vista, click . • In Windows XP and earlier, click Start. 2 Click All Programs or Programs, and then select the printer program folder from the list. 3 From the program...

User's Guide
Page 30
...select the maximum Power Saver timeout. 5 Press until you exit Setup, or press another mode button. Using the printer software Installing printer software Using Windows 1 Close all open software programs. 2 Insert the printer software CD. 3 From the main installation screen, click Install. 4 Follow the instructions ...5 Follow the instructions on the screens. The Power Saver timeout is the time it takes for the printer to switch to the Lexmark Web site at www.lexmark.com. 2 From the home page, navigate through the menu selection, and then click Drivers & Downloads. 30 3 Press the...
...select the maximum Power Saver timeout. 5 Press until you exit Setup, or press another mode button. Using the printer software Installing printer software Using Windows 1 Close all open software programs. 2 Insert the printer software CD. 3 From the main installation screen, click Install. 4 Follow the instructions ...5 Follow the instructions on the screens. The Power Saver timeout is the time it takes for the printer to switch to the Lexmark Web site at www.lexmark.com. 2 From the home page, navigate through the menu selection, and then click Drivers & Downloads. 30 3 Press the...
User's Guide
Page 31
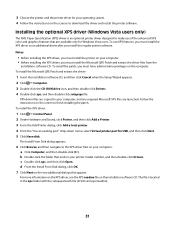
To use of the advanced XPS color and graphics features that are available only for Windows Vista users. To install the patch, you must have administrator privileges on the two additional dialogs that ends in the xps folder with the setupxps ... use XPS features, you must install the XPS driver as an additional driver after you install the regular printer software. Installing the optional XPS driver (Windows Vista users only) The XML Paper Specification (XPS) driver is located in your computer, and any required Microsoft XPS files are copied to the XPS...
To use of the advanced XPS color and graphics features that are available only for Windows Vista users. To install the patch, you must have administrator privileges on the two additional dialogs that ends in the xps folder with the setupxps ... use XPS features, you must install the XPS driver as an additional driver after you install the regular printer software. Installing the optional XPS driver (Windows Vista users only) The XML Paper Specification (XPS) driver is located in your computer, and any required Microsoft XPS files are copied to the XPS...
User's Guide
Page 32
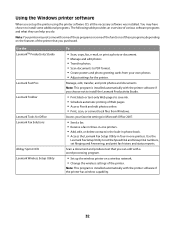
.... • Add, edit, or delete contacts in the built-in phone book. • Access the Lexmark Fax Setup Utility in four-in-one printers. Using the Windows printer software When you purchased. You may not come with the printer software if you choose not to install... or text-only Web pages to PDF format. • Create posters and photo greeting cards from Windows. Use the LexmarkTM Productivity Studio Lexmark Fast Pics Lexmark Toolbar Lexmark Tools for Office Lexmark Fax Solutions Abbyy Sprint OCR Lexmark Wireless Setup Utility To • Scan, copy, fax, e-mail, or print a photo or ...
.... • Add, edit, or delete contacts in the built-in phone book. • Access the Lexmark Fax Setup Utility in four-in-one printers. Using the Windows printer software When you purchased. You may not come with the printer software if you choose not to install... or text-only Web pages to PDF format. • Create posters and photo greeting cards from Windows. Use the LexmarkTM Productivity Studio Lexmark Fast Pics Lexmark Toolbar Lexmark Tools for Office Lexmark Fax Solutions Abbyy Sprint OCR Lexmark Wireless Setup Utility To • Scan, copy, fax, e-mail, or print a photo or ...
User's Guide
Page 34
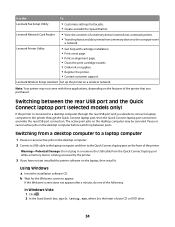
...If the Welcome screen does not appear after a minute, do one of your CD or DVD drive. 34 Using Windows a Insert the installation software CD. Switching between ports. Lexmark Network Card Reader • View the contents of a memory device inserted into a network printer. • Transfer... photos and documents from the Quick Connect laptop port while a memory device is the letter of the following: In Windows Vista 1 Click . 2 In...
...If the Welcome screen does not appear after a minute, do one of your CD or DVD drive. 34 Using Windows a Insert the installation software CD. Switching between ports. Lexmark Network Card Reader • View the contents of a memory device inserted into a network printer. • Transfer... photos and documents from the Quick Connect laptop port while a memory device is the letter of the following: In Windows Vista 1 Click . 2 In...

User's Guide
Page 35
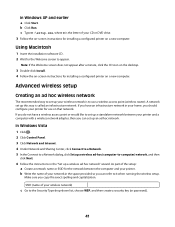
Note: If the Welcome screen does not appear after a minute, then click the CD icon on the computer screen. 35 c Double-click Install. Using Macintosh a Insert the installation software CD. b Wait for the Welcome screen to appear. d Follow the instructions on the desktop. c Follow the instructions on the computer screen. In Windows XP and earlier 1 Click Start. 2 Click Run. 3 Type D:\setup.exe, where D is the letter of your CD or DVD drive.
Note: If the Welcome screen does not appear after a minute, then click the CD icon on the computer screen. 35 c Double-click Install. Using Macintosh a Insert the installation software CD. b Wait for the Welcome screen to appear. d Follow the instructions on the desktop. c Follow the instructions on the computer screen. In Windows XP and earlier 1 Click Start. 2 Click Run. 3 Type D:\setup.exe, where D is the letter of your CD or DVD drive.
User's Guide
Page 37
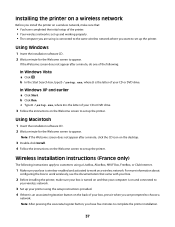
...Start Search box, type D:\setup.exe, where D is the letter of your box is wireless-enabled and activated to work on a wireless network. In Windows XP and earlier a Click Start. Using Macintosh 1 Insert the installation software CD. 2 Wait a minute for the Welcome screen to appear. c Type ...the printer. • Your wireless network is set up and working properly. • The computer you are prompted to choose a network. Using Windows 1 Insert the installation software CD. 2 Wait a minute for the Welcome screen to appear. Note: After pressing the associate/register button, you have...
...Start Search box, type D:\setup.exe, where D is the letter of your box is wireless-enabled and activated to work on a wireless network. In Windows XP and earlier a Click Start. Using Macintosh 1 Insert the installation software CD. 2 Wait a minute for the Welcome screen to appear. c Type ...the printer. • Your wireless network is set up and working properly. • The computer you are prompted to choose a network. Using Windows 1 Insert the installation software CD. 2 Wait a minute for the Welcome screen to appear. Note: After pressing the associate/register button, you have...

User's Guide
Page 39
...process. 4 Follow the prompts on the computer screen. Using Macintosh 1 From the Finder desktop, double-click the printer folder. 2 Double-click Lexmark Wireless Setup Assistant. 3 Follow the instructions on the computer screen to reinstall the software, and then make the changes that is connected to ...to start using the installation cable as the configured network, the security key, or other settings: Using Windows 1 Do one of the following: • In Windows Vista, click . • In Windows XP and earlier, click Start. 2 Click All Programs or Programs, and then select the printer ...
...process. 4 Follow the prompts on the computer screen. Using Macintosh 1 From the Finder desktop, double-click the printer folder. 2 Double-click Lexmark Wireless Setup Assistant. 3 Follow the instructions on the computer screen to reinstall the software, and then make the changes that is connected to ...to start using the installation cable as the configured network, the security key, or other settings: Using Windows 1 Do one of the following: • In Windows Vista, click . • In Windows XP and earlier, click Start. 2 Click All Programs or Programs, and then select the printer ...
User's Guide
Page 40
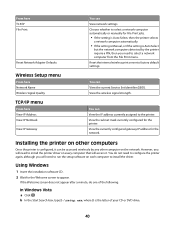
... computer to select a network computer automatically or manually for the Welcome screen to factory default settings. Installing the printer on the network. Using Windows 1 Insert the installation software CD. 2 Wait for File Print jobs. • If the setting is Auto Select, then the printer selects...is Auto Select but the network computers detected by any other computer on other computers Once the printer is the letter of the following: In Windows Vista a Click . View the wireless signal strength. b In the Start Search box, type D:\setup.exe, where D is configured, ...
... computer to select a network computer automatically or manually for the Welcome screen to factory default settings. Installing the printer on the network. Using Windows 1 Insert the installation software CD. 2 Wait for File Print jobs. • If the setting is Auto Select, then the printer selects...is Auto Select but the network computers detected by any other computer on other computers Once the printer is the letter of the following: In Windows Vista a Click . View the wireless signal strength. b In the Start Search box, type D:\setup.exe, where D is configured, ...
User's Guide
Page 41
... hoc wireless network The recommended way to set up a standalone network between the computer and your wireless network) c Go to use on that network. In Windows Vista 1 Click . 2 Click Control Panel. 3 Click Network and Internet. 4 Under Network and Sharing Center, click Connect to a Network. 5 In the ...can refer to -computer) network, and then click Next. 6 Follow the instructions in the "Set up this way is called an infrastructure network. In Windows XP and earlier a Click Start. c Type D:\setup.exe, where D is to the Security Type drop-down list, choose WEP, and then create...
... hoc wireless network The recommended way to set up a standalone network between the computer and your wireless network) c Go to use on that network. In Windows Vista 1 Click . 2 Click Control Panel. 3 Click Network and Internet. 4 Under Network and Sharing Center, click Connect to a Network. 5 In the ...can refer to -computer) network, and then click Next. 6 Follow the instructions in the "Set up this way is called an infrastructure network. In Windows XP and earlier a Click Start. c Type D:\setup.exe, where D is to the Security Type drop-down list, choose WEP, and then create...

User's Guide
Page 42
... configure the printer for use that the computer is configured for the ad hoc network. 7 Close the Control Panel and any remaining windows. 8 If this is much less than the range of your computer has third-party software that intruders will connect to create an... software CD, and then follow the instructions on a keyboard. b Click All Programs. c Select the printer program folder, and then click Tools ΠLexmark Wireless Setup Utility. 9 When the available networks are A-F, a-f, and 0-9. ASCII characters are letters, numbers, punctuation, and symbols found on the Welcome screen....
... configure the printer for use that the computer is configured for the ad hoc network. 7 Close the Control Panel and any remaining windows. 8 If this is much less than the range of your computer has third-party software that intruders will connect to create an... software CD, and then follow the instructions on a keyboard. b Click All Programs. c Select the printer program folder, and then click Tools ΠLexmark Wireless Setup Utility. 9 When the available networks are A-F, a-f, and 0-9. ASCII characters are letters, numbers, punctuation, and symbols found on the Welcome screen....

User's Guide
Page 43
...ad hoc networks. wireless access points are not used.. 22 Click OK twice to close the two open windows. 23 It may take a few minutes for your knowledge. 17 If necessary, clear the "The key... key you chose so you want to delete the network from the list, and then click Tools ΠLexmark Wireless Setup Utility. 43 b Click All Programs or Programs. c Select the printer program folder from the list...(SSID) box, type the name you can refer to recognize the new settings. 10 Select the Use Windows to it when running the wireless setup. The range of an ad hoc network is provided for me ...
...ad hoc networks. wireless access points are not used.. 22 Click OK twice to close the two open windows. 23 It may take a few minutes for your knowledge. 17 If necessary, clear the "The key... key you chose so you want to delete the network from the list, and then click Tools ΠLexmark Wireless Setup Utility. 43 b Click All Programs or Programs. c Select the printer program folder from the list...(SSID) box, type the name you can refer to recognize the new settings. 10 Select the Use Windows to it when running the wireless setup. The range of an ad hoc network is provided for me ...
User's Guide
Page 44
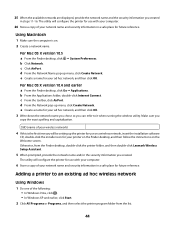
... Make sure you created in a safe place for use with your computer. 26 Store a copy of the following: • In Windows Vista, click . • In Windows XP and earlier, click Start. 2 Click All Programs or Programs, and then select the printer program folder from the Finder desktop, ...double-click the printer folder, and then double-click Lexmark Wireless Setup Assistant. 5 When prompted, provide the network name and/or the ...
... Make sure you created in a safe place for use with your computer. 26 Store a copy of the following: • In Windows Vista, click . • In Windows XP and earlier, click Start. 2 Click All Programs or Programs, and then select the printer program folder from the Finder desktop, ...double-click the printer folder, and then double-click Lexmark Wireless Setup Assistant. 5 When prompted, provide the network name and/or the ...

User's Guide
Page 50
... rebar Arrange your access point and the printer, try one or more of interference can block the signal, including: • Cubicle walls • Ducts • Window frames • Poles and interior support columns • Metal office furniture and cabinets • Elevators • Steel doors • Walls and other appliances • Bluetooth...
... rebar Arrange your access point and the printer, try one or more of interference can block the signal, including: • Cubicle walls • Ducts • Window frames • Poles and interior support columns • Metal office furniture and cabinets • Elevators • Steel doors • Walls and other appliances • Bluetooth...
User's Guide
Page 53
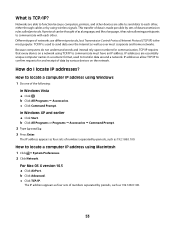
... an IP address. How to locate a computer IP address using TCP/IP to send data over the Internet as well as 192.168.0.100. In Windows XP and earlier a Click Start. b Click All Programs or Programs ΠAccessories ΠCommand Prompt. 2 Type ipconfig. 3 Press Enter. This transfer of data is TCP... as a language, and like a language, it has rules allowing participants to transfer data around a network. What is made possible by various devices on a network using Windows 1 Do one of the following: In...
... an IP address. How to locate a computer IP address using TCP/IP to send data over the Internet as well as 192.168.0.100. In Windows XP and earlier a Click Start. b Click All Programs or Programs ΠAccessories ΠCommand Prompt. 2 Type ipconfig. 3 Press Enter. This transfer of data is TCP... as a language, and like a language, it has rules allowing participants to transfer data around a network. What is made possible by various devices on a network using Windows 1 Do one of the following: In...
User's Guide
Page 61
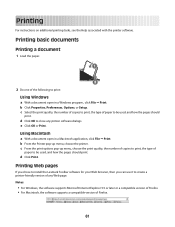
... Macintosh a With a document open in a Macintosh application, click File ΠPrint. Printing Web pages If you chose to install the Lexmark Toolbar software for your Web browser, then you can use it to close any Web page. d Click OK to create a printer-friendly ...Properties, Preferences, Options, or Setup. Printing basic documents Printing a document 1 Load the paper. 2 Do one of paper to print: Using Windows a With a document open in a Windows program , click File ΠPrint. c From the print options pop-up menu, choose the printer. e Click OK or Print. Printing ...
... Macintosh a With a document open in a Macintosh application, click File ΠPrint. Printing Web pages If you chose to install the Lexmark Toolbar software for your Web browser, then you can use it to close any Web page. d Click OK to create a printer-friendly ...Properties, Preferences, Options, or Setup. Printing basic documents Printing a document 1 Load the paper. 2 Do one of paper to print: Using Windows a With a document open in a Windows program , click File ΠPrint. c From the print options pop-up menu, choose the printer. e Click OK or Print. Printing ...
User's Guide
Page 62
... option is available only when you want to print, and then select Collate Copies. 4 Click OK to print. 4 Click Print. Collated Not collated Using Windows 1 With a document open, click File ΠPrint. 2 Click Properties, Preferences, Options, or Setup. 3 From the Copies section of the Print ...copies If you print multiple copies of a document, you can also adjust settings or preview the page before printing. Printing multiple copies of a document Using Windows 1 With a document open , click File ΠPrint. 2 From the Printer pop-up menu, choose the printer. 3 In the Copies field...
... option is available only when you want to print, and then select Collate Copies. 4 Click OK to print. 4 Click Print. Collated Not collated Using Windows 1 With a document open, click File ΠPrint. 2 Click Properties, Preferences, Options, or Setup. 3 From the Copies section of the Print ...copies If you print multiple copies of a document, you can also adjust settings or preview the page before printing. Printing multiple copies of a document Using Windows 1 With a document open , click File ΠPrint. 2 From the Printer pop-up menu, choose the printer. 3 In the Copies field...
User's Guide
Page 63
Printing the last page first (reverse page order) Using Windows 1 With a document open , click File ΠPrint. 2 From the Printer pop-up menu, choose Paper Handling. Printing multiple pages on one of the following: For ...-up menu, choose Paper Handling. For Mac OS X version 10.3 a From the print options pop-up menu, choose the printer. 3 Do one sheet (N-Up) Using Windows 1 With a document open, click File ΠPrint. 2 Click Properties, Preferences, Options, or Setup. 3 From the Advanced tab, select N-Up under the Layout drop-down menu...
Printing the last page first (reverse page order) Using Windows 1 With a document open , click File ΠPrint. 2 From the Printer pop-up menu, choose Paper Handling. Printing multiple pages on one of the following: For ...-up menu, choose Paper Handling. For Mac OS X version 10.3 a From the print options pop-up menu, choose the printer. 3 Do one sheet (N-Up) Using Windows 1 With a document open, click File ΠPrint. 2 Click Properties, Preferences, Options, or Setup. 3 From the Advanced tab, select N-Up under the Layout drop-down menu...


