User's Guide
Page 26
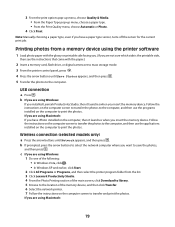
..., print all photos, print photos that fall within a date range, or print photos by selecting photo numbers. Note: Use this menu if you will be downloaded to customize the photos before printing them. 26
..., print all photos, print photos that fall within a date range, or print photos by selecting photo numbers. Note: Use this menu if you will be downloaded to customize the photos before printing them. 26

User's Guide
Page 30
... mode when the printer is the time it takes for the printer to switch to the Lexmark Web site at www.lexmark.com. 2 From the home page, navigate through the menu selection, and then click Drivers & Downloads. 30 3 Press the arrow buttons until Clear Settings Timeout appears, and then press . 4 Press the arrow...
... mode when the printer is the time it takes for the printer to switch to the Lexmark Web site at www.lexmark.com. 2 From the home page, navigate through the menu selection, and then click Drivers & Downloads. 30 3 Press the arrow buttons until Clear Settings Timeout appears, and then press . 4 Press the arrow...
User's Guide
Page 31
... the CD-ROM drive icon, and then double-click Drivers. 4 Double-click xps, and then double-click setupxps file. XPS driver files are copied to download the driver and install the printer software. c Double-click xps, and then click Open. For more information on the XPS driver, see the XPS readme...
... the CD-ROM drive icon, and then double-click Drivers. 4 Double-click xps, and then double-click setupxps file. XPS driver files are copied to download the driver and install the printer software. c Double-click xps, and then click Open. For more information on the XPS driver, see the XPS readme...
User's Guide
Page 76
... 2 Click All Programs or Programs, and then select the printer program folder from the list. 3 Click Lexmark Productivity Studio. 4 From the Photo Printing section of the main screen, click Download to library. 5 Browse to the location of the photos stored on the memory device appear on the computer ...is connected to the computer through a USB cable, and you can transfer photos from a memory card or flash drive to the computer using the Lexmark Network Card Reader. Follow the instructions on the computer screen. The printer may require that you select a computer (and a PIN, if required...
... 2 Click All Programs or Programs, and then select the printer program folder from the list. 3 Click Lexmark Productivity Studio. 4 From the Photo Printing section of the main screen, click Download to library. 5 Browse to the location of the photos stored on the memory device appear on the computer ...is connected to the computer through a USB cable, and you can transfer photos from a memory card or flash drive to the computer using the Lexmark Network Card Reader. Follow the instructions on the computer screen. The printer may require that you select a computer (and a PIN, if required...
User's Guide
Page 79
..., press the arrow buttons to select the network computer where you insert the memory device. b If you are using Windows: If you installed Lexmark Productivity Studio, then it launches when you want to mass storage mode. 3 From the printer control panel, press . 4 Press the arrow ... computer to print the photos. If you insert the memory device. Printing photos from the list. 3 Click Lexmark Productivity Studio. 4 From the Photo Printing section of the main screen, click Download to library. 5 Browse to the location of the following: • In Windows Vista, click . •...
..., press the arrow buttons to select the network computer where you insert the memory device. b If you are using Windows: If you installed Lexmark Productivity Studio, then it launches when you want to mass storage mode. 3 From the printer control panel, press . 4 Press the arrow ... computer to print the photos. If you insert the memory device. Printing photos from the list. 3 Click Lexmark Productivity Studio. 4 From the Photo Printing section of the main screen, click Download to library. 5 Browse to the location of the following: • In Windows Vista, click . •...
User's Guide
Page 88
... or USB Flash Drive appears, and then press . 88 Note: Make sure that you make a selection. b Press the arrow buttons until the printer has finished downloading the scan applications list. c Press the arrow buttons until the application that the memory device is not write-protected. d Use the arrow buttons to select...
... or USB Flash Drive appears, and then press . 88 Note: Make sure that you make a selection. b Press the arrow buttons until the printer has finished downloading the scan applications list. c Press the arrow buttons until the application that the memory device is not write-protected. d Use the arrow buttons to select...

User's Guide
Page 89
...• In Windows XP and earlier, click Start. 4 Click All Programs or Programs, and then select the printer program folder from the list. 5 Click Lexmark Productivity Studio. 6 From the Photo Printing section of the network computer appears, and then press . d Press . Using Windows 1 Open the top cover,.... Use the arrow buttons to avoid dark edges on the computer screen. d Press the arrow buttons until the printer has finished downloading the scan applications list. To assign a computer name and a PIN to select the quality and original image size, and then press a selection...
...• In Windows XP and earlier, click Start. 4 Click All Programs or Programs, and then select the printer program folder from the list. 5 Click Lexmark Productivity Studio. 6 From the Photo Printing section of the network computer appears, and then press . d Press . Using Windows 1 Open the top cover,.... Use the arrow buttons to avoid dark edges on the computer screen. d Press the arrow buttons until the printer has finished downloading the scan applications list. To assign a computer name and a PIN to select the quality and original image size, and then press a selection...
User's Guide
Page 90
...on. • The printer is Color. Note: If you choose Network, you want to select a network computer. Make sure a photo-editing application is downloaded from the applications available on the computer. Scanning to a computer over a network 1 Make sure that you want appears, and then press . 5 Wait ... avoid dark edges on the scanned image. 3 From the printer control panel, press . 4 Press the arrow buttons to choose where to finish downloading the applications list. if you are using the Scan mode is configured to scan over a network. 5 When the destination that you are 7 Press...
...on. • The printer is Color. Note: If you choose Network, you want to select a network computer. Make sure a photo-editing application is downloaded from the applications available on the computer. Scanning to a computer over a network 1 Make sure that you want appears, and then press . 5 Wait ... avoid dark edges on the scanned image. 3 From the printer control panel, press . 4 Press the arrow buttons to choose where to finish downloading the applications list. if you are using the Scan mode is configured to scan over a network. 5 When the destination that you are 7 Press...

User's Guide
Page 91
Using Macintosh To cancel a scan job started in the Lexmark All-in the Lexmark Productivity Studio, click Stop on the computer screen. 91 Using Windows To cancel a scan job started in the printer control panel, press . Canceling scan jobs ... for each digit (the default value is 0000) in the PIN, and then press each time you select a digit. 6 Wait until the printer has finished downloading the scan applications list. 7 Press the arrow buttons until the application that you want appears, and then press . 8 Press .
Using Macintosh To cancel a scan job started in the Lexmark All-in the Lexmark Productivity Studio, click Stop on the computer screen. 91 Using Windows To cancel a scan job started in the printer control panel, press . Canceling scan jobs ... for each digit (the default value is 0000) in the PIN, and then press each time you select a digit. 6 Wait until the printer has finished downloading the scan applications list. 7 Press the arrow buttons until the application that you want appears, and then press . 8 Press .
User's Guide
Page 100
...and then place the cloth on a print cartridge, then the ink level is low. Install a new cartridge if necessary. Using Windows Use the Lexmark Service Center to check the ink levels of the cartridges. 1 Do one of the following: • In Windows Vista, click . • ...click Start. 2 Click All Programs or Programs, and then select the printer program folder from the list. 3 Select Lexmark Service Center. 4 If you have not yet downloaded the Lexmark Service Center, download it. 5 Check the ink levels of the cartridges on the Printer Maintenance page. Install a new cartridge if necessary...
...and then place the cloth on a print cartridge, then the ink level is low. Install a new cartridge if necessary. Using Windows Use the Lexmark Service Center to check the ink levels of the cartridges. 1 Do one of the following: • In Windows Vista, click . • ...click Start. 2 Click All Programs or Programs, and then select the printer program folder from the list. 3 Select Lexmark Service Center. 4 If you have not yet downloaded the Lexmark Service Center, download it. 5 Check the ink levels of the cartridges on the Printer Maintenance page. Install a new cartridge if necessary...

User's Guide
Page 110
... Windows Vista a Click ΠControl Panel. If the software still does not install correctly, visit our Web site at www.lexmark.com to check for drivers or downloads. 3 Select your printer family. 4 Select your printer model. 5 Select your country or region. 2 Click the links for...software. 5 Restart the computer before reinstalling the printer software. 6 Insert the installation CD, and then follow the instructions on the computer screen to download, and then follow the instructions on the computer screen. b Click System and Maintenance ΠSystem. In Windows XP a Click Start. c ...
... Windows Vista a Click ΠControl Panel. If the software still does not install correctly, visit our Web site at www.lexmark.com to check for drivers or downloads. 3 Select your printer family. 4 Select your printer model. 5 Select your country or region. 2 Click the links for...software. 5 Restart the computer before reinstalling the printer software. 6 Insert the installation CD, and then follow the instructions on the computer screen to download, and then follow the instructions on the computer screen. b Click System and Maintenance ΠSystem. In Windows XP a Click Start. c ...
User's Guide
Page 127
... expressly designated by the manufacturer, are periodically made at any time. For information on supplies and downloads, visit www.lexmark.com. 127 Notices Product information Product name: Lexmark 3600 Series Machine type: 4438 Model(s): 001, 002 Product name: Lexmark 4600 Series Machine type: 4438 Model number 2: W02, W03, WE2, WE3 Edition notice March 2008 The...
... expressly designated by the manufacturer, are periodically made at any time. For information on supplies and downloads, visit www.lexmark.com. 127 Notices Product information Product name: Lexmark 3600 Series Machine type: 4438 Model(s): 001, 002 Product name: Lexmark 4600 Series Machine type: 4438 Model number 2: W02, W03, WE2, WE3 Edition notice March 2008 The...

User's Guide
Page 135
.... c Reservation of authorized users to the number specified in the form of a discrete agreement, shrink-wrap license, or electronic license terms at the time of download. This Agreement is copyrighted and owned by Lexmark International, Inc. If any Software Program installed on which the Software Program (if any public or distributed network...
.... c Reservation of authorized users to the number specified in the form of a discrete agreement, shrink-wrap license, or electronic license terms at the time of download. This Agreement is copyrighted and owned by Lexmark International, Inc. If any Software Program installed on which the Software Program (if any public or distributed network...

C77x - Menus and Messages Guide
Page 49
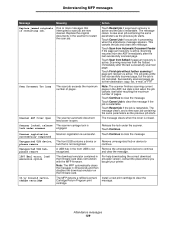
... of printed pages, and the number of copies requested. The resources remain in flash memory. PostScript emulation-Uses a PS interpreter for downloaded resources. Modifies the logical and physical printable area. Setting a printer language as a menu item if a formatted, nondefective hard disk ... This menu item is only available on the hard disk. Using the MFP menus Menu item Printer Language Print Area Download Target Job Accounting Purpose Values and descriptions Specifies the default printer language used to communicate data from the control panel. Specifies...
... of printed pages, and the number of copies requested. The resources remain in flash memory. PostScript emulation-Uses a PS interpreter for downloaded resources. Modifies the logical and physical printable area. Setting a printer language as a menu item if a formatted, nondefective hard disk ... This menu item is only available on the hard disk. Using the MFP menus Menu item Printer Language Print Area Download Target Job Accounting Purpose Values and descriptions Specifies the default printer language used to communicate data from the control panel. Specifies...

C77x - Menus and Messages Guide
Page 50
...stored in flash memory or on the hard disk are unaffected.) Do Not Restore* User-defined settings remain. It then deletes those resources associated with downloaded resources, such as a Banner Page. Returns MFP settings to the Restore Now factory default values. • All menu items are deleted. (..., the Standard Serial and Serial menu items, the Standard Network and Network menu items, and the Standard USB and USB menu items • All downloaded resources (fonts, macros, and symbol sets) in printer memory (RAM) are returned to Off, clear the check box. Note: This menu item...
...stored in flash memory or on the hard disk are unaffected.) Do Not Restore* User-defined settings remain. It then deletes those resources associated with downloaded resources, such as a Banner Page. Returns MFP settings to the Restore Now factory default values. • All menu items are deleted. (..., the Standard Serial and Serial menu items, the Standard Network and Network menu items, and the Standard USB and USB menu items • All downloaded resources (fonts, macros, and symbol sets) in printer memory (RAM) are returned to Off, clear the check box. Note: This menu item...

C77x - Menus and Messages Guide
Page 80
... items, the Standard Serial and Serial menu items, the Standard Network and Network menu items, and the Standard USB and USB menu items • All downloaded resources (fonts, macros, and symbol sets) in MFP memory (RAM) are not affected. Restore Now • All menu items are not executed. Touch Activate Hex...
... items, the Standard Serial and Serial menu items, the Standard Network and Network menu items, and the Standard USB and USB menu items • All downloaded resources (fonts, macros, and symbol sets) in MFP memory (RAM) are not affected. Restore Now • All menu items are not executed. Touch Activate Hex...

C77x - Menus and Messages Guide
Page 81
...Flash Disk Specifies to configure a variety of MFP features. Note: Job Accounting only appears when a nondefective hard disk is available. All downloaded resources are automatically stored in the flash memory or on a hard disk is permanent storage rather than is installed. PCL Emulation* PS Emulation...flash memory or on the hard disk even when the MFP is needed. On Specifies the storage location for all downloaded resources for downloaded resources. All downloaded resources are automatically stored on the hard disk. Using the MFP menus Setup Menu Use the Setup Menu to ...
...Flash Disk Specifies to configure a variety of MFP features. Note: Job Accounting only appears when a nondefective hard disk is available. All downloaded resources are automatically stored in the flash memory or on a hard disk is permanent storage rather than is installed. PCL Emulation* PS Emulation...flash memory or on the hard disk even when the MFP is needed. On Specifies the storage location for all downloaded resources for downloaded resources. All downloaded resources are automatically stored on the hard disk. Using the MFP menus Setup Menu Use the Setup Menu to ...

C77x - Menus and Messages Guide
Page 82
... items, the Standard Serial and Serial menu items, the Standard Network and Network menu items, and the Standard USB and USB menu items • All downloaded resources (fonts, macros, and symbol sets) in printer memory (RAM) are deleted. (Resources residing in the non-printable area defined by Normal Print Area, the...
... items, the Standard Serial and Serial menu items, the Standard Network and Network menu items, and the Standard USB and USB menu items • All downloaded resources (fonts, macros, and symbol sets) in printer memory (RAM) are deleted. (Resources residing in the non-printable area defined by Normal Print Area, the...

C77x - Menus and Messages Guide
Page 83
...-specific factory default values) 12U PC-850 (non-US)* (country/region-specific factory default values) A symbol set is not set for download. Using the MFP menus Menu item Font Priority Purpose Values and descriptions Establishes the font search order. Disk Note: Shows all fonts stored ... affect jobs using the PCL emulation printer language. Identifies a specific font from all fonts downloaded to 100%. Determines the symbol set to printer RAM. Printing from the factory. Download Shows all sources. PCL Emulation Menu Use these menu items to the MFP from the specified...
...-specific factory default values) 12U PC-850 (non-US)* (country/region-specific factory default values) A symbol set is not set for download. Using the MFP menus Menu item Font Priority Purpose Values and descriptions Establishes the font search order. Disk Note: Shows all fonts stored ... affect jobs using the PCL emulation printer language. Identifies a specific font from all fonts downloaded to 100%. Determines the symbol set to printer RAM. Printing from the factory. Download Shows all sources. PCL Emulation Menu Use these menu items to the MFP from the specified...
C77x - Menus and Messages Guide
Page 109
... in the ADF, but the job is open. For help downloading the correct download emulator version, contact the place where you bought your printer. 30.yy Invalid refill, change cartridge The MFP detects a refilled Lexmark Cartridge Return Program print cartridge. Attendance messages 109 Touch Restart job...pages go to clear the message. Touch Cancel Job to continue and clear the message. 1565 Emul error, load emulation option The download emulator contained in the front USB is active. Touch Restart job if the job is not recognized. successfully completed Touch Continue to ...
... in the ADF, but the job is open. For help downloading the correct download emulator version, contact the place where you bought your printer. 30.yy Invalid refill, change cartridge The MFP detects a refilled Lexmark Cartridge Return Program print cartridge. Attendance messages 109 Touch Restart job...pages go to clear the message. Touch Cancel Job to continue and clear the message. 1565 Emul error, load emulation option The download emulator contained in the front USB is active. Touch Restart job if the job is not recognized. successfully completed Touch Continue to ...


