
From Setup to Printing
Page 2
... NS/G/1234/J/100003 for additional suggestions. has determined that to the public telecommunications systems in this program introduce personal computers, printers, monitors, or fax machines that interference will not occur in a residential installation. European Community (EC) directives conformity This... and then plugging it believes appropriate without incurring any time. Federal Communications Commission (FCC) Compliance information statement The Lexmark Z54 Color Jetprinter, Type 4111-005 has been tested and found to make these changes will cut the energy used instead. Note...
... NS/G/1234/J/100003 for additional suggestions. has determined that to the public telecommunications systems in this program introduce personal computers, printers, monitors, or fax machines that interference will not occur in a residential installation. European Community (EC) directives conformity This... and then plugging it believes appropriate without incurring any time. Federal Communications Commission (FCC) Compliance information statement The Lexmark Z54 Color Jetprinter, Type 4111-005 has been tested and found to make these changes will cut the energy used instead. Note...
From Setup to Printing
Page 3
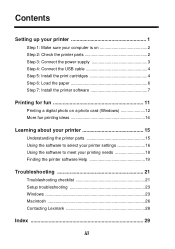
... the printer parts 2 Step 3: Connect the power supply 3 Step 4: Connect the USB cable 4 Step 5: Install the print cartridges 4 Step 6: Load the paper 6 Step 7: Install the printer software ...7 Printing for fun 11 Printing a digital photo on a photo card (Windows 12 More fun printing ideas 14 Learning about your printer 15 Understanding the printer parts 15 Using the software to select your printer... settings 16 Using the software to meet your printing needs 18 Finding the printer...
... the printer parts 2 Step 3: Connect the power supply 3 Step 4: Connect the USB cable 4 Step 5: Install the print cartridges 4 Step 6: Load the paper 6 Step 7: Install the printer software ...7 Printing for fun 11 Printing a digital photo on a photo card (Windows 12 More fun printing ideas 14 Learning about your printer 15 Understanding the printer parts 15 Using the software to select your printer... settings 16 Using the software to meet your printing needs 18 Finding the printer...

From Setup to Printing
Page 5
To set up your first document using Windows 98, Windows Me, Windows 2000, Windows XP, Mac OS 8.6 to 9.2, or Mac OS X version 10.0.3 to 10.1. Setting up your Lexmark™ Z54 Color Jetprinter™, you step by step from setup through printing your printer This booklet takes you will need: • A computer with a CD-ROM drive and USB port • A USB cable (such as Lexmark P/N 12A2405), purchased separately • A4 or letter size paper See page 28 for information about contacting Lexmark. 1
To set up your first document using Windows 98, Windows Me, Windows 2000, Windows XP, Mac OS 8.6 to 9.2, or Mac OS X version 10.0.3 to 10.1. Setting up your Lexmark™ Z54 Color Jetprinter™, you step by step from setup through printing your printer This booklet takes you will need: • A computer with a CD-ROM drive and USB port • A USB cable (such as Lexmark P/N 12A2405), purchased separately • A4 or letter size paper See page 28 for information about contacting Lexmark. 1
From Setup to Printing
Page 6
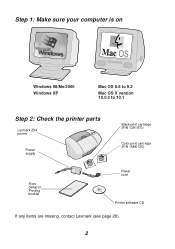
Step 1: Make sure your computer is on Windows 98/Me/2000 Windows XP Mac OS 8.6 to 9.2 Mac OS X version 10.0.3 to 10.1 Step 2: Check the printer parts Lexmark Z54 printer Power supply Black print cartridge (P/N 12A1970) Color print cartridge (P/N 15M0120) From Setup to Printing booklet Power cord Printer software CD If any items are missing, contact Lexmark (see page 28). 2
Step 1: Make sure your computer is on Windows 98/Me/2000 Windows XP Mac OS 8.6 to 9.2 Mac OS X version 10.0.3 to 10.1 Step 2: Check the printer parts Lexmark Z54 printer Power supply Black print cartridge (P/N 12A1970) Color print cartridge (P/N 15M0120) From Setup to Printing booklet Power cord Printer software CD If any items are missing, contact Lexmark (see page 28). 2
From Setup to Printing
Page 8
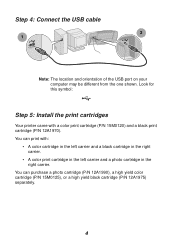
... cartridge (P/N 15M0120) and a black print cartridge (P/N 12A1970). Look for this symbol: Step 5: Install the print cartridges Your printer came with : • A color cartridge in the left carrier and a black cartridge in the right carrier. • A color print cartridge in the left carrier and a photo cartridge in the right carrier. Step 4: Connect the USB...
... cartridge (P/N 15M0120) and a black print cartridge (P/N 12A1970). Look for this symbol: Step 5: Install the print cartridges Your printer came with : • A color cartridge in the left carrier and a black cartridge in the right carrier. • A color print cartridge in the left carrier and a photo cartridge in the right carrier. Step 4: Connect the USB...

From Setup to Printing
Page 11
Operating system: Windows 98/Me/2000 and Windows XP Mac OS 8.6 to 9.2 Mac OS X version 10.0.3 to click. 7 2 Load up to 100 sheets of plain inkjet paper, and then squeeze and slide the paper guide to the left edge of the steps for your operating system. The arrows show you where to 10.1 Page: 8 9 10 Note: Your software screens may be different from the ones shown in this booklet. Step 7: Install the printer software Follow all of the paper.
Operating system: Windows 98/Me/2000 and Windows XP Mac OS 8.6 to 9.2 Mac OS X version 10.0.3 to click. 7 2 Load up to 100 sheets of plain inkjet paper, and then squeeze and slide the paper guide to the left edge of the steps for your operating system. The arrows show you where to 10.1 Page: 8 9 10 Note: Your software screens may be different from the ones shown in this booklet. Step 7: Install the printer software Follow all of the paper.

From Setup to Printing
Page 12
Congratulations! Note: If this screen does not appear, see page 23. 4 Continue with "Learning about your computer screen. Now that you have successfully set up your printer and installed the printer software, continue with the installation steps on your printer" on any screens similar to the one shown. 2 Insert the printer software CD. 3 Wait for the Lexmark printer software installation screen to appear, and then click Install Now. Windows 1 Click Cancel on page 15. 8
Congratulations! Note: If this screen does not appear, see page 23. 4 Continue with "Learning about your computer screen. Now that you have successfully set up your printer and installed the printer software, continue with the installation steps on your printer" on any screens similar to the one shown. 2 Insert the printer software CD. 3 Wait for the Lexmark printer software installation screen to appear, and then click Install Now. Windows 1 Click Cancel on page 15. 8

From Setup to Printing
Page 13
Note: If this screen does not appear, see page 26. 4 Continue with "Learning about your computer screen. Mac OS 8.6 to 9.2 1 Quit all software applications not in use. 2 Insert the printer software CD. 3 Wait for the Lexmark Installation dialog box to appear, and then click Install and Agree. Congratulations! Now that you have successfully set up your printer and installed the printer software, continue with the installation steps on your printer" on page 15. 9
Note: If this screen does not appear, see page 26. 4 Continue with "Learning about your computer screen. Mac OS 8.6 to 9.2 1 Quit all software applications not in use. 2 Insert the printer software CD. 3 Wait for the Lexmark Installation dialog box to appear, and then click Install and Agree. Congratulations! Now that you have successfully set up your printer and installed the printer software, continue with the installation steps on your printer" on page 15. 9

From Setup to Printing
Page 14
Congratulations! Now that you have successfully set up your printer and installed the printer software, continue with the installation steps shown on page 15. 10 Note: If this screen does not appear, see page 26. 4 Continue with "Learning about your printer" on your screen. Mac OS X version 10.0.3 to 10.1 1 Quit all software applications not in use. 2 Insert the printer software CD. 3 Wait for the Lexmark printer software installation screen to appear, and then click Install and Agree.
Congratulations! Now that you have successfully set up your printer and installed the printer software, continue with the installation steps shown on page 15. 10 Note: If this screen does not appear, see page 26. 4 Continue with "Learning about your printer" on your screen. Mac OS X version 10.0.3 to 10.1 1 Quit all software applications not in use. 2 Insert the printer software CD. 3 Wait for the Lexmark printer software installation screen to appear, and then click Install and Agree.

From Setup to Printing
Page 15
For information about printing other projects, see page 12. Printing for your operating system may not support all of paper Envelope Print many pages on the same sheet Banner Poster Iron-on transfer Transparency Note: The printer software for fun To learn how to print a photo card using Windows operating system, see page 14. Greeting card Print on both sides of a sheet Booklet of these features. 11
For information about printing other projects, see page 12. Printing for your operating system may not support all of paper Envelope Print many pages on the same sheet Banner Poster Iron-on transfer Transparency Note: The printer software for fun To learn how to print a photo card using Windows operating system, see page 14. Greeting card Print on both sides of a sheet Booklet of these features. 11

From Setup to Printing
Page 16
Printing a digital photo on a photo card (Windows) 1 Load up to the left edge of the paper support. You do not push the cards too far into the printer. - All the cards have the same dimensions. 2 Squeeze and slide the paper guide to 10 photo cards vertically against the right side of the cards. 12 When you . - You carefully read the instructions that came with your cards. - The print side is facing you load photo cards, make sure: -
Printing a digital photo on a photo card (Windows) 1 Load up to the left edge of the paper support. You do not push the cards too far into the printer. - All the cards have the same dimensions. 2 Squeeze and slide the paper guide to 10 photo cards vertically against the right side of the cards. 12 When you . - You carefully read the instructions that came with your cards. - The print side is facing you load photo cards, make sure: -

From Setup to Printing
Page 17
3 Open your digital photo in Windows 2000/Me and Windows XP, follow the instructions for Windows 98 to print, click File Print. Note: For some software applications in your photo application. 4 Open the Print properties from your software application. Windows 98/Me and Windows XP: From the file you want to print, click File Print Properties or Preferences. From the Printer Settings tab, click Change. Windows 2000: From the file you want to open Printing Preferences or Printing Properties. 5 From the I Want To menu, click Print a photograph. 13
3 Open your digital photo in Windows 2000/Me and Windows XP, follow the instructions for Windows 98 to print, click File Print. Note: For some software applications in your photo application. 4 Open the Print properties from your software application. Windows 98/Me and Windows XP: From the file you want to print, click File Print Properties or Preferences. From the Printer Settings tab, click Change. Windows 2000: From the file you want to open Printing Preferences or Printing Properties. 5 From the I Want To menu, click Print a photograph. 13

From Setup to Printing
Page 18
Macintosh 1 Refer to the Lexmark Z54 Solution Center (see page 18). 2 Click the "Printing ideas" link in the left navigation area. 14 Windows 1 Refer to the Online User's Guide (see ... OK. 8 From Print Properties, click OK. 9 From the Print screen, click OK or print. 10 To prevent smudging, remove each photo as it exits the printer and let it dry completely before stacking. More fun printing ideas To learn how to print special projects using your operating system, follow these steps.
Macintosh 1 Refer to the Lexmark Z54 Solution Center (see page 18). 2 Click the "Printing ideas" link in the left navigation area. 14 Windows 1 Refer to the Online User's Guide (see ... OK. 8 From Print Properties, click OK. 9 From the Print screen, click OK or print. 10 To prevent smudging, remove each photo as it exits the printer and let it dry completely before stacking. More fun printing ideas To learn how to print special projects using your operating system, follow these steps.
From Setup to Printing
Page 19
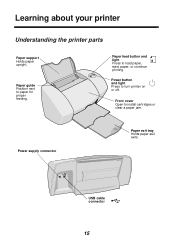
Learning about your printer Understanding the printer parts Paper support Holds paper upright. USB cable connector 15 Paper feed button and light Press to install cartridges or clear a paper jam. Power supply connector Paper exit tray Holds paper as it exits. Front cover Open to load paper, eject paper, or continue printing. Paper guide Position next to turn printer on or off. Power button and light Press to paper for proper feeding.
Learning about your printer Understanding the printer parts Paper support Holds paper upright. USB cable connector 15 Paper feed button and light Press to install cartridges or clear a paper jam. Power supply connector Paper exit tray Holds paper as it exits. Front cover Open to load paper, eject paper, or continue printing. Paper guide Position next to turn printer on or off. Power button and light Press to paper for proper feeding.

From Setup to Printing
Page 20
..., click File Page Setup. With your document open , click File Print Properties or Preferences. Using the software to -use projects menu helps you adjust your printer settings. Note: Your software screens may appear slightly different from the ones shown depending on your document open , click File Print. The Quality/ Copies, Paper... Setup, and Print Style tabs let you print photos, banners, envelopes, posters, and much more. I Want To menu This online, easy-to select your printer settings Print Properties (Windows only) With your operating system. 16
..., click File Page Setup. With your document open , click File Print Properties or Preferences. Using the software to -use projects menu helps you adjust your printer settings. Note: Your software screens may appear slightly different from the ones shown depending on your document open , click File Print. The Quality/ Copies, Paper... Setup, and Print Style tabs let you print photos, banners, envelopes, posters, and much more. I Want To menu This online, easy-to select your printer settings Print Properties (Windows only) With your operating system. 16
From Setup to Printing
Page 22
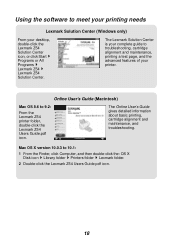
..., cartridge alignment and maintenance, and troubleshooting. Mac OS X version 10.0.3 to 9.2: From the Lexmark Z54 printer folder, double-click the Lexmark Z54 Users Guide.pdf icon. Using the software to meet your printing needs Lexmark Solution Center (Windows only) From your printer. Online User's Guide (Macintosh) Mac OS 8.6 to 10.1: 1 From the Finder, click Computer...
..., cartridge alignment and maintenance, and troubleshooting. Mac OS X version 10.0.3 to 9.2: From the Lexmark Z54 printer folder, double-click the Lexmark Z54 Users Guide.pdf icon. Using the software to meet your printing needs Lexmark Solution Center (Windows only) From your printer. Online User's Guide (Macintosh) Mac OS 8.6 to 10.1: 1 From the Finder, click Computer...
From Setup to Printing
Page 23
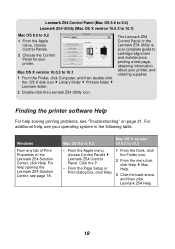
...10.1 1 From the Finder, click Computer, and then double-click the: OS X disk icon Library folder Printers folder Lexmark folder. Lexmark Z54 Control 2 From the menu bar, Panel. Finding the printer software Help For help solving printing problems, see page 18. Print dialog box, click Help. 3 Click ... is your complete guide to 9.2 1 From the Apple menu, choose Control Panels. 2 Choose the Control Panel for your printer. Lexmark Z54 Control Panel (Mac OS 8.6 to 9.2) Lexmark Z54 Utility (Mac OS X version 10.0.3 to 10.1) Mac OS 8.6 to cartridge alignment and maintenance, printing a test ...
...10.1 1 From the Finder, click Computer, and then double-click the: OS X disk icon Library folder Printers folder Lexmark folder. Lexmark Z54 Control 2 From the menu bar, Panel. Finding the printer software Help For help solving printing problems, see page 18. Print dialog box, click Help. 3 Click ... is your complete guide to 9.2 1 From the Apple menu, choose Control Panels. 2 Choose the Control Panel for your printer. Lexmark Z54 Control Panel (Mac OS 8.6 to 9.2) Lexmark Z54 Utility (Mac OS X version 10.0.3 to 10.1) Mac OS 8.6 to cartridge alignment and maintenance, printing a test ...
From Setup to Printing
Page 25
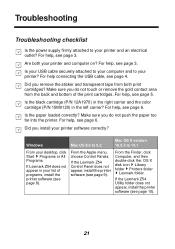
..., click Computer, and then double-click the: OS X disk icon Library folder Printers folder Lexmark folder. Are both print cartridges? Is your USB cable securely attached to your computer and to 10.1 From your printer? For help , see page 5. Windows Mac OS 8.6 to 9.2 Mac OS ...page 3. Troubleshooting Troubleshooting checklist Is the power supply firmly attached to your printer and computer on? Is the black cartridge (P/N 12A1970) in the right carrier and the color cartridge (P/N 15M0120) in your printer software correctly? For help , see page 4. Did you do not ...
..., click Computer, and then double-click the: OS X disk icon Library folder Printers folder Lexmark folder. Are both print cartridges? Is your USB cable securely attached to your computer and to 10.1 From your printer? For help , see page 5. Windows Mac OS 8.6 to 9.2 Mac OS ...page 3. Troubleshooting Troubleshooting checklist Is the power supply firmly attached to your printer and computer on? Is the black cartridge (P/N 12A1970) in the right carrier and the color cartridge (P/N 15M0120) in your printer software correctly? For help , see page 4. Did you do not ...

From Setup to Printing
Page 26
You follow these steps: 1 Disconnect your printer from any error message on your printer. Lexmark Z54 Control Panel. 2 From the Cartridges tab, click Print Test 2 Click Print Test Page. If the test page prints, the problem may be with a USB...icon. 2 From the Troubleshooting tab, click Print a Test Page. 1 From the Apple 1 Open the menu, choose Lexmark Z54 Utility Control Panels folder (see page 19). Page. - If the test page does not print, access the printer software Help (see page 4). - You installed the print cartridges correctly (see page 19) for further troubleshooting...
You follow these steps: 1 Disconnect your printer from any error message on your printer. Lexmark Z54 Control Panel. 2 From the Cartridges tab, click Print Test 2 Click Print Test Page. If the test page prints, the problem may be with a USB...icon. 2 From the Troubleshooting tab, click Print a Test Page. 1 From the Apple 1 Open the menu, choose Lexmark Z54 Utility Control Panels folder (see page 19). Page. - If the test page does not print, access the printer software Help (see page 4). - You installed the print cartridges correctly (see page 19) for further troubleshooting...

From Setup to Printing
Page 27
... CD, nothing happened. 1 Close all open software applications. 2 Restart your computer. 3 Make sure you may have while setting up your printer, such as: • Slow print speed or poor print quality • Paper misfeeds or jams • Error messages or flashing lights Use this chapter for... help solving problems you click Cancel on any screens similar to the one in step 1 on page 8. 23 Setup troubleshooting Refer to the Lexmark Solution Center (see page 18) or the Online User's Guide (see page 18) for help solving problems you may have after setting up your CD...
... CD, nothing happened. 1 Close all open software applications. 2 Restart your computer. 3 Make sure you may have while setting up your printer, such as: • Slow print speed or poor print quality • Paper misfeeds or jams • Error messages or flashing lights Use this chapter for... help solving problems you click Cancel on any screens similar to the one in step 1 on page 8. 23 Setup troubleshooting Refer to the Lexmark Solution Center (see page 18) or the Online User's Guide (see page 18) for help solving problems you may have after setting up your CD...


