

Setup Sheet
Page 1
Connect the power supply. CAUTION: Do not use the fax feature during a lightning storm. Lift the paper support, and extend the paper exit tray. 1 2 Load paper and adjust the paper guide. Turn your User's Guide. 2 Visit our Web site. Safety information • Use ... is near the product and easily accessible. • Refer service or repairs, other than those described in the user documentation, to a professional service person. X1100 Series All-In-One For more help: 1 Refer to your computer on . http://support.lexmark.com/ 3 Call us at (859) 825-3000.
Connect the power supply. CAUTION: Do not use the fax feature during a lightning storm. Lift the paper support, and extend the paper exit tray. 1 2 Load paper and adjust the paper guide. Turn your User's Guide. 2 Visit our Web site. Safety information • Use ... is near the product and easily accessible. • Refer service or repairs, other than those described in the user documentation, to a professional service person. X1100 Series All-In-One For more help: 1 Refer to your computer on . http://support.lexmark.com/ 3 Call us at (859) 825-3000.
User's Guide
Page 5
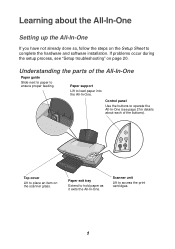
... hold paper as it exits the All-In-One. Understanding the parts of the buttons). Paper exit tray Extend to access the print cartridges. 1 Paper support Lift to place an item on page 20. Learning about each of the All-In-One Paper guide Slide next to paper to ensure proper...
... hold paper as it exits the All-In-One. Understanding the parts of the buttons). Paper exit tray Extend to access the print cartridges. 1 Paper support Lift to place an item on page 20. Learning about each of the All-In-One Paper guide Slide next to paper to ensure proper...
User's Guide
Page 14
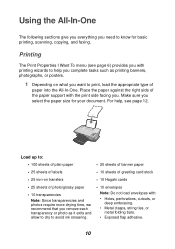
..., we recommend that you remove each transparency or photo as it exits and allow to dry to print, load the appropriate type of the paper support with : • Holes, perforations, cutouts, or deep embossing. • Metal clasps, string ties, or metal folding bars. • Exposed flap adhesive. 10 Using the All...
..., we recommend that you remove each transparency or photo as it exits and allow to dry to print, load the appropriate type of the paper support with : • Holes, perforations, cutouts, or deep embossing. • Metal clasps, string ties, or metal folding bars. • Exposed flap adhesive. 10 Using the All...
User's Guide
Page 21
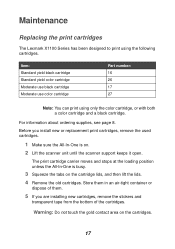
.... 4 Remove the old cartridges. Warning: Do not touch the gold contact area on . 2 Lift the scanner unit until the scanner support keeps it open. Maintenance Replacing the print cartridges The Lexmark X1100 Series has been designed to print using only the color cartridge, or with both a color cartridge and a black cartridge. Before you...
.... 4 Remove the old cartridges. Warning: Do not touch the gold contact area on . 2 Lift the scanner unit until the scanner support keeps it open. Maintenance Replacing the print cartridges The Lexmark X1100 Series has been designed to print using only the color cartridge, or with both a color cartridge and a black cartridge. Before you...
User's Guide
Page 22
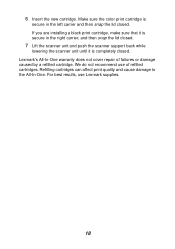
... the color print cartridge is secure in the right carrier, and then snap the lid closed. 7 Lift the scanner unit and push the scanner support back while lowering the scanner unit until it is completely closed . If you are installing a black print cartridge, make sure that it is secure in... the left carrier and then snap the lid closed . Refilling cartridges can affect print quality and cause damage to the All-In-One. Lexmark's All-In-One warranty does not cover repair of refilled cartridges. For best results, use of failures or damage caused by a refilled cartridge. We ...
... the color print cartridge is secure in the right carrier, and then snap the lid closed. 7 Lift the scanner unit and push the scanner support back while lowering the scanner unit until it is completely closed . If you are installing a black print cartridge, make sure that it is secure in... the left carrier and then snap the lid closed . Refilling cartridges can affect print quality and cause damage to the All-In-One. Lexmark's All-In-One warranty does not cover repair of refilled cartridges. For best results, use of failures or damage caused by a refilled cartridge. We ...
User's Guide
Page 30
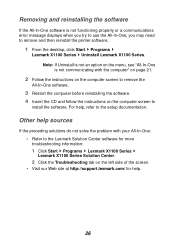
...: If Uninstall is not an option on the left side of the screen. • Visit our Web site at http://support.lexmark.com/ for more troubleshooting information: 1 Click Start Programs Lexmark X1100 Series Lexmark X1100 Series Solution Center. 2 Click the Troubleshooting tab on the menu, see "All-In-One is not functioning properly or a communications error...
...: If Uninstall is not an option on the left side of the screen. • Visit our Web site at http://support.lexmark.com/ for more troubleshooting information: 1 Click Start Programs Lexmark X1100 Series Lexmark X1100 Series Solution Center. 2 Click the Troubleshooting tab on the menu, see "All-In-One is not functioning properly or a communications error...
User's Guide
Page 31
...that to which can radiate radio frequency energy and, if not installed and used by the Director of Manufacturing and Technical Support, Lexmark International, S.A., Boigny, France. European Community (EC) directives conformity This product is not responsible for any interference received, ... Companies participating in a violation of FCC regulations. Electronic emission notices Federal Communications Commission (FCC) compliance information statement The Lexmark 3100 Series 4476-K01 has been tested and found to comply with the limits for a Class B digital device, pursuant to ...
...that to which can radiate radio frequency energy and, if not installed and used by the Director of Manufacturing and Technical Support, Lexmark International, S.A., Boigny, France. European Community (EC) directives conformity This product is not responsible for any interference received, ... Companies participating in a violation of FCC regulations. Electronic emission notices Federal Communications Commission (FCC) compliance information statement The Lexmark 3100 Series 4476-K01 has been tested and found to comply with the limits for a Class B digital device, pursuant to ...
