
User's Guide
Page 3
Table of contents Chapter 1: Printer overview 9 Print speed ...10 Memory ...10 Paper handling 10 Chapter 2: Avoiding print quality problems 11 Media and supplies 11 Transparencies 11 Chapter 3: Canceling a print job 12 Chapter 4: Controlling printed output 13 Image Smoothing 13 Color correction 13 Print mode ...13 Toner darkness 14 Printing text ...14 Halftone screens 14 Chapter 5: Using the operator panel 16 Understanding the operator panel 16 Using the operator panel buttons 17 Changing printer settings 17 Printing the menu settings page 18 i
Table of contents Chapter 1: Printer overview 9 Print speed ...10 Memory ...10 Paper handling 10 Chapter 2: Avoiding print quality problems 11 Media and supplies 11 Transparencies 11 Chapter 3: Canceling a print job 12 Chapter 4: Controlling printed output 13 Image Smoothing 13 Color correction 13 Print mode ...13 Toner darkness 14 Printing text ...14 Halftone screens 14 Chapter 5: Using the operator panel 16 Understanding the operator panel 16 Using the operator panel buttons 17 Changing printer settings 17 Printing the menu settings page 18 i

User's Guide
Page 7
Chapter 39: Ordering supplies 133 Chapter 40: Calling for service 135 Chapter 41: Contacting Lexmark customer service on the Web 136 Chapter 42: Solving display problems 137 Chapter 43: Solving network printing problems 138 Chapter 44: Checking an unresponsive printer 139 Chapter 45: Solving printing problems 140 Chapter 46: Solving print quality problems 143 Chapter 47: Clearing paper jams 146 200 Paper Jam Pages Jammed (Check Areas A-F, T1-5, MPF 147 240 Paper Jam Check MP Feeder 163 24 Paper Jam Check Tray
Chapter 39: Ordering supplies 133 Chapter 40: Calling for service 135 Chapter 41: Contacting Lexmark customer service on the Web 136 Chapter 42: Solving display problems 137 Chapter 43: Solving network printing problems 138 Chapter 44: Checking an unresponsive printer 139 Chapter 45: Solving printing problems 140 Chapter 46: Solving print quality problems 143 Chapter 47: Clearing paper jams 146 200 Paper Jam Pages Jammed (Check Areas A-F, T1-5, MPF 147 240 Paper Jam Check MP Feeder 163 24 Paper Jam Check Tray

User's Guide
Page 8
... 183 Dimensions ...183 Chapter 54: Restoring factory default settings 184 Chapter 55: Printing sample fonts 185 Chapter 56: Understanding printer messages 186 Chapter 57: Using printer menus 235 Chapter 58: Color Menu 239 Chapter 59: Finishing Menu 242 Chapter 60: Infrared Menu 248 Chapter 61: Job Menu 253 Chapter 62: LocalTalk Menu 255...
... 183 Dimensions ...183 Chapter 54: Restoring factory default settings 184 Chapter 55: Printing sample fonts 185 Chapter 56: Understanding printer messages 186 Chapter 57: Using printer menus 235 Chapter 58: Color Menu 239 Chapter 59: Finishing Menu 242 Chapter 60: Infrared Menu 248 Chapter 61: Job Menu 253 Chapter 62: LocalTalk Menu 255...

User's Guide
Page 11
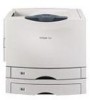
... Ethernet, Token-Ring, LocalTalk, serial, infrared, or additional parallel ports. 1 Printer overview The following illustrations show a Lexmark™ C910 standard model configuration and a fully configured network printer. Standard model configuration Fully configured The Lexmark C910 is critical. You can attach up to match the color process used in a particular application, you can select RGB or...
... Ethernet, Token-Ring, LocalTalk, serial, infrared, or additional parallel ports. 1 Printer overview The following illustrations show a Lexmark™ C910 standard model configuration and a fully configured network printer. Standard model configuration Fully configured The Lexmark C910 is critical. You can attach up to match the color process used in a particular application, you can select RGB or...

User's Guide
Page 12
... the number and complexity of paper sizes, from A5 to A3 and 11x17 in memory even after the printer is turned off and back on. To increase paper feeding capacity, you load a stack of color and mono jobs may ship with a 550-sheet tray, and one optional 3000-sheet high capacity feeder.... 10 You can print four-color and mono jobs at up to three optional drawers to the base printer, which can install an optional hard disk for storing downloaded resources and job statistics, and for multiple-page jobs...
... the number and complexity of paper sizes, from A5 to A3 and 11x17 in memory even after the printer is turned off and back on. To increase paper feeding capacity, you load a stack of color and mono jobs may ship with a 550-sheet tray, and one optional 3000-sheet high capacity feeder.... 10 You can print four-color and mono jobs at up to three optional drawers to the base printer, which can install an optional hard disk for storing downloaded resources and job statistics, and for multiple-page jobs...

User's Guide
Page 13
...output on transparencies, we recommend using the following Lexmark transparencies. If you use other transparencies, the print quality may affect the adhesion of jobs you print and the media you could cause damage to the printer. Feeding media that is time to ensure the...too light, damp, damaged, or otherwise unacceptable for more information. Check the operator panel display, the Supplies Menu, or MarkVision for your printer: P/N 12A5940 (letter size) P/N 12A5941 (A4 size) These transparencies have characteristics that meets the recommended guidelines. Depending on the type of...
...output on transparencies, we recommend using the following Lexmark transparencies. If you use other transparencies, the print quality may affect the adhesion of jobs you print and the media you could cause damage to the printer. Feeding media that is time to ensure the...too light, damp, damaged, or otherwise unacceptable for more information. Check the operator panel display, the Supplies Menu, or MarkVision for your printer: P/N 12A5940 (letter size) P/N 12A5941 (A4 size) These transparencies have characteristics that meets the recommended guidelines. Depending on the type of...

User's Guide
Page 14
Canceling Job briefly appears on the second line. 2 Press Select. The printer returns to the Ready state. 12 The printer finishes printing any page already being printed, and then stops. Job Menu appears on the first line of the display and Cancel Job appears on the display. 3 Canceling a print job To cancel a print job: 1 Press Menu.
Canceling Job briefly appears on the second line. 2 Press Select. The printer returns to the Ready state. 12 The printer finishes printing any page already being printed, and then stops. Job Menu appears on the first line of the display and Cancel Job appears on the display. 3 Canceling a print job To cancel a print job: 1 Press Menu.

User's Guide
Page 15
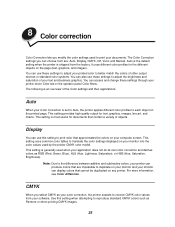
...has no effect on the page (text, graphics, and images). It uses different color profiles for the different objects on images downloaded at 72 dpi. This setting produces output just like any colors in your printer driver or from are: Auto, Display, CMYK, Off, Vivid, and Manual. Your... printer default is useful for images downloaded from the graphics tab of your printer driver, operator panel, or MarkVision remote operator panel. ...
...has no effect on the page (text, graphics, and images). It uses different color profiles for the different objects on images downloaded at 72 dpi. This setting produces output just like any colors in your printer driver or from are: Auto, Display, CMYK, Off, Vivid, and Manual. Your... printer default is useful for images downloaded from the graphics tab of your printer driver, operator panel, or MarkVision remote operator panel. ...

User's Guide
Page 16
..., crisp text characters. The default toner darkness setting is known as pels, may be possible to represent a particular gray level or color tone. These dots, also known as halftone screening. The following illustration shows a halftone screen and halftone cells rotated 45 degrees. This...The term halftone screen refers to the pattern of dots applied to an object on to produce quality photographic images on a page printer. Attributes Halftone screens have three main attributes: screen frequency, screen angle, and spot function. These cells contain the individual pel spaces...
..., crisp text characters. The default toner darkness setting is known as pels, may be possible to represent a particular gray level or color tone. These dots, also known as halftone screening. The following illustration shows a halftone screen and halftone cells rotated 45 degrees. This...The term halftone screen refers to the pattern of dots applied to an object on to produce quality photographic images on a page printer. Attributes Halftone screens have three main attributes: screen frequency, screen angle, and spot function. These cells contain the individual pel spaces...

User's Guide
Page 17
... may make the colors or halftones seem to print millions of colors. 15 Spot function The spot function determines the shape of the dots by assigning a priority to each individual pel within the halftone cell and then combining the different halftone screens, your printer is set to the... eye. The printer code defines the order...
... may make the colors or halftones seem to print millions of colors. 15 Spot function The spot function determines the shape of the dots by assigning a priority to each individual pel within the halftone cell and then combining the different halftone screens, your printer is set to the... eye. The printer code defines the order...

User's Guide
Page 18
...liquid crystal display (LCD), five buttons, and one indicator light. 5 Using the operator panel This section contains information about the status of your printer. You can change a setting from your application, use the operator panel or the remote operator panel available from the operator panel. If the... light is: • Off, the printer is off • On, the printer is on, but idle • Blinking, the printer is on and is busy 16 Ready LCD 1 Menu 2 Select 3 Return 4 Light Go 5 Stop 6 Indicator...
...liquid crystal display (LCD), five buttons, and one indicator light. 5 Using the operator panel This section contains information about the status of your printer. You can change a setting from your application, use the operator panel or the remote operator panel available from the operator panel. If the... light is: • Off, the printer is off • On, the printer is on, but idle • Blinking, the printer is on and is busy 16 Ready LCD 1 Menu 2 Select 3 Return 4 Light Go 5 Stop 6 Indicator...

User's Guide
Page 19
... from the operator panel menus, press Go before sending a job to scroll through 6 appear beside the operator panel buttons; The printer must display Ready for Print and Hold jobs. Using the operator panel buttons Use the five operator panel buttons to open a menu, scroll ...through a list of the button has a function. Each end of values, change printer settings, and respond to print. these numbers are used to enter personal identification numbers (PIN) for jobs to printer messages. Go Menu Select Return Stop Press the Go button to: • Return to the Ready...
... from the operator panel menus, press Go before sending a job to scroll through 6 appear beside the operator panel buttons; The printer must display Ready for Print and Hold jobs. Using the operator panel buttons Use the five operator panel buttons to open a menu, scroll ...through a list of the button has a function. Each end of values, change printer settings, and respond to print. these numbers are used to enter personal identification numbers (PIN) for jobs to printer messages. Go Menu Select Return Stop Press the Go button to: • Return to the Ready...

User's Guide
Page 20
...Off setting • Changing a numerical setting To select a new value as a setting: 1 From a Ready status message, press Menu. You can modify printer settings by: • Selecting a setting from the operator panel. Printing the menu settings page Complete the following steps to print a list of the current ...user default settings and installed printer options: 1 Make sure the printer power is now the user default setting. The menu names appear. 2 Continue to select the menu or menu item displayed...
...Off setting • Changing a numerical setting To select a new value as a setting: 1 From a Ready status message, press Menu. You can modify printer settings by: • Selecting a setting from the operator panel. Printing the menu settings page Complete the following steps to print a list of the current ...user default settings and installed printer options: 1 Make sure the printer power is now the user default setting. The menu names appear. 2 Continue to select the menu or menu item displayed...
User's Guide
Page 21
...and reinstall the option. Once stored, these settings remain active until you change them. Note: Settings you choose from your printer is not listed, turn your printer on a non-ground fault interrupter (GFI) circuit. 5 Verify the amount of memory installed is correctly listed under "...may override the settings you select from the operator panel, the asterisk moves next to the selected setting to inadvertently change other printer settings. See Changing printer settings. You can , however, use Print and Hold features, clear messages, and select items from the Job Menu when...
...and reinstall the option. Once stored, these settings remain active until you change them. Note: Settings you choose from your printer is not listed, turn your printer on a non-ground fault interrupter (GFI) circuit. 5 Verify the amount of memory installed is correctly listed under "...may override the settings you select from the operator panel, the asterisk moves next to the selected setting to inadvertently change other printer settings. See Changing printer settings. You can , however, use Print and Hold features, clear messages, and select items from the Job Menu when...

User's Guide
Page 22
... a topic: • Printing and deleting held • Accessing held jobs from the Job Menu. 6 Using the Print and Hold function When sending a job to the printer, you can specify in the driver that you sent the job. See Confidential jobs for more of the jobs. When you are stored in memory.... If you select Confidential Job, you must go to the printer and use the operator panel to specify what you want to do with one or more information. From either Confidential Job or Held Jobs (Repeat...
... a topic: • Printing and deleting held • Accessing held jobs from the Job Menu. 6 Using the Print and Hold function When sending a job to the printer, you can specify in the driver that you sent the job. See Confidential jobs for more of the jobs. When you are stored in memory.... If you select Confidential Job, you must go to the printer and use the operator panel to specify what you want to do with one or more information. From either Confidential Job or Held Jobs (Repeat...

User's Guide
Page 23
... to increase or decrease the number on the display, it is Ready, continue to print or delete that might cause the printer to free up additional printer memory by scrolling through the list of the held jobs, your PIN. Recognizing when format errors occur If the symbol appears ...panel 1 To access held job, you have marked. You may print. • Delete the job. Be aware, however, that only part of insufficient printer memory or invalid data that job. - These formatting problems are looking for one or more information. 4 Press Menu until you are a recurring problem with...
... to increase or decrease the number on the display, it is Ready, continue to print or delete that might cause the printer to free up additional printer memory by scrolling through the list of the held jobs, your PIN. Recognizing when format errors occur If the symbol appears ...panel 1 To access held job, you have marked. You may print. • Delete the job. Be aware, however, that only part of insufficient printer memory or invalid data that job. - These formatting problems are looking for one or more information. 4 Press Menu until you are a recurring problem with...

User's Guide
Page 24
... automatically deleted from the Held Jobs menu. The job is satisfactory before printing the remaining copies. Verify Print If you send a Verify Print job, the printer prints one copy and holds the remaining copies you requested from the driver in memory so you send a Reserve Print job, the... extra memory to process additional held jobs. Use Verify Print to examine the first copy to see if it from printer memory when the printer requires extra memory to process additional held jobs. See Printing and deleting held in memory. See Printing and deleting held jobs if you need help ...
... automatically deleted from the Held Jobs menu. The job is satisfactory before printing the remaining copies. Verify Print If you send a Verify Print job, the printer prints one copy and holds the remaining copies you requested from the driver in memory so you send a Reserve Print job, the... extra memory to process additional held jobs. Use Verify Print to examine the first copy to see if it from printer memory when the printer requires extra memory to process additional held jobs. See Printing and deleting held in memory. See Printing and deleting held jobs if you need help ...

User's Guide
Page 25
... If you enter an invalid PIN, the message No Jobs Found. Retry? The PIN must be four digits using the printer can print the job. The numbers next to the button names identify which button to enter the four-digit PIN associated...else using the numbers 1-6. Confidential jobs When you send a job to the printer, you can then choose to print or delete jobs matching the PIN you entered. (See Printing and deleting... held in printer memory until you are displayed on the operator panel to all print jobs matching the ...
... If you enter an invalid PIN, the message No Jobs Found. Retry? The PIN must be four digits using the printer can print the job. The numbers next to the button names identify which button to enter the four-digit PIN associated...else using the numbers 1-6. Confidential jobs When you send a job to the printer, you can then choose to print or delete jobs matching the PIN you entered. (See Printing and deleting... held in printer memory until you are displayed on the operator panel to all print jobs matching the ...

User's Guide
Page 26
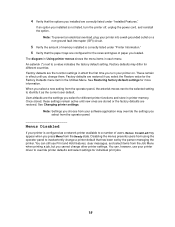
The printer settings available are determined by the application that the correct printer is selected in the dialog box. 4 Adjust the printer settings according to the selected printer. 24 7 Sending a job to print To send a job to the printer: 1 Open the file you want to print. 2 From the File menu, choose Print. 3 Verify that opens your need. Note: Click Properties or Setup to adjust printer settings not available from the first screen, and then click OK. 5 Click OK or Print to send the job to your file.
The printer settings available are determined by the application that the correct printer is selected in the dialog box. 4 Adjust the printer settings according to the selected printer. 24 7 Sending a job to print To send a job to the printer: 1 Open the file you want to print. 2 From the File menu, choose Print. 3 Verify that opens your need. Note: Click Properties or Setup to adjust printer settings not available from the first screen, and then click OK. 5 Click OK or Print to send the job to your file.
User's Guide
Page 27
... business graphics. Note: Due to print your printer can produce colors that cannot be duplicated on any printer. 8 Color correction Color Correction lets you modify the color settings used by the printer CMYK color model. This setting provides high quality output for documents that approximates the colors on your monitor into the color values used to the difference between additive...
... business graphics. Note: Due to print your printer can produce colors that cannot be duplicated on any printer. 8 Color correction Color Correction lets you modify the color settings used by the printer CMYK color model. This setting provides high quality output for documents that approximates the colors on your monitor into the color values used to the difference between additive...


