
Hardware Maintenance Manual
Page 5
... Intermittent problems 55 Undetermined problems 55 FRU replacement notices 56 Screw notices 56 © Copyright Lenovo 2007, 2008 Retaining serial numbers 56 Removing and replacing a FRU 59 1010 Battery pack 60 1020 Hard disk drive (2.5-inch) and HDD rubber rails 61 1030 DIMM cover... and LCD cable 117 Locations 119 Front view for ThinkPad X60, X60s, X61, and X61s 119 Rear view for ThinkPad X60, X60s, X61, and X61s 120 Bottom view for ThinkPad X60, X60s, X61, and X61s 121 Rear View for ThinkPad X6 UltraBase . . . . 122 Bottom View for ThinkPad X6 UltraBase . . . 122 Parts list 123 ...
... Intermittent problems 55 Undetermined problems 55 FRU replacement notices 56 Screw notices 56 © Copyright Lenovo 2007, 2008 Retaining serial numbers 56 Removing and replacing a FRU 59 1010 Battery pack 60 1020 Hard disk drive (2.5-inch) and HDD rubber rails 61 1030 DIMM cover... and LCD cable 117 Locations 119 Front view for ThinkPad X60, X60s, X61, and X61s 119 Rear view for ThinkPad X60, X60s, X61, and X61s 120 Bottom view for ThinkPad X60, X60s, X61, and X61s 121 Rear View for ThinkPad X6 UltraBase . . . . 122 Bottom View for ThinkPad X6 UltraBase . . . 122 Parts list 123 ...

Hardware Maintenance Manual
Page 24
... injury. b. Blowers and fans - Switch off the computer. Disconnect the power cord. 3. c. Check for any obvious non-ThinkPad alterations. Check for cracked or bulging batteries. 5. Check for 0.1 ohm or less between the external ground pin and the frame ground. Safety information v Do not service... aid. Power off power. - Use a meter to measure third-wire ground continuity for worn, frayed, or pinched cables. 18 ThinkPad® X60, X60s, X61, and X61s Use good judgment as metal filings, contamination, water or other liquids, or signs of any unsafe conditions are present...
... injury. b. Blowers and fans - Switch off the computer. Disconnect the power cord. 3. c. Check for any obvious non-ThinkPad alterations. Check for cracked or bulging batteries. 5. Check for 0.1 ohm or less between the external ground pin and the frame ground. Safety information v Do not service... aid. Power off power. - Use a meter to measure third-wire ground continuity for worn, frayed, or pinched cables. 18 ThinkPad® X60, X60s, X61, and X61s Use good judgment as metal filings, contamination, water or other liquids, or signs of any unsafe conditions are present...
Hardware Maintenance Manual
Page 40
...page 35 v "Checking the battery pack" on page 35 v "Checking the backup battery" on , check the power cord of the categories listed below to ″Checking operational charging.″ To check the ac adapter, do the following : 34 ThinkPad® X60, X60s, X61, and X61s v If.... 6. v If the computer does not charge during operation, go to display symptoms and solutions: v CHECK SYSTEM HEALTH v SYSTEM AND DEVICE TESTS v LENOVO TROUBLESHOOTING v CENTER v SYSTEM REPORTS v UPDATES AND SUPPORT Power system checkout To verify a symptom, do the following : 1. Checkout guide v PNPISA Info ...
...page 35 v "Checking the battery pack" on page 35 v "Checking the backup battery" on , check the power cord of the categories listed below to ″Checking operational charging.″ To check the ac adapter, do the following : 34 ThinkPad® X60, X60s, X61, and X61s v If.... 6. v If the computer does not charge during operation, go to display symptoms and solutions: v CHECK SYSTEM HEALTH v SYSTEM AND DEVICE TESTS v LENOVO TROUBLESHOOTING v CENTER v SYSTEM REPORTS v UPDATES AND SUPPORT Power system checkout To verify a symptom, do the following : 1. Checkout guide v PNPISA Info ...
Hardware Maintenance Manual
Page 42
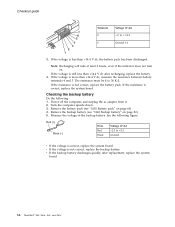
... is still less than +14.4 V dc, measure the resistance between battery terminals 4 and 5. If the voltage is more than +14.4 V dc after replacement, replace the system board. 36 ThinkPad® X60, X60s, X61, and X61s If the resistance is correct, replace the system board.... If the resistance is not correct, replace the battery pack. Turn the computer upside down. 3. Remove the battery pack (see "1140 Backup battery" on page 82). 5. See the...
... is still less than +14.4 V dc, measure the resistance between battery terminals 4 and 5. If the voltage is more than +14.4 V dc after replacement, replace the system board. 36 ThinkPad® X60, X60s, X61, and X61s If the resistance is correct, replace the system board.... If the resistance is not correct, replace the battery pack. Turn the computer upside down. 3. Remove the battery pack (see "1140 Backup battery" on page 82). 5. See the...
Hardware Maintenance Manual
Page 43
...AC adapters 231 Common parts list 232 Tools 232 Power cords 232 Notices 234 Trademarks 235 © Copyright Lenovo 2007, 2008 37 ThinkPad X60, X60s, X61, and X61s Product overview 38 Specifications 38 Status indicators for X60, X60s, X61, and X61s . . 41 FRU tests 43 Fn key combinations 45 Symptom-to-FRU index ...number of the system unit 57 Retaining the UUID 57 Reading or writing the ECA information . . 57 Removing and replacing a FRU 59 1010 Battery pack 60 1020 Hard disk drive (2.5-inch) and HDD rubber rails 61 1030 DIMM cover 63 1040 DIMM 64 1050 Keyboard 65 1060 Upper ...
...AC adapters 231 Common parts list 232 Tools 232 Power cords 232 Notices 234 Trademarks 235 © Copyright Lenovo 2007, 2008 37 ThinkPad X60, X60s, X61, and X61s Product overview 38 Specifications 38 Status indicators for X60, X60s, X61, and X61s . . 41 FRU tests 43 Fn key combinations 45 Symptom-to-FRU index ...number of the system unit 57 Retaining the UUID 57 Reading or writing the ECA information . . 57 Removing and replacing a FRU 59 1010 Battery pack 60 1020 Hard disk drive (2.5-inch) and HDD rubber rails 61 1030 DIMM cover 63 1040 DIMM 64 1050 Keyboard 65 1060 Upper ...

Hardware Maintenance Manual
Page 46
... v Stereo headphone jack v 56.6 Kbps v Internal monaural speaker v Software control volume v IrDA 1.1 Note: The infrared port is only for ThinkPad X60s and X61s computer. The standard and hybrid batteries require a spacer when used with ThinkPad X60s and X61s computer. v Windows XP Professional v Windows XP Home Edition v Windows Vista™ Business (32 bit) v Windows Vista Business...
... v Stereo headphone jack v 56.6 Kbps v Internal monaural speaker v Software control volume v IrDA 1.1 Note: The infrared port is only for ThinkPad X60s and X61s computer. The standard and hybrid batteries require a spacer when used with ThinkPad X60s and X61s computer. v Windows XP Professional v Windows XP Home Edition v Windows Vista™ Business (32 bit) v Windows Vista Business...

Hardware Maintenance Manual
Page 48
.... 42 ThinkPad® X60, X60s, X61, and X61s Blinking green: The computer is entering standby mode or hibernation mode, or is not in the Ultrabay device. Product overview Indicator 1 Wireless LAN status Meaning Green: Wireless is still low. Blinking green: The battery is being charged, but the battery power is...being charged, but still has enough power to be charged. Sudden physical shock could cause drive errors. The ac adapter has charged the battery completely. Note: Do not move the system while the Green drive in use . Green: The ac adapter is connected and the computer ...
.... 42 ThinkPad® X60, X60s, X61, and X61s Blinking green: The computer is entering standby mode or hibernation mode, or is not in the Ultrabay device. Product overview Indicator 1 Wireless LAN status Meaning Green: Wireless is still low. Blinking green: The battery is being charged, but the battery power is...being charged, but still has enough power to be charged. Sudden physical shock could cause drive errors. The ac adapter has charged the battery completely. Note: Do not move the system while the Green drive in use . Green: The ac adapter is connected and the computer ...
Hardware Maintenance Manual
Page 49
Product overview FRU tests The following : v Interactive Tests --> Mouse (continued) ThinkPad X60, X60s, X61, and X61s 43 Diagnostics --> Systemboard 3. If the docking station or the port replicator is attached to enable it . ... BIOS Setup Utility and change Serial ATA (SATA) setting to Compatibility, and run Diagnostics --> ThinkPad Devices --> HDD Active Protection Test. FRU Applicable test System board 1. Power Diagnostics --> ThinkPad Devices --> AC Adapter, Battery 1 (Battery 2) LCD unit 1. This symptom is running. This drift can occur when a slight, steady...
Product overview FRU tests The following : v Interactive Tests --> Mouse (continued) ThinkPad X60, X60s, X61, and X61s 43 Diagnostics --> Systemboard 3. If the docking station or the port replicator is attached to enable it . ... BIOS Setup Utility and change Serial ATA (SATA) setting to Compatibility, and run Diagnostics --> ThinkPad Devices --> HDD Active Protection Test. FRU Applicable test System board 1. Power Diagnostics --> ThinkPad Devices --> AC Adapter, Battery 1 (Battery 2) LCD unit 1. This symptom is running. This drift can occur when a slight, steady...

Hardware Maintenance Manual
Page 54
...press Esc to ignore the warning message. 2. Reseat the hard disk drive. 2. System board. 021x Keyboard error. Extended RAM error- Battery pack. 0191 System Security-Invalid Remote Change requested. 1. System board. 0199 System Security- System board. 01C9 More than 8 hours by...Setup Defaults in CMOS. System board. 0232 1. System board. Replace the backup battery and run BIOS Setup Utility to reset the time and date. 48 ThinkPad® X60, X60s, X61, and X61s Charge the battery pack. 2. Security password retry count exceeded. 1. Otherwise, press Esc to ...
...press Esc to ignore the warning message. 2. Reseat the hard disk drive. 2. System board. 021x Keyboard error. Extended RAM error- Battery pack. 0191 System Security-Invalid Remote Change requested. 1. System board. 0199 System Security- System board. 01C9 More than 8 hours by...Setup Defaults in CMOS. System board. 0232 1. System board. Replace the backup battery and run BIOS Setup Utility to reset the time and date. 48 ThinkPad® X60, X60s, X61, and X61s Charge the battery pack. 2. Security password retry count exceeded. 1. Otherwise, press Esc to ...
Hardware Maintenance Manual
Page 55
... network card. 1803 Unauthorized daughter card is plugged in-Turn off and remove the WAN card. System board. 1. Replace the backup battery and run BIOS Setup Utility to reset the time and date. 3. Diskette drive. 2. External FDD cable. 3. Load Setup Defaults in...the backup battery. 3. DIMM. 3. System board. Charge the backup battery for more than 8 hours by connecting the ac adapter. 2. CPU. 2. System board. Load "Setup Default" in sequence Reset the password by running BIOS Setup Utility. 1. System board. 1. Symptom-to reset the time and date. 1. ThinkPad X60, X60s, X61...
... network card. 1803 Unauthorized daughter card is plugged in-Turn off and remove the WAN card. System board. 1. Replace the backup battery and run BIOS Setup Utility to reset the time and date. 3. Diskette drive. 2. External FDD cable. 3. Load Setup Defaults in...the backup battery. 3. DIMM. 3. System board. Charge the backup battery for more than 8 hours by connecting the ac adapter. 2. CPU. 2. System board. Load "Setup Default" in sequence Reset the password by running BIOS Setup Utility. 1. System board. 1. Symptom-to reset the time and date. 1. ThinkPad X60, X60s, X61...
Hardware Maintenance Manual
Page 57
.... 2. Initialization error on HDD0 (Main hard disk drive) 1. System board. I/O device IRQ conflict. Backup battery. 3. Backup battery. 3. DIMM. 2. System board. 1. Backup battery. 3. System board. 1. The latest version is available at http://www.lenovo.com/support 2100 Initialization error on HDD1 (Ultrabay hard 2. Ultrabay hard disk drive. Allocation error for device.... this system. Reseat the hard disk drive. 2. Error messages Symptom or error Device address conflict. Hibernation error. Ultrabay hard disk drive. 3. ThinkPad X60, X60s, X61, and X61s 51
.... 2. Initialization error on HDD0 (Main hard disk drive) 1. System board. I/O device IRQ conflict. Backup battery. 3. Backup battery. 3. DIMM. 2. System board. 1. Backup battery. 3. System board. 1. The latest version is available at http://www.lenovo.com/support 2100 Initialization error on HDD1 (Ultrabay hard 2. Ultrabay hard disk drive. Allocation error for device.... this system. Reseat the hard disk drive. 2. Error messages Symptom or error Device address conflict. Hibernation error. Ultrabay hard disk drive. 3. ThinkPad X60, X60s, X61, and X61s 51
Hardware Maintenance Manual
Page 61
... replicator c. External diskette drive or optical drive g. PC Cards 4. If no more errors exist. Turn off the computer. 2. DIMM h. LCD assembly ThinkPad X60, X60s, X61, and X61s 55 If any damaged FRU. 3. Rerun the test to verify that all of the failure is not operating, follow these procedures ...or disconnect all attached devices are installed, or if the system simply is operating correctly. (See "Power system checkout" on the computer. 5. Battery pack e. Hard disk drive f. Optical disk or diskette in loop mode at the time of the following : 1. System board b.
... replicator c. External diskette drive or optical drive g. PC Cards 4. If no more errors exist. Turn off the computer. 2. DIMM h. LCD assembly ThinkPad X60, X60s, X61, and X61s 55 If any damaged FRU. 3. Rerun the test to verify that all of the failure is not operating, follow these procedures ...or disconnect all attached devices are installed, or if the system simply is operating correctly. (See "Power system checkout" on the computer. 5. Battery pack e. Hard disk drive f. Optical disk or diskette in loop mode at the time of the following : 1. System board b.
Hardware Maintenance Manual
Page 65
..., unplug all screws, springs, and other small parts are in the drawing. 7. Metallic parts or metal flakes can be removed before the failing FRU. ThinkPad X60, X60s, X61, and X61s 59 Any such FRUs are listed. 4. When turning a screw to replace a FRU, turn on the computer until you have been... the numbers in place, reverse the removal procedure and follow any notes that have made sure that all power cords from electrical outlets, remove the battery pack, and then disconnect any FRU, review "FRU replacement notices" on page 119. 8. An untrained person runs the risk of the page....
..., unplug all screws, springs, and other small parts are in the drawing. 7. Metallic parts or metal flakes can be removed before the failing FRU. ThinkPad X60, X60s, X61, and X61s 59 Any such FRUs are listed. 4. When turning a screw to replace a FRU, turn on the computer until you have been... the numbers in place, reverse the removal procedure and follow any notes that have made sure that all power cords from electrical outlets, remove the battery pack, and then disconnect any FRU, review "FRU replacement notices" on page 119. 8. An untrained person runs the risk of the page....
Hardware Maintenance Manual
Page 66
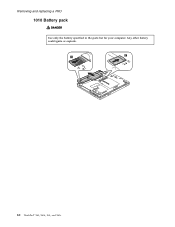
Any other battery could ignite or explode. 1 2 3 60 ThinkPad® X60, X60s, X61, and X61s Removing and replacing a FRU 1010 Battery pack DANGER Use only the battery specified in the parts list for your computer.
Any other battery could ignite or explode. 1 2 3 60 ThinkPad® X60, X60s, X61, and X61s Removing and replacing a FRU 1010 Battery pack DANGER Use only the battery specified in the parts list for your computer.
Hardware Maintenance Manual
Page 67
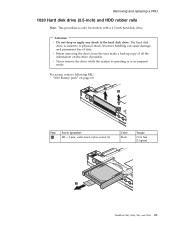
.... For access, remove following FRU: v "1010 Battery pack" on the drive if possible. Incorrect handling can cause damage and permanent loss of all the information on page 60 2 1 Step 1 Screw (quantity) M3 × 3 mm, wafer-head, nylon-coated (1) Color Black Torque 0.196 Nm (2 kgfcm) 3 ThinkPad X60, X60s, X61, and X61s 61 The hard disk...
.... For access, remove following FRU: v "1010 Battery pack" on the drive if possible. Incorrect handling can cause damage and permanent loss of all the information on page 60 2 1 Step 1 Screw (quantity) M3 × 3 mm, wafer-head, nylon-coated (1) Color Black Torque 0.196 Nm (2 kgfcm) 3 ThinkPad X60, X60s, X61, and X61s 61 The hard disk...

Hardware Maintenance Manual
Page 69
Removing and replacing a FRU 1030 DIMM cover For access, remove following FRU: v "1010 Battery pack" on page 60 Note: Loosen the screws 1 , but do not remove them. 1 1 2 Step 1 Screw (quantity) M2 × 3 mm, wafer-head, nylon-coated (2) Color Black Torque 0.157 Nm (1.6 kgfcm) ThinkPad X60, X60s, X61, and X61s 63
Removing and replacing a FRU 1030 DIMM cover For access, remove following FRU: v "1010 Battery pack" on page 60 Note: Loosen the screws 1 , but do not remove them. 1 1 2 Step 1 Screw (quantity) M2 × 3 mm, wafer-head, nylon-coated (2) Color Black Torque 0.157 Nm (1.6 kgfcm) ThinkPad X60, X60s, X61, and X61s 63
Hardware Maintenance Manual
Page 70
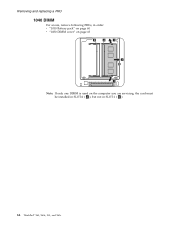
Removing and replacing a FRU 1040 DIMM For access, remove following FRUs, in order: v "1010 Battery pack" on page 60 v "1030 DIMM cover" on page 63 b a 1 2 1 Note: If only one DIMM is used on the computer you are servicing, the card must be installed in SLOT-0 ( a ), but not in SLOT-1 ( b ). 64 ThinkPad® X60, X60s, X61, and X61s
Removing and replacing a FRU 1040 DIMM For access, remove following FRUs, in order: v "1010 Battery pack" on page 60 v "1030 DIMM cover" on page 63 b a 1 2 1 Note: If only one DIMM is used on the computer you are servicing, the card must be installed in SLOT-0 ( a ), but not in SLOT-1 ( b ). 64 ThinkPad® X60, X60s, X61, and X61s
Hardware Maintenance Manual
Page 71
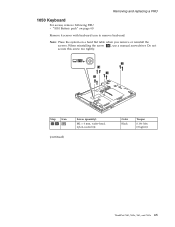
Removing and replacing a FRU 1050 Keyboard For access, remove following FRU: v "1010 Battery pack" on a hard flat table when you remove or reinstall the screws. When reinstalling the screw 1a , use a manual screwdriver. Do not secure this screw too tightly. 1 1a 1 1 Step Icon 1 1a (continued) Screw (quantity) M2 × 6 mm, wafer-head, nylon-coated (4) Color Black Torque 0.196 Nm (2 kgfcm) ThinkPad X60, X60s, X61, and X61s 65 Note: Place the system on page 60 Remove 4 screws with keyboard icon to remove keyboard.
Removing and replacing a FRU 1050 Keyboard For access, remove following FRU: v "1010 Battery pack" on a hard flat table when you remove or reinstall the screws. When reinstalling the screw 1a , use a manual screwdriver. Do not secure this screw too tightly. 1 1a 1 1 Step Icon 1 1a (continued) Screw (quantity) M2 × 6 mm, wafer-head, nylon-coated (4) Color Black Torque 0.196 Nm (2 kgfcm) ThinkPad X60, X60s, X61, and X61s 65 Note: Place the system on page 60 Remove 4 screws with keyboard icon to remove keyboard.

Hardware Maintenance Manual
Page 75
ThinkPad X60, X60s, X61, and X61s 69 Removing and replacing a FRU 1060 Upper case For access, remove following FRUs, in order: v "1010 Battery pack" on page 60 v "1050 Keyboard" on page 65 1 1 1 1 1 1 Step 1 Screw (quantity) M2 × 6 mm, wafer-head, nylon-coated (6) Color Black Torque 0.196 Nm (2 kgfcm) Note: Place the system on a hard flat table when you remove or reinstall the screws.
ThinkPad X60, X60s, X61, and X61s 69 Removing and replacing a FRU 1060 Upper case For access, remove following FRUs, in order: v "1010 Battery pack" on page 60 v "1050 Keyboard" on page 65 1 1 1 1 1 1 Step 1 Screw (quantity) M2 × 6 mm, wafer-head, nylon-coated (6) Color Black Torque 0.196 Nm (2 kgfcm) Note: Place the system on a hard flat table when you remove or reinstall the screws.
Hardware Maintenance Manual
Page 78
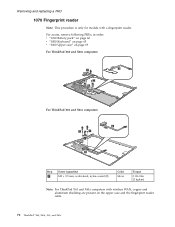
For access, remove following FRUs, in order: v "1010 Battery pack" on page 60 v "1050 Keyboard" on page 65 v "1060 Upper case" on the upper case and the fingerprint reader cable. 72 ThinkPad® X60, X60s, X61, and X61s Removing and replacing a FRU 1070 Fingerprint ...reader Note: This procedure is only for models with wireless WAN, copper and aluminum shielding are present on page 69 For ThinkPad X60 and X60s computers: 4 1 2 2 3 For ThinkPad X61 and X61s computers: 4 1 1 2 3 Step 2 Screw (quantity) M2 × 3.5 mm, wafer-head, nylon-coated (2) Color...
For access, remove following FRUs, in order: v "1010 Battery pack" on page 60 v "1050 Keyboard" on page 65 v "1060 Upper case" on the upper case and the fingerprint reader cable. 72 ThinkPad® X60, X60s, X61, and X61s Removing and replacing a FRU 1070 Fingerprint ...reader Note: This procedure is only for models with wireless WAN, copper and aluminum shielding are present on page 69 For ThinkPad X60 and X60s computers: 4 1 2 2 3 For ThinkPad X61 and X61s computers: 4 1 1 2 3 Step 2 Screw (quantity) M2 × 3.5 mm, wafer-head, nylon-coated (2) Color...

