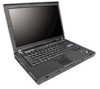
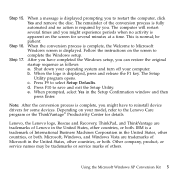
Lenovo ThinkPad T61 15.4
View Results Below
Free Lenovo ThinkPad T61 manuals!
Problems with Lenovo ThinkPad T61?
Ask a Question
Free Lenovo ThinkPad T61 manuals!
Problems with Lenovo ThinkPad T61?
Ask a Question
Related Manual Pages


Related Videos

Prodajem Laptop IBM LENOVO THINKPAD T61 15.4" Intel Core 2 Duo T7300 250GB 2GB RAM ,win 7
Duration: 3:37
Total Views: 346
Duration: 3:37
Total Views: 346
Similar Questions

Is The Lenovo Flex 2 (15) Still Supported Or Is Its Support Ending Soon?
Will the support for the Lenovo Flex 2 (15) continue to be supported? Or is that a different Lenovo ...
Will the support for the Lenovo Flex 2 (15) continue to be supported? Or is that a different Lenovo ...
(Posted by mdeminsky 1 year ago)

Related Terms
The following terms were also used when searching for Lenovo ThinkPad T61 15.4:- ibm lenovo thinkpad t61
- ibm thinkpad t61
- lenovo thinkpad t61
- lenovo thinkpad t61 14.1
- lenovo thinkpad t61 14.1-inch
- lenovo thinkpad t61 15.4
- lenovo thinkpad t61 15.4 notebook
- lenovo thinkpad t61 6458
- lenovo thinkpad t61 6460
- lenovo thinkpad t61 7658
- lenovo thinkpad t61 7663
- lenovo thinkpad t61 ac adapter
- lenovo thinkpad t61 adapter
- lenovo thinkpad t61 audio drivers
- lenovo thinkpad t61 base system device
- lenovo thinkpad t61 battery
- lenovo thinkpad t61 battery not charging
- lenovo thinkpad t61 battery replacement
- lenovo thinkpad t61 bios
- lenovo thinkpad t61 bios update
- lenovo thinkpad t61 bluetooth
- lenovo thinkpad t61 bluetooth problems
- lenovo thinkpad t61 charger
- lenovo thinkpad t61 core 2 duo
- lenovo thinkpad t61 cost
- lenovo thinkpad t61 display
- lenovo thinkpad t61 docking station
- lenovo thinkpad t61 downloads
- lenovo thinkpad t61 driver
- lenovo thinkpad t61 driver download
- lenovo thinkpad t61 drivers
- lenovo thinkpad t61 drivers download
- lenovo thinkpad t61 drivers windows 7
- lenovo thinkpad t61 error codes
- lenovo thinkpad t61 fan
- lenovo thinkpad t61 fan error
- lenovo thinkpad t61 fan replacement
- lenovo thinkpad t61 function keys
- lenovo thinkpad t61 graphics card
- lenovo thinkpad t61 hard drive
- lenovo thinkpad t61 hard drive replacement
- lenovo thinkpad t61 hard drive upgrade
- lenovo thinkpad t61 keyboard
- lenovo thinkpad t61 laptop
- lenovo thinkpad t61 laptop computer
- lenovo thinkpad t61 laptop price
- lenovo thinkpad t61 laptop review
- lenovo thinkpad t61 layout
- lenovo thinkpad t61 manual
- lenovo thinkpad t61 manual download
- lenovo thinkpad t61 memory
- lenovo thinkpad t61 memory specifications
- lenovo thinkpad t61 memory upgrade
- lenovo thinkpad t61 motherboard
- lenovo thinkpad t61 motherboard replacement
- lenovo thinkpad t61 notebook
- lenovo thinkpad t61 notebook pc
- lenovo thinkpad t61 parts
- lenovo thinkpad t61 password reset
- lenovo thinkpad t61 pci controller driver
- lenovo thinkpad t61 pdf
- lenovo thinkpad t61 power adapter
- lenovo thinkpad t61 price
- lenovo thinkpad t61 price in india
- lenovo thinkpad t61 ram
- lenovo thinkpad t61 ram upgrade
- lenovo thinkpad t61 recovery
- lenovo thinkpad t61 reset with no passwords
- lenovo thinkpad t61 review
- lenovo thinkpad t61 reviews
- lenovo thinkpad t61 screen problem
- lenovo thinkpad t61 screen replacement
- lenovo thinkpad t61 sound not working
- lenovo thinkpad t61 specifications
- lenovo thinkpad t61 specs
- lenovo thinkpad t61 support
- lenovo thinkpad t61 t7300
- lenovo thinkpad t61 update
- lenovo thinkpad t61 user guide
- lenovo thinkpad t61 user manual
- lenovo thinkpad t61 webcam
- lenovo thinkpad t61 weight
- lenovo thinkpad t61 widescreen
- lenovo thinkpad t61 windows 7
- lenovo thinkpad t61 windows 7 drivers
- lenovo thinkpad t61 windows 8 drivers
- lenovo thinkpad t61 windows 8.1 drivers
- lenovo thinkpad t61 wireless driver
- lenovo thinkpad t61 wireless not working
- lenovo thinkpad t61 wireless switch
- lenovo thinkpad t61 won't turn on
- lenovo thinkpad t61. slow running
- lenovo thinkpad t61p
- lenovo thinkpad t61p battery
- lenovo thinkpad t61p battery 92p1139
- lenovo thinkpad t61p beep codes
- lenovo thinkpad t61p drivers
- lenovo thinkpad t61p manual
- lenovo thinkpad t61p no screen
- lenovo thinkpad t61p review
- lenovo thinkpad t61p software
- lenovo thinkpad t61p wuxga lcd
- thinkpad t61
- thinkpad t61 14.1
- thinkpad t61 14.1-inch
- thinkpad t61 15.4
- thinkpad t61 15.4 notebook
- thinkpad t61 64 bit
- thinkpad t61 6458
- thinkpad t61 6460
- thinkpad t61 7658
- thinkpad t61 7663
- thinkpad t61 8gb ram
- thinkpad t61 ac adapter
- thinkpad t61 adapter
- thinkpad t61 audio drivers
- thinkpad t61 base system device
- thinkpad t61 base system device driver
- thinkpad t61 base system device windows 7
- thinkpad t61 battery
- thinkpad t61 battery life
- thinkpad t61 battery not charging
- thinkpad t61 battery replacement
- thinkpad t61 bios
- thinkpad t61 bios password
- thinkpad t61 bios update
- thinkpad t61 black screen
- thinkpad t61 bluetooth
- thinkpad t61 bluetooth + windows 7
- thinkpad t61 bluetooth problems
- thinkpad t61 boot order
- thinkpad t61 change of ram
- thinkpad t61 charger
- thinkpad t61 cmos replacement
- thinkpad t61 cooling fan
- thinkpad t61 core 2 duo
- thinkpad t61 cost
- thinkpad t61 cpu upgrade
- thinkpad t61 cpu's
- thinkpad t61 display
- thinkpad t61 dock
- thinkpad t61 docking station
- thinkpad t61 downloads
- thinkpad t61 driver
- thinkpad t61 driver download
- thinkpad t61 drivers
- thinkpad t61 drivers download
- thinkpad t61 drivers for windows 7
- thinkpad t61 drivers for xp
- thinkpad t61 drivers windows 7
- thinkpad t61 dual boot
- thinkpad t61 error codes
- thinkpad t61 fan
- thinkpad t61 fan control
- thinkpad t61 fan error
- thinkpad t61 fan noise
- thinkpad t61 fan replacement
- thinkpad t61 for sale
- thinkpad t61 function keys
- thinkpad t61 graphics card
- thinkpad t61 graphics card upgrade
- thinkpad t61 hard drive
- thinkpad t61 hard drive replacement
- thinkpad t61 hard drive upgrade
- thinkpad t61 hardware maintenance manual
- thinkpad t61 install discs
- thinkpad t61 keyboard
- thinkpad t61 keyboard cover
- thinkpad t61 keyboard lock
- thinkpad t61 keyboard replacement
- thinkpad t61 laptop
- thinkpad t61 laptop battery
- thinkpad t61 laptop computer
- thinkpad t61 laptop price
- thinkpad t61 laptop review
- thinkpad t61 layout
- thinkpad t61 linux
- thinkpad t61 manual
- thinkpad t61 manual download
- thinkpad t61 manual owner
- thinkpad t61 manual pdf
- thinkpad t61 manual.pdf
- thinkpad t61 max ram
- thinkpad t61 memory
- thinkpad t61 memory installation
- thinkpad t61 memory specifications
- thinkpad t61 memory upgrade
- thinkpad t61 motherboard
- thinkpad t61 motherboard replacement
- thinkpad t61 no power
- thinkpad t61 notebook
- thinkpad t61 notebook pc
- thinkpad t61 parts
- thinkpad t61 passphrase
- thinkpad t61 password reset
- thinkpad t61 pci controller driver
- thinkpad t61 pdf
- thinkpad t61 plugged in not charging
- thinkpad t61 post
- thinkpad t61 power adapter
- thinkpad t61 power manager windows 7
- thinkpad t61 price
- thinkpad t61 price in india
- thinkpad t61 ram
- thinkpad t61 ram upgrade
- thinkpad t61 recovery
- thinkpad t61 recovery cd download
- thinkpad t61 recovery disk
- thinkpad t61 recovery partition
- thinkpad t61 refurbished
- thinkpad t61 repair manual
- thinkpad t61 replace hard drive
- thinkpad t61 replacement hard drive
- thinkpad t61 reset with no passwords
- thinkpad t61 review
- thinkpad t61 reviews
- thinkpad t61 safe mode
- thinkpad t61 screen problem
- thinkpad t61 screen replacement
- thinkpad t61 screen size
- thinkpad t61 screen upgrade
- thinkpad t61 series
- thinkpad t61 service manual
- thinkpad t61 software
- thinkpad t61 sound not working
- thinkpad t61 spec
- thinkpad t61 specifications
- thinkpad t61 specs
- thinkpad t61 ssd
- thinkpad t61 support
- thinkpad t61 t7300
- thinkpad t61 treiber
- thinkpad t61 unknown device
- thinkpad t61 update
- thinkpad t61 upgrades
- thinkpad t61 user guide
- thinkpad t61 user manual
- thinkpad t61 video card
- thinkpad t61 video card upgrade
- thinkpad t61 video driver
- thinkpad t61 webcam
- thinkpad t61 weight
- thinkpad t61 widescreen
- thinkpad t61 wifi
- thinkpad t61 wifi driver
- thinkpad t61 will not power on
- thinkpad t61 windows 10
- thinkpad t61 windows 2008
- thinkpad t61 windows 7
- thinkpad t61 windows 7 drivers
- thinkpad t61 windows 7 recovery disk
- thinkpad t61 windows 8
- thinkpad t61 windows 8 drivers
- thinkpad t61 windows 8.1 drivers
- thinkpad t61 wireless card
- thinkpad t61 wireless driver
- thinkpad t61 wireless drivers
- thinkpad t61 wireless manager
- thinkpad t61 wireless not working
- thinkpad t61 wireless switch
- thinkpad t61 won't start
- thinkpad t61 won't turn on
- thinkpad t61. slow running
- thinkpad t61p
- thinkpad t61p 6460 t9300
- thinkpad t61p battery
- thinkpad t61p battery 92p1139
- thinkpad t61p beep codes
- thinkpad t61p driver
- thinkpad t61p drivers
- thinkpad t61p drivers windows 7
- thinkpad t61p manual
- thinkpad t61p no screen
- thinkpad t61p review
- thinkpad t61p software
- thinkpad t61p video driver
- thinkpad t61p wuxga lcd
- thinkpadt61 bluetooth
- thinkpadt61 cpu upgraded
- thinkpadt61 ssd
- thinkpadt61 windows7
- thinkpadt61 windows8