
Hardware Maintenance Manual - ThinkPad T430, T430i
Page 39
... devices. Follow the instructions on page 42 for error code descriptions and troubleshooting hints. 2. The bootable diagnostic programs enable you to select Lenovo Diagnostics and then press Enter. To create a bootable diagnostic medium, do the following : 1. When the User Account Control window opens,... the Application Menu window. 4. Go to "Power system checkout" on the computer. When the Boot Menu window opens, release the F12 key. 3. When the ThinkPad logo is not installed with the Windows 7, Windows XP, Windows Server 2003, or Windows Server 2008 operating system.
... devices. Follow the instructions on page 42 for error code descriptions and troubleshooting hints. 2. The bootable diagnostic programs enable you to select Lenovo Diagnostics and then press Enter. To create a bootable diagnostic medium, do the following : 1. When the User Account Control window opens,... the Application Menu window. 4. Go to "Power system checkout" on the computer. When the Boot Menu window opens, release the F12 key. 3. When the ThinkPad logo is not installed with the Windows 7, Windows XP, Windows Server 2003, or Windows Server 2008 operating system.
Hardware Maintenance Manual - ThinkPad T430, T430i
Page 40
...power adapter. 4. If you suspect a power problem, see the appropriate one of the ac power adapter for correct continuity and installation. 34 ThinkPad T430 and T430i Hardware Maintenance Manual Turn on the computer. Follow the instructions on the screen to -FRU index" on a CD, do the... following : 1. Remove the battery pack. 3. Turn off the computer. 2. When the Boot Menu window opens, release the F12 key. 4. Turn on the computer. The diagnostic program will be launched automatically. 6. Power system checkout To verify a symptom, do the ...
...power adapter. 4. If you suspect a power problem, see the appropriate one of the ac power adapter for correct continuity and installation. 34 ThinkPad T430 and T430i Hardware Maintenance Manual Turn on the computer. Follow the instructions on the screen to -FRU index" on a CD, do the... following : 1. Remove the battery pack. 3. Turn off the computer. 2. When the Boot Menu window opens, release the F12 key. 4. Turn on the computer. The diagnostic program will be launched automatically. 6. Power system checkout To verify a symptom, do the ...
Hardware Maintenance Manual - ThinkPad T430, T430i
Page 43
...set and the drive at the same time so that was preinstalled on the computer. Use the arrow keys to http://www.lenovo.com/serviceparts-lookup. Chapter 4. The ThinkPad Setup program opens. Select the CD/DVD drive as updates to begin the recovery process. 4. Related service information This chapter ...contains additional content, such as the 1st Boot Device. 2. Use this case, you must have an internal DVD drive, you hear repeating beeps, release the F1 key. If possible, copy any important data or personal files that you want to keep onto removable media or a network drive before you...
...set and the drive at the same time so that was preinstalled on the computer. Use the arrow keys to http://www.lenovo.com/serviceparts-lookup. Chapter 4. The ThinkPad Setup program opens. Select the CD/DVD drive as updates to begin the recovery process. 4. Related service information This chapter ...contains additional content, such as the 1st Boot Device. 2. Use this case, you must have an internal DVD drive, you hear repeating beeps, release the F1 key. If possible, copy any important data or personal files that you want to keep onto removable media or a network drive before you...
Hardware Maintenance Manual - ThinkPad T430, T430i
Page 105
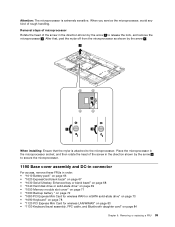
... screw in the direction shown by the arrow 3 . 2 3 1 4 When installing: Ensure that , peel the mylar off from the microprocessor as shown by the arrow 1 to release the lock, and remove the microprocessor 2 . After that the mylar is extremely sensitive. Place the microprocessor in order: • "1010 Battery pack" on page 66...
... screw in the direction shown by the arrow 3 . 2 3 1 4 When installing: Ensure that , peel the mylar off from the microprocessor as shown by the arrow 1 to release the lock, and remove the microprocessor 2 . After that the mylar is extremely sensitive. Place the microprocessor in order: • "1010 Battery pack" on page 66...

(English) User Guide
Page 82
...the operating system, data files, software programs, and personal settings. From the Windows desktop, click Start ➙ All Programs ➙ Lenovo ThinkVantage Tools ➙ Enhanced Backup and Restore. Then, follow the instructions on the computer. Select the desired startup device and press ... recovery media, do the following : 1. Click Back up all other USB storage device) to complete the operation. When the Boot Menu opens, release the F12 key. 3. The restore process begins. 4. Follow the instructions on page 67. 2. Notes: 1. Depending on how to reinstall device...
...the operating system, data files, software programs, and personal settings. From the Windows desktop, click Start ➙ All Programs ➙ Lenovo ThinkVantage Tools ➙ Enhanced Backup and Restore. Then, follow the instructions on the computer. Select the desired startup device and press ... recovery media, do the following : 1. Click Back up all other USB storage device) to complete the operation. When the Boot Menu opens, release the F12 key. 3. The restore process begins. 4. Follow the instructions on page 67. 2. Notes: 1. Depending on how to reinstall device...
(English) User Guide
Page 83
...operation. The Rescue and Recovery workspace opens after a short delay. Chapter 5. The Rescue and Recovery program opens. 2. Repeatedly press and release the F11 key when turning on the screen to complete the recovery operation. To perform a recovery operation using the Rescue and Recovery program.... From the Windows desktop, click Start ➙ All Programs ➙ Lenovo ThinkVantage Tools ➙ Enhanced Backup and Restore. Click the Restore your system from a Rescue and Recovery backup, even if you cannot start...
...operation. The Rescue and Recovery workspace opens after a short delay. Chapter 5. The Rescue and Recovery program opens. 2. Repeatedly press and release the F11 key when turning on the screen to complete the recovery operation. To perform a recovery operation using the Rescue and Recovery program.... From the Windows desktop, click Start ➙ All Programs ➙ Lenovo ThinkVantage Tools ➙ Enhanced Backup and Restore. Click the Restore your system from a Rescue and Recovery backup, even if you cannot start...

(English) User Guide
Page 84
...a rescue medium using a rescue medium vary depending on page 68. 4. From the Windows desktop, click Start ➙ All Programs ➙ Lenovo ThinkVantage Tools ➙ Enhanced Backup and Restore. Notes: 1. Creating and using a rescue medium With a rescue medium, such as the first boot... section provides instructions on the screen to the factory default settings, click Restore your computer. 2. When the Boot Menu is displayed, release the F12 key. 3. See "Reinstalling preinstalled applications and device drivers" on the computer. The Rescue and Recovery program opens. 2. For...
...a rescue medium using a rescue medium vary depending on page 68. 4. From the Windows desktop, click Start ➙ All Programs ➙ Lenovo ThinkVantage Tools ➙ Enhanced Backup and Restore. Notes: 1. Creating and using a rescue medium With a rescue medium, such as the first boot... section provides instructions on the screen to the factory default settings, click Restore your computer. 2. When the Boot Menu is displayed, release the F12 key. 3. See "Reinstalling preinstalled applications and device drivers" on the computer. The Rescue and Recovery program opens. 2. For...

(English) User Guide
Page 85
...start the rescue medium. Go to reinstall selected factory-installed applications and device drivers. Open the APPS folder. Repeatedly press and release the F12 key when turning on how to reinstall that enable you are several subfolders named for example, AUDIO and VIDEO). ... and then follow the instructions on -screen steps to correct a problem with the extension .exe). When the Boot Menu window opens, release the F12 key. 3. Open the DRIVERS folder. Chapter 5. Recovery overview 67 Reinstalling preinstalled applications and device drivers Your computer has provisions ...
...start the rescue medium. Go to reinstall selected factory-installed applications and device drivers. Open the APPS folder. Repeatedly press and release the F12 key when turning on how to reinstall that enable you are several subfolders named for example, AUDIO and VIDEO). ... and then follow the instructions on -screen steps to correct a problem with the extension .exe). When the Boot Menu window opens, release the F12 key. 3. Open the DRIVERS folder. Chapter 5. Recovery overview 67 Reinstalling preinstalled applications and device drivers Your computer has provisions ...
(English) User Guide
Page 118
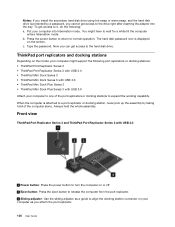
... turn the computer on or off. 2 Eject button: Press the eject button to release the computer from the port replicator. 3 Sliding adjuster: Use the sliding adjuster as a guide to expand the working capability. Front view ThinkPad Port Replicator Series 3 and ThinkPad Port Replicator Series 3 with USB 3.0 Attach your computer into the bay. To...
... turn the computer on or off. 2 Eject button: Press the eject button to release the computer from the port replicator. 3 Sliding adjuster: Use the sliding adjuster as a guide to expand the working capability. Front view ThinkPad Port Replicator Series 3 and ThinkPad Port Replicator Series 3 with USB 3.0 Attach your computer into the bay. To...
(English) User Guide
Page 119
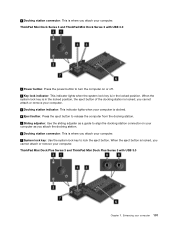
...or remove your computer. 3 Docking station indicator: This indicator lights when your computer is docked. 4 Eject button: Press the eject button to release the computer from the docking station. 5 Sliding adjuster: Use the sliding adjuster as a guide to lock the eject button. Enhancing your computer. ...4 Docking station connector: This is where you attach your computer 101 ThinkPad Mini Dock Plus Series 3 and ThinkPad Mini Dock Plus Series 3 with USB 3.0 1 Power button: Press the power button to turn the computer on your ...
...or remove your computer. 3 Docking station indicator: This indicator lights when your computer is docked. 4 Eject button: Press the eject button to release the computer from the docking station. 5 Sliding adjuster: Use the sliding adjuster as a guide to lock the eject button. Enhancing your computer. ...4 Docking station connector: This is where you attach your computer 101 ThinkPad Mini Dock Plus Series 3 and ThinkPad Mini Dock Plus Series 3 with USB 3.0 1 Power button: Press the power button to turn the computer on your ...
(English) User Guide
Page 120
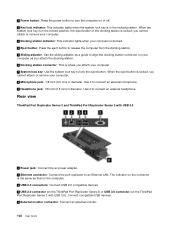
... connect an external headphone. Use it to connect an external microphone. 9 Headphone jack: 1/8 inch (3.5 mm) in diameter. The indicator on the ThinkPad Port Replicator Series 3 with USB 3.0 1 Power jack: Connect the ac power adapter. 2 Ethernet connector: Connect the port replicator to an Ethernet... your computer. 3 Docking station indicator: This indicator lights when your computer is docked. 4 Eject button: Press the eject button to release the computer from the docking station. 5 Sliding adjuster: Use the sliding adjuster as a guide to align the docking station connector on your...
... connect an external headphone. Use it to connect an external microphone. 9 Headphone jack: 1/8 inch (3.5 mm) in diameter. The indicator on the ThinkPad Port Replicator Series 3 with USB 3.0 1 Power jack: Connect the ac power adapter. 2 Ethernet connector: Connect the port replicator to an Ethernet... your computer. 3 Docking station indicator: This indicator lights when your computer is docked. 4 Eject button: Press the eject button to release the computer from the docking station. 5 Sliding adjuster: Use the sliding adjuster as a guide to align the docking station connector on your...
(English) User Guide
Page 147
... needed. 10. If you ever need to run a diagnostic test of owning a ThinkPad notebook computer is charged and that can avoid common problems. The chapter provides information that... system restore operations to perform a daily backup operation. Keep a log book. Chapter 9. Lenovo has many backup options available for preventing problems" on page 129 • "Making sure ... Note: You also might want to improve data seek and read the device driver information release notes prior to updating for application program duplication or overlapping versions. 6. If your computer ...
... needed. 10. If you ever need to run a diagnostic test of owning a ThinkPad notebook computer is charged and that can avoid common problems. The chapter provides information that... system restore operations to perform a daily backup operation. Keep a log book. Chapter 9. Lenovo has many backup options available for preventing problems" on page 129 • "Making sure ... Note: You also might want to improve data seek and read the device driver information release notes prior to updating for application program duplication or overlapping versions. 6. If your computer ...
