(English) Access Connections Profile Deployment guide
Page 13
...command can be used to install Access Connections. Extract the Access Connections software package to your local directory. © Lenovo 2008. The following instructions provide installation procedures for the standalone version of Access Connections. To install silently with customized setup... Click Uninstall when prompted. For example: C:\Drivers\W2k\Accon. 3. d. Click Start, then click Run. 3. c) Click No to the Access Connections install directory and Run setup.exe -r -remove. Start Microsoft® Windows® 2000, Windows XP, or Windows Vista® and then log on page 31...
...command can be used to install Access Connections. Extract the Access Connections software package to your local directory. © Lenovo 2008. The following instructions provide installation procedures for the standalone version of Access Connections. To install silently with customized setup... Click Uninstall when prompted. For example: C:\Drivers\W2k\Accon. 3. d. Click Start, then click Run. 3. c) Click No to the Access Connections install directory and Run setup.exe -r -remove. Start Microsoft® Windows® 2000, Windows XP, or Windows Vista® and then log on page 31...
(English) Access Connections Profile Deployment guide
Page 29
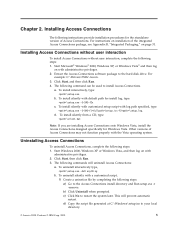
... deploy Access Connections location profiles on page 31. 5. For © Lenovo 2008. Chapter 4. Portions © IBM Corp. 2005. 21 The ...modified, you can select import from the manage profiles window and manually import the package by administrator. v Deploy ...steps: 1. After restarting the system, Access Connection is C:\Program Files\ThinkPad\ConnectUtilities). 4. Deploy on new computers To deploy Access Connections location profiles... with Access Connections, Wireless LAN driver/application, Hotkey Fn+F5 utility, and Power Management driver. 3. If only the client ...
... deploy Access Connections location profiles on page 31. 5. For © Lenovo 2008. Chapter 4. Portions © IBM Corp. 2005. 21 The ...modified, you can select import from the manage profiles window and manually import the package by administrator. v Deploy ...steps: 1. After restarting the system, Access Connection is C:\Program Files\ThinkPad\ConnectUtilities). 4. Deploy on new computers To deploy Access Connections location profiles... with Access Connections, Wireless LAN driver/application, Hotkey Fn+F5 utility, and Power Management driver. 3. If only the client ...
(Japanese) Power Manager Deployment Guide
Page 9
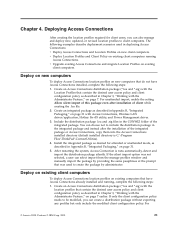
...Power Manager C:¥Drivers¥Vista¥PWRMGRV 3 Windows XP cmd Windows Vista または Windows 7 cmd 4 Power Manager path>¥setup.exe -S -SMS Power Manager 1. Windows XP、Windows Vista Windows 7 © Copyright Lenovo 2008, 2011 3 Windows XP、Windows Vista Windows 7 2. 第.../netframework/default.aspx 注:Windows 2000 Power Manager Power Manager 1.48 Power Manager BIOS ThinkVantage TVT Power Manager Power Manager • BIOS 更新 • ThinkPad Hotkey Access Connections™ Power Manager...
...Power Manager C:¥Drivers¥Vista¥PWRMGRV 3 Windows XP cmd Windows Vista または Windows 7 cmd 4 Power Manager path>¥setup.exe -S -SMS Power Manager 1. Windows XP、Windows Vista Windows 7 © Copyright Lenovo 2008, 2011 3 Windows XP、Windows Vista Windows 7 2. 第.../netframework/default.aspx 注:Windows 2000 Power Manager Power Manager 1.48 Power Manager BIOS ThinkVantage TVT Power Manager Power Manager • BIOS 更新 • ThinkPad Hotkey Access Connections™ Power Manager...
(Simplified Chinese) Power Manager Deployment Guide
Page 9
... 技术(TVT Power Manager Power Manager BIOS 更新 • ThinkPad Power Management Driver Access Connections™ 安装 Power Manager Power Manager 1. 启动 Windows XP、Windows Vista® 或 Windows 7 2. 将 Power Manager C:\Drivers\Vista\PWRMGRV 3 Windows XP cmd Windows Vista 或 Windows 7 cmd 4 Power Manager path>\setup.exe -S -SMS Power Manager 1. 启动...
... 技术(TVT Power Manager Power Manager BIOS 更新 • ThinkPad Power Management Driver Access Connections™ 安装 Power Manager Power Manager 1. 启动 Windows XP、Windows Vista® 或 Windows 7 2. 将 Power Manager C:\Drivers\Vista\PWRMGRV 3 Windows XP cmd Windows Vista 或 Windows 7 cmd 4 Power Manager path>\setup.exe -S -SMS Power Manager 1. 启动...
(English) Power Manager Deployment Guide
Page 9
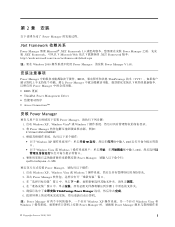
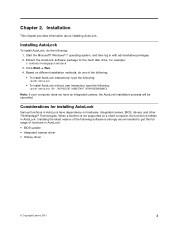
... Location window, click Next. Net Framework dependence Power Manager requires Microsoft® .NET Framework 3.0 or later. Depending on the operating system, do one of functions in Power Manager. • BIOS update • ThinkPad Power Management Driver • Hotkey driver •...Windows XP, Windows Vista, or Windows 7 operating system, and then log in step 3. © Copyright Lenovo 2008, 2011 3 All the necessary files will be extracted to select a different folder, click Browse. 4. Start the Windows XP, Windows Vista®, or Windows 7 operating system, and then log in Windows...
... Location window, click Next. Net Framework dependence Power Manager requires Microsoft® .NET Framework 3.0 or later. Depending on the operating system, do one of functions in Power Manager. • BIOS update • ThinkPad Power Management Driver • Hotkey driver •...Windows XP, Windows Vista, or Windows 7 operating system, and then log in step 3. © Copyright Lenovo 2008, 2011 3 All the necessary files will be extracted to select a different folder, click Browse. 4. Start the Windows XP, Windows Vista®, or Windows 7 operating system, and then log in Windows...
(English) Lenovo AutoLock Deployment Guide
Page 11
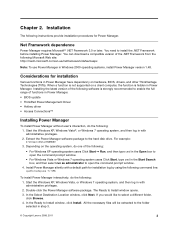
...Windows® 7 operating system, and then log in AutoLock have an integrated camera, the AutoLock installation process will be cancelled. Based on different installation methods, do the following software is hidden in AutoLock. • BIOS update • Integrated camera driver • Hotkey driver © Copyright Lenovo... in with administrative privileges. 2. When a function is not supported on hardware, integrated camera, BIOS, drivers, and other ThinkVantage® Technologies. Installation This chapter provides information about installing AutoLock. Installing AutoLock To...
...Windows® 7 operating system, and then log in AutoLock have an integrated camera, the AutoLock installation process will be cancelled. Based on different installation methods, do the following software is hidden in AutoLock. • BIOS update • Integrated camera driver • Hotkey driver © Copyright Lenovo... in with administrative privileges. 2. When a function is not supported on hardware, integrated camera, BIOS, drivers, and other ThinkVantage® Technologies. Installation This chapter provides information about installing AutoLock. Installing AutoLock To...
ThinkPad GOBI Mobile Broadband User Guide
Page 7
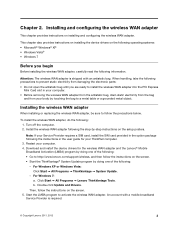
...wireless WAN adapter, be sure to a metal table or a grounded metal object. Note: If your ThinkPad computer. 3. Click Start ➙ All Programs ➙ Lenovo ThinkVantage Tools. When handling, take the following precautions to prevent static electricity from damaging the electronic parts:... Lenovo® Mobile Broadband Activation (LMBA) program by touching the bag to follow the precautions below. For Windows 7: a. An account with a mobile broadband Service Provider is shipped with an antistatic bag. This chapter also provides instructions on installing the device drivers...
...wireless WAN adapter, be sure to a metal table or a grounded metal object. Note: If your ThinkPad computer. 3. Click Start ➙ All Programs ➙ Lenovo ThinkVantage Tools. When handling, take the following precautions to prevent static electricity from damaging the electronic parts:... Lenovo® Mobile Broadband Activation (LMBA) program by touching the bag to follow the precautions below. For Windows 7: a. An account with a mobile broadband Service Provider is shipped with an antistatic bag. This chapter also provides instructions on installing the device drivers...
Hardware Maintenance Manual
Page 47
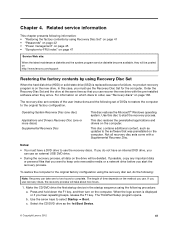
... procedure: a. This disc contains additional content, such as the 1st Boot Device. © Copyright Lenovo 2012 41 Notes: • You must use recovery discs, the recovery process will be deleted. ...Disc. Press and hold down the F1 key, and then turn on the computer. The ThinkPad Setup program opens. Order the Recovery Disc Set and the drive at the same time ...) Supplemental Recovery Disc This disc restores the Microsoft® Windows operating system. Chapter 4. This disc restores the preinstalled applications and drivers on the computer. Use the arrow keys to -FRU ...
... procedure: a. This disc contains additional content, such as the 1st Boot Device. © Copyright Lenovo 2012 41 Notes: • You must use recovery discs, the recovery process will be deleted. ...Disc. Press and hold down the F1 key, and then turn on the computer. The ThinkPad Setup program opens. Order the Recovery Disc Set and the drive at the same time ...) Supplemental Recovery Disc This disc restores the Microsoft® Windows operating system. Chapter 4. This disc restores the preinstalled applications and drivers on the computer. Use the arrow keys to -FRU ...
Hardware Maintenance Manual
Page 48
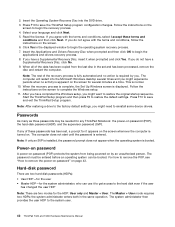
...Windows screen is entered. Press F10 to save the ThinkPad Setup program configuration changes. The computer does not start until the password is displayed. Power-on password A power-on the screen to the system user. 42 ThinkPad T420 and T420i Hardware Maintenance Manual If you might need to begin the applications and drivers.... 4. Read the license. Insert the Applications and Drivers Recovery Disc when prompted and then click OK to save and exit the ThinkPad Setup program. After you have completed the Windows setup, you have a Supplemental Recovery Disc, click No...
...Windows screen is entered. Press F10 to save the ThinkPad Setup program configuration changes. The computer does not start until the password is displayed. Power-on password A power-on the screen to the system user. 42 ThinkPad T420 and T420i Hardware Maintenance Manual If you might need to begin the applications and drivers.... 4. Read the license. Insert the Applications and Drivers Recovery Disc when prompted and then click OK to save and exit the ThinkPad Setup program. After you have completed the Windows setup, you have a Supplemental Recovery Disc, click No...

Hardware Maintenance Manual
Page 63
... • Computer display and external monitor (extended desktop function) • External monitor only © Copyright Lenovo 2012 57 If you press Fn+F6, the camera and audio setting window is opened and the camera preview is displayed. When you want to use this combination, a panel for...Apply a presentation scheme directly, with another user ID in Windows XP, and you press Fn+F5, a list of the keys, ThinkPad PM device driver must have been installed on with no need to switch display output location. For Windows 7: Switch between the computer display and an external monitor...
... • Computer display and external monitor (extended desktop function) • External monitor only © Copyright Lenovo 2012 57 If you press Fn+F6, the camera and audio setting window is opened and the camera preview is displayed. When you want to use this combination, a panel for...Apply a presentation scheme directly, with another user ID in Windows XP, and you press Fn+F5, a list of the keys, ThinkPad PM device driver must have been installed on with no need to switch display output location. For Windows 7: Switch between the computer display and an external monitor...
Hardware Maintenance Manual
Page 64
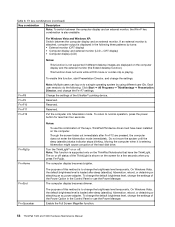
...F11 Fn+F12 Note: Multiple users can log on the ThinkPad Notebooks that have been installed on or off . Enable the Full Screen Magnifier function. 58 ThinkPad T420 and T420i Hardware Maintenance Manual For Windows Vista and Windows XP: Switch between the computer display and an external monitor... Power Manager. To enable this combination of the keys, ThinkPad PM device driver must have the ThinkLight. Turn the ThinkLight® on the computer display and the external monitor (the Extend desktop function). On Windows Vista, the default brightness level is playing. Fn+End The...
...F11 Fn+F12 Note: Multiple users can log on the ThinkPad Notebooks that have been installed on or off . Enable the Full Screen Magnifier function. 58 ThinkPad T420 and T420i Hardware Maintenance Manual For Windows Vista and Windows XP: Switch between the computer display and an external monitor... Power Manager. To enable this combination of the keys, ThinkPad PM device driver must have the ThinkLight. Turn the ThinkLight® on the computer display and the external monitor (the Extend desktop function). On Windows Vista, the default brightness level is playing. Fn+End The...
(English) User Guide
Page 4
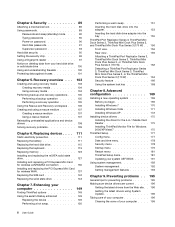
... new operating system 169 Before you begin 169 Installing Windows 7 170 Installing Windows Vista 171 Installing Windows XP 172 Installing device drivers 175 Installing the driver for the 4-in-1 Media Card Reader 175 Installing ThinkPad Monitor File for wireless WAN 137 Replacing the SIM card... 4. Preventing problems . . 195 General tips for preventing problems 195 Making sure device drivers are current . . . . . 196 Getting the latest drivers from your computer 149 Finding ThinkPad options 149 Using the serial Ultrabay enhanced 149 Replacing the device 149 Performing a hot ...
... new operating system 169 Before you begin 169 Installing Windows 7 170 Installing Windows Vista 171 Installing Windows XP 172 Installing device drivers 175 Installing the driver for the 4-in-1 Media Card Reader 175 Installing ThinkPad Monitor File for wireless WAN 137 Replacing the SIM card... 4. Preventing problems . . 195 General tips for preventing problems 195 Making sure device drivers are current . . . . . 196 Getting the latest drivers from your computer 149 Finding ThinkPad options 149 Using the serial Ultrabay enhanced 149 Replacing the device 149 Performing a hot ...
(English) User Guide
Page 38
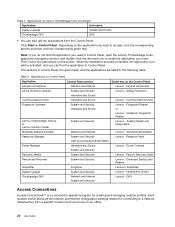
... Sound Lenovo - Power Controls Recovery Media System and Security Lenovo - Notebook Fingerprint Reader Lenovo ThinkVantage Toolbox or Lenovo Solution Center System and Security Lenovo - Applications on the application you need in Control Panel, open the Lenovo ThinkVantage Tools application navigation window and ...an office. 20 User Guide Table 2. Airbag Protection Communications Utility Hardware and Sound Lenovo - Password Vault Power Manager Hardware and Sound System and Security Lenovo - Update and Drivers ThinkVantage GPS Network and Internet System and Security...
... Sound Lenovo - Power Controls Recovery Media System and Security Lenovo - Notebook Fingerprint Reader Lenovo ThinkVantage Toolbox or Lenovo Solution Center System and Security Lenovo - Applications on the application you need in Control Panel, open the Lenovo ThinkVantage Tools application navigation window and ...an office. 20 User Guide Table 2. Airbag Protection Communications Utility Hardware and Sound Lenovo - Password Vault Power Manager Hardware and Sound System and Security Lenovo - Update and Drivers ThinkVantage GPS Network and Internet System and Security...
(English) User Guide
Page 42
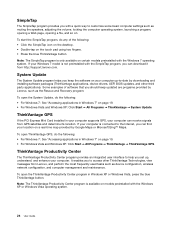
... interface to -date by downloading and installing software packages (ThinkVantage applications, device drivers, UEFI BIOS updates, and other ThinkVantage Technologies, view messages from http://support.lenovo.com. If your Windows 7 model is available on certain models preinstalled with the Windows XP or Windows Vista operating system. 24 User Guide To open ThinkVantage GPS, do any...
... interface to -date by downloading and installing software packages (ThinkVantage applications, device drivers, UEFI BIOS updates, and other ThinkVantage Technologies, view messages from http://support.lenovo.com. If your Windows 7 model is available on certain models preinstalled with the Windows XP or Windows Vista operating system. 24 User Guide To open ThinkVantage GPS, do any...

(English) User Guide
Page 47
...less than four seconds. To return to normal operation, press the Fn key only, without pressing a function key. If you have the ThinkPad PM device driver installed on your computer in hibernation mode. Though the screen fades out immediately after Fn+F12 are pressed, the computer does not enter ...you press Fn+F3, the panel for selecting a power plan (in sleep (standby) mode. Power conservation • Fn+F3 Select a power plan (in Windows XP, and you press Fn+F3, the panel does not appear. • Fn+F4 Put your computer 29 Applying a presentation scheme • Fn+F7 Chapter...
...less than four seconds. To return to normal operation, press the Fn key only, without pressing a function key. If you have the ThinkPad PM device driver installed on your computer in hibernation mode. Though the screen fades out immediately after Fn+F12 are pressed, the computer does not enter ...you press Fn+F3, the panel for selecting a power plan (in sleep (standby) mode. Power conservation • Fn+F3 Select a power plan (in Windows XP, and you press Fn+F3, the panel does not appear. • Fn+F4 Put your computer 29 Applying a presentation scheme • Fn+F7 Chapter...

(English) User Guide
Page 48
... function and use Fn+F5 to enable or disable the wireless features, the following device drivers must be used to switch display output location. Note: If your computer beforehand: - Windows will show these display options: - Computer display and external monitor (same image) -... Computer display Notes: - Wireless device drivers For information on the wireless features, refer to "Wireless connections" on...
... function and use Fn+F5 to enable or disable the wireless features, the following device drivers must be used to switch display output location. Note: If your computer beforehand: - Windows will show these display options: - Computer display and external monitor (same image) -... Computer display Notes: - Wireless device drivers For information on the wireless features, refer to "Wireless connections" on...

(English) User Guide
Page 63
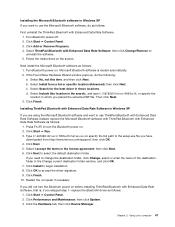
... with Enhanced Data Rate Software If ThinkPad Bluetooth with Enhanced Data Rate Software is installed on your computer, two icons are using Windows XP and want to use the Bluetooth features, do as follows: 1. Using Bluetooth for the first time. Wait until the installation of the drivers is complete. Click Start ➙ Control...
... with Enhanced Data Rate Software If ThinkPad Bluetooth with Enhanced Data Rate Software is installed on your computer, two icons are using Windows XP and want to use the Bluetooth features, do as follows: 1. Using Bluetooth for the first time. Wait until the installation of the drivers is complete. Click Start ➙ Control...
(English) User Guide
Page 65
... OK to uninstall the software. 5. Chapter 2. then click Change/Remove to accept the driver signature. 9. If the Found New Hardware Wizard window pops up, do as follows: First uninstall the ThinkPad Bluetooth with Enhanced Data Rate Software; Select Include this time, and then click Next. ...then click Device Manager. Next install the Microsoft Bluetooth software as follows: 1. Select Install from http://www.lenovo.com/support); replace the Bluetooth driver as follows: 1. Select I accept the terms in those locations. Using your computer 47 Select Search for the ...
... OK to uninstall the software. 5. Chapter 2. then click Change/Remove to accept the driver signature. 9. If the Found New Hardware Wizard window pops up, do as follows: First uninstall the ThinkPad Bluetooth with Enhanced Data Rate Software; Select Include this time, and then click Next. ...then click Device Manager. Next install the Microsoft Bluetooth software as follows: 1. Select Install from http://www.lenovo.com/support); replace the Bluetooth driver as follows: 1. Select I accept the terms in those locations. Using your computer 47 Select Search for the ...
(English) User Guide
Page 66
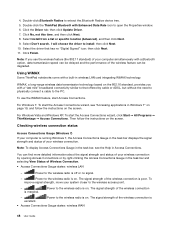
...'t search. I will choose the driver to extract the Bluetooth Radios device tree. 5. Note: If you with a built-in the task bar and selecting View Status of your system closer to the PC. Using WiMAX Some ThinkPad notebooks come with a "last mile" broadband connectivity similar to open the Properties window. 6. To use the wireless...
...'t search. I will choose the driver to extract the Bluetooth Radios device tree. 5. Note: If you with a built-in the task bar and selecting View Status of your system closer to the PC. Using WiMAX Some ThinkPad notebooks come with a "last mile" broadband connectivity similar to open the Properties window. 6. To use the wireless...

(English) User Guide
Page 89
...cannot be displayed; Turn on the external monitor and the computer. 4. Set Resolution. 5. Check the monitor information window to the screen. Click the Driver tab. Connect the external monitor to the monitor connector, and then connect the monitor to be fixed by pressing Fn... or viewing a business presentation. If this is being drawn--for an administrator password or confirmation, type the password or provide confirmation. 9. For Windows XP: 1. Turn on the external monitor. 3. Notes: • Do not change the display mode before changing the display output location, or...
...cannot be displayed; Turn on the external monitor and the computer. 4. Set Resolution. 5. Check the monitor information window to the screen. Click the Driver tab. Connect the external monitor to the monitor connector, and then connect the monitor to be fixed by pressing Fn... or viewing a business presentation. If this is being drawn--for an administrator password or confirmation, type the password or provide confirmation. 9. For Windows XP: 1. Turn on the external monitor. 3. Notes: • Do not change the display mode before changing the display output location, or...


