
Hardware Maintenance Manual
Page 35
... supports the docking station. General checkout 29 Turn on the model.) Note: PC-Doctor menu does not mean the formal support device list. To test a USB device, connect it by using Configuration utility for DOS is available at the following Web site: http://www.lenovo.com/support ... the computer. Note: You can start the BIOS Setup Utility by the customer, BIOS Setup Utility menu appears after the password is entered. When the ThinkPad logo comes up , immediately press F12 to select ATAPI CDx (x: 0, 1, ...) and then press Enter. 7. Chapter 3. Note: When you initialize the ...
... supports the docking station. General checkout 29 Turn on the model.) Note: PC-Doctor menu does not mean the formal support device list. To test a USB device, connect it by using Configuration utility for DOS is available at the following Web site: http://www.lenovo.com/support ... the computer. Note: You can start the BIOS Setup Utility by the customer, BIOS Setup Utility menu appears after the password is entered. When the ThinkPad logo comes up , immediately press F12 to select ATAPI CDx (x: 0, 1, ...) and then press Enter. 7. Chapter 3. Note: When you initialize the ...
Hardware Maintenance Manual
Page 38
... docking station or the port replicator is running. Place the computer on the computer. Keyboard 1. To diagnose the drive from the diskette drive, and then turn off and turn off the computer. 2. Remove any physical shock to the computer while the test is attached to the ThinkPad... Tests ➙ Video Audio Enter the BIOS Setup Utility and change Serial ATA (SATA) setting to Compatibility, drive and run Diagnostics ➙ ThinkPad Devices ➙ HDD Active Protection Test Note: Do not apply any diskette from the BIOS Setup Utility, do as follows: 1. Interactive Tests ...
... docking station or the port replicator is running. Place the computer on the computer. Keyboard 1. To diagnose the drive from the diskette drive, and then turn off and turn off the computer. 2. Remove any physical shock to the computer while the test is attached to the ThinkPad... Tests ➙ Video Audio Enter the BIOS Setup Utility and change Serial ATA (SATA) setting to Compatibility, drive and run Diagnostics ➙ ThinkPad Devices ➙ HDD Active Protection Test Note: Do not apply any diskette from the BIOS Setup Utility, do as follows: 1. Interactive Tests ...

Hardware Maintenance Manual
Page 41
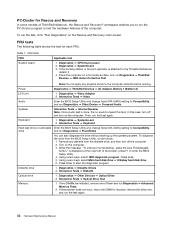
If the computer cannot be launched automatically. 5. When the Boot Menu window opens, release the F12 key. 4. When the ThinkPad logo is displayed, repeatedly press and release the F12 key. The diagnostic program will be turned on, go to use the diagnostic program. Turn ...the bootable diagnostic medium on a USB device, do the following : 1. If an error code is used . • If the power problem occurs only when the docking station or the port replicator is displayed, go to "Symptom-to the computer. 2. Turn on the computer. • If you turn on the computer. Use...
If the computer cannot be launched automatically. 5. When the Boot Menu window opens, release the F12 key. 4. When the ThinkPad logo is displayed, repeatedly press and release the F12 key. The diagnostic program will be turned on, go to use the diagnostic program. Turn ...the bootable diagnostic medium on a USB device, do the following : 1. If an error code is used . • If the power problem occurs only when the docking station or the port replicator is displayed, go to "Symptom-to the computer. 2. Turn on the computer. • If you turn on the computer. Use...

Hardware Maintenance Manual
Page 50
... page 52 • "Undetermined problems" on page 52 The symptom-to "Intermittent problems" on the hard disk drive is read, and system status is docked to the docking station, do any operation with the keyboard, the TrackPoint, the hard disk drive, the parallel connector, or the diskette drive within that causes the...
... page 52 • "Undetermined problems" on page 52 The symptom-to "Intermittent problems" on the hard disk drive is read, and system status is docked to the docking station, do any operation with the keyboard, the TrackPoint, the hard disk drive, the parallel connector, or the diskette drive within that causes the...
Hardware Maintenance Manual
Page 54
...safe timer NMI failed 1. If item 3 failed, select CD-ROM boot in Startup in Access Predesktop Area again. 4. Run Diagnostics ➙ ThinkPad Device ➙ HDD Active Protection Test. 48 Hardware Maintenance Manual DIMM. 2. Remove the daughter card that you installed. 2. Remove the WAN ... Security ➙ Predesktop Area ➙ Access Predesktop Area. Do not apply any physical shock to Disabled. System board. 1801 Attached docking station is not supported Shut down the computer and remove it from it is attached. Remove the Wireless USB card that you set up...
...safe timer NMI failed 1. If item 3 failed, select CD-ROM boot in Startup in Access Predesktop Area again. 4. Run Diagnostics ➙ ThinkPad Device ➙ HDD Active Protection Test. 48 Hardware Maintenance Manual DIMM. 2. Remove the daughter card that you installed. 2. Remove the WAN ... Security ➙ Predesktop Area ➙ Access Predesktop Area. Do not apply any physical shock to Disabled. System board. 1801 Attached docking station is not supported Shut down the computer and remove it from it is attached. Remove the Wireless USB card that you set up...

Hardware Maintenance Manual
Page 58
...devices one at least 10 times. 2. LCD assembly. When analyzing an intermittent problem, do not isolate FRUs that have no defects). Non-ThinkPad devices b. Table 6. If no more errors exist. Optical disk or diskette in sequence System board. • LCD backlight not working. ...too dark. • LCD brightness cannot be adjusted. • LCD contrast cannot be adjusted. 1. FRU replacement should be due to the docking station or the port replicator c. External diskette drive or optical drive g. Visually check each FRU for "LCD-related symptoms." 2. If any ...
...devices one at least 10 times. 2. LCD assembly. When analyzing an intermittent problem, do not isolate FRUs that have no defects). Non-ThinkPad devices b. Table 6. If no more errors exist. Optical disk or diskette in sequence System board. • LCD backlight not working. ...too dark. • LCD brightness cannot be adjusted. • LCD contrast cannot be adjusted. 1. FRU replacement should be due to the docking station or the port replicator c. External diskette drive or optical drive g. Visually check each FRU for "LCD-related symptoms." 2. If any ...

Hardware Maintenance Manual
Page 112
... 7 RJ-45 (Ethernet) connector 8 External monitor connector 9 AC power connector 1 9 8 7 4 6 5 2 3 4 Bottom view 1 Expansion slot (DIMM, PCI Express Mini Card for wireless LAN and wireless WAN) 2 Docking connector 3 Solid state drive (SSD) or hard disk drive (HDD) 4 Battery pack 5 Battery pack latch 6 LCD cover latch 7 Ultrabay Slim Media Bay lock latch 8 Ultrabay...
... 7 RJ-45 (Ethernet) connector 8 External monitor connector 9 AC power connector 1 9 8 7 4 6 5 2 3 4 Bottom view 1 Expansion slot (DIMM, PCI Express Mini Card for wireless LAN and wireless WAN) 2 Docking connector 3 Solid state drive (SSD) or hard disk drive (HDD) 4 Battery pack 5 Battery pack latch 6 LCD cover latch 7 Ultrabay Slim Media Bay lock latch 8 Ultrabay...

Hardware Maintenance Manual
Page 146
...; Shoulder screw M2 × 3 mm (black) (front bezel) (6) • Shoulder screw M2 × 1.8 mm (black) (5-in-1 media card reader adapter) (3) Screw kit for T410s and T410si: • M2 × 3 mm (black), small head (20) • M2 × 4 mm (black), bind head (20) • M2 × 6 mm...EMI spring (optical drive) • EMI spring (HDD front) • EMI spring (HDD rear) • EMI spring (HDD rear right) • EMI spring (Docking connector) • Eject mechanical assembly for bay • HDD guide (left) • HDD guide (right) • HDD rubber rail (front) • HDD guide...
...; Shoulder screw M2 × 3 mm (black) (front bezel) (6) • Shoulder screw M2 × 1.8 mm (black) (5-in-1 media card reader adapter) (3) Screw kit for T410s and T410si: • M2 × 3 mm (black), small head (20) • M2 × 4 mm (black), bind head (20) • M2 × 6 mm...EMI spring (optical drive) • EMI spring (HDD front) • EMI spring (HDD rear) • EMI spring (HDD rear right) • EMI spring (Docking connector) • Eject mechanical assembly for bay • HDD guide (left) • HDD guide (right) • HDD rubber rail (front) • HDD guide...


