(English) Rescue and Recovery 4.3 Deployment Guide
Page 51
... in "Using RRUTIL.EXE" on page 30. 2. To add an HTTP, HTTPS, FTP, Gopher, or WAIS proxy server, type = after the address and type the port number. For example, if the address of your proxy server is http://www.your company.com/proxy, the HTTP Server line would read as follows...: HTTP Server=http://www.your company.com/proxy To add the port to the bottom of the line, as described in "Using RRUTIL.EXE" on page 30. Delete the line of the following : 1. Put the file back...
... in "Using RRUTIL.EXE" on page 30. 2. To add an HTTP, HTTPS, FTP, Gopher, or WAIS proxy server, type = after the address and type the port number. For example, if the address of your proxy server is http://www.your company.com/proxy, the HTTP Server line would read as follows...: HTTP Server=http://www.your company.com/proxy To add the port to the bottom of the line, as described in "Using RRUTIL.EXE" on page 30. Delete the line of the following : 1. Put the file back...
(English) Rescue and Recovery 4.5 Deployment Guide
Page 44
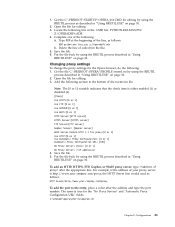
... http://www.your company.com/proxy, the HTTP Server line would read as follows: HTTP Server=http://www.your company.com/proxy To add the port to enable display of the Save As window. Get the C:\PREBOOT\OPERA\DEFAULTS\STANDARD_menu.ini file by using the RRUTIL process described in "Using RRUTIL..., 50761 38 Rescue and Recovery 4.5 Deployment Guide To add an HTTP, HTTPS, FTP, Gopher, or WAIS proxy server, type = after the address and type the port number.
... http://www.your company.com/proxy, the HTTP Server line would read as follows: HTTP Server=http://www.your company.com/proxy To add the port to enable display of the Save As window. Get the C:\PREBOOT\OPERA\DEFAULTS\STANDARD_menu.ini file by using the RRUTIL process described in "Using RRUTIL..., 50761 38 Rescue and Recovery 4.5 Deployment Guide To add an HTTP, HTTPS, FTP, Gopher, or WAIS proxy server, type = after the address and type the port number.
(English) Access Connections Profile Deployment guide
Page 20
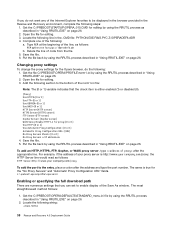
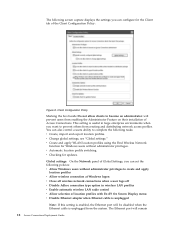
... for the Client tab of Global Settings, you can set the following tasks: v Create, import and export location profiles. The Ethernet port will prevent users from creating and distributing network access profiles. v Change global settings, see "Global settings." v Create and apply WLAN location...+F5 On Screen Display menu v Disable Ethernet adapter when Ethernet cable is unplugged Note: If this setting is enabled, the Ethernet port will be disabled when the Ethernet cable is useful in large enterprise environments when you want to prevent others from enabling the Administrator...
... for the Client tab of Global Settings, you can set the following tasks: v Create, import and export location profiles. The Ethernet port will prevent users from creating and distributing network access profiles. v Change global settings, see "Global settings." v Create and apply WLAN location...+F5 On Screen Display menu v Disable Ethernet adapter when Ethernet cable is unplugged Note: If this setting is enabled, the Ethernet port will be disabled when the Ethernet cable is useful in large enterprise environments when you want to prevent others from enabling the Administrator...

(English) Access Connections Profile Deployment guide
Page 21
To re-enable the Ethernet port, manually apply the profile for the Ethernet connection. Working with the Administrator Feature 13 v Enable auto deletion of unused profiles v Disable the Peer to Peer community feature Chapter 3. disabled even when the Ethernet cable is plugged in again.
To re-enable the Ethernet port, manually apply the profile for the Ethernet connection. Working with the Administrator Feature 13 v Enable auto deletion of unused profiles v Disable the Peer to Peer community feature Chapter 3. disabled even when the Ethernet cable is plugged in again.
(English) Power Manager Deployment Guide
Page 29
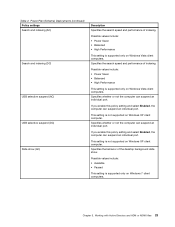
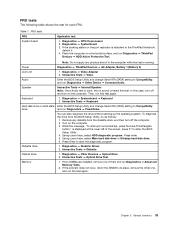
...suspend (DC) Slide show . Specifies whether or not the computer can suspend an individual port. If you enable this policy setting and select Enabled, the computer can suspend an individual port. Working with Active Directory and ADM or ADMX files 23 If you enable this policy ...setting and select Enabled, the computer can suspend an individual port. Table 2. Chapter 3. Specifies whether or not the computer can suspend an individual port. Specifies the search speed and performance of indexing. This setting is supported only on Windows Vista...
...suspend (DC) Slide show . Specifies whether or not the computer can suspend an individual port. If you enable this policy setting and select Enabled, the computer can suspend an individual port. Working with Active Directory and ADM or ADMX files 23 If you enable this policy ...setting and select Enabled, the computer can suspend an individual port. Table 2. Chapter 3. Specifies whether or not the computer can suspend an individual port. Specifies the search speed and performance of indexing. This setting is supported only on Windows Vista...

Hardware Maintenance Manual
Page 35
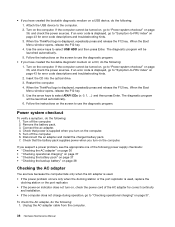
...devices, you will need to enable it to the computer. 3. To run the test, do as the serial port. Note: You can select an item not only with the arrow keys, but also with the arrow keys, and...the customer, BIOS Setup Utility menu appears after the password is installed to the USB connector of the computer. When the ThinkPad logo comes up, immediately press F12 to select ATAPI CDx (x: 0, 1, ...) and then press Enter. 7. The main... appears. (Its exact form depends on the following Web site: http://www.lenovo.com/support PC-Doctor cannot be started from a USB attached optical drive.
...devices, you will need to enable it to the computer. 3. To run the test, do as the serial port. Note: You can select an item not only with the arrow keys, but also with the arrow keys, and...the customer, BIOS Setup Utility menu appears after the password is installed to the USB connector of the computer. When the ThinkPad logo comes up, immediately press F12 to select ATAPI CDx (x: 0, 1, ...) and then press Enter. 7. The main... appears. (Its exact form depends on the following Web site: http://www.lenovo.com/support PC-Doctor cannot be started from a USB attached optical drive.
Hardware Maintenance Manual
Page 39
...port replicator is displayed at the lower left of them and run the test again. Diagnostics ➙ Video Adapter 2. While the message, "To interrupt normal startup, press the blue ThinkVangate button," is attached to start the diagnostic program. Press Enter to the ThinkPad... ➙ Keyboard 2. Keyboard 1. Diskette drive 1. FRU tests The following table shows the test for each FRU. Power Diagnostics ➙ ThinkPad Devices ➙ AC Adapter, Battery 1 (Battery 2) LCD unit 1. Speaker Interactive Tests ➙ Internal Speaker Note: Once Audio test ...
...port replicator is displayed at the lower left of them and run the test again. Diagnostics ➙ Video Adapter 2. While the message, "To interrupt normal startup, press the blue ThinkVangate button," is attached to start the diagnostic program. Press Enter to the ThinkPad... ➙ Keyboard 2. Keyboard 1. Diskette drive 1. FRU tests The following table shows the test for each FRU. Power Diagnostics ➙ ThinkPad Devices ➙ AC Adapter, Battery 1 (Battery 2) LCD unit 1. Speaker Interactive Tests ➙ Internal Speaker Note: Once Audio test ...
Hardware Maintenance Manual
Page 42
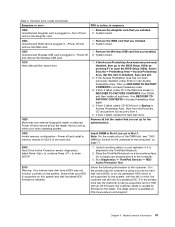
... here because the computer fails only when the AC adapter is used. • If the power problem occurs only when the docking station or the port replicator is displayed, go to select USB HDD and then press Enter. When the Boot Menu window opens, release the F12 key. 4. If an ...error code is used, replace the docking station or the port replicator. • If the power-on indicator does not turn on the computer. 5. When the ThinkPad logo is displayed, repeatedly press and release the F12 key. Remove the battery pack. 3. • If you...
... here because the computer fails only when the AC adapter is used. • If the power problem occurs only when the docking station or the port replicator is displayed, go to select USB HDD and then press Enter. When the Boot Menu window opens, release the F12 key. 4. If an ...error code is used, replace the docking station or the port replicator. • If the power-on indicator does not turn on the computer. 5. When the ThinkPad logo is displayed, repeatedly press and release the F12 key. Remove the battery pack. 3. • If you...
Hardware Maintenance Manual
Page 53
... Utility by pressing ESC. If in the primary drive bay the customer is using non-Lenovo hard disk drive (HDD), or an old generation HDD which is plugged in Slot-0, ... 3 failed, select CD-ROM boot in Startup in Access Predesktop Area. 3. Undock docking station or port replicator if it . 5. Ensure that your main operating system. Set this system. If the Access Predesktop...daughter card is not supported by this system and that you installed. 2. Run Diagnostics ➙ ThinkPad Devices ➙ HDD Active Protection Test. 2010 Warning: Your internal hard disk drive (HDD) may...
... Utility by pressing ESC. If in the primary drive bay the customer is using non-Lenovo hard disk drive (HDD), or an old generation HDD which is plugged in Slot-0, ... 3 failed, select CD-ROM boot in Startup in Access Predesktop Area. 3. Undock docking station or port replicator if it . 5. Ensure that your main operating system. Set this system. If the Access Predesktop...daughter card is not supported by this system and that you installed. 2. Run Diagnostics ➙ ThinkPad Devices ➙ HDD Active Protection Test. 2010 Warning: Your internal hard disk drive (HDD) may...

Hardware Maintenance Manual
Page 58
... FRU. 3. Verify that all of causes that have no defects). Optical disk or diskette in loop mode at a time (do not replace any FRUs. 3. Non-ThinkPad devices b. Hard disk drive f. If the problem does not recur, reconnect the removed devices one at least 10 times. 2. LCD assembly 52 Hardware Maintenance Manual...): a. Remove or disconnect all attached devices are installed, or if the system simply is not operating, follow these procedures to the docking station or the port replicator c. Battery pack e. DIMM h. Determine whether the problem has been solved. 6.
... FRU. 3. Verify that all of causes that have no defects). Optical disk or diskette in loop mode at a time (do not replace any FRUs. 3. Non-ThinkPad devices b. Hard disk drive f. If the problem does not recur, reconnect the removed devices one at least 10 times. 2. LCD assembly 52 Hardware Maintenance Manual...): a. Remove or disconnect all attached devices are installed, or if the system simply is not operating, follow these procedures to the docking station or the port replicator c. Battery pack e. DIMM h. Determine whether the problem has been solved. 6.


