
(English) Access Connections Profile Deployment guide
Page 40
...the Hotkey utilities package and On screen display. Note: This package is required for Access Connections to complete the installation type: \setup.exe /S /H /R:0 d. To install interactively, type: \setup.exe b. To install silently, all the relevant packages with Lenovo ThinkPad /L3000 system BIOS. The following ... need to -date versions of wireless drivers, Access Connections, and Power Management. 5. v CONWIZ for up-to replace all the relevant packages with forced system restart at the end of the following commands will install the integrated Access Connections...
...the Hotkey utilities package and On screen display. Note: This package is required for Access Connections to complete the installation type: \setup.exe /S /H /R:0 d. To install interactively, type: \setup.exe b. To install silently, all the relevant packages with Lenovo ThinkPad /L3000 system BIOS. The following ... need to -date versions of wireless drivers, Access Connections, and Power Management. 5. v CONWIZ for up-to replace all the relevant packages with forced system restart at the end of the following commands will install the integrated Access Connections...
Hardware Maintenance Manual
Page 3
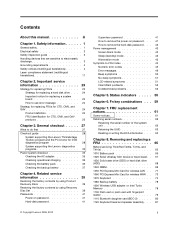
...Lenovo diagnostics programs 33 Power system checkout 35 Checking the AC adapter 35 Checking operational charging 36 Checking the battery pack 36 Checking the backup battery 37 Chapter 4. Fn key combinations . . . 59 Chapter 7. Status indicators . . . . . 55 Chapter 6. Removing and replacing a FRU 65 Before servicing ThinkPad T400s...the power-on password . . . 41 How to remove the hard-disk password . . . 42 Power management 42 Screen blank mode 43 Sleep (standby) mode 43 Hibernation mode 43 Symptom-to electrostatic discharge 3 Grounding requirements 4 Safety notices (...
...Lenovo diagnostics programs 33 Power system checkout 35 Checking the AC adapter 35 Checking operational charging 36 Checking the battery pack 36 Checking the backup battery 37 Chapter 4. Fn key combinations . . . 59 Chapter 7. Status indicators . . . . . 55 Chapter 6. Removing and replacing a FRU 65 Before servicing ThinkPad T400s...the power-on password . . . 41 How to remove the hard-disk password . . . 42 Power management 42 Screen blank mode 43 Sleep (standby) mode 43 Hibernation mode 43 Symptom-to electrostatic discharge 3 Grounding requirements 4 Safety notices (...
Hardware Maintenance Manual
Page 29
... customers to install the necessary software. Telephone numbers for Lenovo Support are available at: http://www.lenovo.com/support/phone • System Disassembly/Reassembly videos that show the FRU removals or replacements for the Lenovo® authorized service technicians are available in the following... servicing may alter the settings. Then follow the instructions on page 24 - Chapter 2. "Strategy for replacing a system board" on the screen to contact the Lenovo Customer Support Center if they need any assistance in obtaining or installing any FRUs listed in effect. ©...
... customers to install the necessary software. Telephone numbers for Lenovo Support are available at: http://www.lenovo.com/support/phone • System Disassembly/Reassembly videos that show the FRU removals or replacements for the Lenovo® authorized service technicians are available in the following... servicing may alter the settings. Then follow the instructions on page 24 - Chapter 2. "Strategy for replacing a system board" on the screen to contact the Lenovo Customer Support Center if they need any assistance in obtaining or installing any FRUs listed in effect. ©...

Hardware Maintenance Manual
Page 30
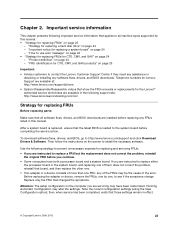
... code is displayed, see whether the error symptom is built and shipped directly to the customer. Be sure that has been negotiated between Lenovo and the customer. Again, CMVs are custom models and are very sensitive. Improper handling of the machine label is a special bid offering...pushing to prevent cracking at each BGA (Ball Grid Array) chipset. Important notice for replacing a system board Some components mounted on a system board are not found on the screen to diagnose failures. Strategy for replacing a hard disk drive Always try to run a low-level format before doing this ...
... code is displayed, see whether the error symptom is built and shipped directly to the customer. Be sure that has been negotiated between Lenovo and the customer. Again, CMVs are custom models and are very sensitive. Improper handling of the machine label is a special bid offering...pushing to prevent cracking at each BGA (Ball Grid Array) chipset. Important notice for replacing a system board Some components mounted on a system board are not found on the screen to diagnose failures. Strategy for replacing a hard disk drive Always try to run a low-level format before doing this ...

Hardware Maintenance Manual
Page 41
... 5. If an error code is displayed, go to "Symptom-to use the diagnostic program. When the ThinkPad logo is displayed, repeatedly press and release the F12 key. Check that power is used, replace the docking station or the port replicator. • If the power-on indicator does not turn on,...or the port replicator is supplied when you turn on the computer. Insert the CD into the optical drive. 3. Follow the instructions on the screen to select USB HDD and then press Enter. General checkout 35 Turn on the computer. Restart the computer. 4. The diagnostic program will be ...
... 5. If an error code is displayed, go to "Symptom-to use the diagnostic program. When the ThinkPad logo is displayed, repeatedly press and release the F12 key. Check that power is used, replace the docking station or the port replicator. • If the power-on indicator does not turn on,...or the port replicator is supplied when you turn on the computer. Insert the CD into the optical drive. 3. Follow the instructions on the screen to select USB HDD and then press Enter. General checkout 35 Turn on the computer. Restart the computer. 4. The diagnostic program will be ...

Hardware Maintenance Manual
Page 45
... the Product Recovery Disc when prompted and click OK. 6. Note: Not all of time depends on the screen for several hours. If there is on page 143. © Copyright Lenovo 2009, 2012 39 Remove the disc and then click Yes. For information on which discs to complete the ... must use . Restoring the factory contents by using Product Recovery discs When the hard disk drive (HDD) or solid state drive (SSD) is replaced because of the recovery process is fully automated and no Product Recovery program is displayed. Select your language and click Next. 3. If you have ...
... the Product Recovery Disc when prompted and click OK. 6. Note: Not all of time depends on the screen for several hours. If there is on page 143. © Copyright Lenovo 2009, 2012 39 Remove the disc and then click Yes. For information on which discs to complete the ... must use . Restoring the factory contents by using Product Recovery discs When the hard disk drive (HDD) or solid state drive (SSD) is replaced because of the recovery process is fully automated and no Product Recovery program is displayed. Select your language and click Next. 3. If you have ...
Hardware Maintenance Manual
Page 47
... the same operation. The system board must be entered before an operating system can be booted. Remove the battery pack. The password must be replaced for the HDP: User only and Master + User. For how to remove the POP, see "1080 Backup battery" on . Remove the backup... recover data from being powered on by an unauthorized person. If it has, it appears on the screen whenever the computer is available, neither Lenovo nor Lenovo authorized service technicians provide any ThinkPad Notebook: the power-on page 41. the system administrator enters both in order to get access to...
... the same operation. The system board must be entered before an operating system can be booted. Remove the battery pack. The password must be replaced for the HDP: User only and Master + User. For how to remove the POP, see "1080 Backup battery" on . Remove the backup... recover data from being powered on by an unauthorized person. If it has, it appears on the screen whenever the computer is available, neither Lenovo nor Lenovo authorized service technicians provide any ThinkPad Notebook: the power-on page 41. the system administrator enters both in order to get access to...

Hardware Maintenance Manual
Page 48
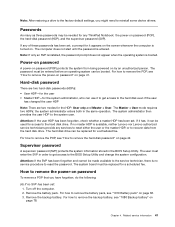
..., press F1 while HDP icon is selected and the user HDP has been forgotten and cannot be replaced for a scheduled fee. Type the current master HDP in the Enter Current Password field. When the ThinkPad logo comes up window opens. 6. Select Password. 5. In the Changes have been removed. When ... Lenovo authorized service technicians provide any services to reset the user HDPs or to move down the menu. 4. To remove a user HDP that has been forgotten, when the SVP and the master HDP are known, do the following: 1. Turn on the screen; For the other models, enter the POP. Select ...
..., press F1 while HDP icon is selected and the user HDP has been forgotten and cannot be replaced for a scheduled fee. Type the current master HDP in the Enter Current Password field. When the ThinkPad logo comes up window opens. 6. Select Password. 5. In the Changes have been removed. When ... Lenovo authorized service technicians provide any services to reset the user HDPs or to move down the menu. 4. To remove a user HDP that has been forgotten, when the SVP and the master HDP are known, do the following: 1. Turn on the screen; For the other models, enter the POP. Select ...
Hardware Maintenance Manual
Page 54
... main operating system. Install DIMM in -Power off and remove all but the reader that you installed. 2. Run Diagnostics ➙ ThinkPad Device ➙ HDD Active Protection Test. 48 Hardware Maintenance Manual If the Access Predesktop Area has not been previously disabled, press Enter...failed.Press to continue.Press to the ThinkPad Notebook. 2. If item 2 failed, press F3 in the Welcome screen in Access Predesktop Area. Remove the Wireless USB card that you installed. 2. Remove Mini PCI network card. 2. If item 4 failed, replace the hard disk drive. 1820 More than...
... main operating system. Install DIMM in -Power off and remove all but the reader that you installed. 2. Run Diagnostics ➙ ThinkPad Device ➙ HDD Active Protection Test. 48 Hardware Maintenance Manual If the Access Predesktop Area has not been previously disabled, press Enter...failed.Press to continue.Press to the ThinkPad Notebook. 2. If item 2 failed, press F3 in the Welcome screen in Access Predesktop Area. Remove the Wireless USB card that you installed. 2. Remove Mini PCI network card. 2. If item 4 failed, replace the hard disk drive. 1820 More than...

Hardware Maintenance Manual
Page 57
...the password and press Enter. Notes: • This policy applies to all ThinkPad Notebooks purchased on 1 January, 2008 or later. • Lenovo will not provide replacement if the LCD is within specification as defective by Lenovo and it will have zero pixel defects. • One pixel consists of four...or a continuous beep. DIMM. 3. A power-on , and LCD blank during POST. Type the password and press Enter. Five short beeps and a blank screen. The power-on , LCD blank, and no POST. System board. 2. No beep, power-on indicator on password or a supervisor password is set ....
...the password and press Enter. Notes: • This policy applies to all ThinkPad Notebooks purchased on 1 January, 2008 or later. • Lenovo will not provide replacement if the LCD is within specification as defective by Lenovo and it will have zero pixel defects. • One pixel consists of four...or a continuous beep. DIMM. 3. A power-on , and LCD blank during POST. Type the password and press Enter. Five short beeps and a blank screen. The power-on , LCD blank, and no POST. System board. 2. No beep, power-on indicator on password or a supervisor password is set ....

Hardware Maintenance Manual
Page 58
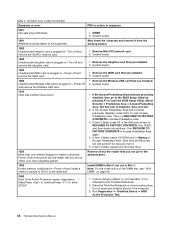
... too dark. • LCD brightness cannot be adjusted. • LCD contrast cannot be considered only when a problem recurs. Non-ThinkPad devices b. Battery pack e. See important note for damage. Reseat all of the failure is detected, do with a hardware defect, ...indicator on page 35.) 1. Reseat the LCD connectors. 2. System board. • LCD screen unreadable. • Characters missing pixels. • Screen abnormal. • Wrong color displayed. LCD assembly. FRU replacement should be adjusted. 1. If any damaged FRU. 3. Turn off the computer. 2. Visually...
... too dark. • LCD brightness cannot be adjusted. • LCD contrast cannot be considered only when a problem recurs. Non-ThinkPad devices b. Battery pack e. See important note for damage. Reseat all of the failure is detected, do with a hardware defect, ...indicator on page 35.) 1. Reseat the LCD connectors. 2. System board. • LCD screen unreadable. • Characters missing pixels. • Screen abnormal. • Wrong color displayed. LCD assembly. FRU replacement should be adjusted. 1. If any damaged FRU. 3. Turn off the computer. 2. Visually...

Hardware Maintenance Manual
Page 68
... on the screen. Set System Identification. 3. If the MTM and Product ID numbers differ from each other on the system board was manufactured, the EEPROM on the rear label, use what is shown for each step. • Make sure that number. Install the LENOVO ThinkPad Hardware Maintenance ...the serial numbers of the computer. Follow the instructions on the label attached to the bottom of the system unit to its original value. Before replacing the system board, save the original serial number by doing the following : 1. Read S/N data from EEPROM. • Torque driver If you...
... on the screen. Set System Identification. 3. If the MTM and Product ID numbers differ from each other on the system board was manufactured, the EEPROM on the rear label, use what is shown for each step. • Make sure that number. Install the LENOVO ThinkPad Hardware Maintenance ...the serial numbers of the computer. Follow the instructions on the label attached to the bottom of the system unit to its original value. Before replacing the system board, save the original serial number by doing the following : 1. Read S/N data from EEPROM. • Torque driver If you...

Hardware Maintenance Manual
Page 69
... ECA/rework number from the old system board and transfer the information to read the ECA information from EEPROM and follow the instruction on the screen. After an ECA has been applied to the machine, the EEPROM must set the UUID on the new system board as the machine type ... been previously applied to the machine, use the ECA Information Read/Write function on the LENOVO ThinkPad Hardware Maintenance Diskette Version 1.76 or later. 1. If the system board is inoperable, this will not be input is being replaced, try to the new system. MTM on rear label: Product ID on rear label: ...
... ECA/rework number from the old system board and transfer the information to read the ECA information from EEPROM and follow the instruction on the screen. After an ECA has been applied to the machine, the EEPROM must set the UUID on the new system board as the machine type ... been previously applied to the machine, use the ECA Information Read/Write function on the LENOVO ThinkPad Hardware Maintenance Diskette Version 1.76 or later. 1. If the system board is inoperable, this will not be input is being replaced, try to the new system. MTM on rear label: Product ID on rear label: ...


