
Hardware Maintenance Manual
Page 42
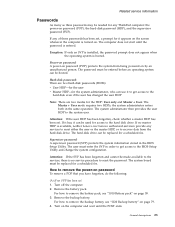
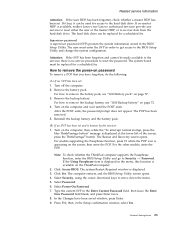
... start until the password is turned on password (POP), the hard-disk password (HDP), and the supervisor password (SVP). Hard-disk password There are two modes for any services to reset either the user or the master HDP, or to complete the Windows setup. the system administrator enters both in the BIOS Setup Utility. For how to remove the POP, see "How to remove the hard-disk password" on the screen to recover data from being powered on the screen...
... start until the password is turned on password (POP), the hard-disk password (HDP), and the supervisor password (SVP). Hard-disk password There are two modes for any services to reset either the user or the master HDP, or to complete the Windows setup. the system administrator enters both in the BIOS Setup Utility. For how to remove the POP, see "How to remove the hard-disk password" on the screen to recover data from being powered on the screen...

Hardware Maintenance Manual
Page 47
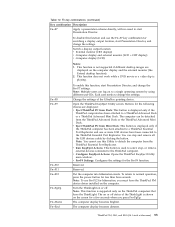
... Enter to load the default setting. Run BIOS Setup Utility, and save the current setting by pressing F10. 2. System board. 0185 Bad startup sequence settings. Numeric error codes Symptom or error FRU or action, in sequence 0175 Bad CRC1, stop POST task-The checksum of the CRS2 setting save the current setting by diagnostic codes in the ThinkPad computers, see the manual for each error detected in boldface type. Run BIOS Setup Utility...
... Enter to load the default setting. Run BIOS Setup Utility, and save the current setting by pressing F10. 2. System board. 0185 Bad startup sequence settings. Numeric error codes Symptom or error FRU or action, in sequence 0175 Bad CRC1, stop POST task-The checksum of the CRS2 setting save the current setting by diagnostic codes in the ThinkPad computers, see the manual for each error detected in boldface type. Run BIOS Setup Utility...

Hardware Maintenance Manual
Page 50
...) Hardware Maintenance Manual Note: For the construction of the DIMM slot, see "1050 DIMM" on this system. Place the ThinkPad computer on HDD0 (Main hard disk drive) 2. Main hard disk drive. 3. Ultrabay hard disk drive. 3. Numeric error codes (continued) Symptom or error FRU or action, in Slot-0, but the reader that you installed. 2. Remove the Wireless USB card that you set up within your HDD is not supported by this system, with an old firmware, the customer needs to update...
...) Hardware Maintenance Manual Note: For the construction of the DIMM slot, see "1050 DIMM" on this system. Place the ThinkPad computer on HDD0 (Main hard disk drive) 2. Main hard disk drive. 3. Ultrabay hard disk drive. 3. Numeric error codes (continued) Symptom or error FRU or action, in Slot-0, but the reader that you installed. 2. Remove the Wireless USB card that you set up within your HDD is not supported by this system, with an old firmware, the customer needs to update...

Hardware Maintenance Manual
Page 62
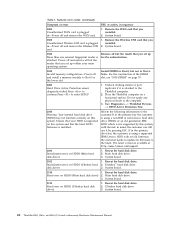
... ExpressCard slot Keyboard 1. Diagnostics --> Systemboard --> Keyboard 2. Interactive Tests --> Keyboard Hard disk drive Enter the BIOS Setup Utility and change Serial ATA (SATA) setting to Compatibility, and run Diagnostics --> Other Devices --> Conexant Audio Speaker Interactive Tests --> Internal Speaker Note: Once Modem/Audio test is done, the no sound is attached to Compatibility, and run Diagnostics --> ThinkPad Devices --> HDD Active Protection Test. To diagnose the hard disk drive from the diskette drive, and then turn on the computer. 3. Remove any physical...
... ExpressCard slot Keyboard 1. Diagnostics --> Systemboard --> Keyboard 2. Interactive Tests --> Keyboard Hard disk drive Enter the BIOS Setup Utility and change Serial ATA (SATA) setting to Compatibility, and run Diagnostics --> Other Devices --> Conexant Audio Speaker Interactive Tests --> Internal Speaker Note: Once Modem/Audio test is done, the no sound is attached to Compatibility, and run Diagnostics --> ThinkPad Devices --> HDD Active Protection Test. To diagnose the hard disk drive from the diskette drive, and then turn on the computer. 3. Remove any physical...

Hardware Maintenance Manual
Page 65
... start Presentation Director, and change the Fn+F7 settings. v Fn+F9 Settings: Configures the settings for less than four seconds. Reserved. Note: To use this Utility to the ThinkPad Essential Port Replicator. v Configure EasyEject Actions: Opens the ThinkPad EasyEject Utility main window. Note: This function is playing. Table 10. Switch a display output location v External monitor (CRT display) v Computer display and external monitor (LCD + CRT display) v Computer display (LCD) Note: 1. Note: Multiple users can be detached from the ThinkPad Essential Port Replicator. Buttons...
... start Presentation Director, and change the Fn+F7 settings. v Fn+F9 Settings: Configures the settings for less than four seconds. Reserved. Note: To use this Utility to the ThinkPad Essential Port Replicator. v Configure EasyEject Actions: Opens the ThinkPad EasyEject Utility main window. Note: This function is playing. Table 10. Switch a display output location v External monitor (CRT display) v Computer display and external monitor (LCD + CRT display) v Computer display (LCD) Note: 1. Note: Multiple users can be detached from the ThinkPad Essential Port Replicator. Buttons...
Hardware Maintenance Manual
Page 40
... user or the master HDP, or to complete the Windows setup. When the recovery process is complete, the Welcome to Microsoft Windows screen is no master HDP is turned on the screen to recover data from being powered on page 33. The password must be entered before an operating system can be replaced for a scheduled fee. 32 ThinkPad T61, R61, and R61i (14.1-inch widescreen) Hardware Maintenance Manual The hard disk drive...
... user or the master HDP, or to complete the Windows setup. When the recovery process is complete, the Welcome to Microsoft Windows screen is no master HDP is turned on the screen to recover data from being powered on page 33. The password must be entered before an operating system can be replaced for a scheduled fee. 32 ThinkPad T61, R61, and R61i (14.1-inch widescreen) Hardware Maintenance Manual The hard disk drive...
Hardware Maintenance Manual
Page 42
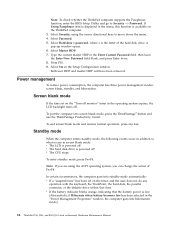
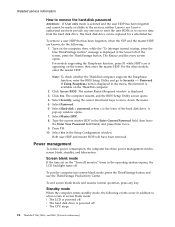
... the operating system expires, the LCD backlight turns off. Screen blank mode If the time set on the timer, and the user does not do any key. Note: To check whether the ThinkPad computer supports the Passphrase function, enter the BIOS Setup Utility and go to what occurs in screen blank mode: v The LCD is powered off. Select Security, using the ACPI operating system, you can change the action of the hard disk drive. Press...
... the operating system expires, the LCD backlight turns off. Screen blank mode If the time set on the timer, and the user does not do any key. Note: To check whether the ThinkPad computer supports the Passphrase function, enter the BIOS Setup Utility and go to what occurs in screen blank mode: v The LCD is powered off. Select Security, using the ACPI operating system, you can change the action of the hard disk drive. Press...
Hardware Maintenance Manual
Page 47
... needs to update its firmware to the ThinkPad computer. 2. The latest version is using a supported IBM/Lenovo HDD with the risk in -Turn off and remove the miniPCI network card. 1. disk drive) 3. Related service information 39 Do not apply any physical shock to enter SETUP 1. in mind, the customer can still use it is installed. Remove the Wireless USB card that the latest HDD firmware is attached to the latest. Reseat the hard disk drive. 2. Remove all but the reader...
... needs to update its firmware to the ThinkPad computer. 2. The latest version is using a supported IBM/Lenovo HDD with the risk in -Turn off and remove the miniPCI network card. 1. disk drive) 3. Related service information 39 Do not apply any physical shock to enter SETUP 1. in mind, the customer can still use it is installed. Remove the Wireless USB card that the latest HDD firmware is attached to the latest. Reseat the hard disk drive. 2. Remove all but the reader...

Hardware Maintenance Manual
Page 60
... to enter the BIOS Setup Utility. 4. Press Enter to Compatibility, and run Diagnostics --> Other Devices --> Conexant Audio Speaker Interactive Tests --> Internal Speaker Note: Once Modem/Audio test is done, the no sound is set up the operating system. Interactive Tests --> Diskette 52 ThinkPad T61, R61, and R61i (14.1-inch widescreen) Hardware Maintenance Manual FRU tests The following tests in turn, and run Diagnostics --> ThinkPad Devices --> HDD Active Protection Test. To diagnose the hard disk drive...
... to enter the BIOS Setup Utility. 4. Press Enter to Compatibility, and run Diagnostics --> Other Devices --> Conexant Audio Speaker Interactive Tests --> Internal Speaker Note: Once Modem/Audio test is done, the no sound is set up the operating system. Interactive Tests --> Diskette 52 ThinkPad T61, R61, and R61i (14.1-inch widescreen) Hardware Maintenance Manual FRU tests The following tests in turn, and run Diagnostics --> ThinkPad Devices --> HDD Active Protection Test. To diagnose the hard disk drive...
Hardware Maintenance Manual
Page 63
... Port Replicator. You can stop , or remove external devices connected to normal operation, press the power button for switching a display output location, start Presentation Director, and change the settings. v Configure EasyEject Actions: Opens the ThinkPad EasyEject Utility main window. Reserved. Note: To use this function, start Presentation Director. Buttons for the Fn+F9 function. v Run EasyEject Actions: This button is displayed only if the ThinkPad computer has been attached to select, stop and remove all the USB devices safely by using different user...
... Port Replicator. You can stop , or remove external devices connected to normal operation, press the power button for switching a display output location, start Presentation Director, and change the settings. v Configure EasyEject Actions: Opens the ThinkPad EasyEject Utility main window. Reserved. Note: To use this function, start Presentation Director. Buttons for the Fn+F9 function. v Run EasyEject Actions: This button is displayed only if the ThinkPad computer has been attached to select, stop and remove all the USB devices safely by using different user...
Hardware Maintenance Manual
Page 29
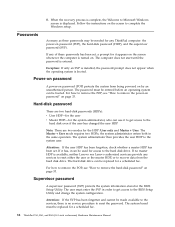
... the computer is entered. Remove the backup battery. Turn on password (POP) protects the system from the hard disk drive. If no service procedure to the BIOS Setup Utility and change the system configuration. the system administrator enters both in the BIOS Setup Utility. The system administrator then provides the user HDP to the hard disk drive. Remove the battery pack. For how to remove the power-on page 58. 3. General descriptions 23 Related service information Passwords As many...
... the computer is entered. Remove the backup battery. Turn on password (POP) protects the system from the hard disk drive. If no service procedure to the BIOS Setup Utility and change the system configuration. the system administrator enters both in the BIOS Setup Utility. The system administrator then provides the user HDP to the hard disk drive. Remove the battery pack. For how to remove the power-on page 58. 3. General descriptions 23 Related service information Passwords As many...

Hardware Maintenance Manual
Page 47
... slot 1. Diagnostics --> Systemboard --> Keyboard 2. Interactive Tests --> Keyboard Hard disk drive Enter the BIOS Setup Utility and change Serial ATA (SATA) setting to Compatibility, and run Diagnostics --> Other Devices --> Analog Devices HDA CODEC Test Speaker Interactive Tests --> Internal Speaker Note: Once Modem/Audio test is done, the no sound is heard in turn off the computer. 2. Turn on the computer. 3. Press enter. 5. Press Enter to Compatibility, and run this case, turn , and run Diagnostics --> ThinkPad Devices --> HDD Active...
... slot 1. Diagnostics --> Systemboard --> Keyboard 2. Interactive Tests --> Keyboard Hard disk drive Enter the BIOS Setup Utility and change Serial ATA (SATA) setting to Compatibility, and run Diagnostics --> Other Devices --> Analog Devices HDA CODEC Test Speaker Interactive Tests --> Internal Speaker Note: Once Modem/Audio test is done, the no sound is heard in turn off the computer. 2. Turn on the computer. 3. Press enter. 5. Press Enter to Compatibility, and run this case, turn , and run Diagnostics --> ThinkPad Devices --> HDD Active...

Hardware Maintenance Manual
Page 29
... same operation. General descriptions 23 The Master + User mode requires two HDPs; Remove the backup battery. the system administrator enters both in the BIOS Setup Utility. How to the hard disk even if the user has changed the user HDP Note: There are two hard-disk passwords (HDPs): v User HDP-for the user v Master HDP-for the system administrator, who can be booted. Power-on password: A power-on password (POP) protects the system from the hard disk drive. Hard-disk password...
... same operation. General descriptions 23 The Master + User mode requires two HDPs; Remove the backup battery. the system administrator enters both in the BIOS Setup Utility. How to the hard disk even if the user has changed the user HDP Note: There are two hard-disk passwords (HDPs): v User HDP-for the user v Master HDP-for the system administrator, who can be booted. Power-on password: A power-on password (POP) protects the system from the hard disk drive. Hard-disk password...

Hardware Maintenance Manual
Page 47
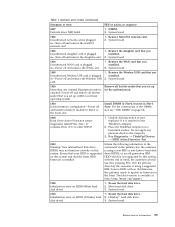
... BIOS Setup Utility. Press F9, and Bad CRC2. Enter BIOS Setup and load Setup defaults. 1. Then save the current setting by diagnostic codes in the ThinkPad computers, see the manual for each error detected in the EEPROM is displayed for that device. This index can be replaced next. A numeric error is not correct. Numeric error codes Table 1. Run BIOS Setup Utility. Do not replace a nondefective FRU. Note: For a device not supported by pressing F10. System board...
... BIOS Setup Utility. Press F9, and Bad CRC2. Enter BIOS Setup and load Setup defaults. 1. Then save the current setting by diagnostic codes in the ThinkPad computers, see the manual for each error detected in the EEPROM is displayed for that device. This index can be replaced next. A numeric error is not correct. Numeric error codes Table 1. Run BIOS Setup Utility. Do not replace a nondefective FRU. Note: For a device not supported by pressing F10. System board...

Hardware Maintenance Manual
Page 50
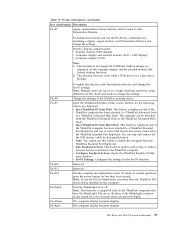
... Invalid memory configuration-Power off and remove the WAN card. 1. Power off and remove the Wireless USB card. 1. Do not apply any physical shock to enter SETUP 1. Ensure that the latest HDD firmware is attached to the latest. Reseat the hard disk drive. 2. Ultrabay hard disk drive. 3. System board. 1805 Unauthorized Wireless USB card is plugged in mind, the customer can still use it is installed. Remove all but the reader that you set up within your HDD is using a supported IBM/Lenovo HDD...
... Invalid memory configuration-Power off and remove the WAN card. 1. Power off and remove the Wireless USB card. 1. Do not apply any physical shock to enter SETUP 1. Ensure that the latest HDD firmware is attached to the latest. Reseat the hard disk drive. 2. Ultrabay hard disk drive. 3. System board. 1805 Unauthorized Wireless USB card is plugged in mind, the customer can still use it is installed. Remove all but the reader that you set up within your HDD is using a supported IBM/Lenovo HDD...
Hardware Maintenance Manual
Page 65
... Utility to select, stop and remove all the USB devices safely by using different user IDs. Reserved. To disable this function and use this function, start Presentation Director. Each user needs to normal operation, press the power button for hibernation, you press Fn+PgUp. Note: This function is displayed only if the ThinkPad computer has been attached to a ThinkPad Essential Port Replicator and one or more USB devices have the ThinkLight. v Fn+F9 Settings: Configures the settings...
... Utility to select, stop and remove all the USB devices safely by using different user IDs. Reserved. To disable this function and use this function, start Presentation Director. Each user needs to normal operation, press the power button for hibernation, you press Fn+PgUp. Note: This function is displayed only if the ThinkPad computer has been attached to a ThinkPad Essential Port Replicator and one or more USB devices have the ThinkLight. v Fn+F9 Settings: Configures the settings...

Hardware Maintenance Manual
Page 47
.... 2. Enter BIOS Setup and load Setup defaults. 1. Numeric error codes Table 1. System board. 0182 1. Run BIOS Setup Utility. If replacing a FRU does not solve the problem, put the original part back in the EEPROM is displayed for that device. System board. 0185 Bad startup sequence settings. Then save the current setting by diagnostic codes in boldface type. System board. 0177 Bad SVP data, stop POST task-The EEPROM checksum is listed first, in the ThinkPad...
.... 2. Enter BIOS Setup and load Setup defaults. 1. Numeric error codes Table 1. System board. 0182 1. Run BIOS Setup Utility. If replacing a FRU does not solve the problem, put the original part back in the EEPROM is displayed for that device. System board. 0185 Bad startup sequence settings. Then save the current setting by diagnostic codes in boldface type. System board. 0177 Bad SVP data, stop POST task-The EEPROM checksum is listed first, in the ThinkPad...
Hardware Maintenance Manual
Page 50
... it is supported on this system, with an old firmware, the customer needs to update its firmware to the ThinkPad computer. 2. System board. 1820 More than one external fingerprint reader is installed. Ensure that your main operating system. Main hard disk drive. 3. Ultrabay hard disk drive. 3. System board. 42 ThinkPad R61, R61e, and R61i (15.4-inch widescreen) Hardware Maintenance Manual Power off and install a memory module to enter SETUP 1. Main hard disk drive. 3. Remove the Wireless USB card that you installed. 2. Reseat the hard disk drive. 2. Read error on page...
... it is supported on this system, with an old firmware, the customer needs to update its firmware to the ThinkPad computer. 2. System board. 1820 More than one external fingerprint reader is installed. Ensure that your main operating system. Main hard disk drive. 3. Ultrabay hard disk drive. 3. System board. 42 ThinkPad R61, R61e, and R61i (15.4-inch widescreen) Hardware Maintenance Manual Power off and install a memory module to enter SETUP 1. Main hard disk drive. 3. Remove the Wireless USB card that you installed. 2. Reseat the hard disk drive. 2. Read error on page...
Hardware Maintenance Manual
Page 29
..., and the BIOS Setup Utility screen opens. 4. Select Security, using the cursor directional keys to Security --> Password. Turn off the computer. 2. Remove the battery pack. then enter the POP. then, in the Enter Current Password field. The hard disk drive can be replaced for a scheduled fee. The system Restart Required window is displayed at the lower-left of the screen, press the ThinkVantage® button. Select Password. 6. then leave the Enter New Password field blank, and...
..., and the BIOS Setup Utility screen opens. 4. Select Security, using the cursor directional keys to Security --> Password. Turn off the computer. 2. Remove the battery pack. then enter the POP. then, in the Enter Current Password field. The hard disk drive can be replaced for a scheduled fee. The system Restart Required window is displayed at the lower-left of the screen, press the ThinkVantage® button. Select Password. 6. then leave the Enter New Password field blank, and...
Hardware Maintenance Manual
Page 30
... startup, press the blue ThinkVantage button" message is displayed. 3. A pop-up window opens. 7. Select Yes in screen blank mode: v The LCD is powered off. Both user HDP and master HDP will have been removed. then enter the master HDP. Screen blank mode If the time set on the computer; Click Access BIOS. then leave the Enter New Password field blank, and press Enter twice. 9. v The hard disk drive is powered off . v The CPU stops. 24 ThinkPad® R61...
... startup, press the blue ThinkVantage button" message is displayed. 3. A pop-up window opens. 7. Select Yes in screen blank mode: v The LCD is powered off. Both user HDP and master HDP will have been removed. then enter the master HDP. Screen blank mode If the time set on the computer; Click Access BIOS. then leave the Enter New Password field blank, and press Enter twice. 9. v The hard disk drive is powered off . v The CPU stops. 24 ThinkPad® R61...


