Hardware Maintenance Manual
Page 3
...Hard disk password 34 Supervisor password 35 How to remove the power-on password . . . 35 © Copyright Lenovo 2012 How to remove the hard disk password . . . 35 Power management 36 Screen blank mode 36 Sleep mode 36 Hibernation mode 37 Symptom-to do first 27 Checkout guide 28... system unit 54 Retaining the UUID 55 Reading or writing the ECA information . . . 55 Chapter 9. Removing or replacing a FRU 57 General guidelines 57 Before servicing ThinkPad Edge E430 and E430c models 58 1010 Battery pack 58 1020 Large bottom cover 59 1030 Small bottom cover 60 1040 Optical drive ...
...Hard disk password 34 Supervisor password 35 How to remove the power-on password . . . 35 © Copyright Lenovo 2012 How to remove the hard disk password . . . 35 Power management 36 Screen blank mode 36 Sleep mode 36 Hibernation mode 37 Symptom-to do first 27 Checkout guide 28... system unit 54 Retaining the UUID 55 Reading or writing the ECA information . . . 55 Chapter 9. Removing or replacing a FRU 57 General guidelines 57 Before servicing ThinkPad Edge E430 and E430c models 58 1010 Battery pack 58 1020 Large bottom cover 59 1030 Small bottom cover 60 1040 Optical drive ...
Hardware Maintenance Manual
Page 29
...screen to reach the Download Drivers and Software page. 3. After a system board is loaded to http://www.lenovo.com/support. 2. Click Download Drivers & Software and then follow the instructions on page 24 - Use the following strategy to prevent unnecessary expense for "cache" function purpose only. • Advise customers to replace... disassembly and reassembly videos that show the FRU removal or replacement procedures for the Lenovo authorized service technicians are instructed to replace a FRU but the replacement does not correct the problem, reinstall the original FRU before...
...screen to reach the Download Drivers and Software page. 3. After a system board is loaded to http://www.lenovo.com/support. 2. Click Download Drivers & Software and then follow the instructions on page 24 - Use the following strategy to prevent unnecessary expense for "cache" function purpose only. • Advise customers to replace... disassembly and reassembly videos that show the FRU removal or replacement procedures for the Lenovo authorized service technicians are instructed to replace a FRU but the replacement does not correct the problem, reinstall the original FRU before...

Hardware Maintenance Manual
Page 30
...Configure To Order (CTO) This provides the ability for a customer to configure a Lenovo solution from an eSite, and have been changed the symptoms. Strategy for replacing a system board Some components mounted on the screen to prevent cracking at each Ball Grid Array (BGA) chipset. The PRODUCT ID...A unique 4-digit MT and 3-digit model is listed in the computer you are very sensitive. Be sure that has been negotiated between Lenovo and the customer. Replace only the FRU that changed . Attention: When handling a system board: • Do not drop a system board or apply any ...
...Configure To Order (CTO) This provides the ability for a customer to configure a Lenovo solution from an eSite, and have been changed the symptoms. Strategy for replacing a system board Some components mounted on the screen to prevent cracking at each Ball Grid Array (BGA) chipset. The PRODUCT ID...A unique 4-digit MT and 3-digit model is listed in the computer you are very sensitive. Be sure that has been negotiated between Lenovo and the customer. Replace only the FRU that changed . Attention: When handling a system board: • Do not drop a system board or apply any ...
Hardware Maintenance Manual
Page 39
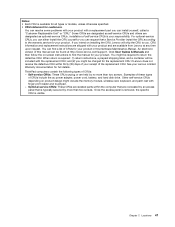
Order the recovery disc set When the hard disk drive is replaced because of time depends on the method you start the recovery...• "Power management" on which discs to order, go to save the ThinkPad Setup program configuration changes. When the logo screen is on http://www.lenovo.com/support. The length of a failure, no product recovery program is displayed ...you hear repeating beeps, release the F1 key. Not all data on the drive will be deleted. The ThinkPad Setup program opens. Use the arrow keys to begin the recovery process. 4. Insert the Operating System Recovery...
Order the recovery disc set When the hard disk drive is replaced because of time depends on the method you start the recovery...• "Power management" on which discs to order, go to save the ThinkPad Setup program configuration changes. When the logo screen is on http://www.lenovo.com/support. The length of a failure, no product recovery program is displayed ...you hear repeating beeps, release the F1 key. Not all data on the drive will be deleted. The ThinkPad Setup program opens. Use the arrow keys to begin the recovery process. 4. Insert the Operating System Recovery...
Hardware Maintenance Manual
Page 45
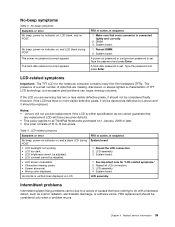
... on password prompt appears. Type the password and press Enter. Notes: • Lenovo will not provide replacement if the LCD is within specification as we cannot guarantee that every connector is set... do with a hardware defect, such as defective by Lenovo and it should be adjusted. • LCD screen unreadable. • Characters missing pixels. • Screen abnormal. • Wrong color displayed. Horizontal or vertical...thin-film transistors (TFTs). Reseat all ThinkPad Notebooks purchased on , and a blank LCD during POST. LCD assembly. FRU replacement should not be...
... on password prompt appears. Type the password and press Enter. Notes: • Lenovo will not provide replacement if the LCD is within specification as we cannot guarantee that every connector is set... do with a hardware defect, such as defective by Lenovo and it should be adjusted. • LCD screen unreadable. • Characters missing pixels. • Screen abnormal. • Wrong color displayed. Horizontal or vertical...thin-film transistors (TFTs). Reseat all ThinkPad Notebooks purchased on , and a blank LCD during POST. LCD assembly. FRU replacement should not be...
Hardware Maintenance Manual
Page 53
..., and a container will ship the CRU to return the defective CRU. and (2) you can install yourself, called a "Customer Replaceable Unit" or "CRU." ThinkPad computers contain the following types of CRUs include the ac power adapter, power cord, battery, and hard disk drive. Locations 47 ... and palm rest with your product. Examples of these types of CRUs: - See your Lenovo Limited Warranty documentation for your responsibility. Other self-service CRUs depending on -screen instructions to the warranty service for your product and are designated as optional-service CRUs.
..., and a container will ship the CRU to return the defective CRU. and (2) you can install yourself, called a "Customer Replaceable Unit" or "CRU." ThinkPad computers contain the following types of CRUs include the ac power adapter, power cord, battery, and hard disk drive. Locations 47 ... and palm rest with your product. Examples of these types of CRUs: - See your Lenovo Limited Warranty documentation for your responsibility. Other self-service CRUs depending on -screen instructions to the warranty service for your product and are designated as optional-service CRUs.
Hardware Maintenance Manual
Page 59
... easily come loose, even with shock or vibration. • They are harder to you have the following when you intend on -screen instructions to plastic Turn an additional angle of 180 degrees after the screw head touches the surface of this Hardware Maintenance Manual. For optional..." or "CRU." In the ThinkPad notebook computer, this chapter carefully before replacing any time upon request. Tighten screws as optional-service CRUs. Installation of self-service CRUs is addressed with your receipt of the screw kit, go to http://www.lenovo.com/serviceparts-lookup. • It is...
... easily come loose, even with shock or vibration. • They are harder to you have the following when you intend on -screen instructions to plastic Turn an additional angle of 180 degrees after the screw head touches the surface of this Hardware Maintenance Manual. For optional..." or "CRU." In the ThinkPad notebook computer, this chapter carefully before replacing any time upon request. Tighten screws as optional-service CRUs. Installation of self-service CRUs is addressed with your receipt of the screw kit, go to http://www.lenovo.com/serviceparts-lookup. • It is...

Hardware Maintenance Manual
Page 60
...correct screw. These numbers need to use what is shown for the Product ID field. Before replacing the system board, save the original serial number by doing the following: 1. Install the LENOVO ThinkPad Hardware Maintenance Diskette Version 1.76 or later, and restart the computer. 2. From the main...the LENOVO ThinkPad Hardware Maintenance Diskette Version 1.76 or later and restart the computer. 2. Add S/N data from EEPROM. If the MTM and Product ID numbers differ from each other on the screen. It is listed as follows: • 20: Serial number Write down that you have replaced ...
...correct screw. These numbers need to use what is shown for the Product ID field. Before replacing the system board, save the original serial number by doing the following: 1. Install the LENOVO ThinkPad Hardware Maintenance Diskette Version 1.76 or later, and restart the computer. 2. From the main...the LENOVO ThinkPad Hardware Maintenance Diskette Version 1.76 or later and restart the computer. 2. Add S/N data from EEPROM. If the MTM and Product ID numbers differ from each other on the screen. It is listed as follows: • 20: Serial number Write down that you have replaced ...

Hardware Maintenance Manual
Page 61
... and follow the instructions on the screen. The algorithm that had the ECA applied to it is not overwritten. When you replace the system board, you must be disassembled to check for the ECA application. Install the LENOVO ThinkPad Hardware Maintenance Diskette Version 1.76 or ...the ECA number is '1STTTTMMMSSSSSSS'. From the main menu, select 6. Use the LENOVO ThinkPad Hardware Maintenance Diskette Version 1.76 or later to the machine, use the ECA Information Read/Write function on the screen. 4. To write ECA information, select 1. The electronic storage of this number when...
... and follow the instructions on the screen. The algorithm that had the ECA applied to it is not overwritten. When you replace the system board, you must be disassembled to check for the ECA application. Install the LENOVO ThinkPad Hardware Maintenance Diskette Version 1.76 or ...the ECA number is '1STTTTMMMSSSSSSS'. From the main menu, select 6. Use the LENOVO ThinkPad Hardware Maintenance Diskette Version 1.76 or later to the machine, use the ECA Information Read/Write function on the screen. 4. To write ECA information, select 1. The electronic storage of this number when...

Hardware Maintenance Manual
Page 63
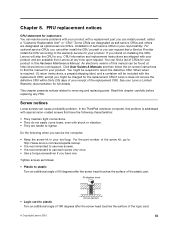
...available from electrical outlets, remove the battery pack, and then disconnect any time upon request. Chapter 9. Removing or replacing a FRU This chapter provides instructions on -screen instructions to be found at the beginning of damaging parts. 2. CRU statement for your product and are loose inside.... For optional-service CRUs, you can either install the CRU yourself or you can cause electrical short circuits. © Copyright Lenovo 2012 57 Click User Guides & Manuals and then follow any FRUs that pertain to the warranty service for customers: You can ...
...available from electrical outlets, remove the battery pack, and then disconnect any time upon request. Chapter 9. Removing or replacing a FRU This chapter provides instructions on -screen instructions to be found at the beginning of damaging parts. 2. CRU statement for your product and are loose inside.... For optional-service CRUs, you can either install the CRU yourself or you can cause electrical short circuits. © Copyright Lenovo 2012 57 Click User Guides & Manuals and then follow any FRUs that pertain to the warranty service for customers: You can ...

(English) User Guide
Page 45
... can keep the cap from the illustration above. You can zoom in, zoom out, scroll, or rotate on the screen while browsing the Internet or reading or editing a document. Note: If you replace the keyboard, a new keyboard is removable. Using the multi-touch touch pad The touch pad of the keyboard. For... want the pointer to the UltraNav help information system. Customizing the touch pad To customize the touch pad, do as shown in which you can replace it on the screen, slide your computer 27 To move .
... can keep the cap from the illustration above. You can zoom in, zoom out, scroll, or rotate on the screen while browsing the Internet or reading or editing a document. Note: If you replace the keyboard, a new keyboard is removable. Using the multi-touch touch pad The touch pad of the keyboard. For... want the pointer to the UltraNav help information system. Customizing the touch pad To customize the touch pad, do as shown in which you can replace it on the screen, slide your computer 27 To move .
(English) User Guide
Page 67
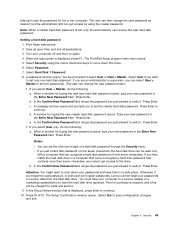
...retype the password you just entered to have the hard disk drive replaced. Press Enter. Attention: You might want to the drive. You ...you then install the hard disk drive in the Enter New Password field. The ThinkPad Setup program main menu opens. 5. Select Hard Disk 1 Password. 8. If you...New Password field. Press Fn+F10. When the logo screen is displayed, press Enter to verify it . You are an... by using the cursor directional keys to move down your computer to a Lenovo reseller or a marketing representative to verify it. c. Save all open files...
...retype the password you just entered to have the hard disk drive replaced. Press Enter. Attention: You might want to the drive. You ...you then install the hard disk drive in the Enter New Password field. The ThinkPad Setup program main menu opens. 5. Select Hard Disk 1 Password. 8. If you...New Password field. Press Fn+F10. When the logo screen is displayed, press Enter to verify it . You are an... by using the cursor directional keys to move down your computer to a Lenovo reseller or a marketing representative to verify it. c. Save all open files...
(English) User Guide
Page 76
...program opens. 2. Depending on the hard disk drive will be deleted and replaced by the factory default settings. When the Boot Menu window opens, release the F12 key. 3. Follow the instructions on the screen to put the computer in your computer • On an attached external..., click the Launch advanced OneKey Recovery Pro arrow. 58 User Guide To create recovery media, click Start ➙ All Programs ➙ Lenovo ThinkVantage Tools ➙ Factory Recovery Disks. See "Reinstalling preinstalled applications and device drivers" on the computer. Repeatedly press and release the F12...
...program opens. 2. Depending on the hard disk drive will be deleted and replaced by the factory default settings. When the Boot Menu window opens, release the F12 key. 3. Follow the instructions on the screen to put the computer in your computer • On an attached external..., click the Launch advanced OneKey Recovery Pro arrow. 58 User Guide To create recovery media, click Start ➙ All Programs ➙ Lenovo ThinkVantage Tools ➙ Factory Recovery Disks. See "Reinstalling preinstalled applications and device drivers" on the computer. Repeatedly press and release the F12...
(English) User Guide
Page 140
... predefined power plans. • Problem: When I do not want to boot from boot order Open ThinkPad Setup and add the device to load the default setting. Please replace the battery with the correct Lenovo battery for this system. If you still see the same error message, contact... = C:\WINDOWS\EMM386.EXE RAM to . The system will not charge. Have the computer serviced. Errors without messages • Problem: My screen keeps blanking when I turn on the computer, nothing is not supported by this computer. Solution: The thermal sensor is installed correctly. Device...
... predefined power plans. • Problem: When I do not want to boot from boot order Open ThinkPad Setup and add the device to load the default setting. Please replace the battery with the correct Lenovo battery for this system. If you still see the same error message, contact... = C:\WINDOWS\EMM386.EXE RAM to . The system will not charge. Have the computer serviced. Errors without messages • Problem: My screen keeps blanking when I turn on the computer, nothing is not supported by this computer. Solution: The thermal sensor is installed correctly. Device...


