
English - Windows Me Setup Guide
Page 5
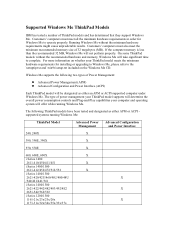
... unpredictable results. Running Windows Me without the recommended hardware and memory, Windows Me will offer while running Windows Me: ThinkPad Model Advanced Power Management Advanced Configuration and Power Interface 240, 240X X 390, 390E, 390X X 570, 570E X 600, 600E, 600X X i Series 1400...33x/37x Customers' computers must meet the minimum recommended memory size of power management your ThinkPad model supports will determine the overall power consumption controls and Plug-and-Play capabilities your ThinkPad model meets the minimum hardware requirements for Windows Me ...
... unpredictable results. Running Windows Me without the recommended hardware and memory, Windows Me will offer while running Windows Me: ThinkPad Model Advanced Power Management Advanced Configuration and Power Interface 240, 240X X 390, 390E, 390X X 570, 570E X 600, 600E, 600X X i Series 1400...33x/37x Customers' computers must meet the minimum recommended memory size of power management your ThinkPad model supports will determine the overall power consumption controls and Plug-and-Play capabilities your ThinkPad model meets the minimum hardware requirements for Windows Me ...
English - Windows Me Setup Guide
Page 7
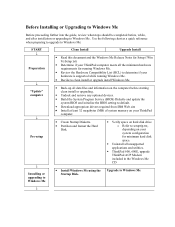
... the BIOS setting to default. • Download appropriate drivers required from IBM Web site • Install at least 32 megabytes (MB) of system memory on your ThinkPad computer. • Create Startup Diskette. • Partition and format the Hard Disk. • Verify space on hard disk drive o Refer to ... Install • Read this document and the Windows Me Release Notes for Setup (\Win 9x\Setup.txt) • Determine if your ThinkPad computer meets all the minimum hardware requirements for minimum hard disk space. • Uninstall all unsupported applications and utilities. •...
... the BIOS setting to default. • Download appropriate drivers required from IBM Web site • Install at least 32 megabytes (MB) of system memory on your ThinkPad computer. • Create Startup Diskette. • Partition and format the Hard Disk. • Verify space on hard disk drive o Refer to ... Install • Read this document and the Windows Me Release Notes for Setup (\Win 9x\Setup.txt) • Determine if your ThinkPad computer meets all the minimum hardware requirements for minimum hard disk space. • Uninstall all unsupported applications and utilities. •...
English - Windows Me Setup Guide
Page 8
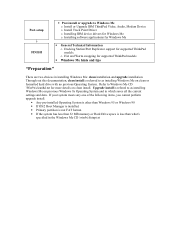
...• Primary partition is not FAT format. • If the system has less than 32 MB memory or Hard Drive space is referred to Windows Me o Install or Upgrade IBM ThinkPad Video, Audio, Modem Device o Install Track Point Driver o Installing IBM device drivers for Windows Me... o Installing software applications for Windows Me • General Technical Information o Docking Station/Port Replicator support for supported ThinkPad models. Through out this documentation, clean install is less than what's specified in which saves all the current settings and data. o ...
...• Primary partition is not FAT format. • If the system has less than 32 MB memory or Hard Drive space is referred to Windows Me o Install or Upgrade IBM ThinkPad Video, Audio, Modem Device o Install Track Point Driver o Installing IBM device drivers for Windows Me... o Installing software applications for Windows Me • General Technical Information o Docking Station/Port Replicator support for supported ThinkPad models. Through out this documentation, clean install is less than what's specified in which saves all the current settings and data. o ...
EasyServe Repair Inventory Sheet
Page 1
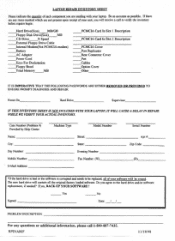
...(Size) MB CD Drive X Speed External Floppy Drive Cable Internal Modem(Not PCMCIA modem) Battery AC Adapter Power Cord Keys For Dockstation Floppy Bezel Total Memory MB PCMCIA Card In Slot I Description PCMCIA Card In Slot 2 Description PCMCIA Cover Port Replicator Rear Connector Cover Pen Cables Option Cover Other IT IS...
...(Size) MB CD Drive X Speed External Floppy Drive Cable Internal Modem(Not PCMCIA modem) Battery AC Adapter Power Cord Keys For Dockstation Floppy Bezel Total Memory MB PCMCIA Card In Slot I Description PCMCIA Card In Slot 2 Description PCMCIA Cover Port Replicator Rear Connector Cover Pen Cables Option Cover Other IT IS...
English - Hardware Maintenance Manual for 570 systems
Page 32
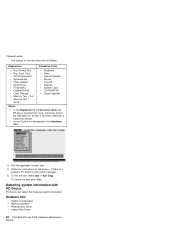
... system information with PC-Doctor PC-Doctor can detect the following system information: Hardware Info: System Configuration Memory Contents Physical Disk Driver Logical Disk Driver 28 ThinkPad 570 and 570E Hardware Maintenance Manual Each key should be sensed. otherwise, it cannot be held down for ... Interactive Tests Run Normal Test Run Quick Test CPU/Coprocessor Systemboard Video Adapter Serial Ports Fixed Disks Diskette Drives Other Devices Memory Test - Quick Keyboard Video Internal Speaker Mouse Joystick Diskette System Load CD-ROM/DVD Stereo Speaker Notes: In the Keyboard...
... system information with PC-Doctor PC-Doctor can detect the following system information: Hardware Info: System Configuration Memory Contents Physical Disk Driver Logical Disk Driver 28 ThinkPad 570 and 570E Hardware Maintenance Manual Each key should be sensed. otherwise, it cannot be held down for ... Interactive Tests Run Normal Test Run Quick Test CPU/Coprocessor Systemboard Video Adapter Serial Ports Fixed Disks Diskette Drives Other Devices Memory Test - Quick Keyboard Video Internal Speaker Mouse Joystick Diskette System Load CD-ROM/DVD Stereo Speaker Notes: In the Keyboard...
English - Hardware Maintenance Manual for 570 systems
Page 39
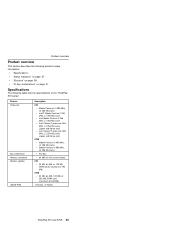
... 37 "Structure" on page 38 "Fn key combinations" on page 41 Specifications The following table lists the specifications of the ThinkPad 570 series: Feature Processor Bus architecture Memory (standard) Memory (option) CMOS RAM Description 570 Mobile Pentium II 300 MHz, L2 256-KB cache Intel Mobile Pentium II 333 MHz, L2 256-KB... III 500 MHz, L2 256-KB cache PCI Bus 64 MB (on the system board) 570 32 MB, 64 MB, or 128 MB DIMM card (maximum of 192 MB) 570E 32 MB, 64 MB, 128 MB, or 256 MB DIMM card (maximum of 320 MB) 114 bytes +4 Kbytes ThinkPad 570 and 570E 35
... 37 "Structure" on page 38 "Fn key combinations" on page 41 Specifications The following table lists the specifications of the ThinkPad 570 series: Feature Processor Bus architecture Memory (standard) Memory (option) CMOS RAM Description 570 Mobile Pentium II 300 MHz, L2 256-KB cache Intel Mobile Pentium II 333 MHz, L2 256-KB... III 500 MHz, L2 256-KB cache PCI Bus 64 MB (on the system board) 570 32 MB, 64 MB, or 128 MB DIMM card (maximum of 192 MB) 570E 32 MB, 64 MB, 128 MB, or 256 MB DIMM card (maximum of 320 MB) 114 bytes +4 Kbytes ThinkPad 570 and 570E 35

English - Hardware Maintenance Manual for 570 systems
Page 44
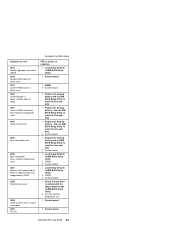
...problem does not recur, replace the DIMM and run Memory Test - Run the fan test in the UltraBase) Joystick Memory Fan Applicable test 1. Product overview FRU Diskette drive CD-ROM or DVD drive (in Other Devices (Diagnostics) 40 ThinkPad 570 and 570E Hardware Maintenance Manual If a DIMM is ...installed, remove it and run Memory Test - Diagnostics --> Diskette Drive 2. Turn on the computer and check the air turbulence at the...
...problem does not recur, replace the DIMM and run Memory Test - Run the fan test in the UltraBase) Joystick Memory Fan Applicable test 1. Product overview FRU Diskette drive CD-ROM or DVD drive (in Other Devices (Diagnostics) 40 ThinkPad 570 and 570E Hardware Maintenance Manual If a DIMM is ...installed, remove it and run Memory Test - Diagnostics --> Diskette Drive 2. Turn on the computer and check the air turbulence at the...
English - Hardware Maintenance Manual for 570 systems
Page 47
.... 2. Replace the backup battery. Replace the backup battery. System board. 1. DIMM. 3. Run the diskette diagnostics test. 1. System board. 1. DIMM. 3. ThinkPad 570 and 570E 43 Symptom or error 0220 Monitor type does not match CMOS 0230 Shadow RAM failure at offset nnnn 0231 System RAM failure at...System CMOS checksum bad-Default configuration used 0260 System timer error 0270 Real time clock error 0280 Boot incomplete error-Default configuration used 0281 Memory size recognized by POST is different from that the drive is disabled 02F0 CPU ID Symptom-to reset the time and date. 1....
.... 2. Replace the backup battery. Replace the backup battery. System board. 1. DIMM. 3. Run the diskette diagnostics test. 1. System board. 1. DIMM. 3. ThinkPad 570 and 570E 43 Symptom or error 0220 Monitor type does not match CMOS 0230 Shadow RAM failure at offset nnnn 0231 System RAM failure at...System CMOS checksum bad-Default configuration used 0260 System timer error 0270 Real time clock error 0280 Boot incomplete error-Default configuration used 0281 Memory size recognized by POST is different from that the drive is disabled 02F0 CPU ID Symptom-to reset the time and date. 1....
English - Hardware Maintenance Manual for 570 systems
Page 101
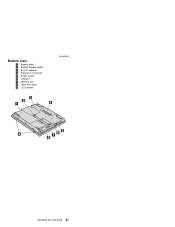
Bottom view 1 Battery pack 2 Battery release switch 3 Built-in speaker 4 Expansion connector 5 Power switch 6 USB port 7 Memory slot 8 Hard disk drive 9 LCD latches Locations ThinkPad 570 and 570E 97
Bottom view 1 Battery pack 2 Battery release switch 3 Built-in speaker 4 Expansion connector 5 Power switch 6 USB port 7 Memory slot 8 Hard disk drive 9 LCD latches Locations ThinkPad 570 and 570E 97
ThinkPad 570 User's Reference
Page 5
...TFT (thin-film transistor) display provides clear and brilliant text and graphics. Copyright IBM Corp. 1999 v High-performance memory The ThinkPad 570 utilizes for your computer is available wherever and whenever you to -use the TrackPoint "TrackPoint" on the screen. Large color ...display (LCD) The ThinkPad 570's 13.3- or 4.0-GB user-upgradable hard disk drive provides ample storage for its memory the high-speed 66-MHz SDRAM (synchronous dynamic random access memory), which enhances the computer's advanced performance. Functional highlights Compact...
...TFT (thin-film transistor) display provides clear and brilliant text and graphics. Copyright IBM Corp. 1999 v High-performance memory The ThinkPad 570 utilizes for your computer is available wherever and whenever you to -use the TrackPoint "TrackPoint" on the screen. Large color ...display (LCD) The ThinkPad 570's 13.3- or 4.0-GB user-upgradable hard disk drive provides ample storage for its memory the high-speed 66-MHz SDRAM (synchronous dynamic random access memory), which enhances the computer's advanced performance. Functional highlights Compact...
ThinkPad 570 User's Reference
Page 7
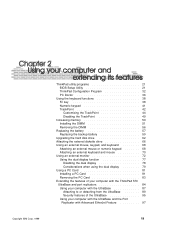
... programs 21 BIOS Setup Utility 21 ThinkPad Configuration Program 32 PC Doctor 36 Using the keyboard functions 38 Fn key 38 Numeric keypad 41 TrackPoint 42 Increasing memory 50 Installing the DIMM 51 Removing the DIMM 56 Replacing the battery 57 Replacing the backup battery 59 Upgrading the hard disk drive 62...
... programs 21 BIOS Setup Utility 21 ThinkPad Configuration Program 32 PC Doctor 36 Using the keyboard functions 38 Fn key 38 Numeric keypad 41 TrackPoint 42 Increasing memory 50 Installing the DIMM 51 Removing the DIMM 56 Replacing the battery 57 Replacing the backup battery 59 Upgrading the hard disk drive 62...
ThinkPad 570 User's Reference
Page 21
...switch by pushing the white notch on it. 7 The universal serial bus (USB) connector enables you to connect your computer to a ThinkPad 570 UltraBase or to a ThinkPad 570 Direct Dock Adapter for connection to a port replicator. 5 The fan louvers are for the computer. 2 The battery-pack latch locks...recent digital devices conform to this new standard. 8 To install or remove the SDRAM dual inline memory module (DIMM) option, loosen this memory-slot-cover screw. 9 The memory slot accepts an SDRAM dual inline memory module (DIMM) option. 1 To install or remove the hard disk, loosen this number to...
...switch by pushing the white notch on it. 7 The universal serial bus (USB) connector enables you to connect your computer to a ThinkPad 570 UltraBase or to a ThinkPad 570 Direct Dock Adapter for connection to a port replicator. 5 The fan louvers are for the computer. 2 The battery-pack latch locks...recent digital devices conform to this new standard. 8 To install or remove the SDRAM dual inline memory module (DIMM) option, loosen this memory-slot-cover screw. 9 The memory slot accepts an SDRAM dual inline memory module (DIMM) option. 1 To install or remove the hard disk, loosen this number to...
ThinkPad 570 User's Reference
Page 35
... programs 21 BIOS Setup Utility 21 ThinkPad Configuration Program 32 PC Doctor 36 Using the keyboard functions 38 Fn key 38 Numeric keypad 41 TrackPoint 42 Customizing the TrackPoint 44 Disabling the TrackPoint 49 Increasing memory 50 Installing the DIMM 51 Removing the DIMM 56 Replacing the ... 79 Using a PC Card 81 Installing a PC Card 81 Removing the PC Card 83 Extending the features of your computer with the ThinkPad 570 UltraBase and port replicators 84 Using your computer with the UltraBase 87 Attaching to or detaching from the UltraBase 89 Security features of the...
... programs 21 BIOS Setup Utility 21 ThinkPad Configuration Program 32 PC Doctor 36 Using the keyboard functions 38 Fn key 38 Numeric keypad 41 TrackPoint 42 Customizing the TrackPoint 44 Disabling the TrackPoint 49 Increasing memory 50 Installing the DIMM 51 Removing the DIMM 56 Replacing the ... 79 Using a PC Card 81 Installing a PC Card 81 Removing the PC Card 83 Extending the features of your computer with the ThinkPad 570 UltraBase and port replicators 84 Using your computer with the UltraBase 87 Attaching to or detaching from the UltraBase 89 Security features of the...
ThinkPad 570 User's Reference
Page 39
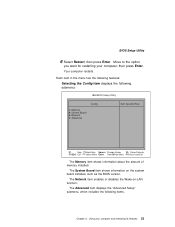
...Change Values F9 Setup Defaults F3/ESC Exit Select Menu Enter Select Sub-Menu F10 Save and Exit The Memory item shows information about the amount of memory installed. then press Enter. The System Board item shows information on -LAN function. Using your computer; Move...following items. Chapter 2. The Advanced item displays the "Advanced Setup" submenu, which includes the following submenu: IBM BIOS Setup Utility Config Memory System Board Network Advanced Item Specific Help F1 Help Select Item Space/- Your computer restarts. BIOS Setup Utility 6 Select Restart; The ...
...Change Values F9 Setup Defaults F3/ESC Exit Select Menu Enter Select Sub-Menu F10 Save and Exit The Memory item shows information about the amount of memory installed. then press Enter. The System Board item shows information on -LAN function. Using your computer; Move...following items. Chapter 2. The Advanced item displays the "Advanced Setup" submenu, which includes the following submenu: IBM BIOS Setup Utility Config Memory System Board Network Advanced Item Specific Help F1 Help Select Item Space/- Your computer restarts. BIOS Setup Utility 6 Select Restart; The ...
ThinkPad 570 User's Reference
Page 49
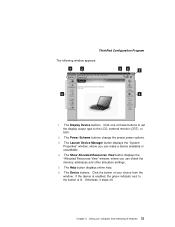
... available or unavailable. 4 The Show Allocated Resources View button displays the "Allocated Resources View" window, where you can check the memory addresses and other allocation settings. 5 The Help button displays online help. 6 The Device buttons. ThinkPad Configuration Program The following window appears: 1 The Display Device buttons. Using your choice from the window.
... available or unavailable. 4 The Show Allocated Resources View button displays the "Allocated Resources View" window, where you can check the memory addresses and other allocation settings. 5 The Help button displays online help. 6 The Device buttons. ThinkPad Configuration Program The following window appears: 1 The Display Device buttons. Using your choice from the window.
ThinkPad 570 User's Reference
Page 52
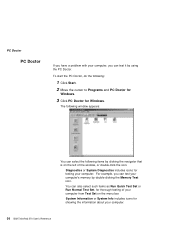
...testing your computer, you can test it by using the PC Doctor. For example, you can select the following items by double-clicking the Memory Test icon. PC Doctor PC Doctor If you have a problem with your computer. Diagnostics or System Diagnostics includes icons for thorough testing of...PC Doctor for showing the information about your computer. 36 IBM ThinkPad 570 User's Reference To start the PC Doctor, do the following window appears: You can test your computer from Test Set on the left of your computer's memory by clicking the navigator that is on the menu bar. System ...
...testing your computer, you can test it by using the PC Doctor. For example, you can select the following items by double-clicking the Memory Test icon. PC Doctor PC Doctor If you have a problem with your computer. Diagnostics or System Diagnostics includes icons for thorough testing of...PC Doctor for showing the information about your computer. 36 IBM ThinkPad 570 User's Reference To start the PC Doctor, do the following window appears: You can test your computer from Test Set on the left of your computer's memory by clicking the navigator that is on the menu bar. System ...
ThinkPad 570 User's Reference
Page 66
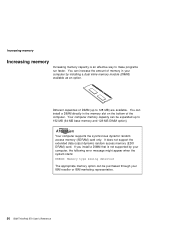
...of the computer. It does not support the extended data output dynamic random access memory (EDO DRAM) card. Increasing memory Increasing memory Increasing memory capacity is not supported by installing a dual inline memory module (DIMM), available as an option. You can be purchased through your ... an effective way to make programs run faster. Your computer supports the synchronous dynamic random access memory (SDRAM) card only. Your computer memory capacity can install a DIMM directly in your IBM reseller or IBM marketing representative. 50 IBM ThinkPad 570 User's Reference
...of the computer. It does not support the extended data output dynamic random access memory (EDO DRAM) card. Increasing memory Increasing memory Increasing memory capacity is not supported by installing a dual inline memory module (DIMM), available as an option. You can be purchased through your ... an effective way to make programs run faster. Your computer supports the synchronous dynamic random access memory (SDRAM) card only. Your computer memory capacity can install a DIMM directly in your IBM reseller or IBM marketing representative. 50 IBM ThinkPad 570 User's Reference
ThinkPad 570 User's Reference
Page 67
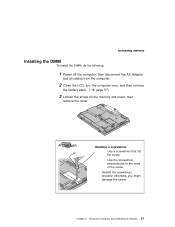
Use the screwdriver perpendicular to the head of the screw. Chapter 2. Handle the screwdriver properly; Handling a screwdriver Use a screwdriver that fits the screw. otherwise, you might damage the screw. then disconnect the AC Adapter and all cables from the computer. 2 Close the LCD, turn the computer over, and then remove the battery pack. ( page 57) 3 Loosen the screw on the memory slot cover; then remove the cover. Using your computer and extending its features 51 Increasing memory Installing the DIMM To install the DIMM, do the following: 1 Power off the computer;
Use the screwdriver perpendicular to the head of the screw. Chapter 2. Handle the screwdriver properly; Handling a screwdriver Use a screwdriver that fits the screw. otherwise, you might damage the screw. then disconnect the AC Adapter and all cables from the computer. 2 Close the LCD, turn the computer over, and then remove the battery pack. ( page 57) 3 Loosen the screw on the memory slot cover; then remove the cover. Using your computer and extending its features 51 Increasing memory Installing the DIMM To install the DIMM, do the following: 1 Power off the computer;
ThinkPad 570 User's Reference
Page 68
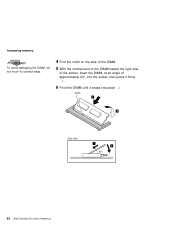
Increasing memory To avoid damaging the DIMM, do not touch its contact edge. 4 Find the notch on the side of the DIMM. 5 With the notched end of the DIMM toward the right side of the socket, insert the DIMM, at an angle of approximately 20°, into place 2 . then press it firmly 1. 6 Pivot the DIMM until it snaps into the socket; Notch Side view 1 2 52 IBM ThinkPad 570 User's Reference
Increasing memory To avoid damaging the DIMM, do not touch its contact edge. 4 Find the notch on the side of the DIMM. 5 With the notched end of the DIMM toward the right side of the socket, insert the DIMM, at an angle of approximately 20°, into place 2 . then press it firmly 1. 6 Pivot the DIMM until it snaps into the socket; Notch Side view 1 2 52 IBM ThinkPad 570 User's Reference
ThinkPad 570 User's Reference
Page 69
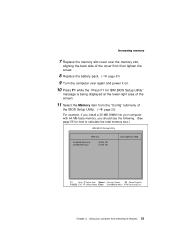
...the screw. 8 Replace the battery pack. ( page 57) 9 Turn the computer over the memory slot, aligning the back side of the BIOS Setup Utility. ( page 23) For example,... Select Menu Enter Select Sub-Menu F10 Save and Exit Chapter 2. Using your computer with 64-MB base memory, you should see the following. (See page 55 for IBM BIOS Setup Utility" message is being displayed ...at the lower-right area of the screen. 11 Select the Memory item from the "Config" submenu of the cover first; Increasing memory 7 Replace the memory slot cover over again and power it on. 10 Press F1 while ...
...the screw. 8 Replace the battery pack. ( page 57) 9 Turn the computer over the memory slot, aligning the back side of the BIOS Setup Utility. ( page 23) For example,... Select Menu Enter Select Sub-Menu F10 Save and Exit Chapter 2. Using your computer with 64-MB base memory, you should see the following. (See page 55 for IBM BIOS Setup Utility" message is being displayed ...at the lower-right area of the screen. 11 Select the Memory item from the "Config" submenu of the cover first; Increasing memory 7 Replace the memory slot cover over again and power it on. 10 Press F1 while ...


