
User Manual
Page 5
... and GAV products 41 General checkout 43 What to do first 44 Checkout guide 45 Diagnostics using PC-Doctor for DOS . . . . 45 Lenovo ThinkVantage Toolbox (Lenovo System Toolbox 48 PC-Doctor for Rescue and Recovery . . . . . 48 FRU tests 49 Power system checkout 51 Checking the ac adapter 51...Retaining the UUID 82 Reading or writing the ECA information . . . 83 Removing and replacing a FRU . . . . 85 Before servicing ThinkPad T510, T510i, and W510 86 1010 Battery pack 87 1020 Serial Ultrabay Enhanced device or travel bezel 88 1030 DIMM slot cover 89 1040 DIMM (bottom slot 90 1050 Hard...
... and GAV products 41 General checkout 43 What to do first 44 Checkout guide 45 Diagnostics using PC-Doctor for DOS . . . . 45 Lenovo ThinkVantage Toolbox (Lenovo System Toolbox 48 PC-Doctor for Rescue and Recovery . . . . . 48 FRU tests 49 Power system checkout 51 Checking the ac adapter 51...Retaining the UUID 82 Reading or writing the ECA information . . . 83 Removing and replacing a FRU . . . . 85 Before servicing ThinkPad T510, T510i, and W510 86 1010 Battery pack 87 1020 Serial Ultrabay Enhanced device or travel bezel 88 1030 DIMM slot cover 89 1040 DIMM (bottom slot 90 1050 Hard...

User Manual
Page 59
.... 4. v If the computer does not charge during operation, go to "Checking operational charging" on page 53 Checking the ac adapter You are servicing. 3. To check the ac adapter, do the following : v Replace the system board. General checkout 51 Turn off the computer. 6. Disconnect the ...a symptom, do the following power supply checkouts: v "Checking the ac adapter" v "Checking operational charging" on page 52 v "Checking the battery pack" on page 52 v "Checking the backup battery" on page 52. Measure the output voltage at the plug of the ac adapter for correct continuity...
.... 4. v If the computer does not charge during operation, go to "Checking operational charging" on page 53 Checking the ac adapter You are servicing. 3. To check the ac adapter, do the following : v Replace the system board. General checkout 51 Turn off the computer. 6. Disconnect the ...a symptom, do the following power supply checkouts: v "Checking the ac adapter" v "Checking operational charging" on page 52 v "Checking the battery pack" on page 52 v "Checking the backup battery" on page 52. Measure the output voltage at the plug of the ac adapter for correct continuity...
User Manual
Page 65
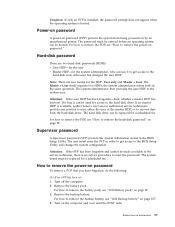
Power-on password A power-on by an unauthorized person. If no master HDP is available, neither Lenovo nor Lenovo authorized service technicians provide any services to reset either the user or the master HDP, or to recover data from being powered on password (POP) protects the system from the hard ... prompt does not appear when the operating system is no SVP has been set . For how to remove the battery pack, see "How to the hard disk drive. Remove the battery pack. The password must be made available to the hard disk even if the user has changed the user HDP Note...
Power-on password A power-on by an unauthorized person. If no master HDP is available, neither Lenovo nor Lenovo authorized service technicians provide any services to reset either the user or the master HDP, or to recover data from being powered on password (POP) protects the system from the hard ... prompt does not appear when the operating system is no SVP has been set . For how to remove the battery pack, see "How to the hard disk drive. Remove the battery pack. The password must be made available to the hard disk even if the user has changed the user HDP Note...
User Manual
Page 66
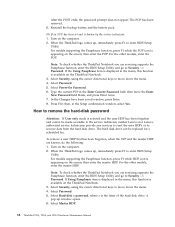
...Select Hard-disk x password, where x is known by the service technician: 1. A pop-up , immediately press F1 to recover data from the hard disk drive. The POP has been removed. 5. Reinstall the backup battery and the battery pack. (B) If an SVP has been set and is the ...the ThinkPad Notebook you are known, do the following: 1. Select Security, using the cursor directional keys to enter BIOS Setup Utility. then enter the master HDP. The hard disk drive can be made available to the service technician, neither Lenovo nor Lenovo authorized service technicians provide any services to...
...Select Hard-disk x password, where x is known by the service technician: 1. A pop-up , immediately press F1 to recover data from the hard disk drive. The POP has been removed. 5. Reinstall the backup battery and the battery pack. (B) If an SVP has been set and is the ...the ThinkPad Notebook you are known, do the following: 1. Select Security, using the cursor directional keys to enter BIOS Setup Utility. then enter the master HDP. The hard disk drive can be made available to the service technician, neither Lenovo nor Lenovo authorized service technicians provide any services to...
User Manual
Page 71
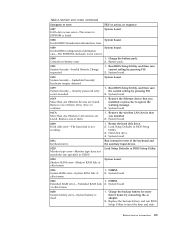
...System board. 021x Keyboard error. Remove one Ethernet devices are found . Reseat the hard disk drive. 2. DIMM. Charge the battery pack. 2. Run BIOS Setup Utility, and then save the current setting by connecting the ac adapter. 2. Security password retry count exceeded...0192 System Security- Load Setup Defaults in BIOS Setup Utility. 3. System board. 01C9 More than 8 hours by pressing F10. 2. Related service information 63 Press to EEPROM is dead. 1. Invalid RFID Serialization Information Area. 0189 System board. Remove the wireless LAN device that you ...
...System board. 021x Keyboard error. Remove one Ethernet devices are found . Reseat the hard disk drive. 2. DIMM. Charge the battery pack. 2. Run BIOS Setup Utility, and then save the current setting by connecting the ac adapter. 2. Security password retry count exceeded...0192 System Security- Load Setup Defaults in BIOS Setup Utility. 3. System board. 01C9 More than 8 hours by pressing F10. 2. Related service information 63 Press to EEPROM is dead. 1. Invalid RFID Serialization Information Area. 0189 System board. Remove the wireless LAN device that you ...
User Manual
Page 77
...solved. 6. If the problem remains, replace the following devices: a. LCD assembly Related service information 69 Remove or disconnect all attached devices are installed, or if the system simply ... the following FRUs one at the time of causes that have no defects). Battery pack e. External diskette drive or optical drive g. Run the diagnostic test for damage. ...the port replicator c. Turn off the computer. 2. Printer, mouse, and other external devices d. Non-ThinkPad devices b. System board b. When analyzing an intermittent problem, do not replace any FRUs. 3. Hard...
...solved. 6. If the problem remains, replace the following devices: a. LCD assembly Related service information 69 Remove or disconnect all attached devices are installed, or if the system simply ... the following FRUs one at the time of causes that have no defects). Battery pack e. External diskette drive or optical drive g. Run the diagnostic test for damage. ...the port replicator c. Turn off the computer. 2. Printer, mouse, and other external devices d. Non-ThinkPad devices b. System board b. When analyzing an intermittent problem, do not replace any FRUs. 3. Hard...
User Manual
Page 93
...as shown in which they are loose inside the computer. When turning a screw to service any FRU, review "FRU replacement notices" on page 81. 3. Verify this by using an electrostatic discharge (ESD) strap (P/N 6405959). © Copyright Lenovo 2009 85 Be sure to replacement. When replacing a FRU, use in place, ... are listed. 4. Attention: After replacing a FRU, do not turn off the computer, unplug all power cords from electrical outlets, remove the battery pack, and then disconnect any notes that all screws, springs, and other small parts are in the drawing. 7.
...as shown in which they are loose inside the computer. When turning a screw to service any FRU, review "FRU replacement notices" on page 81. 3. Verify this by using an electrostatic discharge (ESD) strap (P/N 6405959). © Copyright Lenovo 2009 85 Be sure to replacement. When replacing a FRU, use in place, ... are listed. 4. Attention: After replacing a FRU, do not turn off the computer, unplug all power cords from electrical outlets, remove the battery pack, and then disconnect any notes that all screws, springs, and other small parts are in the drawing. 7.

User Manual
Page 94
Removal steps of SIM card Some models of the ThinkPad T510, T510i, and W510 you are servicing has the SIM card, remove it before you start the servicing. To remove the SIM card, you need to remove the battery pack first. (See "1010 Battery pack" on page 87.) After you insert the card back into the slot firmly. 86 ThinkPad T510, T510i, and W510 Hardware Maintenance Manual If the computer you are servicing might have the SIM card that you finish the servicing, make sure that the customer has installed. Before servicing ThinkPad T510, T510i, and W510 Table 9.
Removal steps of SIM card Some models of the ThinkPad T510, T510i, and W510 you are servicing has the SIM card, remove it before you start the servicing. To remove the SIM card, you need to remove the battery pack first. (See "1010 Battery pack" on page 87.) After you insert the card back into the slot firmly. 86 ThinkPad T510, T510i, and W510 Hardware Maintenance Manual If the computer you are servicing might have the SIM card that you finish the servicing, make sure that the customer has installed. Before servicing ThinkPad T510, T510i, and W510 Table 9.

User Manual
Page 98
... slot) For access, remove these FRUs in order: v "1010 Battery pack" on page 87 v "1030 DIMM slot cover" on the computer you are servicing, the card must be installed in SLOT-0 ( a ), but not in the slot and does not move easily. 90 ThinkPad T510, T510i, and W510 Hardware Maintenance Manual Make sure that...
... slot) For access, remove these FRUs in order: v "1010 Battery pack" on page 87 v "1030 DIMM slot cover" on the computer you are servicing, the card must be installed in SLOT-0 ( a ), but not in the slot and does not move easily. 90 ThinkPad T510, T510i, and W510 Hardware Maintenance Manual Make sure that...

User Manual
Page 105
... into the socket. Press the DIMM firmly, and pivot it until it is used on the computer you are servicing, the card must be installed in SLOT-0 ( a ), but not in order: v "1010 Battery pack" on page 87 v "1030 DIMM slot cover" on page 89 v "1060 Keyboard" on page 93 Table 19. a b When...
... into the socket. Press the DIMM firmly, and pivot it until it is used on the computer you are servicing, the card must be installed in SLOT-0 ( a ), but not in order: v "1010 Battery pack" on page 87 v "1030 DIMM slot cover" on page 89 v "1060 Keyboard" on page 93 Table 19. a b When...

User Manual
Page 124
...113 Attention: CPU is extremely sensitive. Table 31. When you service the CPU, avoid any kind of rough handling. Removal steps of CPU Rotate the head of the screw in the direction shown by arrow 1 to secure the CPU. 116 ThinkPad T510, T510i, and W510 Hardware Maintenance Manual 1160 CPU For ...access, remove these FRUs in order: v "1010 Battery pack" on page 87 v "1030 DIMM slot cover" on page 89 v "1060 Keyboard" on page 93 v "...
...113 Attention: CPU is extremely sensitive. Table 31. When you service the CPU, avoid any kind of rough handling. Removal steps of CPU Rotate the head of the screw in the direction shown by arrow 1 to secure the CPU. 116 ThinkPad T510, T510i, and W510 Hardware Maintenance Manual 1160 CPU For ...access, remove these FRUs in order: v "1010 Battery pack" on page 87 v "1030 DIMM slot cover" on page 89 v "1060 Keyboard" on page 93 v "...


