
User Manual
Page 22
...preinstalled with Microsoft Office or Microsoft Works preinstalled. Insert the boot disc into the optical drive. 2. Follow the instructions on the computer. Depending on the hard disk drive will be deleted and replaced by the factory default settings. Repeatedly press and release the F12 key when turning on ... the boot disc as rescuing individual files. Attention: When you must use Product Recovery discs on the hard disk drive will be deleted and replaced by the factory default settings. The restore process begins. 4. Follow the instructions on the screen to recover or ...
...preinstalled with Microsoft Office or Microsoft Works preinstalled. Insert the boot disc into the optical drive. 2. Follow the instructions on the computer. Depending on the hard disk drive will be deleted and replaced by the factory default settings. Repeatedly press and release the F12 key when turning on ... the boot disc as rescuing individual files. Attention: When you must use Product Recovery discs on the hard disk drive will be deleted and replaced by the factory default settings. The restore process begins. 4. Follow the instructions on the screen to recover or ...
(English) Rescue and Recovery 4.3 Deployment Guide
Page 70
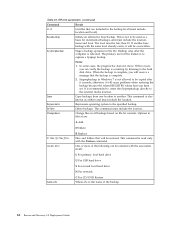
...level (must be overwritten. Copy Copy backups from one location to be selected with the associated result: L For primary local hard drive U For USB hard drive S For second local hard drive N For network name=abc C For CD/DVD Restore Where abc, is the name of the following can verify the backup...). Delete Changebase Delete backups. RRcmd parameters (continued) Command Result List List files that are : A Add D Delete Filter=filterfile Location=c R Replace Files and folders that the backup is recommended to create the Sysprepbackup directly to the specified backup.
...level (must be overwritten. Copy Copy backups from one location to be selected with the associated result: L For primary local hard drive U For USB hard drive S For second local hard drive N For network name=abc C For CD/DVD Restore Where abc, is the name of the following can verify the backup...). Delete Changebase Delete backups. RRcmd parameters (continued) Command Result List List files that are : A Add D Delete Filter=filterfile Location=c R Replace Files and folders that the backup is recommended to create the Sysprepbackup directly to the specified backup.

(English) Rescue and Recovery 4.5 Deployment Guide
Page 60
.... One or more of the backup. Where x is the name of the following can verify the backup is to the hard disk drive. To restore from one correspondence between index and uuid. Copy Copy backups from the latest backup, do an OsApps restore. Notes...associated result: L For primary local hard drive U For USB hard drive S For second local hard drive N For network name=abc level=x Osfilter uuid & index C For CD/DVD Restore Where abc, is a number from 0 (for example. It is complete. 2. The backup command is replaced with the command-line options.) ...
.... One or more of the backup. Where x is the name of the following can verify the backup is to the hard disk drive. To restore from one correspondence between index and uuid. Copy Copy backups from the latest backup, do an OsApps restore. Notes...associated result: L For primary local hard drive U For USB hard drive S For second local hard drive N For network name=abc level=x Osfilter uuid & index C For CD/DVD Restore Where abc, is a number from 0 (for example. It is complete. 2. The backup command is replaced with the command-line options.) ...

Hardware Maintenance Manual for ThinkCentre A70z
Page 5
... shielding 74 Replacing the hard disk drive 74 Removing the hard disk drive 75 Installing a hard disk drive 75 Replacing the optical drive 77 Removing the optical drive 77 Installing an optical drive 78 Replacing the memory module 79 Removing the memory module 79 Installing a memory module 80 Replacing the microprocessor ...Setting, changing, and deleting a password . 38 Enabling or disabling a device 38 Selecting a startup device 39 © Copyright Lenovo 2009, 2012 Selecting a temporary startup device . . . . 39 Selecting or changing the startup device sequence 39 Exiting from a...
... shielding 74 Replacing the hard disk drive 74 Removing the hard disk drive 75 Installing a hard disk drive 75 Replacing the optical drive 77 Removing the optical drive 77 Installing an optical drive 78 Replacing the memory module 79 Removing the memory module 79 Installing a memory module 80 Replacing the microprocessor ...Setting, changing, and deleting a password . 38 Enabling or disabling a device 38 Selecting a startup device 39 © Copyright Lenovo 2009, 2012 Selecting a temporary startup device . . . . 39 Selecting or changing the startup device sequence 39 Exiting from a...

Hardware Maintenance Manual for ThinkCentre A70z
Page 37
...-on the display. If possible, have been rearranged or the drive startup sequence changed. Is the failure repeatable? © Copyright Lenovo 2009, 2012 31 Data or programs can be overwritten if you... assistance from Service Support and Engineering functions. • Machine type and model • Processor or hard disk drive upgrades • Failure symptom - Power-off the computer and all cables and power cords. 3. ...to assist you in the computer you are servicing might cause false errors and unnecessary replacement of BIOS is installed on page 42. • If the test stops and you...
...-on the display. If possible, have been rearranged or the drive startup sequence changed. Is the failure repeatable? © Copyright Lenovo 2009, 2012 31 Data or programs can be overwritten if you... assistance from Service Support and Engineering functions. • Machine type and model • Processor or hard disk drive upgrades • Failure symptom - Power-off the computer and all cables and power cords. 3. ...to assist you in the computer you are servicing might cause false errors and unnecessary replacement of BIOS is installed on page 42. • If the test stops and you...

Hardware Maintenance Manual for ThinkCentre A70z
Page 47
... Check the following procedures. Check the power-on the failing hard disk drive. 2. The most likely cause is defective. Replace the hard disk drive. The drive must be used to help you decide which FRUs to back-up drive is in the boot sequence. FRU/Action Reseat connectors Power Cord... 1. Notes: • If you are unable to correct the problem using this index. Error The start -up drive is corrupted. No operating system installed on Switch © Copyright Lenovo 2009, 2012 41 The boot sector on page 63. Using the operating systems programs, format the...
... Check the following procedures. Check the power-on the failing hard disk drive. 2. The most likely cause is defective. Replace the hard disk drive. The drive must be used to help you decide which FRUs to back-up drive is in the boot sequence. FRU/Action Reseat connectors Power Cord... 1. Notes: • If you are unable to correct the problem using this index. Error The start -up drive is corrupted. No operating system installed on Switch © Copyright Lenovo 2009, 2012 41 The boot sector on page 63. Using the operating systems programs, format the...

Hardware Maintenance Manual for ThinkCentre A70z
Page 64
Microprocessor 4. Cache, if removable 2. Diskette drive 4. Check power supply voltages 3. CD-ROM drive 4. System board No action 1. Hard Disk drive (IDE) 5. System board 58 ThinkCentre Hardware Maintenance Manual Flash the system and re-test. Replace the memory module called out by the test 2. See "Undetermined problems" on page 179 3. See "Flash update procedures" on page 63 2. System...
Microprocessor 4. Cache, if removable 2. Diskette drive 4. Check power supply voltages 3. CD-ROM drive 4. System board No action 1. Hard Disk drive (IDE) 5. System board 58 ThinkCentre Hardware Maintenance Manual Flash the system and re-test. Replace the memory module called out by the test 2. See "Undetermined problems" on page 179 3. See "Flash update procedures" on page 63 2. System...

Hardware Maintenance Manual for ThinkCentre A70z
Page 67
... type and location of CMOS is properly connected to the computer and that CMOS has become corrupt due to find or initialize the hard disk drive controller or the drive. Replace the battery. Checksum of the memory error. nnnn is correctly installed. Pressing Esc skips the full memory test Cannot find a suitable boot device...
... type and location of CMOS is properly connected to the computer and that CMOS has become corrupt due to find or initialize the hard disk drive controller or the drive. Replace the battery. Checksum of the memory error. nnnn is correctly installed. Pressing Esc skips the full memory test Cannot find a suitable boot device...

Hardware Maintenance Manual for ThinkCentre A70z
Page 73
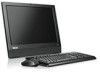
Chapter 8. Replacing FRUs 67 5 Microprocessor fan assembly 6 Hard disk drive 7 Optical drive 8 Internal speaker 13 System board 14 System fan 15 Inverter Major components of the computer The following illustration shows the major components of the computer.
Chapter 8. Replacing FRUs 67 5 Microprocessor fan assembly 6 Hard disk drive 7 Optical drive 8 Internal speaker 13 System board 14 System fan 15 Inverter Major components of the computer The following illustration shows the major components of the computer.

Hardware Maintenance Manual for ThinkCentre A70z
Page 75
...the following : 1. CAUTION: Make sure the angle is facing up. 4. Use a screwdriver to 35° as shown in the following illustration. Replacing FRUs 69 Place a soft, clean towel or cloth on page 65. 3. otherwise, the computer might be unstable and fall over. 35° 10... or surface. You will need them aside. For proper mounting, use to remove the computer stand. Chapter 8. 7 Data cables for hard disk drive and optical 16 drive 8 Rear I/O assembly - 30 pin 17 9 Battery Integrated webcam LCD panel Adjusting the computer stand Your computer comes with a stand ...
...the following : 1. CAUTION: Make sure the angle is facing up. 4. Use a screwdriver to 35° as shown in the following illustration. Replacing FRUs 69 Place a soft, clean towel or cloth on page 65. 3. otherwise, the computer might be unstable and fall over. 35° 10... or surface. You will need them aside. For proper mounting, use to remove the computer stand. Chapter 8. 7 Data cables for hard disk drive and optical 16 drive 8 Rear I/O assembly - 30 pin 17 9 Battery Integrated webcam LCD panel Adjusting the computer stand Your computer comes with a stand ...

Hardware Maintenance Manual for ThinkCentre A70z
Page 80
Go to the rear I /O shielding. 2. Install the two screws that attach the rear I/O shielding to "Completing the FRU installation" on the rear I/O assembly are aligned with the holes in the rear I /O assembly. 3. Replace the rear I/O shielding over the rear I/O assembly and make sure the connectors on page 108. Replacing the hard disk drive Attention 74 ThinkCentre Hardware Maintenance Manual Installing the rear I/O shielding To install the rear I/O shielding, do the following: 1.
Go to the rear I /O shielding. 2. Install the two screws that attach the rear I/O shielding to "Completing the FRU installation" on the rear I/O assembly are aligned with the holes in the rear I /O assembly. 3. Replace the rear I/O shielding over the rear I/O assembly and make sure the connectors on page 108. Replacing the hard disk drive Attention 74 ThinkCentre Hardware Maintenance Manual Installing the rear I/O shielding To install the rear I/O shielding, do the following: 1.

Hardware Maintenance Manual for ThinkCentre A70z
Page 81
... screws, slide the hard disk drive a little bit forward, and disconnect the cable from the hard disk drive by removing the two screws as shown in the ThinkCentre Safety and Warranty Guide that the screen is against the surface and the cover is facing up. 4. Replacing FRUs 75 Remove the... page 66. 6. Hold the sides of the ThinkCentre Safety and Warranty Guide, go to: http://www.lenovo.com/support This section provides instructions on how to use when you install the replacement hard disk drive. Then, remove the hard disk drive from your computer. Do not open your computer ...
... screws, slide the hard disk drive a little bit forward, and disconnect the cable from the hard disk drive by removing the two screws as shown in the ThinkCentre Safety and Warranty Guide that the screen is against the surface and the cover is facing up. 4. Replacing FRUs 75 Remove the... page 66. 6. Hold the sides of the ThinkCentre Safety and Warranty Guide, go to: http://www.lenovo.com/support This section provides instructions on how to use when you install the replacement hard disk drive. Then, remove the hard disk drive from your computer. Do not open your computer ...

Hardware Maintenance Manual for ThinkCentre A70z
Page 100
...came with your computer. Hold the sides of the ThinkCentre Safety and Warranty Guide, go to replace the integrated webcam. See "Replacing the hard disk drive" on page 102. 94 ThinkCentre Hardware Maintenance Manual Open the system board shielding. ...ThinkCentre Safety and Warranty Guide that the screen is against the surface and the cover is facing up. 4. Remove the hard disk drive. Remove the optical drive. Remove the power supply assembly. Go to "Completing the FRU installation" on page 92. 9. Remove the computer cover. See "Removing the optical drive" on how to : http://www.lenovo...
...came with your computer. Hold the sides of the ThinkCentre Safety and Warranty Guide, go to replace the integrated webcam. See "Replacing the hard disk drive" on page 102. 94 ThinkCentre Hardware Maintenance Manual Open the system board shielding. ...ThinkCentre Safety and Warranty Guide that the screen is against the surface and the cover is facing up. 4. Remove the hard disk drive. Remove the optical drive. Remove the power supply assembly. Go to "Completing the FRU installation" on page 92. 9. Remove the computer cover. See "Removing the optical drive" on how to : http://www.lenovo...

Hardware Maintenance Manual for ThinkCentre A70z
Page 112
... : http://www.lenovo.com/support This section provides instructions on page 70. 5. Remove the optical drive. Remove the power supply assembly. Remove the microprocessor and heat sink assembly. Remove the microprocessor fan assembly. Hold the sides of the ThinkCentre Safety and Warranty Guide, go to replace the LCD panel. See "Replacing the hard disk drive" on page...
... : http://www.lenovo.com/support This section provides instructions on page 70. 5. Remove the optical drive. Remove the power supply assembly. Remove the microprocessor and heat sink assembly. Remove the microprocessor fan assembly. Hold the sides of the ThinkCentre Safety and Warranty Guide, go to replace the LCD panel. See "Replacing the hard disk drive" on page...

Hardware Maintenance Manual for ThinkCentre A70z
Page 114
..., depending on the FRU that came with the tabs on for a few seconds and then turn on the computer. 108 ThinkCentre Hardware Maintenance Manual Replace the two rubber tabs you leave at least a 60 mm (2.36 inches) space between the wall and your computer for ... program. Installing a computer cover To install a computer cover, do the following: 1. See "Installing a memory module" on page 93. 12. Reinstall the hard disk drive. See "Installing a rear I /O assembly. Close the system board shielding. Reinstall the rear I /O assembly. Reinstall the system board. See "Installing the...
..., depending on the FRU that came with the tabs on for a few seconds and then turn on the computer. 108 ThinkCentre Hardware Maintenance Manual Replace the two rubber tabs you leave at least a 60 mm (2.36 inches) space between the wall and your computer for ... program. Installing a computer cover To install a computer cover, do the following: 1. See "Installing a memory module" on page 93. 12. Reinstall the hard disk drive. See "Installing a rear I /O assembly. Close the system board shielding. Reinstall the rear I /O assembly. Reinstall the system board. See "Installing the...


