IdeaCentre K220 Hardware Replacement Guide
Page 3
... computer 7 Identifying parts on the system board 9 Chapter 2 Replacing hardware 14 Removing the computer cover 14 Removing and replacing the front bezel 15 Replacing the power supply 17 Replacing the heat sink assembly 18 Replacing a memory module 20 Replacing PCI Express adapter 21 Replacing the hard disk drive 24 Replacing an optical... the system fan assembly 26 Replacing the keyboard 28 Replacing the mouse 29 Replacing the External speaker 30 Completing the installation 30 Appendix 32 31036127 IdeaCentre K_HRG_EN.indd 36 2008.10.20 1:59:47 PM
... computer 7 Identifying parts on the system board 9 Chapter 2 Replacing hardware 14 Removing the computer cover 14 Removing and replacing the front bezel 15 Replacing the power supply 17 Replacing the heat sink assembly 18 Replacing a memory module 20 Replacing PCI Express adapter 21 Replacing the hard disk drive 24 Replacing an optical... the system fan assembly 26 Replacing the keyboard 28 Replacing the mouse 29 Replacing the External speaker 30 Completing the installation 30 Appendix 32 31036127 IdeaCentre K_HRG_EN.indd 36 2008.10.20 1:59:47 PM
IdeaCentre K220 Hardware Replacement Guide
Page 4
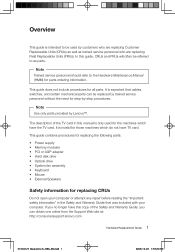
...cables, switches, and certain mechanical parts can obtain one online from the Support Web site at: http://consumersupport.lenovo.com Hardware Replacement Guide 1 31036127 IdeaCentre K_HRG_EN.indd 1 2008.10.20 1:59:20 PM In this manual is invalid for parts ordering information. It...replacing Field Replaceable Units (FRUs). Note Use only parts provided by -step procedures. This guide contains procedures for replacing the following parts: • Power supply • Memory modules • PCI or AGP adapter • Hard disk drive • Optical drive • System fan assembly • ...
...cables, switches, and certain mechanical parts can obtain one online from the Support Web site at: http://consumersupport.lenovo.com Hardware Replacement Guide 1 31036127 IdeaCentre K_HRG_EN.indd 1 2008.10.20 1:59:20 PM In this manual is invalid for parts ordering information. It...replacing Field Replaceable Units (FRUs). Note Use only parts provided by -step procedures. This guide contains procedures for replacing the following parts: • Power supply • Memory modules • PCI or AGP adapter • Hard disk drive • Optical drive • System fan assembly • ...
IdeaCentre K220 Hardware Replacement Guide
Page 8
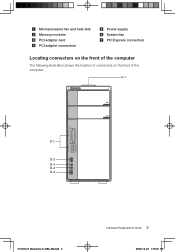
Microprocessor fan and heat sink Memory modules PCI adapter card PCI adapter connectors Power supply System fan PCI Express connectors Locating connectors on the front of the computer The following illustration shows the location of connectors on the front of the computer. F-1 xD CF/I/II/MD MS/Pro/Duo/ProDuo SD/Mini/HC/MiniHC MMC/RS/Plus/Mob D-1 D-2 D-3 D-4 D-2 31036127 IdeaCentre K_HRG_EN.indd 5 Hardware Replacement Guide 5 2008.10.20 1:59:21 PM
Microprocessor fan and heat sink Memory modules PCI adapter card PCI adapter connectors Power supply System fan PCI Express connectors Locating connectors on the front of the computer The following illustration shows the location of connectors on the front of the computer. F-1 xD CF/I/II/MD MS/Pro/Duo/ProDuo SD/Mini/HC/MiniHC MMC/RS/Plus/Mob D-1 D-2 D-3 D-4 D-2 31036127 IdeaCentre K_HRG_EN.indd 5 Hardware Replacement Guide 5 2008.10.20 1:59:21 PM
IdeaCentre K220 Hardware Replacement Guide
Page 10
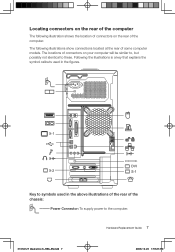
Power Connector: To supply power to these. The following illustration shows the location of connectors on the rear of the computer. Following the illustrations is a key that explains the symbol ... above illustrations of the rear of connectors on your computer will be similar to, but possibly not identical to the computer. Hardware Replacement Guide 7 31036127 IdeaCentre K_HRG_EN.indd 7 2008.10.20 1:59:23 PM The locations of the chassis: ---
Power Connector: To supply power to these. The following illustration shows the location of connectors on the rear of the computer. Following the illustrations is a key that explains the symbol ... above illustrations of the rear of connectors on your computer will be similar to, but possibly not identical to the computer. Hardware Replacement Guide 7 31036127 IdeaCentre K_HRG_EN.indd 7 2008.10.20 1:59:23 PM The locations of the chassis: ---
IdeaCentre K220 Hardware Replacement Guide
Page 20
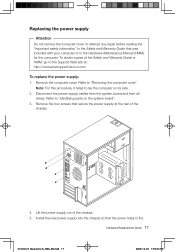
... on its side. 2. Refer to "Removing the computer cover". Remove the four screws that secure the power supply at : http://consumersupport.lenovo.com To replace the power supply: 1. Replacing the power supply Attention Do not remove the computer cover or attempt any repair before reading the "Important safety information" in... the Hardware Maintenance Manual (HMM) for the computer. Install the new power supply into the chassis so that was included with your computer or in the Hardware Replacement Guide 17 31036127 IdeaCentre K_HRG_EN.indd 17 2008.10.20 1:59:34 PM To obtain copies...
... on its side. 2. Refer to "Removing the computer cover". Remove the four screws that secure the power supply at : http://consumersupport.lenovo.com To replace the power supply: 1. Replacing the power supply Attention Do not remove the computer cover or attempt any repair before reading the "Important safety information" in... the Hardware Maintenance Manual (HMM) for the computer. Install the new power supply into the chassis so that was included with your computer or in the Hardware Replacement Guide 17 31036127 IdeaCentre K_HRG_EN.indd 17 2008.10.20 1:59:34 PM To obtain copies...

IdeaCentre K220 Hardware Replacement Guide
Page 21
Reconnect a power supply connector to each of the Safety and Warranty Guide or HMM, go to the Support Web site at: http://consumersupport.lenovo.com To replace the heat sink assembly: 1. Replacing the heat sink assembly Attention Do not remove the computer cover or attempt ...Locate the heat sink. Install the four screws to the system board. 18 Hardware Replacement Guide 31036127 IdeaCentre K_HRG_EN.indd 18 2008.10.20 1:59:34 PM Refer to "Identifying parts on its side. 3. power supply align with your computer or in the chassis. 6. To obtain copies of the drives. 9. Note...
Reconnect a power supply connector to each of the Safety and Warranty Guide or HMM, go to the Support Web site at: http://consumersupport.lenovo.com To replace the heat sink assembly: 1. Replacing the heat sink assembly Attention Do not remove the computer cover or attempt ...Locate the heat sink. Install the four screws to the system board. 18 Hardware Replacement Guide 31036127 IdeaCentre K_HRG_EN.indd 18 2008.10.20 1:59:34 PM Refer to "Identifying parts on its side. 3. power supply align with your computer or in the chassis. 6. To obtain copies of the drives. 9. Note...


