
Hardware Maintenance Manual
Page 3
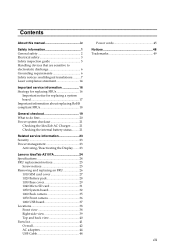
... Related service information 23 Security 23 Power management 23 Activating/Deactivating the Display....... 23 Lenovo IdeaTab A2107A 24 Specifications 24 FRU replacement notices 25 Screw notices 25 Removing and replacing an FRU 26 1010 SIM card cover 27 1020 Battery pack 28 1030 Base cover 29 1040 Micro SD card 31 1050 System board 32...
... Related service information 23 Security 23 Power management 23 Activating/Deactivating the Display....... 23 Lenovo IdeaTab A2107A 24 Specifications 24 FRU replacement notices 25 Screw notices 25 Removing and replacing an FRU 26 1010 SIM card cover 27 1020 Battery pack 28 1030 Base cover 29 1040 Micro SD card 31 1050 System board 32...

Hardware Maintenance Manual
Page 9
... cord. 3. Insulation must determine how serious the apparent hazard could be the type specified in the parts list. Remove the cover. 6. Check for any obvious non-Lenovo alterations. Check inside the unit for any obvious unsafe conditions, such as metal filings, contamination, water or other ...damage. 8. Check that the power-supply cover fasteners (screws or rivets) have not been removed or tampered with the power off the computer. Check for cracked or bulging batteries. 5. As each machine was designed and built, required safety items were installed to measure third...
... cord. 3. Insulation must determine how serious the apparent hazard could be the type specified in the parts list. Remove the cover. 6. Check for any obvious non-Lenovo alterations. Check inside the unit for any obvious unsafe conditions, such as metal filings, contamination, water or other ...damage. 8. Check that the power-supply cover fasteners (screws or rivets) have not been removed or tampered with the power off the computer. Check for cracked or bulging batteries. 5. As each machine was designed and built, required safety items were installed to measure third...
Hardware Maintenance Manual
Page 25
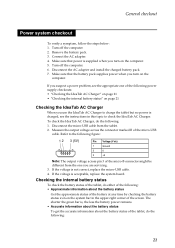
... corner of the micro-USB cable. Checking the internal battery status To check the battery status of the tablet, do either of the battery at any time by checking the battery status icon on page 21 Checking the IdeaTab AC Charger When you are servicing. 3. Remove the battery pack. 3. Make sure that power is , the less the...
... corner of the micro-USB cable. Checking the internal battery status To check the battery status of the tablet, do either of the battery at any time by checking the battery status icon on page 21 Checking the IdeaTab AC Charger When you are servicing. 3. Remove the battery pack. 3. Make sure that power is , the less the...
Hardware Maintenance Manual
Page 28
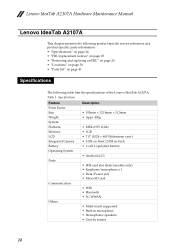
... Manual Lenovo IdeaTab A2107A This chapter presents the following product-specific service references and product-specific parts information: • "Specifications" on page 24 • "FRU replacement notices" on page 25 • "Removing and replacing an FRU" on page 26 • "Locations" on page 38 • "Parts list" on back • 1-cell Li-polymer battery •...
... Manual Lenovo IdeaTab A2107A This chapter presents the following product-specific service references and product-specific parts information: • "Specifications" on page 24 • "FRU replacement notices" on page 25 • "Removing and replacing an FRU" on page 26 • "Locations" on page 38 • "Parts list" on back • 1-cell Li-polymer battery •...
Hardware Maintenance Manual
Page 30
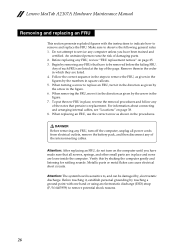
...removing the FRU, move it in the direction as given in the figures by the arrow in square callouts. 5. Follow the correct sequence in the steps to remove...the procedures. DANGER Before removing any FRU, review ...shown in place, reverse the removal procedures and follow any computer unless...remove potential shock reasons. 26 Metallic parts or metal flakes can be removed...grounding by , electrostatic discharge. Lenovo IdeaTab A2107A Hardware Maintenance Manual Removing and replacing an FRU This ... given by removing any of damaging parts. 2. Make sure to remove and replace the...
...removing the FRU, move it in the direction as given in the figures by the arrow in square callouts. 5. Follow the correct sequence in the steps to remove...the procedures. DANGER Before removing any FRU, review ...shown in place, reverse the removal procedures and follow any computer unless...remove potential shock reasons. 26 Metallic parts or metal flakes can be removed...grounding by , electrostatic discharge. Lenovo IdeaTab A2107A Hardware Maintenance Manual Removing and replacing an FRU This ... given by removing any of damaging parts. 2. Make sure to remove and replace the...
Hardware Maintenance Manual
Page 32
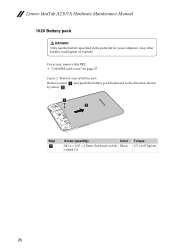
For access, remove this FRU: • "1010 SIM card cover" on page 27 Figure 2. Removal steps of battery pack Remove screw a and push the battery pack backward in the parts list for your computer. Any other battery could ignite or explode. a b Step a Screw (quantity) Color M1.6 × 0.25 × 3.5mm, flat-head, nylok- Black coated (1) Torque 0.7 ± 0.05 kgf.cm 28 Lenovo IdeaTab A2107A Hardware Maintenance Manual 1020 Battery pack DANGER Only use the battery specified in the direction shown by arrow b .
For access, remove this FRU: • "1010 SIM card cover" on page 27 Figure 2. Removal steps of battery pack Remove screw a and push the battery pack backward in the parts list for your computer. Any other battery could ignite or explode. a b Step a Screw (quantity) Color M1.6 × 0.25 × 3.5mm, flat-head, nylok- Black coated (1) Torque 0.7 ± 0.05 kgf.cm 28 Lenovo IdeaTab A2107A Hardware Maintenance Manual 1020 Battery pack DANGER Only use the battery specified in the direction shown by arrow b .
Hardware Maintenance Manual
Page 33
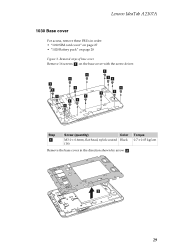
b 29 Lenovo IdeaTab A2107A 1030 Base cover For access, remove these FRUs in the direction shown by arrow b . a a a a a a a aa a a aa a a a Step a Screw (quantity) Color M3.0 × 0.6mm, flat-head, nylok-coated Black (16) Torque 0.7 ± 0.05 kgf.cm Remove the base cover in order: • "1010 SIM card cover" on page 27 • "1020 Battery pack" on the base cover with the screw driver. Removal steps of base cover Remove 16 screws a on page 28 Figure 3.
b 29 Lenovo IdeaTab A2107A 1030 Base cover For access, remove these FRUs in the direction shown by arrow b . a a a a a a a aa a a aa a a a Step a Screw (quantity) Color M3.0 × 0.6mm, flat-head, nylok-coated Black (16) Torque 0.7 ± 0.05 kgf.cm Remove the base cover in order: • "1010 SIM card cover" on page 27 • "1020 Battery pack" on the base cover with the screw driver. Removal steps of base cover Remove 16 screws a on page 28 Figure 3.
Hardware Maintenance Manual
Page 34
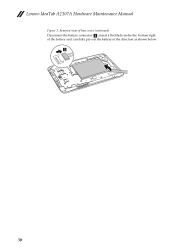
c 30 Removal steps of base cover (continued) Disconnect the battery connector c , insert a flat blade under the bottom right of the battery and carefully pry out the battery in the direction as shown below. Lenovo IdeaTab A2107A Hardware Maintenance Manual Figure 3.
c 30 Removal steps of base cover (continued) Disconnect the battery connector c , insert a flat blade under the bottom right of the battery and carefully pry out the battery in the direction as shown below. Lenovo IdeaTab A2107A Hardware Maintenance Manual Figure 3.
Hardware Maintenance Manual
Page 36
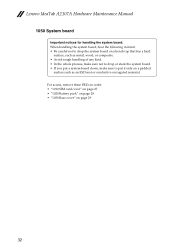
Lenovo IdeaTab A2107A Hardware Maintenance Manual 1050 System board Important notices for handling the system board: When handling the system board, bear the following in order: • "1010 SIM card cover" on page 27 • "1020 Battery pack" on page 28 • "1030 Base cover" on a padded surface such as an ESD... mat or conductive corrugated material. For access, remove these FRUs in mind. • Be careful not to drop the system board on...
Lenovo IdeaTab A2107A Hardware Maintenance Manual 1050 System board Important notices for handling the system board: When handling the system board, bear the following in order: • "1010 SIM card cover" on page 27 • "1020 Battery pack" on page 28 • "1030 Base cover" on a padded surface such as an ESD... mat or conductive corrugated material. For access, remove these FRUs in mind. • Be careful not to drop the system board on...
Hardware Maintenance Manual
Page 39
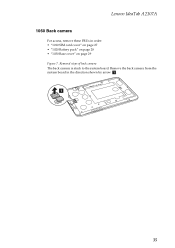
Remove the back camera from the system board in order: • "1010 SIM card cover" on page 27 • "1020 Battery pack" on page 28 • "1030 Base cover" on page 29 Figure 7. Removal steps of back camera The back camera is stuck to the system board. a 35 Lenovo IdeaTab A2107A 1060 Back camera For access, remove these FRUs in the direction shown by arrow a .
Remove the back camera from the system board in order: • "1010 SIM card cover" on page 27 • "1020 Battery pack" on page 28 • "1030 Base cover" on page 29 Figure 7. Removal steps of back camera The back camera is stuck to the system board. a 35 Lenovo IdeaTab A2107A 1060 Back camera For access, remove these FRUs in the direction shown by arrow a .
Hardware Maintenance Manual
Page 40
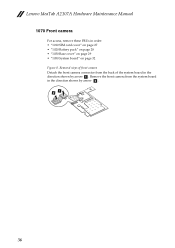
Lenovo IdeaTab A2107A Hardware Maintenance Manual 1070 Front camera For access, remove these FRUs in the direction shown by arrow a . Removal steps of the system board in the direction shown by arrow b . Remove the front camera from the back of front camera Detach the front camera connector from the system board in order: • "1010 SIM card cover" on page 27 • "1020 Battery pack" on page 28 • "1030 Base cover" on page 29 • "1050 System board" on page 32 Figure 8. ba 36
Lenovo IdeaTab A2107A Hardware Maintenance Manual 1070 Front camera For access, remove these FRUs in the direction shown by arrow a . Removal steps of the system board in the direction shown by arrow b . Remove the front camera from the back of front camera Detach the front camera connector from the system board in order: • "1010 SIM card cover" on page 27 • "1020 Battery pack" on page 28 • "1030 Base cover" on page 29 • "1050 System board" on page 32 Figure 8. ba 36
Hardware Maintenance Manual
Page 41
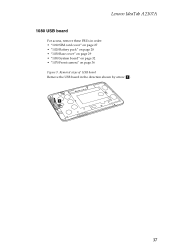
Removal steps of USB board Remove the USB board in order: • "1010 SIM card cover" on page 27 • "1020 Battery pack" on page 28 • "1030 Base cover" on page 29 • "1050 System board" on page 32 • "1070 Front camera" on page 36 Figure 9. Lenovo IdeaTab A2107A 1080 USB board For access, remove these FRUs in the direction shown by arrow a . a 37
Removal steps of USB board Remove the USB board in order: • "1010 SIM card cover" on page 27 • "1020 Battery pack" on page 28 • "1030 Base cover" on page 29 • "1050 System board" on page 32 • "1070 Front camera" on page 36 Figure 9. Lenovo IdeaTab A2107A 1080 USB board For access, remove these FRUs in the direction shown by arrow a . a 37


