IdeaPad Z510 Battery Removal - Lenovo
IdeaPad Z510 Battery Removal

View Results Below
Free Lenovo IdeaPad Z510 manuals!
Problems with Lenovo IdeaPad Z510?
Ask a Question
Free Lenovo IdeaPad Z510 manuals!
Problems with Lenovo IdeaPad Z510?
Ask a Question
Related Manual Pages


Similar Questions

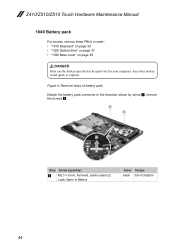
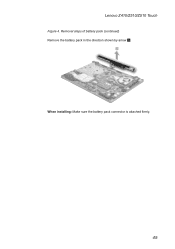
Battery Removal
I can not release the battery.There are release buttons on both ends but no joy.One end appears to r...
I can not release the battery.There are release buttons on both ends but no joy.One end appears to r...
(Posted by garymutton 8 years ago)


Continous Sound
why is my lenovo G570 had a continous sound when i start up?
why is my lenovo G570 had a continous sound when i start up?
(Posted by janettesalazar 11 years ago)
Related Terms
The following terms were also used when searching for IdeaPad Z510 Battery Removal - Lenovo:- ideapad samsung z510
- ideapad y510
- ideapad y510p
- ideapad z510
- ideapad z510 (white)
- ideapad z510 15.6
- ideapad z510 15.6 intel quad core i7
- ideapad z510 15.6 laptop
- ideapad z510 15.6 specs
- ideapad z510 amazon
- ideapad z510 battery
- ideapad z510 battery life
- ideapad z510 battery not charging
- ideapad z510 battery price
- ideapad z510 battery problems
- ideapad z510 battery removal
- ideapad z510 battery replacement
- ideapad z510 bios
- ideapad z510 bios key
- ideapad z510 bios update
- ideapad z510 boot from cd
- ideapad z510 boot from usb
- ideapad z510 boot key
- ideapad z510 boot menu
- ideapad z510 charger
- ideapad z510 cnet
- ideapad z510 coupon
- ideapad z510 dark chocolate
- ideapad z510 disassembly
- ideapad z510 driver
- ideapad z510 drivers
- ideapad z510 drivers for windows 7
- ideapad z510 enter bios
- ideapad z510 hard drive
- ideapad z510 hdd caddy
- ideapad z510 i5
- ideapad z510 i5-4200m
- ideapad z510 i7
- ideapad z510 i7 price
- ideapad z510 i7 review
- ideapad z510 india
- ideapad z510 keyboard
- ideapad z510 keyboard replacement
- ideapad z510 laptop
- ideapad z510 laptop deals
- ideapad z510 laptop review
- ideapad z510 laptop reviews
- ideapad z510 lenovo
- ideapad z510 manual
- ideapad z510 memory upgrade
- ideapad z510 motherboard
- ideapad z510 msata
- ideapad z510 no booting device
- ideapad z510 price
- ideapad z510 price in india
- ideapad z510 ram
- ideapad z510 ram upgrade
- ideapad z510 recovery key
- ideapad z510 release date
- ideapad z510 review
- ideapad z510 reviews
- ideapad z510 safe mode
- ideapad z510 sale
- ideapad z510 samsung
- ideapad z510 screen replacement
- ideapad z510 spec
- ideapad z510 specification
- ideapad z510 specs
- ideapad z510 ssd
- ideapad z510 ssd upgrade
- ideapad z510 support
- ideapad z510 touch
- ideapad z510 touch screen
- ideapad z510 touchpad not working
- ideapad z510 ubuntu
- ideapad z510 video
- ideapad z510 webcam not working
- ideapad z510 weight
- ideapad z510 windows 7
- ideapad z510 youtube
- lenovo ideapad samsung z510
- lenovo ideapad y510
- lenovo ideapad y510p
- lenovo ideapad z510
- lenovo ideapad z510 15.6
- lenovo ideapad z510 15.6 intel quad core i7
- lenovo ideapad z510 15.6 laptop
- lenovo ideapad z510 15.6 specs
- lenovo ideapad z510 amazon
- lenovo ideapad z510 battery
- lenovo ideapad z510 battery life
- lenovo ideapad z510 battery not charging
- lenovo ideapad z510 battery price
- lenovo ideapad z510 battery problems
- lenovo ideapad z510 battery removal
- lenovo ideapad z510 battery replacement
- lenovo ideapad z510 bios
- lenovo ideapad z510 bios key
- lenovo ideapad z510 boot from cd
- lenovo ideapad z510 boot key
- lenovo ideapad z510 charger
- lenovo ideapad z510 cnet
- lenovo ideapad z510 coupon
- lenovo ideapad z510 dark chocolate
- lenovo ideapad z510 disassembly
- lenovo ideapad z510 driver
- lenovo ideapad z510 drivers
- lenovo ideapad z510 drivers for windows 7
- lenovo ideapad z510 enter bios
- lenovo ideapad z510 hard drive
- lenovo ideapad z510 hdd caddy
- lenovo ideapad z510 i5
- lenovo ideapad z510 i7
- lenovo ideapad z510 i7 price
- lenovo ideapad z510 i7 review
- lenovo ideapad z510 india
- lenovo ideapad z510 keyboard
- lenovo ideapad z510 keyboard replacement
- lenovo ideapad z510 laptop
- lenovo ideapad z510 laptop review
- lenovo ideapad z510 manual
- lenovo ideapad z510 memory upgrade
- lenovo ideapad z510 motherboard
- lenovo ideapad z510 no booting device
- lenovo ideapad z510 price
- lenovo ideapad z510 price in india
- lenovo ideapad z510 ram
- lenovo ideapad z510 ram upgrade
- lenovo ideapad z510 recovery key
- lenovo ideapad z510 release date
- lenovo ideapad z510 review
- lenovo ideapad z510 reviews
- lenovo ideapad z510 safe mode
- lenovo ideapad z510 samsung
- lenovo ideapad z510 screen replacement
- lenovo ideapad z510 specification
- lenovo ideapad z510 specs
- lenovo ideapad z510 support
- lenovo ideapad z510 touch
- lenovo ideapad z510 touch screen
- lenovo ideapad z510 touchpad not working
- lenovo ideapad z510 windows 7