User Guide
Page 2
....lenovo.com, click Support, and then click User's guides and manuals. If you . • The features described in this guide may differ from the actual product. Be sure to read it , go to read Lenovo Safety and General Information Guide first. • Some instructions in this guide are using other operating systems, some operations may not apply to you are common to restrictions set...
....lenovo.com, click Support, and then click User's guides and manuals. If you . • The features described in this guide may differ from the actual product. Be sure to read it , go to read Lenovo Safety and General Information Guide first. • Some instructions in this guide are using other operating systems, some operations may not apply to you are common to restrictions set...
User Guide
Page 3
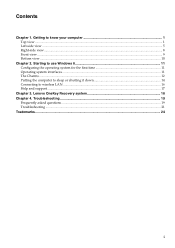
Lenovo OneKey Recovery system 18 Chapter 4. Starting to use Windows 8 11 Configuring the operating system for the first time 11 Operating system interfaces ...11 The Charms ...12 Putting the computer to sleep or shutting it down 14 Connecting to know your computer 1 Top view ...1 Left-side view ...5 Right-side view...8 Front view ...9 Bottom view ...10 Chapter 2. Getting to wireless LAN ...16 Help and support ...17 Chapter 3. Troubleshooting ...19 Frequently asked questions ...19 Troubleshooting ...21 Trademarks ...24 i Contents Chapter 1.
Lenovo OneKey Recovery system 18 Chapter 4. Starting to use Windows 8 11 Configuring the operating system for the first time 11 Operating system interfaces ...11 The Charms ...12 Putting the computer to sleep or shutting it down 14 Connecting to know your computer 1 Top view ...1 Left-side view ...5 Right-side view...8 Front view ...9 Bottom view ...10 Chapter 2. Getting to wireless LAN ...16 Help and support ...17 Chapter 3. Troubleshooting ...19 Frequently asked questions ...19 Troubleshooting ...21 Trademarks ...24 i Contents Chapter 1.
User Guide
Page 6
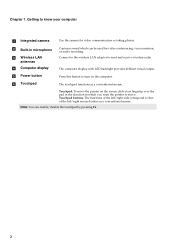
... over the pad in the direction in microphone c Wireless LAN antennas d Computer display e Power button f Touchpad Captures sound which you want the pointer to turn on a conventional mouse. b Built-in which can enable/disable the touchpad by pressing F6. 2 Press this button to move the pointer on the screen, slide your computer a Integrated camera Use the camera for video conferencing, voice narration, or audio recording. Note: You can be used for video communication...
... over the pad in the direction in microphone c Wireless LAN antennas d Computer display e Power button f Touchpad Captures sound which you want the pointer to turn on a conventional mouse. b Built-in which can enable/disable the touchpad by pressing F6. 2 Press this button to move the pointer on the screen, slide your computer a Integrated camera Use the camera for video conferencing, voice narration, or audio recording. Note: You can be used for video communication...
User Guide
Page 7
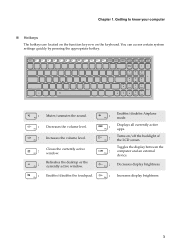
... an external device. : Decreases display brightness. : Increases display brightness. 3 Getting to know your computer „ Hotkeys The hotkeys are located on the function key row on /off the backlight of the LCD screen. Chapter 1. You can access certain system settings quickly by pressing the appropriate hotkey. : Mutes/unmutes the sound. : Decreases the volume level. : Increases the volume level. : Closes the currently active window. : Refreshes the desktop or the currently active window. : Enables/disables the touchpad. : Enables/disables Airplane mode. : Displays all...
... an external device. : Decreases display brightness. : Increases display brightness. 3 Getting to know your computer „ Hotkeys The hotkeys are located on the function key row on /off the backlight of the LCD screen. Chapter 1. You can access certain system settings quickly by pressing the appropriate hotkey. : Mutes/unmutes the sound. : Decreases the volume level. : Increases the volume level. : Closes the currently active window. : Refreshes the desktop or the currently active window. : Enables/disables the touchpad. : Enables/disables Airplane mode. : Displays all...

User Guide
Page 9
... "Using memory cards (not supplied)" on page 7. Getting to enter the boot menu. h Memory card slot Insert memory cards (not supplied) here. b Novo button When the computer is off, press this button to start the Lenovo Recovery system or the BIOS setup utility, or to know your computer Left-side view 12 3 4 567 8 a AC power adapter jack Connect the AC power adapter here. c Fan louvers Dissipate internal heat. g USB port Connects to devices with HDMI inputs, such as a TV or an external display. f HDMI port Connects to USB devices...
... "Using memory cards (not supplied)" on page 7. Getting to enter the boot menu. h Memory card slot Insert memory cards (not supplied) here. b Novo button When the computer is off, press this button to start the Lenovo Recovery system or the BIOS setup utility, or to know your computer Left-side view 12 3 4 567 8 a AC power adapter jack Connect the AC power adapter here. c Fan louvers Dissipate internal heat. g USB port Connects to devices with HDMI inputs, such as a TV or an external display. f HDMI port Connects to USB devices...
User Guide
Page 10
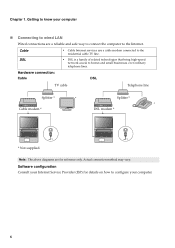
.... Getting to wired LAN Wired connections are for details on how to configure your computer „ Connecting to know your computer. 6 Cable DSL Hardware connection: Cable • Cable Internet services use a cable modem connected to the residential cable TV line. • DSL is a family of related technologies that bring high-speed network access to the Internet. Note: The above diagrams are a reliable and safe way to connect the computer to homes...
.... Getting to wired LAN Wired connections are for details on how to configure your computer „ Connecting to know your computer. 6 Cable DSL Hardware connection: Cable • Cable Internet services use a cable modem connected to the residential cable TV line. • DSL is a family of related technologies that bring high-speed network access to the Internet. Note: The above diagrams are a reliable and safe way to connect the computer to homes...

User Guide
Page 11
... by that device. Note: The dummy card is used for future use . However, some devices may not be recognized. „ Using memory cards (not supplied) Your computer supports the following types of the memory card slot. Inserting a memory card 1 Push the dummy card in the slot at a time. • This card reader does not support SDIO devices (e.g., SDIO Bluetooth, etc.). Getting to a power source before connecting. Note: Before removing the memory card, disable it , and then installs the driver automatically.
... by that device. Note: The dummy card is used for future use . However, some devices may not be recognized. „ Using memory cards (not supplied) Your computer supports the following types of the memory card slot. Inserting a memory card 1 Push the dummy card in the slot at a time. • This card reader does not support SDIO devices (e.g., SDIO Bluetooth, etc.). Getting to a power source before connecting. Note: Before removing the memory card, disable it , and then installs the driver automatically.
User Guide
Page 12
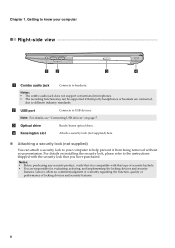
... being removed without your computer Right-side view 1 2 3 4 a Combo audio jack Connects to know your permission. c Optical drive Reads/burns optical discs. Lenovo offers no comment judgment or warranty regarding the function, quality or performance of security keyhole. • You are connected, due to USB devices. For details on page 7. Note: For details, see "Connecting USB devices" on installing the security lock, please refer to the instructions...
... being removed without your computer Right-side view 1 2 3 4 a Combo audio jack Connects to know your permission. c Optical drive Reads/burns optical discs. Lenovo offers no comment judgment or warranty regarding the function, quality or performance of security keyhole. • You are connected, due to USB devices. For details on page 7. Note: For details, see "Connecting USB devices" on installing the security lock, please refer to the instructions...
User Guide
Page 13
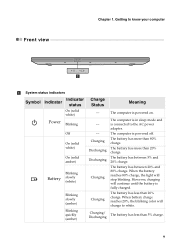
... sleep mode and is fully charged. The battery has less than 80% charge. The battery has between 20% and 80% charge. Blinking Battery slowly (white) Blinking slowly (amber) Charging Charging The battery has between 5% and 20% charge. However, charging will stop blinking. The computer is powered on. Blinking quickly (amber) Charging/ Discharging The battery has less than 20% charge. When the battery reaches 80% charge, the light will continue until the battery is connected to the AC power adapter...
... sleep mode and is fully charged. The battery has less than 80% charge. The battery has between 20% and 80% charge. Blinking Battery slowly (white) Blinking slowly (amber) Charging Charging The battery has between 5% and 20% charge. However, charging will stop blinking. The computer is powered on. Blinking quickly (amber) Charging/ Discharging The battery has less than 20% charge. When the battery reaches 80% charge, the light will continue until the battery is connected to the AC power adapter...
User Guide
Page 15
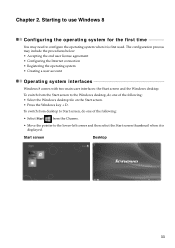
...; Registering the operating system • Creating a user account Operating system interfaces Windows 8 comes with two main user interfaces: the Start screen and the Windows desktop. Start screen Desktop 11 Chapter 2. To switch from the Charms. • Move the pointer to configure the operating system when it is first used. The configuration process may need to the lower-left corner and then select the Start screen thumbnail when it is displayed.
...; Registering the operating system • Creating a user account Operating system interfaces Windows 8 comes with two main user interfaces: the Start screen and the Windows desktop. Start screen Desktop 11 Chapter 2. To switch from the Charms. • Move the pointer to configure the operating system when it is first used. The configuration process may need to the lower-left corner and then select the Start screen thumbnail when it is displayed.
User Guide
Page 17
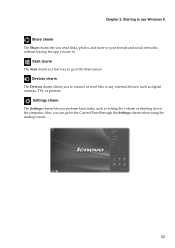
... to the Start screen. Starting to use Windows 8 Share charm The Share charm lets you to connect or send files to the Control Panel through the Settings charm when using the desktop screen. 13 Start charm The Start charm is a fast way to go to your friends and social networks without leaving the app you can get to any external devices, such as setting the volume or shutting...
... to the Start screen. Starting to use Windows 8 Share charm The Share charm lets you to connect or send files to the Control Panel through the Settings charm when using the desktop screen. 13 Start charm The Start charm is a fast way to go to your friends and social networks without leaving the app you can get to any external devices, such as setting the volume or shutting...
User Guide
Page 18
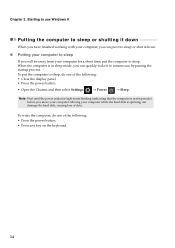
... power button. • Press any key on the keyboard. 14 Note: Wait until the power indicator light starts blinking (indicating that the computer is in sleep mode, you can quickly wake it down When you have finished working with your computer, you can damage the hard disk, causing loss of the following : • Close the display panel. • Press the power button. • Open the Charms and then select Settings → Power → Sleep...
... power button. • Press any key on the keyboard. 14 Note: Wait until the power indicator light starts blinking (indicating that the computer is in sleep mode, you can quickly wake it down When you have finished working with your computer, you can damage the hard disk, causing loss of the following : • Close the display panel. • Press the power button. • Open the Charms and then select Settings → Power → Sleep...
User Guide
Page 20
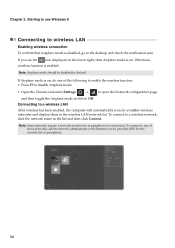
... displayed on , do one of the following to enable the wireless function: • Press F7 to disable Airplane mode. • Open the Charms and select Settings → to open the Network configuration page, and then toggle the Airplane mode switch to a wireless LAN After wireless has been enabled, the computer will automatically scan for connection. If Airplane mode is disabled, go to the desktop and check the notification area. Starting to use Windows 8 Connecting...
... displayed on , do one of the following to enable the wireless function: • Press F7 to disable Airplane mode. • Open the Charms and select Settings → to open the Network configuration page, and then toggle the Airplane mode switch to a wireless LAN After wireless has been enabled, the computer will automatically scan for connection. If Airplane mode is disabled, go to the desktop and check the notification area. Starting to use Windows 8 Connecting...

User Guide
Page 21
You can also get online help and support by clicking on your computer. You can read the Windows Help and Support file on one of the two links listed under More to use Windows 8 Help and support If you have any problems using the operating system, see the Windows Help and Support file. Chapter 2. Starting to explore. 17 To open the Windows Help and Support file, do one of the following: • Select Settings charm, then select Help. • Press Windows key + F1.
You can also get online help and support by clicking on your computer. You can read the Windows Help and Support file on one of the two links listed under More to use Windows 8 Help and support If you have any problems using the operating system, see the Windows Help and Support file. Chapter 2. Starting to explore. 17 To open the Windows Help and Support file, do one of the following: • Select Settings charm, then select Help. • Press Windows key + F1.
User Guide
Page 22
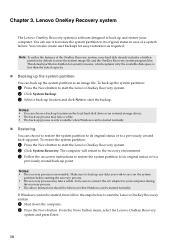
... external storage device. • The back-up point. So be started normally. Note: To utilize the features of a system failure. You can be sure to connect the AC adapter to your hard disk already includes a hidden partition by default to start the Lenovo OneKey Recovery system: 1 Shut down the computer. 2 Press the Novo button. Make sure to back up any data you wish to a previously created...
... external storage device. • The back-up point. So be started normally. Note: To utilize the features of a system failure. You can be sure to connect the AC adapter to your hard disk already includes a hidden partition by default to start the Lenovo OneKey Recovery system: 1 Shut down the computer. 2 Press the Novo button. Make sure to back up any data you wish to a previously created...
User Guide
Page 23
... software, you need to restore the system to its original factory status. You can find the hardware specifications for your computer on the D partition of your hard disk. Read and follow when using your computer is , replace the damaged media. If your computer. When do if the back-up before starting the recovery process. 19 You can also download the latest device drivers from the Lenovo consumer support website. Troubleshooting...
... software, you need to restore the system to its original factory status. You can find the hardware specifications for your computer on the D partition of your hard disk. Read and follow when using your computer is , replace the damaged media. If your computer. When do if the back-up before starting the recovery process. 19 You can also download the latest device drivers from the Lenovo consumer support website. Troubleshooting...
User Guide
Page 24
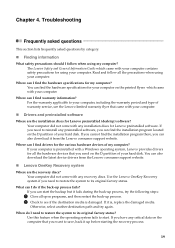
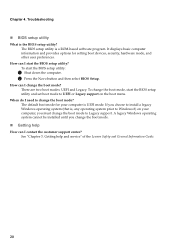
... boot menu. When do I start the BIOS setup utility? A legacy Windows operating system cannot be installed until you must change the boot mode, start the BIOS setup utility: 1 Shut down the computer. 2 Press the Novo button and then select BIOS Setup. Chapter 4. It displays basic computer information and provides options for your computer, you change the boot mode. „ Getting help and service" of the Lenovo Safety and General Information Guide. 20 The default boot mode for setting boot devices, security, hardware mode, and other user...
... boot menu. When do I start the BIOS setup utility? A legacy Windows operating system cannot be installed until you must change the boot mode, start the BIOS setup utility: 1 Shut down the computer. 2 Press the Novo button and then select BIOS Setup. Chapter 4. It displays basic computer information and provides options for your computer, you change the boot mode. „ Getting help and service" of the Lenovo Safety and General Information Guide. 20 The default boot mode for setting boot devices, security, hardware mode, and other user...
User Guide
Page 25
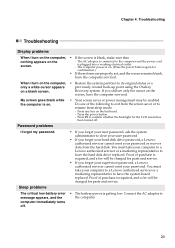
... your hard disk drive password, a Lenovo authorized servicer cannot reset your computer to a Lenovo authorized servicer or a marketing representative to have the hard disk drive replaced. Proof of purchase is on the screen, have the computer serviced. • Restore the system partition to the computer and the power cord is getting low. Connect the AC adapter to confirm whether the backlight for parts and service. • The battery power is plugged into a working electrical outlet. - Sleep problems...
... your hard disk drive password, a Lenovo authorized servicer cannot reset your computer to a Lenovo authorized servicer or a marketing representative to have the hard disk drive replaced. Proof of purchase is on the screen, have the computer serviced. • Restore the system partition to the computer and the power cord is getting low. Connect the AC adapter to confirm whether the backlight for parts and service. • The battery power is plugged into a working electrical outlet. - Sleep problems...
User Guide
Page 26
... are installed and configured correctly, have the computer serviced. To reset the computer, press and hold the power button for the LCD screen has been turned off . - The screen is not used. - If the power indicator is in blinking, press the power button to confirm whether the backlight for 4 seconds or more. Troubleshooting The computer enters sleep mode immediately after the battery status indicator shows empty. 22 the computer does not work. •...
... are installed and configured correctly, have the computer serviced. To reset the computer, press and hold the power button for the LCD screen has been turned off . - The screen is not used. - If the power indicator is in blinking, press the power button to confirm whether the backlight for 4 seconds or more. Troubleshooting The computer enters sleep mode immediately after the battery status indicator shows empty. 22 the computer does not work. •...
User Guide
Page 27
... created backup point. A hard disk drive problem The hard disk drive does not work . • The surge protector in the battery might lock when it enters sleep mode during a communication operation. The connected external device does not work . then turn off your computer. • When using a Windows operating system. • There is powered off the computer for 4 seconds or more space on the destination device. • To turn on the network. • See the Boot menu of the BIOS setup utility. Otherwise, the device...
... created backup point. A hard disk drive problem The hard disk drive does not work . • The surge protector in the battery might lock when it enters sleep mode during a communication operation. The connected external device does not work . then turn off your computer. • When using a Windows operating system. • There is powered off the computer for 4 seconds or more space on the destination device. • To turn on the network. • See the Boot menu of the BIOS setup utility. Otherwise, the device...


