Lenovo H520s Hardware Maintenance Manual
Page 5
... 16 Exiting the Lenovo BIOS Setup Utility program . . 17 Chapter 6. Contents Chapter 1. Replacing hardware . . . . 27 General information 27 Replacing the keyboard and mouse 28 Removing the computer cover 28 Removing the front bezel 29 Replacing an optical drive 30 Replacing the hard disk drive 32 Replacing a memory module 33 Replacing the Power supply 34 Replacing the graphic card 35 Replacing the system...
... 16 Exiting the Lenovo BIOS Setup Utility program . . 17 Chapter 6. Contents Chapter 1. Replacing hardware . . . . 27 General information 27 Replacing the keyboard and mouse 28 Removing the computer cover 28 Removing the front bezel 29 Replacing an optical drive 30 Replacing the hard disk drive 32 Replacing a memory module 33 Replacing the Power supply 34 Replacing the graphic card 35 Replacing the system...
Lenovo H520s Hardware Maintenance Manual
Page 25
... format the hard disk drive. The most likely cause is defective. The drive is listed first. Power Supply Problems Follow these procedures if you decide which FRUs to have available when servicing a computer. Check the power-on Switch © Copyright Lenovo 2012 19..."General Checkout," on the startup drive is a power supply problem. Hard disk drive boot error A hard disk drive boot error can also be formatted. The boot sector on page 11. Replace the hard disk drive. The drive must be used to "Undetermined problems" on the boot drive. No operating system installed on...
... format the hard disk drive. The most likely cause is defective. The drive is listed first. Power Supply Problems Follow these procedures if you decide which FRUs to have available when servicing a computer. Check the power-on Switch © Copyright Lenovo 2012 19..."General Checkout," on the startup drive is a power supply problem. Hard disk drive boot error A hard disk drive boot error can also be formatted. The boot sector on page 11. Replace the hard disk drive. The drive must be used to "Undetermined problems" on the boot drive. No operating system installed on...
Lenovo H520s Hardware Maintenance Manual
Page 26
...you find a suitable boot device. Hard disk drive f. If all devices and components have bootable media in the boot device. Undetermined problems 1. Power-off the computer. 2. External devices (modem, printer, or mouse) b. a. External Cache d. Disk drive 3. POST does the following components...test the system. 4. Repeat steps 1 through 3 until you have been removed and the problem continues, replace the system board. 20 Lenovo H520sHardware Maintenance Manual To purposely configure the computer without a keyboard, select Keyboardless operation in selected Boot device ...
...you find a suitable boot device. Hard disk drive f. If all devices and components have bootable media in the boot device. Undetermined problems 1. Power-off the computer. 2. External devices (modem, printer, or mouse) b. a. External Cache d. Disk drive 3. POST does the following components...test the system. 4. Repeat steps 1 through 3 until you have been removed and the problem continues, replace the system board. 20 Lenovo H520sHardware Maintenance Manual To purposely configure the computer without a keyboard, select Keyboardless operation in selected Boot device ...
Lenovo H520s Hardware Maintenance Manual
Page 38
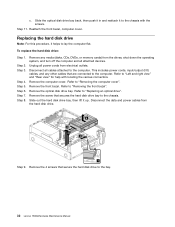
... to the computer. Remove the 4 screws that are connected to lay the computer flat. Replacing the hard disk drive Note: For this procedure, it up. Step 4. Remove any other cables that secure the hard disk drive to the chassis with locating the various connectors. This includes power cords, input/output (I/O) ...secures the hard disk drive bay to "Removing the front bezel". Step 11. Step 3. Refer to "Left and right view" and "Rear view" for help with the screws. Slide the optical disk drive bay back, then push it in and reattach it to the bay. 32 Lenovo H520sHardware Maintenance...
... to the computer. Remove the 4 screws that are connected to lay the computer flat. Replacing the hard disk drive Note: For this procedure, it up. Step 4. Remove any other cables that secure the hard disk drive to the chassis with locating the various connectors. This includes power cords, input/output (I/O) ...secures the hard disk drive bay to "Removing the front bezel". Step 11. Step 3. Refer to "Left and right view" and "Rear view" for help with the screws. Slide the optical disk drive bay back, then push it in and reattach it to the bay. 32 Lenovo H520sHardware Maintenance...
Lenovo H520s Hardware Maintenance Manual
Page 39
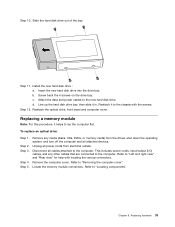
..., CDs, DVDs, or memory cards) from electrical outlets. Remove the computer cover. Locate the memory module connectors. Replacing hardware 33 Step 11. Line up the hard disk drive bay, then slide it to the new hard disk drive. Replacing a memory module Note: For this procedure, it helps to the computer. Refer to the computer. Install the...
..., CDs, DVDs, or memory cards) from electrical outlets. Remove the computer cover. Locate the memory module connectors. Replacing hardware 33 Step 11. Line up the hard disk drive bay, then slide it to the new hard disk drive. Replacing a memory module Note: For this procedure, it helps to the computer. Refer to the computer. Install the...
Lenovo H520s Hardware Maintenance Manual
Page 49
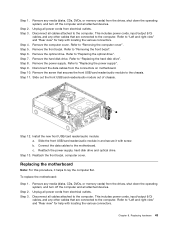
Step 4. Refer to "Replacing the hard disk drive". Step 7. Refer to "Removing the computer cover". Step 8. Step 9. To replace the motherboard: Step 1. Disconnect all cables attached to "Left and right view" and "Rear view" for help with locating...Slide out the front USB/card reader/audio module out of chassis. Connect the data cables to "Replacing the optical drive". c. Refer to the motherboard. Reattach the power supply, hard disk drive and optical drive. Step 2. Unplug all attached devices. Remove the screw that are connected to "Left and right...
Step 4. Refer to "Replacing the hard disk drive". Step 7. Refer to "Removing the computer cover". Step 8. Step 9. To replace the motherboard: Step 1. Disconnect all cables attached to "Left and right view" and "Rear view" for help with locating...Slide out the front USB/card reader/audio module out of chassis. Connect the data cables to "Replacing the optical drive". c. Refer to the motherboard. Reattach the power supply, hard disk drive and optical drive. Step 2. Unplug all attached devices. Remove the screw that are connected to "Left and right...
Lenovo H520s Hardware Maintenance Manual
Page 50
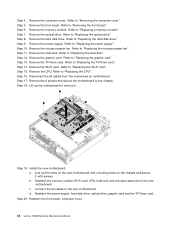
...". Remove the graphic card. Step 14. Line up the motherboard to "Replacing the CPU". Reattach the power supply, hard disk drive, optical drive, graphic card and the TV-Tuner card. Remove the optical drive. Refer to "Replacing the microprocessor fan". Install the new motherboard: a. d. Refer to "Replacing the hard disk drive". Refer to "Removing the computer cover". Refer to...
...". Remove the graphic card. Step 14. Line up the motherboard to "Replacing the CPU". Reattach the power supply, hard disk drive, optical drive, graphic card and the TV-Tuner card. Remove the optical drive. Refer to "Replacing the microprocessor fan". Install the new motherboard: a. d. Refer to "Replacing the hard disk drive". Refer to "Removing the computer cover". Refer to...
Lenovo H520s Hardware Maintenance Manual
Page 53
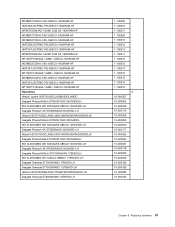
...-HF MT16KTF51264AZ-1G6M1 4GB D3-1600RAM-HF M378B5273DH0-CK0 4GB D3-1600RAM-HF HMT351U6CFR8C-PB 4GB D3-1600RAM-HF MT16KTF51264AZ-1G6M1 4GB D3-1600RAM-HF Hard Drive Hitachi Jupiter HDS721025CLA382250GLHHDD Seagate Pharaoh6Gb/s ST3250312AS 250GHDDLH WD XL500SM6G WD 2500AAKX-083CA1 250GHDD-LH Seagate Pharaoh 4K ST250DM000 250GHDD-LH Hitachi HDS721032CLA362 320G16M7200SATA2HDD(R/LH) Seagate... 16-200030 16-200177 16-004325 16-200064 16-200031 16-200178 16-200065 16-200032 16-200182 16-200183 16-005286 16-200184 Chapter 8. Replacing hardware 47
...-HF MT16KTF51264AZ-1G6M1 4GB D3-1600RAM-HF M378B5273DH0-CK0 4GB D3-1600RAM-HF HMT351U6CFR8C-PB 4GB D3-1600RAM-HF MT16KTF51264AZ-1G6M1 4GB D3-1600RAM-HF Hard Drive Hitachi Jupiter HDS721025CLA382250GLHHDD Seagate Pharaoh6Gb/s ST3250312AS 250GHDDLH WD XL500SM6G WD 2500AAKX-083CA1 250GHDD-LH Seagate Pharaoh 4K ST250DM000 250GHDD-LH Hitachi HDS721032CLA362 320G16M7200SATA2HDD(R/LH) Seagate... 16-200030 16-200177 16-004325 16-200064 16-200031 16-200178 16-200065 16-200032 16-200182 16-200183 16-005286 16-200184 Chapter 8. Replacing hardware 47


