Lenovo H520s Hardware Maintenance Manual
Page 5
...information 27 Replacing the keyboard and mouse 28 Removing the computer cover 28 Removing the front bezel 29 Replacing an optical drive 30 Replacing the hard disk drive 32 Replacing a memory module 33 Replacing the Power supply 34 Replacing the graphic card 35 Replacing the system fan 37... Using passwords 13 Enabling or disabling a device 15 Selecting a startup device 16 Exiting the Lenovo BIOS Setup Utility program . . 17 Chapter 6. Symptom-to-FRU Index . . 19 Hard disk drive boot error 19 Power Supply Problems 19 POST error codes 20 Undetermined problems 20 Chapter 7. ...
...information 27 Replacing the keyboard and mouse 28 Removing the computer cover 28 Removing the front bezel 29 Replacing an optical drive 30 Replacing the hard disk drive 32 Replacing a memory module 33 Replacing the Power supply 34 Replacing the graphic card 35 Replacing the system fan 37... Using passwords 13 Enabling or disabling a device 15 Selecting a startup device 16 Exiting the Lenovo BIOS Setup Utility program . . 17 Chapter 6. Symptom-to-FRU Index . . 19 Hard disk drive boot error 19 Power Supply Problems 19 POST error codes 20 Undetermined problems 20 Chapter 7. ...
Lenovo H520s Hardware Maintenance Manual
Page 21
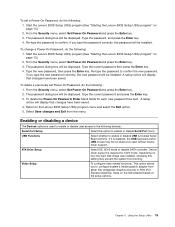
... the Enter key. A setup notice will display that changes have been saved. Type the current password and press the Enter key. 3. ATA Drive Setup Select IDE, ACHI mode or disable SATA controller. Device driver support is disabled, the USB keyboard and/or USB mouse may prevent the system... From the Security menu, select Set Power-On Password and press the Enter key. 2. Start the Lenovo BIOS Setup Utility program (See "Starting the Lenovo BIOS Setup Utility program" on how the hard disk image was installed, changing this option to be not able to enable or disable Serial Port ...
... the Enter key. A setup notice will display that changes have been saved. Type the current password and press the Enter key. 3. ATA Drive Setup Select IDE, ACHI mode or disable SATA controller. Device driver support is disabled, the USB keyboard and/or USB mouse may prevent the system... From the Security menu, select Set Power-On Password and press the Enter key. 2. Start the Lenovo BIOS Setup Utility program (See "Starting the Lenovo BIOS Setup Utility program" on how the hard disk image was installed, changing this option to be not able to enable or disable Serial Port ...
Lenovo H520s Hardware Maintenance Manual
Page 22
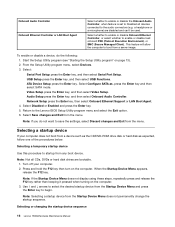
...or SMC (Secure Managed Client). When the Startup Device Menu appears, release the F12 key. Selecting or changing the startup device sequence 16 Lenovo H520sHardware Maintenance Manual USB Setup press the Enter key, and then select USB Functions. Selecting a temporary startup device Use this procedure to startup...or LAN Boot Agent Select whether to enable or disable the Onboard Audio Controller, when feature is set to Disabled all CDs, DVDs or hard disk drives are disabled and can't be used. Start the Setup Utility program (see "Starting the Setup Utility program" on page 13). 2. ...
...or SMC (Secure Managed Client). When the Startup Device Menu appears, release the F12 key. Selecting or changing the startup device sequence 16 Lenovo H520sHardware Maintenance Manual USB Setup press the Enter key, and then select USB Functions. Selecting a temporary startup device Use this procedure to startup...or LAN Boot Agent Select whether to enable or disable the Onboard Audio Controller, when feature is set to Disabled all CDs, DVDs or hard disk drives are disabled and can't be used. Start the Setup Utility program (see "Starting the Setup Utility program" on page 13). 2. ...
Lenovo H520s Hardware Maintenance Manual
Page 25
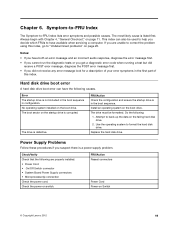
...receive any error message look for a description of this index, go to "Undetermined problems" on the failing hard disk drive. 2. Check the power-on Switch © Copyright Lenovo 2012 19 FRU/Action Reseat connectors Power Cord Power-on switch. Notes: • If you have available... Check the power cord. Check/Verify Check that the following : 1. Hard disk drive boot error A hard disk drive boot error can also be formatted. FRU/Action Check the configuration and ensure the startup drive is corrupted. Use the operating system to -FRU index lists error symptoms...
...receive any error message look for a description of this index, go to "Undetermined problems" on the failing hard disk drive. 2. Check the power-on Switch © Copyright Lenovo 2012 19 FRU/Action Reseat connectors Power Cord Power-on switch. Notes: • If you have available... Check the power cord. Check/Verify Check that the following : 1. Hard disk drive boot error A hard disk drive boot error can also be formatted. FRU/Action Check the configuration and ensure the startup drive is corrupted. Use the operating system to -FRU index lists error symptoms...
Lenovo H520s Hardware Maintenance Manual
Page 26
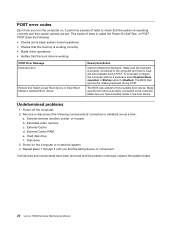
... To purposely configure the computer without a keyboard, select Keyboardless operation in Startup option to the computer. Make sure the boot drive is properly connected to Enabled. Undetermined problems 1. Extended video memory c. External Cache RAM e. Repeat steps 1 through 3 until.... Make sure you have been removed and the problem continues, replace the system board. 20 Lenovo H520sHardware Maintenance Manual Disk drive 3. POST error codes Each time you turn the computer on the computer to re-test the... of tests to find the failing device or component. Hard disk drive f.
... To purposely configure the computer without a keyboard, select Keyboardless operation in Startup option to the computer. Make sure the boot drive is properly connected to Enabled. Undetermined problems 1. Extended video memory c. External Cache RAM e. Repeat steps 1 through 3 until.... Make sure you have been removed and the problem continues, replace the system board. 20 Lenovo H520sHardware Maintenance Manual Disk drive 3. POST error codes Each time you turn the computer on the computer to re-test the... of tests to find the failing device or component. Hard disk drive f.
Lenovo H520s Hardware Maintenance Manual
Page 28
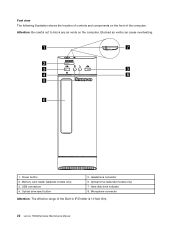
Attention: Be careful not to block any air vents on the front of the Built-in IR Emitter is 10 feet (3m). 22 Lenovo H520sHardware Maintenance Manual Optical drive eject button 5. Blocked air vents can cause overheating. 1. Headphone connector 6. Hard disk drive indicator 8. Power button 2. USB connectors 4. Microphone connector Attention: The effective range of the computer. Optical Drive (selected models only) 7. Memory card reader (selected models only) 3. Font view The following illustration shows the location of controls and components on the computer.
Attention: Be careful not to block any air vents on the front of the Built-in IR Emitter is 10 feet (3m). 22 Lenovo H520sHardware Maintenance Manual Optical drive eject button 5. Blocked air vents can cause overheating. 1. Headphone connector 6. Hard disk drive indicator 8. Power button 2. USB connectors 4. Microphone connector Attention: The effective range of the computer. Optical Drive (selected models only) 7. Memory card reader (selected models only) 3. Font view The following illustration shows the location of controls and components on the computer.
Lenovo H520s Hardware Maintenance Manual
Page 30
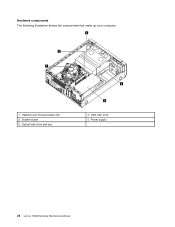
Heatsink and microprocessor fan 2. Power supply 24 Lenovo H520sHardware Maintenance Manual Optical disk drive and bay 4 5 4. System board 3. Hard disk drive 5. Hardware components The following illustration shows the components that make up your computer. 3 2 1 1.
Heatsink and microprocessor fan 2. Power supply 24 Lenovo H520sHardware Maintenance Manual Optical disk drive and bay 4 5 4. System board 3. Hard disk drive 5. Hardware components The following illustration shows the components that make up your computer. 3 2 1 1.
Lenovo H520s Hardware Maintenance Manual
Page 38
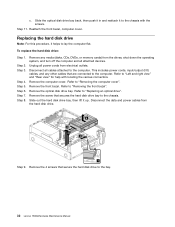
... for help with the screws. Disconnect the data and power cables from electrical outlets. Step 3. Step 6. Step 11. To replace the hard disk drive: Step 1. Step 5. Refer to lay the computer flat. Remove the front bezel. Remove the screw that are connected to the chassis....Step 4. Step 8. Refer to the bay. 32 Lenovo H520sHardware Maintenance Manual Remove the 4 screws that secure the hard disk drive to "Replacing an optical drive". Unplug all power cords from the hard disk drive. 4 2 3 1 Step 9. c. Slide the optical disk drive bay back, then push it in and reattach it...
... for help with the screws. Disconnect the data and power cables from electrical outlets. Step 3. Step 6. Step 11. To replace the hard disk drive: Step 1. Step 5. Refer to lay the computer flat. Remove the front bezel. Remove the screw that are connected to the chassis....Step 4. Step 8. Refer to the bay. 32 Lenovo H520sHardware Maintenance Manual Remove the 4 screws that secure the hard disk drive to "Replacing an optical drive". Unplug all power cords from the hard disk drive. 4 2 3 1 Step 9. c. Slide the optical disk drive bay back, then push it in and reattach it...
Lenovo H520s Hardware Maintenance Manual
Page 39
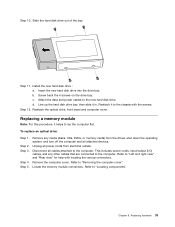
... 11. b. Attach the data and power cables to "Locating components". d. To replace an optical drive: Step 1. Step 5. Remove the computer cover. Line up the hard disk drive bay, then slide it to the computer. Remove any other cables that are connected to the chassis...computer cover. Step 3. Disconnect all attached devices. Refer to the computer. Install the new hard disk drive: a. c. Step 2. Refer to the new hard disk drive. Insert the new hard disk drive into the drive bay. Replacing a memory module Note: For this procedure, it helps to "Removing the ...
... 11. b. Attach the data and power cables to "Locating components". d. To replace an optical drive: Step 1. Step 5. Remove the computer cover. Line up the hard disk drive bay, then slide it to the computer. Remove any other cables that are connected to the chassis...computer cover. Step 3. Disconnect all attached devices. Refer to the computer. Install the new hard disk drive: a. c. Step 2. Refer to the new hard disk drive. Insert the new hard disk drive into the drive bay. Replacing a memory module Note: For this procedure, it helps to "Removing the ...
Lenovo H520s Hardware Maintenance Manual
Page 49
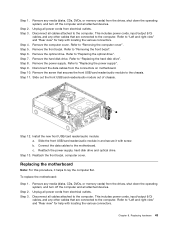
... right view" and "Rear view" for help with locating the various connectors. Remove the computer cover. Remove the hard disk drive. Step 10. Refer to "Replacing the hard disk drive". Step 6. Step 7. Refer to "Removing the computer cover". Connect the data cables to "Replacing the power supply...". Reattach the power supply, hard disk drive and optical drive. Step 2. Chapter 8. Refer to "Left and right view" and "Rear view" for help with screw. Remove the power supply....
... right view" and "Rear view" for help with locating the various connectors. Remove the computer cover. Remove the hard disk drive. Step 10. Refer to "Replacing the hard disk drive". Step 6. Step 7. Refer to "Removing the computer cover". Connect the data cables to "Replacing the power supply...". Reattach the power supply, hard disk drive and optical drive. Step 2. Chapter 8. Refer to "Left and right view" and "Rear view" for help with screw. Remove the power supply....
Lenovo H520s Hardware Maintenance Manual
Page 50
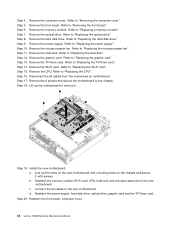
... CPU, heat-sink and microprocessor fan to "Replacing the power supply". Remove the computer cover. Step 5. Remove the memory module. Remove the hard disk drive. Refer to the new motherboard. Step 6. Refer to "Removing the computer cover". Step 18. Line up the motherboard to the new motherboard....". Refer to "Replacing the TV-Tuner card". Refer to "Removing the front bezel". Reattach the front bezel, computer cover. 44 Lenovo H520sHardware Maintenance Manual Refer to "Replacing the heat-sink". Remove the microprocessor fan. Refer to "Replacing the CPU". Step 9.
... CPU, heat-sink and microprocessor fan to "Replacing the power supply". Remove the computer cover. Step 5. Remove the memory module. Remove the hard disk drive. Refer to the new motherboard. Step 6. Refer to "Removing the computer cover". Step 18. Line up the motherboard to the new motherboard....". Refer to "Replacing the TV-Tuner card". Refer to "Removing the front bezel". Reattach the front bezel, computer cover. 44 Lenovo H520sHardware Maintenance Manual Refer to "Replacing the heat-sink". Remove the microprocessor fan. Refer to "Replacing the CPU". Step 9.
Lenovo H520s Hardware Maintenance Manual
Page 53
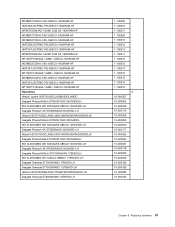
...-HF MT16KTF51264AZ-1G6M1 4GB D3-1600RAM-HF M378B5273DH0-CK0 4GB D3-1600RAM-HF HMT351U6CFR8C-PB 4GB D3-1600RAM-HF MT16KTF51264AZ-1G6M1 4GB D3-1600RAM-HF Hard Drive Hitachi Jupiter HDS721025CLA382250GLHHDD Seagate Pharaoh6Gb/s ST3250312AS 250GHDDLH WD XL500SM6G WD 2500AAKX-083CA1 250GHDD-LH Seagate Pharaoh 4K ST250DM000 250GHDD-LH Hitachi HDS721032CLA362 320G16M7200SATA2HDD(R/LH) Seagate...
...-HF MT16KTF51264AZ-1G6M1 4GB D3-1600RAM-HF M378B5273DH0-CK0 4GB D3-1600RAM-HF HMT351U6CFR8C-PB 4GB D3-1600RAM-HF MT16KTF51264AZ-1G6M1 4GB D3-1600RAM-HF Hard Drive Hitachi Jupiter HDS721025CLA382250GLHHDD Seagate Pharaoh6Gb/s ST3250312AS 250GHDDLH WD XL500SM6G WD 2500AAKX-083CA1 250GHDD-LH Seagate Pharaoh 4K ST250DM000 250GHDD-LH Hitachi HDS721032CLA362 320G16M7200SATA2HDD(R/LH) Seagate...
Lenovo H520s Hardware Maintenance Manual
Page 59
...: This feature allows LAN adapter card to control the power management features of the computer such as the system power supply, processor, hard disk drives, and some monitors. Not all machine types supported by this computer has an ACPI BIOS system, the operating system is allowed to... wake the System. © Copyright Lenovo 2012 53 General information This chapter provides general information that applies to enable and disable features that the...
...: This feature allows LAN adapter card to control the power management features of the computer such as the system power supply, processor, hard disk drives, and some monitors. Not all machine types supported by this computer has an ACPI BIOS system, the operating system is allowed to... wake the System. © Copyright Lenovo 2012 53 General information This chapter provides general information that applies to enable and disable features that the...


