
Lenovo H520s Hardware Maintenance Manual
Page 15
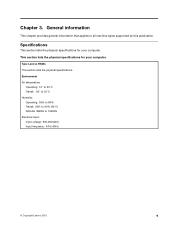
...;C Transit: -20° to 55°C Humidity: Operating: 35% to 80% Transit: 20% to 90% (40°C) Altitude: 86KPa to all machine types supported by this publication. Type Lenovo H520s This section lists the physical specifications. General information This chapter provides general information that applies to 106KPa Electrical input: Input voltage: 90V-264V...
...;C Transit: -20° to 55°C Humidity: Operating: 35% to 80% Transit: 20% to 90% (40°C) Altitude: 86KPa to all machine types supported by this publication. Type Lenovo H520s This section lists the physical specifications. General information This chapter provides general information that applies to 106KPa Electrical input: Input voltage: 90V-264V...
Lenovo H520s Hardware Maintenance Manual
Page 21
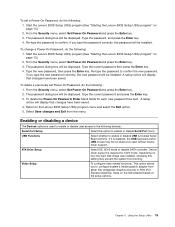
... key. 3. Type the current password and press the Enter key. 3. A setup notice will display that changes have been saved. Device driver support is required for each new password line item. Return to enable or disable USB (Universal Serial Bus) functions. If it is used without device... driver support. Using the Setup Utility 15 Type the new password, then press the Enter key. USB Functions Select whether to the Lenovo BIOS Setup Utility program menu and select the Exit option. 5. To change a ...
... key. 3. Type the current password and press the Enter key. 3. A setup notice will display that changes have been saved. Device driver support is required for each new password line item. Return to enable or disable USB (Universal Serial Bus) functions. If it is used without device... driver support. Using the Setup Utility 15 Type the new password, then press the Enter key. USB Functions Select whether to the Lenovo BIOS Setup Utility program menu and select the Exit option. 5. To change a ...
Lenovo H520s Hardware Maintenance Manual
Page 22
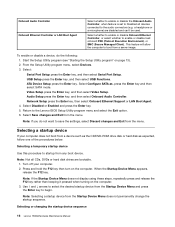
... Selecting a startup device from the menu. ATA Device Setup press the Enter key. Network Setup press the Enter key, then select Onboard Ethernet Support or LAN Boot Agent. 4. Use ↑ and ↓ arrows to select the desired startup device from a device such as the CD/...enable or disable load onboard PXE (Preboot Execution Environment), or SMC (Secure Managed Client). Selecting or changing the startup device sequence 16 Lenovo H520sHardware Maintenance Manual USB Setup press the Enter key, and then select USB Functions. Select Disabled or Enabled and press the Enter key...
... Selecting a startup device from the menu. ATA Device Setup press the Enter key. Network Setup press the Enter key, then select Onboard Ethernet Support or LAN Boot Agent. 4. Use ↑ and ↓ arrows to select the desired startup device from a device such as the CD/...enable or disable load onboard PXE (Preboot Execution Environment), or SMC (Secure Managed Client). Selecting or changing the startup device sequence 16 Lenovo H520sHardware Maintenance Manual USB Setup press the Enter key, and then select USB Functions. Select Disabled or Enabled and press the Enter key...

Lenovo H520s Hardware Maintenance Manual
Page 31
... Chapter 7. Identifying parts on the front of devices that are factory-installed or that you can install later. Battery 8. It provides basic computing functions and supports a variety of the motherboard. 1 2 3 4 5 6 7 8 9 18 17 16 15 14 1. 12V power connector 2. The following illustration shows the location of connectors and components on the motherboard...
... Chapter 7. Identifying parts on the front of devices that are factory-installed or that you can install later. Battery 8. It provides basic computing functions and supports a variety of the motherboard. 1 2 3 4 5 6 7 8 9 18 17 16 15 14 1. 12V power connector 2. The following illustration shows the location of connectors and components on the motherboard...
Lenovo H520s Hardware Maintenance Manual
Page 33
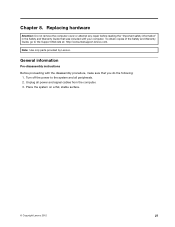
... system and all power and signal cables from the computer. 3. Place the system on a flat, stable surface. © Copyright Lenovo 2012 27 Chapter 8. Note: Use only parts provided by Lenovo. General information Pre-disassembly instructions Before proceeding with your computer. Replacing hardware Attention: Do not remove the computer cover or attempt...the Safety and Warranty Guide that was included with the disassembly procedure, make sure that you do the following: 1. Turn off the power to the Support Web site at: http://consumersupport.lenovo.com. Unplug all peripherals. 2.
... system and all power and signal cables from the computer. 3. Place the system on a flat, stable surface. © Copyright Lenovo 2012 27 Chapter 8. Note: Use only parts provided by Lenovo. General information Pre-disassembly instructions Before proceeding with your computer. Replacing hardware Attention: Do not remove the computer cover or attempt...the Safety and Warranty Guide that was included with the disassembly procedure, make sure that you do the following: 1. Turn off the power to the Support Web site at: http://consumersupport.lenovo.com. Unplug all peripherals. 2.
Lenovo H520s Hardware Maintenance Manual
Page 59
Additional Service Information This chapter provides additional information that applies to all operating systems support ACPI BIOS mode. Not all machine types supported by this computer has an ACPI BIOS system, the operating system is ignored. Advanced configuration and power interface (ACPI) BIOS As this ... of the computer and the settings for Advanced Power Management (APM) BIOS mode is allowed to wake the System. © Copyright Lenovo 2012 53 General information This chapter provides general information that the service representative might find helpful. Chapter 9.
Additional Service Information This chapter provides additional information that applies to all operating systems support ACPI BIOS mode. Not all machine types supported by this computer has an ACPI BIOS system, the operating system is ignored. Advanced configuration and power interface (ACPI) BIOS As this ... of the computer and the settings for Advanced Power Management (APM) BIOS mode is allowed to wake the System. © Copyright Lenovo 2012 53 General information This chapter provides general information that the service representative might find helpful. Chapter 9.

User Guide
Page 4
... The Charms Bar 12 Shutting down the computer 12 Switching between apps 12 Closing an app 13 Opening other system programs 13 Windows Help and Support 13 Using the Rescue System 15 OneKey Recovery 16 Driver and Application Installation 17 Troubleshooting and Confirming Setup 19 Troubleshooting Display Problems 20 Troubleshooting Audio...
... The Charms Bar 12 Shutting down the computer 12 Switching between apps 12 Closing an app 13 Opening other system programs 13 Windows Help and Support 13 Using the Rescue System 15 OneKey Recovery 16 Driver and Application Installation 17 Troubleshooting and Confirming Setup 19 Troubleshooting Display Problems 20 Troubleshooting Audio...
User Guide
Page 5
Troubleshooting Problems with Optical Drives and Hard Disks 23 Special considerations for troubleshooting Windows 24 Windows Help and Support 24 BIOS setup utility 25 Performing Daily Maintenance Tasks 25 Hardware Replacement Guide 27 Locations 30 Replacing hardware 35 Appendix 45 Declaration 45 Trademarks 46 Energy Star Statement 47 Enabling ErP compliance mode 48 ii Contents
Troubleshooting Problems with Optical Drives and Hard Disks 23 Special considerations for troubleshooting Windows 24 Windows Help and Support 24 BIOS setup utility 25 Performing Daily Maintenance Tasks 25 Hardware Replacement Guide 27 Locations 30 Replacing hardware 35 Appendix 45 Declaration 45 Trademarks 46 Energy Star Statement 47 Enabling ErP compliance mode 48 ii Contents

User Guide
Page 11
... instructions for those devices. 6 User Guide Headphone Use this connector to attach headphones to an Ethernet-type local area network. TV-Tuner connector (optional) Only supported on a stereo system or other sounds without disturbing anyone. USB connector Use this connector to attach the computer to your display or TV. DVI connector...
... instructions for those devices. 6 User Guide Headphone Use this connector to attach headphones to an Ethernet-type local area network. TV-Tuner connector (optional) Only supported on a stereo system or other sounds without disturbing anyone. USB connector Use this connector to attach the computer to your display or TV. DVI connector...
User Guide
Page 12
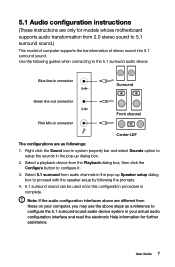
... your actual audio configuration interface and read the electronic Help information for further assistance. 5.1 Audio configuration instructions (These instructions are only for models whose motherboard supports audio transformation from those on your computer, you may use the above are different from 2.0 stereo sound to 5.1 surround sound.) This model of computer...
... your actual audio configuration interface and read the electronic Help information for further assistance. 5.1 Audio configuration instructions (These instructions are only for models whose motherboard supports audio transformation from those on your computer, you may use the above are different from 2.0 stereo sound to 5.1 surround sound.) This model of computer...

User Guide
Page 15
... wireless LAN antenna to access your wireless home network. To connect your computer to other end to the wireless network: 1. Your computer is designed to support a wireless (selected models only) or wired network that connects your computer to the network router or broadband modem. Note: Broadband modem and router installation procedures...
... wireless LAN antenna to access your wireless home network. To connect your computer to other end to the wireless network: 1. Your computer is designed to support a wireless (selected models only) or wired network that connects your computer to the network router or broadband modem. Note: Broadband modem and router installation procedures...
User Guide
Page 16
For any question related to the operating system, please contact Microsoft directly. User Guide 11 Please use it in accordance with the End User License Agreement (EULA) between apps Closing an app Opening other system programs Windows Help and Support Attention: The Windows 8 operating system is provided by Microsoft Corporation. Using Windows 8 This chapter contains the following topics: Switching between the main Windows 8 interfaces The Charms Bar Shutting down the computer Switching between you and Microsoft.
For any question related to the operating system, please contact Microsoft directly. User Guide 11 Please use it in accordance with the End User License Agreement (EULA) between apps Closing an app Opening other system programs Windows Help and Support Attention: The Windows 8 operating system is provided by Microsoft Corporation. Using Windows 8 This chapter contains the following topics: Switching between the main Windows 8 interfaces The Charms Bar Shutting down the computer Switching between you and Microsoft.
User Guide
Page 18
... explore. To open the menu. • Press the Windows key + X. When the thumbnail appears, right-click with the operating system, see the Windows Help and Support file. Opening other system programs There is a fast way to open other system programs. To open the menu, do one of the following: • Move... you have a problem with the mouse to the bottom left corner of the screen. User Guide 13 You can also get online help and support by clicking on your computer. Closing an app To close an app, do one of the following: • Select the Settings charm, then select Help. &#...
... explore. To open the menu. • Press the Windows key + X. When the thumbnail appears, right-click with the operating system, see the Windows Help and Support file. Opening other system programs There is a fast way to open other system programs. To open the menu, do one of the following: • Move... you have a problem with the mouse to the bottom left corner of the screen. User Guide 13 You can also get online help and support by clicking on your computer. Closing an app To close an app, do one of the following: • Select the Settings charm, then select Help. &#...
User Guide
Page 25
... loose; Check to see if the signal cable to the connector on the computer graphics card. Check to the connector on ; This message may help support personnel diagnose and fix the problem(s). • If an error message occurs in a program, see if the monitor power cord is securely connected to see...
... loose; Check to see if the signal cable to the connector on the computer graphics card. Check to the connector on ; This message may help support personnel diagnose and fix the problem(s). • If an error message occurs in a program, see if the monitor power cord is securely connected to see...
User Guide
Page 29
...channel list for troubleshooting Windows Record the following information as calculated using this computer model only support the Windows 8 system. 2. When you use the Windows Media Center to watch Teletext programming. Windows Help and Support If you change your TV signal from digital to analog, your computer. b. You ...actual capacity due to the rounding of totals. When you want to watch digital TV again, you can read the Windows Help and Support file on one of the following two situations, you change your TV signal from analog to analog before you must set the TV ...
...channel list for troubleshooting Windows Record the following information as calculated using this computer model only support the Windows 8 system. 2. When you use the Windows Media Center to watch Teletext programming. Windows Help and Support If you change your TV signal from digital to analog, your computer. b. You ...actual capacity due to the rounding of totals. When you want to watch digital TV again, you can read the Windows Help and Support file on one of the following two situations, you change your TV signal from analog to analog before you must set the TV ...
User Guide
Page 30
...? When do not spray cleaning solution directly onto the display. The legacy Windows operating system cannot be installed if you need to UEFI or Legacy support on the boot menu. Only use liquid or aerosol cleaners, which may contain flammable substances. To start the BIOS setup utility and set boot mode... to clean the components include: a vacuum cleaner, a soft cotton cloth, pure water (preferably purified or distilled water) and cotton swabs. If you need to Legacy support. BIOS setup utility What is the UEFI mode.
...? When do not spray cleaning solution directly onto the display. The legacy Windows operating system cannot be installed if you need to UEFI or Legacy support on the boot menu. Only use liquid or aerosol cleaners, which may contain flammable substances. To start the BIOS setup utility and set boot mode... to clean the components include: a vacuum cleaner, a soft cotton cloth, pure water (preferably purified or distilled water) and cotton swabs. If you need to Legacy support. BIOS setup utility What is the UEFI mode.
User Guide
Page 33
...;. Overview This guide is expected that cables, switches, and certain mechanical parts can obtain one online from the Support Web site at http://support.lenovo.com. 28 User Guide The description of the Safety and Warranty Guide, you no longer have a TV-Tuner card installed. Note: Trained service personnel should ...
...;. Overview This guide is expected that cables, switches, and certain mechanical parts can obtain one online from the Support Web site at http://support.lenovo.com. 28 User Guide The description of the Safety and Warranty Guide, you no longer have a TV-Tuner card installed. Note: Trained service personnel should ...

User Guide
Page 34
... installation information • Publications • Troubleshooting information • Parts information • Links to other useful sources of information To access this information, go to http://support.lenovo.com. Tools required To disassemble the computer, you have Internet access, the most up-to avoid a mismatch when replacing the components. During the disassembly procedure...
... installation information • Publications • Troubleshooting information • Parts information • Links to other useful sources of information To access this information, go to http://support.lenovo.com. Tools required To disassemble the computer, you have Internet access, the most up-to avoid a mismatch when replacing the components. During the disassembly procedure...

User Guide
Page 38
Lenovo H505s 12 3 4 5 6 13 12 11 10 9 8 7 Microprocessor and heat sink Memory slots (2) Thermal sensor header Battery Mini PCI-E slot Clear CMOS jumper Front audio connector ... system board The system board (sometimes called the planar or motherboard) is the main circuit board in your computer. It provides basic computer functions and supports a variety of devices that are factory-installed or that you can install later.
Lenovo H505s 12 3 4 5 6 13 12 11 10 9 8 7 Microprocessor and heat sink Memory slots (2) Thermal sensor header Battery Mini PCI-E slot Clear CMOS jumper Front audio connector ... system board The system board (sometimes called the planar or motherboard) is the main circuit board in your computer. It provides basic computer functions and supports a variety of devices that are factory-installed or that you can install later.
User Guide
Page 40
...to the computer. Note: Use only parts provided by Lenovo. General information Pre-disassembly instructions Before proceeding with your operating system, and turn off the computer and all attached devices. 2. Unplug all cables attached to the Support Web site at the rear of the computer". 4....from the drives, shut down before reading the "Important safety information" in the Safety and Warranty Guide that secure the computer cover at http://support.lenovo.com. User Guide 35 To remove the computer cover: 1. Remove any media (disks, CDs, or memory cards) from electrical outlets. ...
...to the computer. Note: Use only parts provided by Lenovo. General information Pre-disassembly instructions Before proceeding with your operating system, and turn off the computer and all attached devices. 2. Unplug all cables attached to the Support Web site at the rear of the computer". 4....from the drives, shut down before reading the "Important safety information" in the Safety and Warranty Guide that secure the computer cover at http://support.lenovo.com. User Guide 35 To remove the computer cover: 1. Remove any media (disks, CDs, or memory cards) from electrical outlets. ...


