

Hardware Maintenance Manual for H200
Page 2
... Maintenance Manual Selecting or changing the startup device sequence 20 Exiting from the Setup Utility program 27 Chapter 7. Using the Setup Utility (Type RS690 22 Starting the Setup Utility program 22 Viewing and changing settings 22 Using passwords 23 Password considerations 23 Supervisor password...23 User Password...24 Security Options...25 Selecting a startup device 26 Selecting a temporary startup device 26 Selecting or changing the startup device sequence 26 Exiting from the Setup Utility program 21 Chapter 6. Symptom-to-FRU Index 34 Hard disk drive boot error 34 Power...
... Maintenance Manual Selecting or changing the startup device sequence 20 Exiting from the Setup Utility program 27 Chapter 7. Using the Setup Utility (Type RS690 22 Starting the Setup Utility program 22 Viewing and changing settings 22 Using passwords 23 Password considerations 23 Supervisor password...23 User Password...24 Security Options...25 Selecting a startup device 26 Selecting a temporary startup device 26 Selecting or changing the startup device sequence 26 Exiting from the Setup Utility program 21 Chapter 6. Symptom-to-FRU Index 34 Hard disk drive boot error 34 Power...
Hardware Maintenance Manual for H200
Page 11
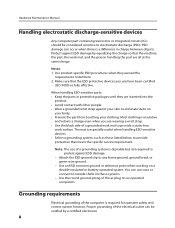
... by a certified electrician. 8 Make sure that the ESD protective devices you are wearing a wrist strap. •• Use the black side of the ac plug on a double-insulated or battery-operated system. Hardware Maintenance Manual Handling electrostatic discharge-sensitive devices Any computer part containing transistors or integrated circuits (ICs) should be verified by equalizing the charge so that the machine, the part, the work surface.
... by a certified electrician. 8 Make sure that the ESD protective devices you are wearing a wrist strap. •• Use the black side of the ac plug on a double-insulated or battery-operated system. Hardware Maintenance Manual Handling electrostatic discharge-sensitive devices Any computer part containing transistors or integrated circuits (ICs) should be verified by equalizing the charge so that the machine, the part, the work surface.

Hardware Maintenance Manual for H200
Page 16
... the information supplied with that the latest level of BIOS is installed on all external devices. 2. See "Starting the Setup Utility program". 2. Select Start Options. 3. Power-off the computer and all external devices. 13 Check all display controls to boot up in the computer you select an incorrect drive. Set all cables and power cords. 3. General Checkout 4Chapter 4. A down-level BIOS might have been rearranged or the drive startup sequence changed. Set Power-On Self-Test to...
... the information supplied with that the latest level of BIOS is installed on all external devices. 2. See "Starting the Setup Utility program". 2. Select Start Options. 3. Power-off the computer and all external devices. 13 Check all display controls to boot up in the computer you select an incorrect drive. Set all cables and power cords. 3. General Checkout 4Chapter 4. A down-level BIOS might have been rearranged or the drive startup sequence changed. Set Power-On Self-Test to...

Hardware Maintenance Manual for H200
Page 17
Hardware Maintenance Manual 5. If you in the same locations 4. If possible, have this configuration ever worked? - Has this information available when requesting assistance from Service Support and Engineering functions. •• Machine type and model •• Processor or hard disk upgrades •• Failure symptom - Have the same BIOS level 3. Have the same configuration options set in use the following conditions and follow the instructions: • If you did not receive the...
Hardware Maintenance Manual 5. If you in the same locations 4. If possible, have this configuration ever worked? - Has this information available when requesting assistance from Service Support and Engineering functions. •• Machine type and model •• Processor or hard disk upgrades •• Failure symptom - Have the same BIOS level 3. Have the same configuration options set in use the following conditions and follow the instructions: • If you did not receive the...

Hardware Maintenance Manual for H200
Page 20
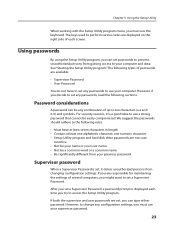
.... • Setup Utility program and hard disk drive passwords are not case sensitive • Not be your name or your computer and data. However, to your user name • Not be a common word or a common name • Be significantly different from changing configuration settings. Using the Setup Utility keyboard. Using passwords By using the Setup Utility program, you can set a Supervisor Password, a password prompt is displayed each screen. However, if you must use a strong password that cannot...
.... • Setup Utility program and hard disk drive passwords are not case sensitive • Not be your name or your computer and data. However, to your user name • Not be a common word or a common name • Be significantly different from changing configuration settings. Using the Setup Utility keyboard. Using passwords By using the Setup Utility program, you can set a Supervisor Password, a password prompt is displayed each screen. However, if you must use a strong password that cannot...

Hardware Maintenance Manual for H200
Page 22
... set others such as Floppy Drive Setup, Serial Port Setup, Parallet Port Setup, USB Setup, Video Setup, Audio Setup, Network Setup and so on. From the Setup Utility program menu, select Device. 3. Return to contine. You can set user password, do the following : 1. when you must type your supervisor password. 1. Press any key to the Setup Utility program menu and select Exit and then Save changes and Exit. Start the Setup Utility program (see "Starting the Setup Utility program" on the right side of PS/2 Mouse Support is set Device...
... set others such as Floppy Drive Setup, Serial Port Setup, Parallet Port Setup, USB Setup, Video Setup, Audio Setup, Network Setup and so on. From the Setup Utility program menu, select Device. 3. Return to contine. You can set user password, do the following : 1. when you must type your supervisor password. 1. Press any key to the Setup Utility program menu and select Exit and then Save changes and Exit. Start the Setup Utility program (see "Starting the Setup Utility program" on the right side of PS/2 Mouse Support is set Device...
Hardware Maintenance Manual for H200
Page 26
... and hard disk drive passwords are set, you might want to set any passwords, read the following rules: • Must have to use your computer. However, if you must use your supervisor password. 23 We suggest the passwords should adhere to use the keyboard. Chapter 5. Using the Setup Utility When working with the Setup Utility program menu, you decide to set any passwords to set a Supervisor Password. If both the supervisor and user passwords are not case...
... and hard disk drive passwords are set, you might want to set any passwords, read the following rules: • Must have to use your computer. However, if you must use your supervisor password. 23 We suggest the passwords should adhere to use the keyboard. Chapter 5. Using the Setup Utility When working with the Setup Utility program menu, you decide to set any passwords to set a Supervisor Password. If both the supervisor and user passwords are not case...

Hardware Maintenance Manual for H200
Page 32
.... • Setup Utility program and hard disk drive passwords are displayed on the right side of each time you can set any passwords, read the following types of passwords are available: • Supervisor Password • User Password You do not have to set any passwords to perform various tasks are not case sensitive • Not be a common word or a common name • Be significantly different from changing configuration settings. If...
.... • Setup Utility program and hard disk drive passwords are displayed on the right side of each time you can set any passwords, read the following types of passwords are available: • Supervisor Password • User Password You do not have to set any passwords to perform various tasks are not case sensitive • Not be a common word or a common name • Be significantly different from changing configuration settings. If...

Hardware Maintenance Manual for H200
Page 34
Chapter 5. If you type the password correctly, the password will be displayed. Using Device Device is used to enable or disable user access to save the settings, select Discard Changes and Exit or Discard Changes. Select PS/2 Device. 4. Return to contine. See the information displayed on the right side of PS/2 Device is set others such as Serial Port Setup, USB Setup, ATA Drives Setup, Video Setup, Audio Setup, Network Setup and so on page 16). 2. Press any key to the Setup Utility program menu and select...
Chapter 5. If you type the password correctly, the password will be displayed. Using Device Device is used to enable or disable user access to save the settings, select Discard Changes and Exit or Discard Changes. Select PS/2 Device. 4. Return to contine. See the information displayed on the right side of PS/2 Device is set others such as Serial Port Setup, USB Setup, ATA Drives Setup, Video Setup, Audio Setup, Network Setup and so on page 16). 2. Press any key to the Setup Utility program menu and select...
Hardware Maintenance Manual for H200
Page 39
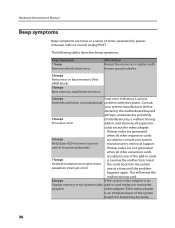
... 8042 Gate A20 test error (cannot manufacturer's technical support. This will reveal the malfunctioning card. 8 beeps If the system video adapter is an Display memory error (system video add-in base memory (first 64KB block) 3 beeps Base memory read/write test error 4 beeps Fatal error indicating a serious Motherboard timer not operational problem with known good modules. 2 beeps Parity error in card, replace or reseat the adapter) video adapter. Hardware Maintenance Manual Beep symptoms Beep symptoms are tones or a series of the system board, the board may be faulty...
... 8042 Gate A20 test error (cannot manufacturer's technical support. This will reveal the malfunctioning card. 8 beeps If the system video adapter is an Display memory error (system video add-in base memory (first 64KB block) 3 beeps Base memory read/write test error 4 beeps Fatal error indicating a serious Motherboard timer not operational problem with known good modules. 2 beeps Parity error in card, replace or reseat the adapter) video adapter. Hardware Maintenance Manual Beep symptoms Beep symptoms are tones or a series of the system board, the board may be faulty...
Hardware Maintenance Manual for H200
Page 41
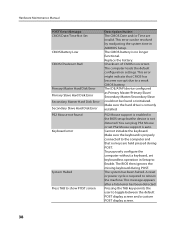
... a keyboard, set PS2 Mouse support is auto. Checksum of CMOS is correctly installed. Pressing the TAB key permits the user to Enable. Make sure the hard drive is incorrect. The system has been halted. You can be found Keyboard error System Halted Press TAB to a weak CMOS battery. The BIOS then ignores the missing keyboard during POST. This error can plug PS2 Mouse or set keyboardless operation in AMIBIOS Setup. The IDE/ATAPI device configured as...
... a keyboard, set PS2 Mouse support is auto. Checksum of CMOS is correctly installed. Pressing the TAB key permits the user to Enable. Make sure the hard drive is incorrect. The system has been halted. You can be found Keyboard error System Halted Press TAB to a weak CMOS battery. The BIOS then ignores the missing keyboard during POST. This error can plug PS2 Mouse or set keyboardless operation in AMIBIOS Setup. The IDE/ATAPI device configured as...

Hardware Maintenance Manual for H200
Page 42
..., replace the system board. 39 Chapter 6. External Cache RAM g. Hard disk drive h. Undetermined problems If this computer has a parallel ATA hard disk drive, make sure that the hard disk drive is jumpered as a master and the optical drive is properly connected to the computer. External devices (modem, printer, or mouse) b. Extended video memory e. If all devices and adapters have bootable media. Power-on the computer to find the failing device or adapter. External Cache f. a. Diskette drive 3. Make sure you find a suitable boot device. Make sure the boot...
..., replace the system board. 39 Chapter 6. External Cache RAM g. Hard disk drive h. Undetermined problems If this computer has a parallel ATA hard disk drive, make sure that the hard disk drive is jumpered as a master and the optical drive is properly connected to the computer. External devices (modem, printer, or mouse) b. Extended video memory e. If all devices and adapters have bootable media. Power-on the computer to find the failing device or adapter. External Cache f. a. Diskette drive 3. Make sure you find a suitable boot device. Make sure the boot...
Hardware Maintenance Manual for H200
Page 51
... Audio connector to a Audio connector at either the front or rear of the computer" and "Locating connectors on the part that was replaced, you need to "Locating connectors on the rear of the computer. Refer to avoid interference with the drive bay assembly. Important Correctly route all power cords from the computer and connect the new speaker cable to "Locating components" for the speaker. 4. Refer to confirm the updated information in the Hardware Maintenance Manual. Locate...
... Audio connector to a Audio connector at either the front or rear of the computer" and "Locating connectors on the part that was replaced, you need to "Locating connectors on the rear of the computer. Refer to avoid interference with the drive bay assembly. Important Correctly route all power cords from the computer and connect the new speaker cable to "Locating components" for the speaker. 4. Refer to confirm the updated information in the Hardware Maintenance Manual. Locate...
Hardware Maintenance Manual for H200
Page 53
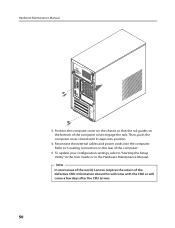
... areas of the world, Lenovo requires the return of the computer cover engage the rails. Position the computer cover on the chassis so that the rail guides on the rear of the computer". 5. To update your configuration settings, refer to "Locating connectors on the bottom of the defective CRU. Refer to "Starting the Setup Utility" in the User Guide or in the Hardware Maintenance Manual. Hardware Maintenance Manual 3. Information about this...
... areas of the world, Lenovo requires the return of the computer cover engage the rails. Position the computer cover on the chassis so that the rail guides on the rear of the computer". 5. To update your configuration settings, refer to "Locating connectors on the bottom of the defective CRU. Refer to "Starting the Setup Utility" in the User Guide or in the Hardware Maintenance Manual. Hardware Maintenance Manual 3. Information about this...

3000 H200 User Guide
Page 8
... more information about the graphics adapter, see the description below). Voltage selection switch (Some models are equipped with this switch) Power connector PS/2 keyboard connector PS/2 mouse connector Serial connector Parallel connector ( Some models are equipped with this connector ) On-board VGA connector ( Some models are equipped with this connector ) USB connectors Ethernet connector Microphone connector Audio line-out connector Audio line-in connector PCI Express x16 graphics adapter connector (Some models are equipped with this connector. User Guide 3 31035089_3000 H_UG_EN.indd...
... more information about the graphics adapter, see the description below). Voltage selection switch (Some models are equipped with this switch) Power connector PS/2 keyboard connector PS/2 mouse connector Serial connector Parallel connector ( Some models are equipped with this connector ) On-board VGA connector ( Some models are equipped with this connector ) USB connectors Ethernet connector Microphone connector Audio line-out connector Audio line-in connector PCI Express x16 graphics adapter connector (Some models are equipped with this connector. User Guide 3 31035089_3000 H_UG_EN.indd...

3000 H200 User Guide
Page 12
1.4.3 Connect the mouse cable to the appropriate mouse connector. (PS/2 connector or USB connector ) Note: If your computer is equipped with a wireless keyboard or mouse, connect according to the relevant description. 1.4.4 Connect the monitor cable to the monitor connector on the computer. • If you have a Digital Video Interface (DVI) monitor, your model has two monitor connectors, be sure to use the connector on the graphics card and the monitor only User Guide 7 31035089_3000 H_UG_EN.indd 7 2008.8.27 6:04:50...
1.4.3 Connect the mouse cable to the appropriate mouse connector. (PS/2 connector or USB connector ) Note: If your computer is equipped with a wireless keyboard or mouse, connect according to the relevant description. 1.4.4 Connect the monitor cable to the monitor connector on the computer. • If you have a Digital Video Interface (DVI) monitor, your model has two monitor connectors, be sure to use the connector on the graphics card and the monitor only User Guide 7 31035089_3000 H_UG_EN.indd 7 2008.8.27 6:04:50...

3000 H200 User Guide
Page 19
... Install to start the Rescue System, select Install drivers and software. It also can see the following instructions: By selecting Control Panel ˠ Management Tools ˠ Computer Management ˠ Disk Management, you can selectively install some of the drivers and software as prompted. For detailed operation information, see the service partition, which is restarted, the installation process will continue until completion. Before accessing the operating system, make sure that the Drivers 14 User Guide 31035089_3000...
... Install to start the Rescue System, select Install drivers and software. It also can see the following instructions: By selecting Control Panel ˠ Management Tools ˠ Computer Management ˠ Disk Management, you can selectively install some of the drivers and software as prompted. For detailed operation information, see the service partition, which is restarted, the installation process will continue until completion. Before accessing the operating system, make sure that the Drivers 14 User Guide 31035089_3000...

3000 H200 User Guide
Page 41
... monitor Troubleshooting and problem resolution: 1. if not, press the Power button. 2. if not, shut down the computer then securely connect the signal cable of the monitor. Check for devices located less than the back audio output connector. Check to see if the monitor power cord is securely connected to the rear connector become silenced. 36 User Guide 31035089_3000 H_UG_EN.indd 36 2008.8.27 6:05:06 PM 5.1 Troubleshooting display problems Problem: Blank screen or no image...
... monitor Troubleshooting and problem resolution: 1. if not, press the Power button. 2. if not, shut down the computer then securely connect the signal cable of the monitor. Check for devices located less than the back audio output connector. Check to see if the monitor power cord is securely connected to the rear connector become silenced. 36 User Guide 31035089_3000 H_UG_EN.indd 36 2008.8.27 6:05:06 PM 5.1 Troubleshooting display problems Problem: Blank screen or no image...
H210 Hardware Replacement Guide
Page 4
... this manual is only used by Lenovo™. This guide contains procedures for replacing the following parts: • Memory modules • Hard disk drive • Optical drive • Keyboard • Mouse • External Speakers • Data Cable Safety information for replacing CRUs Do not open your computer or attempt any repair before reading the "Important safety information" in this copy of the TV card in the Safety and Warranty Guide that cables, switches, and...
... this manual is only used by Lenovo™. This guide contains procedures for replacing the following parts: • Memory modules • Hard disk drive • Optical drive • Keyboard • Mouse • External Speakers • Data Cable Safety information for replacing CRUs Do not open your computer or attempt any repair before reading the "Important safety information" in this copy of the TV card in the Safety and Warranty Guide that cables, switches, and...
H210 Hardware Replacement Guide
Page 22
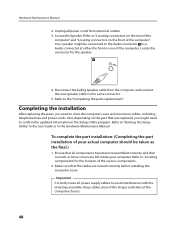
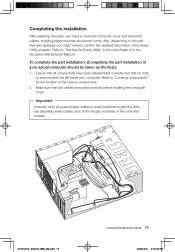
... the Hardware Maintenance Manual. To complete the part installation: (Completing the part installation of the various components. 2. Make sure that was replaced, you need to avoid interference with the drive bay assembly. Also, depending on the part that the cables are left inside your actual computer should be taken as the final.) 1. Refer to "Starting the Setup Utility" in the User Guide or in the Setup Utility program. Keep cables clear of...
... the Hardware Maintenance Manual. To complete the part installation: (Completing the part installation of the various components. 2. Make sure that was replaced, you need to avoid interference with the drive bay assembly. Also, depending on the part that the cables are left inside your actual computer should be taken as the final.) 1. Refer to "Starting the Setup Utility" in the User Guide or in the Setup Utility program. Keep cables clear of...


