User Guide
Page 24
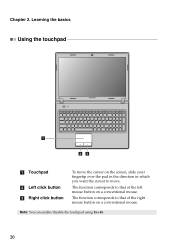
Note: You can enable/disable the touchpad using Fn+F6. 20 Learning the basics Using the touchpad 1 23 a Touchpad b Left click button c Right click button To move the cursor on the screen, slide your fingertip over the pad in the direction in which you want the cursor to that of the left mouse button on a conventional mouse. Chapter 2. The function corresponds to that of the right mouse button on a conventional mouse. The function corresponds to move.
Note: You can enable/disable the touchpad using Fn+F6. 20 Learning the basics Using the touchpad 1 23 a Touchpad b Left click button c Right click button To move the cursor on the screen, slide your fingertip over the pad in the direction in which you want the cursor to that of the left mouse button on a conventional mouse. Chapter 2. The function corresponds to that of the right mouse button on a conventional mouse. The function corresponds to move.
User Guide
Page 27
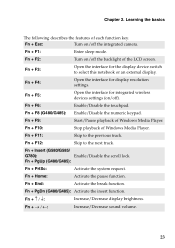
... device switch to select this notebook or an external display. Fn + F6: Enable/Disable the touchpad. Fn + F9: Start/Pause playback of the LCD screen. Fn + Home: Activate the pause function. Fn Increase/Decrease sound volume. 23 Fn + F1: Enter sleep mode. Fn + F12: Skip to the... previous track. Fn + F8 (G480/G485): Enable/Disable the numeric keypad. Fn + Insert (G580/G585/ G780): Enable/Disable the scroll lock. Fn + F11: Skip to the next track. Fn + F2: Turn on /off). Fn + F3: Open the interface ...
... device switch to select this notebook or an external display. Fn + F6: Enable/Disable the touchpad. Fn + F9: Start/Pause playback of the LCD screen. Fn + Home: Activate the pause function. Fn Increase/Decrease sound volume. 23 Fn + F1: Enter sleep mode. Fn + F12: Skip to the... previous track. Fn + F8 (G480/G485): Enable/Disable the numeric keypad. Fn + Insert (G580/G585/ G780): Enable/Disable the scroll lock. Fn + F11: Skip to the next track. Fn + F2: Turn on /off). Fn + F3: Open the interface ...
User Guide
Page 34
...is enabled, switching between integrated and discrete GPUs is starting up. Note: To enter BIOS setup utility, press F2 when the Lenovo logo appears on select models Optimus is automatically switched by others. Chapter 2. The computer cannot be used by Optimus to the ... performance. Learning the basics „ Using passwords Using passwords helps prevent your password at the prompt. About NVIDIA® OptimusTM (on the screen while the computer is performed automatically without user intervention. 30 Enter your computer from one to set a password and enable it, a prompt...
...is enabled, switching between integrated and discrete GPUs is starting up. Note: To enter BIOS setup utility, press F2 when the Lenovo logo appears on select models Optimus is automatically switched by others. Chapter 2. The computer cannot be used by Optimus to the ... performance. Learning the basics „ Using passwords Using passwords helps prevent your password at the prompt. About NVIDIA® OptimusTM (on the screen while the computer is performed automatically without user intervention. 30 Enter your computer from one to set a password and enable it, a prompt...
User Guide
Page 51
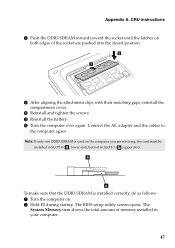
A Reinstall the battery. The BIOS setup utility screen opens. Connect the AC adapter and the cables to the computer again. Appendix A. CRU instructions 8 Push the DDR3 SDRAM inward toward the socket until the ...
A Reinstall the battery. The BIOS setup utility screen opens. Connect the AC adapter and the cables to the computer again. Appendix A. CRU instructions 8 Push the DDR3 SDRAM inward toward the socket until the ...
Hardware Maintenance Manual
Page 3
...Disc 23 Passwords 24 Power-on password 24 Hard-disk password 24 Supervisor password 24 Power management 25 Screen blank mode 25 Sleep (standby) mode 25 Hibernation mode 26 Lenovo G480/G485/G580/G585/G780 ........27 Specifications 27 Status indicators 29 Fn key combinations 31 FRU replacement notices 32 Screw notices...1060 DIMM 45 1070 PCI Express Mini Card for wireless LAN/WAN 47 1080 Keyboard 49 1090 Keyboard bezel 52 1100 Speakers (Lenovo G480/G485/ G580/G585 59 1110 System board 60 1120 LCD unit 70 1130 Fan assembly and Heat Sink assembly 74 1140 CPU 78 1150 Base cover...
...Disc 23 Passwords 24 Power-on password 24 Hard-disk password 24 Supervisor password 24 Power management 25 Screen blank mode 25 Sleep (standby) mode 25 Hibernation mode 26 Lenovo G480/G485/G580/G585/G780 ........27 Specifications 27 Status indicators 29 Fn key combinations 31 FRU replacement notices 32 Screw notices...1060 DIMM 45 1070 PCI Express Mini Card for wireless LAN/WAN 47 1080 Keyboard 49 1090 Keyboard bezel 52 1100 Speakers (Lenovo G480/G485/ G580/G585 59 1110 System board 60 1120 LCD unit 70 1130 Fan assembly and Heat Sink assembly 74 1140 CPU 78 1150 Base cover...
Hardware Maintenance Manual
Page 20
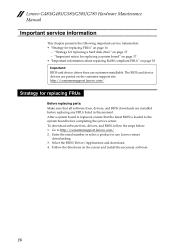
...replaced, ensure that all software fixes, drivers, and BIOS downloads are installed before completing the service action. Lenovo G480/G485/G580/G585/G780 Hardware Maintenance Manual Important service information This chapter presents the following important service information: • "Strategy... for replacing FRUs" on the screen and install the necessary software. 16 After a system board is loaded to http://consumersupport.lenovo.com...
...replaced, ensure that all software fixes, drivers, and BIOS downloads are installed before completing the service action. Lenovo G480/G485/G580/G585/G780 Hardware Maintenance Manual Important service information This chapter presents the following important service information: • "Strategy... for replacing FRUs" on the screen and install the necessary software. 16 After a system board is loaded to http://consumersupport.lenovo.com...
Hardware Maintenance Manual
Page 27
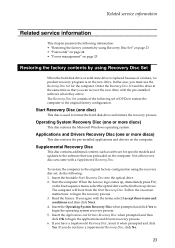
...because of a failure, no product recovery program is used to format the hard disk drive and initiate the recovery process. When the Lenovo logo comes up device. The computer will boot from the Start Recovery Disc. If you agree with the pre-installed software when they... 2. Applications and Drivers Recovery Disc (one or more discs) This disc restores the pre-installed applications and drivers on the computer. on -screen instructions to begin the operating system recovery process. 5. Supplemental Recovery Disc This disc contains additional content, such as the first boot-up , ...
...because of a failure, no product recovery program is used to format the hard disk drive and initiate the recovery process. When the Lenovo logo comes up device. The computer will boot from the Start Recovery Disc. If you agree with the pre-installed software when they... 2. Applications and Drivers Recovery Disc (one or more discs) This disc restores the pre-installed applications and drivers on the computer. on -screen instructions to begin the operating system recovery process. 5. Supplemental Recovery Disc This disc contains additional content, such as the first boot-up , ...
Hardware Maintenance Manual
Page 28
...many as three passwords may be replaced for any Lenovo computer: the power-on password (POP), the...If no activity is apparent on the screen to the Microsoft Windows screen is required by an unauthorized person. The... operating system can be booted. Follow the instructions on the screen for access to reset the password. Power-on password A ...has been copied from being powered on the screen whenever the computer is booted. When the recovery...experience periods when no master HDP is available, neither Lenovo nor Lenov authorized service technicians provide any of the ...
...many as three passwords may be replaced for any Lenovo computer: the power-on password (POP), the...If no activity is apparent on the screen to the Microsoft Windows screen is required by an unauthorized person. The... operating system can be booted. Follow the instructions on the screen for access to reset the password. Power-on password A ...has been copied from being powered on the screen whenever the computer is booted. When the recovery...experience periods when no master HDP is available, neither Lenovo nor Lenov authorized service technicians provide any of the ...

Hardware Maintenance Manual
Page 29
... within that time. • If the battery indicator is amber, indicating that the battery power is powered off. • The CPU stops. Screen blank mode If the time set on the "Turn off monitor" timer in the following event, the computer automatically returns from sleep (standby) mode... resume the operation, do any action to reenter operation mode. 25 To reduce power consumption, the computer has three power management modes: screen blank, sleep (standby), and hibernation. In certain circumstances, the computer goes into hibernation mode.) To cause the computer to what occurs in...
... within that time. • If the battery indicator is amber, indicating that the battery power is powered off. • The CPU stops. Screen blank mode If the time set on the "Turn off monitor" timer in the following event, the computer automatically returns from sleep (standby) mode... resume the operation, do any action to reenter operation mode. 25 To reduce power consumption, the computer has three power management modes: screen blank, sleep (standby), and hibernation. In certain circumstances, the computer goes into hibernation mode.) To cause the computer to what occurs in...
Hardware Maintenance Manual
Page 35
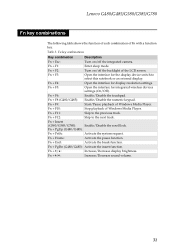
...Disable the touchpad. Fn + PgDn (G480/G485): Activate the insert function. Fn + / : Increase/Decrease sound volume. 31 Lenovo G480/G485/G580/G585/G780 Fn key combinations The following table shows the function of each combination of Windows Media Player. Fn + F5: Open the ... Activate the break function. Fn + F1: Enter sleep mode. Fn + Home: Activate the pause function. Fn + F10: Stop playback of the LCD screen. Fn + F3: Open the interface for integrated wireless devices settings (On/Off). Fn + F8 (G480/G485): Enable/Disable the numeric keypad. Fn ...
...Disable the touchpad. Fn + PgDn (G480/G485): Activate the insert function. Fn + / : Increase/Decrease sound volume. 31 Lenovo G480/G485/G580/G585/G780 Fn key combinations The following table shows the function of each combination of Windows Media Player. Fn + F5: Open the ... Activate the break function. Fn + F1: Enter sleep mode. Fn + Home: Activate the pause function. Fn + F10: Stop playback of the LCD screen. Fn + F3: Open the interface for integrated wireless devices settings (On/Off). Fn + F8 (G480/G485): Enable/Disable the numeric keypad. Fn ...
Safety and General Information Guide - Notebook
Page 24
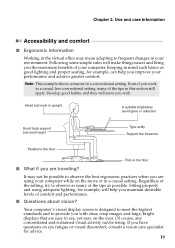
... in your performance and achieve greater comfort. Even if you with clear, crisp images and large, bright displays that are traveling? Your computer's visual display screen is designed to meet the highest standards and to observe as possible. Following some simple rules will help you the maximum benefits of the tips...
... in your performance and achieve greater comfort. Even if you with clear, crisp images and large, bright displays that are traveling? Your computer's visual display screen is designed to meet the highest standards and to observe as possible. Following some simple rules will help you the maximum benefits of the tips...
Safety and General Information Guide - Notebook
Page 25
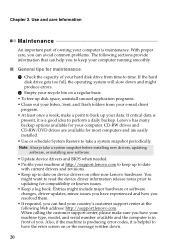
...CD-RW drives and CD-RW/DVD drives are available for maintenance 1 Check the capacity of your country's customer support center at http://support.lenovo.com to keep your computer running smoothly. ■ General tips for most computers and are easily installed. • Use or schedule System ...program. • At least once a week, make sure you . Use and care Information Maintenance An important part of you have the error screen on other non-Lenovo hardware. When calling the customer support center, please make a point to time. If critical data is present, it is maintenance...
...CD-RW drives and CD-RW/DVD drives are available for maintenance 1 Check the capacity of your country's customer support center at http://support.lenovo.com to keep your computer running smoothly. ■ General tips for most computers and are easily installed. • Use or schedule System ...program. • At least once a week, make sure you . Use and care Information Maintenance An important part of you have the error screen on other non-Lenovo hardware. When calling the customer support center, please make a point to time. If critical data is present, it is maintenance...
Safety and General Information Guide - Notebook
Page 37
.... ■ Risk of hazard connecting Class I equipment to cable distribution networks For Class l equipment in Norway, intended to be connected to cable distribution systems, the screen of a coaxial cable is required to be galvanic isolated from the protective earth. • Connection to a Cable Distribution System is to be located in the...
.... ■ Risk of hazard connecting Class I equipment to cable distribution networks For Class l equipment in Norway, intended to be connected to cable distribution systems, the screen of a coaxial cable is required to be galvanic isolated from the protective earth. • Connection to a Cable Distribution System is to be located in the...
User Guide - Lenovo Notebooks (for Windows 8.1)
Page 3
Help and support 16 Trademarks 17 i Contents Chapter 1. Operating system interfaces 2 Switching screens ...2 Using the Start screen 3 Using the desktop ...5 Chapter 3. Getting apps from the Windows Store 11 Creating a Microsoft account 11 Accessing the store...12 Getting your apps ...12 Chapter 5. Touch gestures 13 Chapter 6. Before use 1 Chapter 2. The charms 6 Search charm...7 Share charm...8 Start charm ...8 Devices charm...8 Settings charm ...9 Chapter 4.
Help and support 16 Trademarks 17 i Contents Chapter 1. Operating system interfaces 2 Switching screens ...2 Using the Start screen 3 Using the desktop ...5 Chapter 3. Getting apps from the Windows Store 11 Creating a Microsoft account 11 Accessing the store...12 Getting your apps ...12 Chapter 5. Touch gestures 13 Chapter 6. Before use 1 Chapter 2. The charms 6 Search charm...7 Share charm...8 Start charm ...8 Devices charm...8 Settings charm ...9 Chapter 4.
User Guide - Lenovo Notebooks (for Windows 8.1)
Page 6
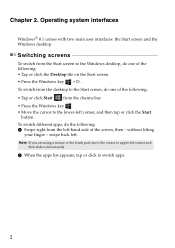
... Move the cursor to switch apps. 2 without lifting your finger - swipe back left corner, and then tap or click the Start button. Switching screens To switch from the left corner and then slide it downwards. 2 When the apps list appears, tap or click to the lower-left . To ...hand side of the following : • Tap or click the Desktop tile on the Start screen. • Press the Windows key + D. Operating system interfaces Windows® 8.1 comes with two main user interfaces: the Start screen and the Windows desktop. Chapter 2. Note: If you are using a mouse or the ...
... Move the cursor to switch apps. 2 without lifting your finger - swipe back left corner, and then tap or click the Start button. Switching screens To switch from the left corner and then slide it downwards. 2 When the apps list appears, tap or click to the lower-left . To ...hand side of the following : • Tap or click the Desktop tile on the Start screen. • Press the Windows key + D. Operating system interfaces Windows® 8.1 comes with two main user interfaces: the Start screen and the Windows desktop. Chapter 2. Note: If you are using a mouse or the ...
User Guide - Lenovo Notebooks (for Windows 8.1)
Page 7
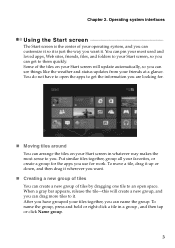
... folders to them quickly. You do not have grouped your tiles together, you have to get to your Start screen in a group , and then tap or click Name group. 3 To move a tile, drag it up ...or down, and then drag it is the center of the tiles on your Start screen, so you can drag more tiles to you want . „ Creating a new group of tiles You can...most sense to it . Some of your friends at a glance. Operating system interfaces Using the Start screen The Start screen is just the way you . Chapter 2. You can create a new group of tiles by dragging one...
... folders to them quickly. You do not have grouped your tiles together, you have to get to your Start screen in a group , and then tap or click Name group. 3 To move a tile, drag it up ...or down, and then drag it is the center of the tiles on your Start screen, so you can drag more tiles to you want . „ Creating a new group of tiles You can...most sense to it . Some of your friends at a glance. Operating system interfaces Using the Start screen The Start screen is just the way you . Chapter 2. You can create a new group of tiles by dragging one...
User Guide - Lenovo Notebooks (for Windows 8.1)
Page 8
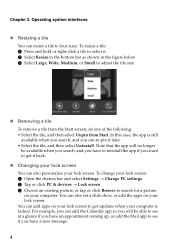
...glance if you want to adjust the tile size. „ Removing a tile To remove a tile from the Start screen, do one of the following: • Select the tile, and then select Unpin from Start. In this case, ...the app is locked. You can add apps on your lock screen to see if you have to reinstall the app if you have an appointment coming up, or add ...the Mail app to get it back. „ Changing your lock screen You can re-pin it . 2 Select Resize in the bottom bar as shown in the figure below. 3...
...glance if you want to adjust the tile size. „ Removing a tile To remove a tile from the Start screen, do one of the following: • Select the tile, and then select Unpin from Start. In this case, ...the app is locked. You can add apps on your lock screen to see if you have to reinstall the app if you have an appointment coming up, or add ...the Mail app to get it back. „ Changing your lock screen You can re-pin it . 2 Select Resize in the bottom bar as shown in the figure below. 3...
User Guide - Lenovo Notebooks (for Windows 8.1)
Page 9
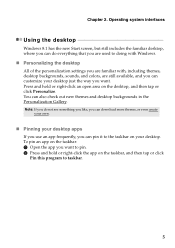
... you can also check out new themes and desktop backgrounds in the Personalization Gallery. Operating system interfaces Using the desktop Windows 8.1 has the new Start screen, but still includes the familiar desktop, where you can do not see something you like, you can download more themes, or even create your own...
... you can also check out new themes and desktop backgrounds in the Personalization Gallery. Operating system interfaces Using the desktop Windows 8.1 has the new Start screen, but still includes the familiar desktop, where you can do not see something you like, you can download more themes, or even create your own...
User Guide - Lenovo Notebooks (for Windows 8.1)
Page 11
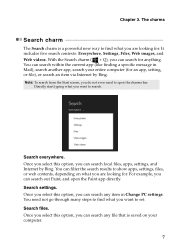
Note: To search from the Start screen, you do not even need not go through many steps to find what you want to set. Directly start typing what you can search out ...
Note: To search from the Start screen, you do not even need not go through many steps to find what you want to set. Directly start typing what you can search out ...

User Guide - Lenovo Notebooks (for Windows 8.1)
Page 12
..., Print, and Project. Chapter 3. Print This enables you want to share, open the charms bar, and select Share. When you are already on the Start screen, you can select Add a device to set up a printer and print documents. Select the item you to play audio or video with people you know.... This charm has the same function as images, videos, and news, etc. Project You can add more to the Start screen by using the Start charm. Open the charms bar and select Start. Once you select this charm to get back to your friends and social...
..., Print, and Project. Chapter 3. Print This enables you want to share, open the charms bar, and select Share. When you are already on the Start screen, you can select Add a device to set up a printer and print documents. Select the item you to play audio or video with people you know.... This charm has the same function as images, videos, and news, etc. Project You can add more to the Start screen by using the Start charm. Open the charms bar and select Start. Once you select this charm to get back to your friends and social...


