

User Guide
Page 3
... battery 36 Replacing the hard disk drive.... 37 Replacing memory 41 Removing the optical drive ........ 45 Trademarks 46 i Learning the basics 8 First use 8 Using AC adapter and battery ...10 Using the touchpad 12 Using the keyboard 13 Connecting external devices.......15 Special keys and buttons 17 System status indicators 18 Securing...
... battery 36 Replacing the hard disk drive.... 37 Replacing memory 41 Removing the optical drive ........ 45 Trademarks 46 i Learning the basics 8 First use 8 Using AC adapter and battery ...10 Using the touchpad 12 Using the keyboard 13 Connecting external devices.......15 Special keys and buttons 17 System status indicators 18 Securing...

User Guide
Page 10
jack Note: For details, see "Using AC adapter and battery" on page 10. 6 Chapter 1. Getting to know your computer Rear view a a AC power adapter Connect the AC adapter here.
jack Note: For details, see "Using AC adapter and battery" on page 10. 6 Chapter 1. Getting to know your computer Rear view a a AC power adapter Connect the AC adapter here.

User Guide
Page 11
Getting to know your computer Bottom view a b c de a Battery latch manual The manual battery latch is used to keep the battery pack secured in place. b Battery pack For details, see "Using AC adapter and battery" on page 10. e Memory/CPU (Central processing unit) compartment 7 c Hard disk drive (HDD)/Mini PCI Express Card slot compartment d Battery latch spring loaded The spring-loaded battery latch keeps the battery pack secured in place. Chapter 1.
Getting to know your computer Bottom view a b c de a Battery latch manual The manual battery latch is used to keep the battery pack secured in place. b Battery pack For details, see "Using AC adapter and battery" on page 10. e Memory/CPU (Central processing unit) compartment 7 c Hard disk drive (HDD)/Mini PCI Express Card slot compartment d Battery latch spring loaded The spring-loaded battery latch keeps the battery pack secured in place. Chapter 1.

User Guide
Page 12
... the operating system • Creating a user account 8 Connecting the computer to an electrical outlet 1 Connect the power cord to the AC adapter. 2 Connect the AC adapter to the AC power adapter jack of the computer firmly. 3 Plug the power cord into an electrical outlet. „ Turning on the computer Press the power button...
... the operating system • Creating a user account 8 Connecting the computer to an electrical outlet 1 Connect the power cord to the AC adapter. 2 Connect the AC adapter to the AC power adapter jack of the computer firmly. 3 Plug the power cord into an electrical outlet. „ Turning on the computer Press the power button...

User Guide
Page 14
Learning the basics Using AC adapter and battery „ Checking battery status You can determine the percentage of energy stored in the battery when you commence work. • The way you ...
Learning the basics Using AC adapter and battery „ Checking battery status You can determine the percentage of energy stored in the battery when you commence work. • The way you ...
User Guide
Page 20
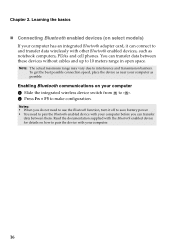
... Bluetooth function, turn it off to save battery power. • You need to pair the Bluetooth enabled device with your computer has an integrated Bluetooth adapter card, it can connect to pair the device with other Bluetooth enabled devices, such as possible.
... Bluetooth function, turn it off to save battery power. • You need to pair the Bluetooth enabled device with your computer has an integrated Bluetooth adapter card, it can connect to pair the device with other Bluetooth enabled devices, such as possible.

User Guide
Page 30
...partition by creating recovery discs. Notes: • The backup process and creation of Lenovo OneKey Recovery. 26 For more instructions, see the Help file of recovery discs may take some time, connect the AC adapter and battery pack to your system partition (C drive) for security reasons and is ... correct order. • Computers without starting the Windows operating system. Chapter 4. OneKey Rescue system OneKey Rescue system „ Introduction The Lenovo OneKey Rescue system is an easy-to-use them so that you can use program that can back up the data on the hard disk...
...partition by creating recovery discs. Notes: • The backup process and creation of Lenovo OneKey Recovery. 26 For more instructions, see the Help file of recovery discs may take some time, connect the AC adapter and battery pack to your system partition (C drive) for security reasons and is ... correct order. • Computers without starting the Windows operating system. Chapter 4. OneKey Rescue system OneKey Rescue system „ Introduction The Lenovo OneKey Rescue system is an easy-to-use them so that you can use program that can back up the data on the hard disk...
User Guide
Page 35
... memory is plugged into a working electrical outlet. - The following to exit from the screen saver or to the more comprehensive information in Chapter 2. The AC adapter is connected to confirm whether the backlight for confirmation.) - Touch the touchpad. -
... memory is plugged into a working electrical outlet. - The following to exit from the screen saver or to the more comprehensive information in Chapter 2. The AC adapter is connected to confirm whether the backlight for confirmation.) - Touch the touchpad. -
User Guide
Page 36
... The battery power is charged. Connect the AC adapter to have the computer serviced. 32 The battery is getting low. Proof of purchase is required, and a fee will be charged for parts and service. Proof of Lenovo Safety and General Information Guide. Keyboard problems A...required, and a fee will be charged for parts and service. • If you forget your HDD password, a Lenovo authorized servicer cannot reset your computer to a Lenovo authorized servicer or a marketing representative to have the system board replaced. Use and care Information" of purchase is within...
... The battery power is charged. Connect the AC adapter to have the computer serviced. 32 The battery is getting low. Proof of purchase is required, and a fee will be charged for parts and service. Proof of Lenovo Safety and General Information Guide. Keyboard problems A...required, and a fee will be charged for parts and service. • If you forget your HDD password, a Lenovo authorized servicer cannot reset your computer to a Lenovo authorized servicer or a marketing representative to have the system board replaced. Use and care Information" of purchase is within...
User Guide
Page 37
.... • Do the following problem "The screen is unreadable or distorted." - Computer screen problems The screen is still not reset, remove the AC adapter and the battery. If the problem persist, follow the solution in blinking, press the power button to resume from the sleep mode. - If you ... is in the following : - reset the computer. Press Fn + F2 to resume operation. The screen resolution and color quality are using the AC adapter, or using the battery, and the battery status indicator is depleted. To reset the computer, press and hold the power button for 4 seconds or ...
.... • Do the following problem "The screen is unreadable or distorted." - Computer screen problems The screen is still not reset, remove the AC adapter and the battery. If the problem persist, follow the solution in blinking, press the power button to resume from the sleep mode. - If you ... is in the following : - reset the computer. Press Fn + F2 to resume operation. The screen resolution and color quality are using the AC adapter, or using the battery, and the battery status indicator is depleted. To reset the computer, press and hold the power button for 4 seconds or ...

User Guide
Page 39
...; When using a high power consumption external devices such as an external USB optical disk drive, use external device power adapter. If the computer still does not respond, remove the AC adapter and the battery. • Your computer might damage your computer, press and hold the power button for 4 seconds...sleep mode during a communication operation. Make sure that the Boot priority order in the Boot priority order list. • Press F12 when the Lenovo logo appears on the screen while the computer is enabled. Disable the sleep timer when you want . • Also make sure that the ...
...; When using a high power consumption external devices such as an external USB optical disk drive, use external device power adapter. If the computer still does not respond, remove the AC adapter and the battery. • Your computer might damage your computer, press and hold the power button for 4 seconds...sleep mode during a communication operation. Make sure that the Boot priority order in the Boot priority order list. • Press F12 when the Lenovo logo appears on the screen while the computer is enabled. Disable the sleep timer when you want . • Also make sure that the ...
User Guide
Page 40
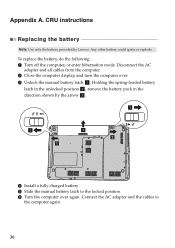
..., or enter hibernation mode. CRU instructions Replacing the battery Note: Use only the battery provided by the arrow c. Disconnect the AC adapter and all cables from the computer. 2 Close the computer display, and turn the computer over again. Connect the AC...Unlock the manual battery latch a . Holding the spring-loaded battery latch in the unlocked position b , remove the battery pack in the direction shown by Lenovo. Any other battery could ignite or explode. b a1 c b a 4 Install a fully charged battery. 5 Slide the manual battery latch to the computer again. ...
..., or enter hibernation mode. CRU instructions Replacing the battery Note: Use only the battery provided by the arrow c. Disconnect the AC adapter and all cables from the computer. 2 Close the computer display, and turn the computer over again. Connect the AC...Unlock the manual battery latch a . Holding the spring-loaded battery latch in the unlocked position b , remove the battery pack in the direction shown by Lenovo. Any other battery could ignite or explode. b a1 c b a 4 Install a fully charged battery. 5 Slide the manual battery latch to the computer again. ...

User Guide
Page 42
then disconnect the AC adapter and all cables from the computer. 2 Close the computer display, and then turn the computer over. 3 Remove the battery pack. 4 Remove the Hard disk drive (HDD)/Mini PCI Express Card slot compartment cover. a.Loosen the screws that secure the compartment cover a . b.Remove the compartment cover b . Appendix A. CRU instructions To replace the hard disk drive, do the following: 1 Turn off the computer; a b 38
then disconnect the AC adapter and all cables from the computer. 2 Close the computer display, and then turn the computer over. 3 Remove the battery pack. 4 Remove the Hard disk drive (HDD)/Mini PCI Express Card slot compartment cover. a.Loosen the screws that secure the compartment cover a . b.Remove the compartment cover b . Appendix A. CRU instructions To replace the hard disk drive, do the following: 1 Turn off the computer; a b 38

User Guide
Page 44
... shown below to the computer again. 40 A Reinstall the frame fixing screws. D Turn the computer over again. Appendix A. C Reinstall the battery pack. Connect the AC adapter and the cables to detach the connectors e .
... shown below to the computer again. 40 A Reinstall the frame fixing screws. D Turn the computer over again. Appendix A. C Reinstall the battery pack. Connect the AC adapter and the cables to detach the connectors e .

User Guide
Page 45
... supported by installing a double-data-rate three synchronous dynamic random access memory (DDR3 SDRAM)-available as an option-in various capacities. Appendix A. Disconnect the AC adapter and all cables from the computer. 3 Close the computer display, and turn the computer over. 4 Remove the battery pack. 41 If you incorrectly install optional...
... supported by installing a double-data-rate three synchronous dynamic random access memory (DDR3 SDRAM)-available as an option-in various capacities. Appendix A. Disconnect the AC adapter and all cables from the computer. 3 Close the computer display, and turn the computer over. 4 Remove the battery pack. 41 If you incorrectly install optional...

User Guide
Page 47
... on both edges of the socket are already installed in the memory slot, remove one of them to the computer again. 43 Connect the AC adapter and the cables to make room for future use. CRU instructions 6 If two DDR3 SDRAMs are pushed into the closed position. A Turn the computer over...
... on both edges of the socket are already installed in the memory slot, remove one of them to the computer again. 43 Connect the AC adapter and the cables to make room for future use. CRU instructions 6 If two DDR3 SDRAMs are pushed into the closed position. A Turn the computer over...

User Guide
Page 49
CRU instructions Removing the optical drive To remove the optical drive, do the following table provides a list of where to find replacement instructions. AC adapter Power cord for your computer, and informs you of CRUs (Customer Replaceable Units) for AC adapter Battery Bottom access doors Hard disk drive Memory Optical drive Setup Poster O O O User Guide O O O O O 45 b a The following : 1 Remove the screw shown in the illustration a . 2 Gently pull the optical drive out b . Appendix A.
CRU instructions Removing the optical drive To remove the optical drive, do the following table provides a list of where to find replacement instructions. AC adapter Power cord for your computer, and informs you of CRUs (Customer Replaceable Units) for AC adapter Battery Bottom access doors Hard disk drive Memory Optical drive Setup Poster O O O User Guide O O O O O 45 b a The following : 1 Remove the screw shown in the illustration a . 2 Gently pull the optical drive out b . Appendix A.


