Hardware Maintenance Manual
Page 5
... the ac adapter 27 Checking operational charging 28 Checking the battery pack 28 Checking the backup battery 29 Related service information 31 Restoring the factory contents by using Product Recovery discs 31 Passwords 32 Power-on password 32 Hard-disk password 32 Supervisor password 32 How to remove the power-on password . . . . 33 How to remove the hard-disk password . . . . 33 Power management 34 Screen blank mode 34 Standby mode 34 Hibernation mode 35 Symptom-to-FRU index 36 Numeric error codes 36 Error messages...
... the ac adapter 27 Checking operational charging 28 Checking the battery pack 28 Checking the backup battery 29 Related service information 31 Restoring the factory contents by using Product Recovery discs 31 Passwords 32 Power-on password 32 Hard-disk password 32 Supervisor password 32 How to remove the power-on password . . . . 33 How to remove the hard-disk password . . . . 33 Power management 34 Screen blank mode 34 Standby mode 34 Hibernation mode 35 Symptom-to-FRU index 36 Numeric error codes 36 Error messages...

Hardware Maintenance Manual
Page 10
... work on the machine, unplug the power cord. v Do not work with live electrical currents. v Fan louvers on the machine help to prevent overheating of maintenance information. Many customers have handles covered with a soft material that another person, familiar with the power-off controls, is a complete circuit. v Find the room emergency power-off . 2 ThinkPad T61, R61, and R61i (14.1-inch widescreen) Hardware Maintenance Manual...
... work on the machine, unplug the power cord. v Do not work with live electrical currents. v Fan louvers on the machine help to prevent overheating of maintenance information. Many customers have handles covered with a soft material that another person, familiar with the power-off controls, is a complete circuit. v Find the room emergency power-off . 2 ThinkPad T61, R61, and R61i (14.1-inch widescreen) Hardware Maintenance Manual...
Hardware Maintenance Manual
Page 23
... the Customer Support Center at 800-565-3344 for replacing a hard disk drive" on page 16 - Use the following important service information: v "Strategy for replacing FRUs" - Strategy for replacing FRUs Before replacing parts: Make sure that the latest BIOS is loaded to the system board before replacing any FRUs listed in obtaining or installing any software fixes, drivers, and BIOS downloads. Enter the product number of the computer or press Auto-detect button on page...
... the Customer Support Center at 800-565-3344 for replacing a hard disk drive" on page 16 - Use the following important service information: v "Strategy for replacing FRUs" - Strategy for replacing FRUs Before replacing parts: Make sure that the latest BIOS is loaded to the system board before replacing any FRUs listed in obtaining or installing any software fixes, drivers, and BIOS downloads. Enter the product number of the computer or press Auto-detect button on page...
Hardware Maintenance Manual
Page 24
... a system board can be the cause of them does not correct the problem, reinstall that changed the symptoms. Attention: The setup configuration on the hard disk to run a low-level format before replacing a hard disk drive. If you are instructed to those settings remain in effect. Running Automatic Configuration may also cause false error codes. then, when service has been completed, verify that the customer has a current backup of...
... a system board can be the cause of them does not correct the problem, reinstall that changed the symptoms. Attention: The setup configuration on the hard disk to run a low-level format before replacing a hard disk drive. If you are instructed to those settings remain in effect. Running Automatic Configuration may also cause false error codes. then, when service has been completed, verify that the customer has a current backup of...
Hardware Maintenance Manual
Page 29
v Before replacing any ThinkPad model that supports the PC-Doctor® for DOS" on removing and replacing FRUs. If you are correct by referring to read the entire page on page 24 - If you go to the checkout guide, be sure to the FRU parts list. "PC-Doctor for Rescue and Recovery" on page 26 v "Power system checkout" on page 27 The...
v Before replacing any ThinkPad model that supports the PC-Doctor® for DOS" on removing and replacing FRUs. If you are correct by referring to read the entire page on page 24 - If you go to the checkout guide, be sure to the FRU parts list. "PC-Doctor for Rescue and Recovery" on page 26 v "Power system checkout" on page 27 The...
Hardware Maintenance Manual
Page 32
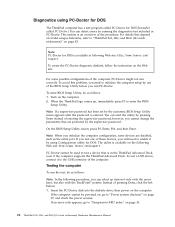
... check the power sources. Insert the PC-Doctor disk into the diskette drive; To avoid this problem, you need to "Power system checkout" on page 36. 24 ThinkPad T61, R61, and R61i (14.1-inch widescreen) Hardware Maintenance Manual If an error code appears, go to enable it to enter the BIOS Setup Utility. On the BIOS Setup Utility screen, press F9, Enter, F10, and then Enter. The utility is entered. To test a USB device, connect it by using PC-Doctor...
... check the power sources. Insert the PC-Doctor disk into the diskette drive; To avoid this problem, you need to "Power system checkout" on page 36. 24 ThinkPad T61, R61, and R61i (14.1-inch widescreen) Hardware Maintenance Manual If an error code appears, go to enable it to enter the BIOS Setup Utility. On the BIOS Setup Utility screen, press F9, Enter, F10, and then Enter. The utility is entered. To test a USB device, connect it by using PC-Doctor...
Hardware Maintenance Manual
Page 33
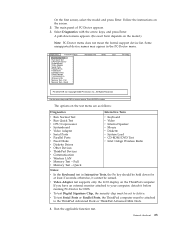
... Quick Test v CPU/Coprocessor v Systemboard v Video Adapter v Serial Ports v Parallel Ports v Fixed Disks v Diskette Drives v Other Devices v ThinkPad Devices v Communication v Wireless LAN v Memory Test - otherwise, it before running PC-Doctor for at least 2 seconds; v Video Adapter test supports only the LCD display on the screen. 2. Run the applicable function test. Some unsupported device names may appear in the PC-Doctor menu. All Rights Reserved. Select Diagnostics with the arrow keys, and press Enter. The options on the model.) Note...
... Quick Test v CPU/Coprocessor v Systemboard v Video Adapter v Serial Ports v Parallel Ports v Fixed Disks v Diskette Drives v Other Devices v ThinkPad Devices v Communication v Wireless LAN v Memory Test - otherwise, it before running PC-Doctor for at least 2 seconds; v Video Adapter test supports only the LCD display on the screen. 2. Run the applicable function test. Some unsupported device names may appear in the PC-Doctor menu. All Rights Reserved. Select Diagnostics with the arrow keys, and press Enter. The options on the model.) Note...
Hardware Maintenance Manual
Page 40
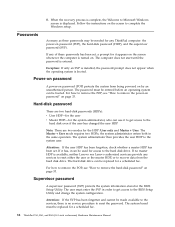
... provides the user HDP to Microsoft Windows screen is turned on page 33. If no service procedure to recover data from being powered on password (POP), the hard-disk password (HDP), and the supervisor password (SVP). The hard disk drive can use it appears on the screen whenever the computer is displayed. Supervisor password A supervisor password (SVP) protects the system information stored in the BIOS Setup Utility. If any services to reset either the user or...
... provides the user HDP to Microsoft Windows screen is turned on page 33. If no service procedure to recover data from being powered on password (POP), the hard-disk password (HDP), and the supervisor password (SVP). The hard disk drive can use it appears on the screen whenever the computer is displayed. Supervisor password A supervisor password (SVP) protects the system information stored in the BIOS Setup Utility. If any services to reset either the user or...
Hardware Maintenance Manual
Page 41
... and cannot be replaced for a scheduled fee. Select Power-On Password. 6. Type the current SVP in the Setup confirmation window, select Yes . Press F10; The hard disk drive can be made available to the servicer, neither Lenovo nor Lenovo authorized servicers provide any services to reset the user HDPs or to remove the battery pack, see "1110 Backup battery" on page 61. 3. For the other models, enter the POP. Turn off the computer...
... and cannot be replaced for a scheduled fee. Select Power-On Password. 6. Type the current SVP in the Setup confirmation window, select Yes . Press F10; The hard disk drive can be made available to the servicer, neither Lenovo nor Lenovo authorized servicers provide any services to reset the user HDPs or to remove the battery pack, see "1110 Backup battery" on page 61. 3. For the other models, enter the POP. Turn off the computer...
Hardware Maintenance Manual
Page 42
.... 3. Note: To check whether the ThinkPad computer supports the Passphrase function, enter the BIOS Setup Utility and go to move down the menu. 4. If Using Passphrase item is displayed in the operating system expires, the LCD backlight turns off . A pop-up window opens. 6. Press F10. 9. v The hard disk drive is powered off . In certain circumstances, the computer goes into screen blank mode, press the ThinkVantage® button and use the ThinkVantage Productivity Center.
.... 3. Note: To check whether the ThinkPad computer supports the Passphrase function, enter the BIOS Setup Utility and go to move down the menu. 4. If Using Passphrase item is displayed in the operating system expires, the LCD backlight turns off . A pop-up window opens. 6. Press F10. 9. v The hard disk drive is powered off . In certain circumstances, the computer goes into screen blank mode, press the ThinkVantage® button and use the ThinkVantage Productivity Center.
Hardware Maintenance Manual
Page 43
... operation: v The ring indicator (RI) is available. Pressing the power button. - v The time set on the power switch. v Turn on the resume timer elapses. Note: If the computer enters the hibernation mode while it is independent of the following : v Press the Fn key. Related service information 35 v Open the LCD cover. Note for the APM operating system: Even if you do not set the low-battery alarm, the charge indicator...
... operation: v The ring indicator (RI) is available. Pressing the power button. - v The time set on the power switch. v Turn on the resume timer elapses. Note: If the computer enters the hibernation mode while it is independent of the following : v Press the Fn key. Related service information 35 v Open the LCD cover. Note for the APM operating system: Even if you do not set the low-battery alarm, the charge indicator...
Hardware Maintenance Manual
Page 44
... suspend mode. If replacing a FRU does not solve the problem, put the original part back in the ThinkPad computers, see the manual for each error detected in boldface type. System board. 36 ThinkPad T61, R61, and R61i (14.1-inch widescreen) Hardware Maintenance Manual v If you determine, during regular servicing, what FRUs are using the APM operating system and have set the mode to be any number. Note: For a device not supported by...
... suspend mode. If replacing a FRU does not solve the problem, put the original part back in the ThinkPad computers, see the manual for each error detected in boldface type. System board. 36 ThinkPad T61, R61, and R61i (14.1-inch widescreen) Hardware Maintenance Manual v If you determine, during regular servicing, what FRUs are using the APM operating system and have set the mode to be any number. Note: For a device not supported by...
Hardware Maintenance Manual
Page 45
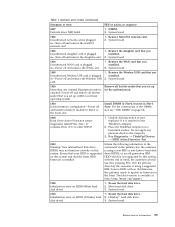
... of the keyboard and the auxiliary input device. 0220 Monitor type error-Monitor type does not match the one of them . Enter BIOS Setup and load Setup defaults. 1. System board. 0199 System Security- Security password retry count exceeded. 1. Run BIOS Setup Utility, and then save the current setting by pressing F10. 2. System board. 01C8 Two or more modem devices are found. Remove the Ethernet device that you installed; Reseat the hard disk drive. 2. Run BIOS Setup Utility. Remove one of...
... of the keyboard and the auxiliary input device. 0220 Monitor type error-Monitor type does not match the one of them . Enter BIOS Setup and load Setup defaults. 1. System board. 0199 System Security- Security password retry count exceeded. 1. Run BIOS Setup Utility, and then save the current setting by pressing F10. 2. System board. 01C8 Two or more modem devices are found. Remove the Ethernet device that you installed; Reseat the hard disk drive. 2. Run BIOS Setup Utility. Remove one of...
Hardware Maintenance Manual
Page 46
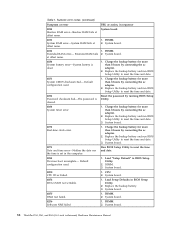
...Load Setup Defaults in BIOS Setup Utility. 2. System board. 0231 System RAM error-System RAM fails at offset nnnn. 1. Replace the backup battery and run BIOS Setup Utility to reset the time and date. 0251 System CMOS checksum bad- System board. 38 ThinkPad T61, R61, and R61i (14.1-inch widescreen) Hardware Maintenance Manual System board. Replace the backup battery and run BIOS Setup Utility to reset the time and date. 0280 Previous boot incomplete- Run BIOS Setup Utility to reset the time and date. 3. Default configuration used . 1. CPU. 2. System board. 02F4...
...Load Setup Defaults in BIOS Setup Utility. 2. System board. 0231 System RAM error-System RAM fails at offset nnnn. 1. Replace the backup battery and run BIOS Setup Utility to reset the time and date. 0251 System CMOS checksum bad- System board. 38 ThinkPad T61, R61, and R61i (14.1-inch widescreen) Hardware Maintenance Manual System board. Replace the backup battery and run BIOS Setup Utility to reset the time and date. 0280 Previous boot incomplete- Run BIOS Setup Utility to reset the time and date. 3. Default configuration used . 1. CPU. 2. System board. 02F4...
Hardware Maintenance Manual
Page 47
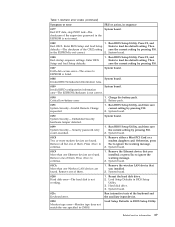
... error codes (continued) Symptom or error FRU or action, in Slot-1. System board. 1803 1. System board. 1804 Unauthorized WAN card is plugged in mind, the customer can still use it is plugged in -Turn off and remove the daughter card. 2. Remove the Wireless USB card that the latest HDD firmware is using a supported IBM/Lenovo HDD with the risk in -Power off and remove the miniPCI network card. 1. Run Diagnostics --> ThinkPad Devices --> HDD Active Protection Test. 2010 Warning: Your internal hard disk drive (HDD...
... error codes (continued) Symptom or error FRU or action, in Slot-1. System board. 1803 1. System board. 1804 Unauthorized WAN card is plugged in mind, the customer can still use it is plugged in -Turn off and remove the daughter card. 2. Remove the Wireless USB card that the latest HDD firmware is using a supported IBM/Lenovo HDD with the risk in -Power off and remove the miniPCI network card. 1. Run Diagnostics --> ThinkPad Devices --> HDD Active Protection Test. 2010 Warning: Your internal hard disk drive (HDD...
Hardware Maintenance Manual
Page 50
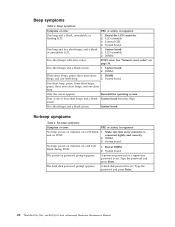
... connector is set . Type the password and press Enter. Beep symptoms Symptom or error FRU or action, in sequence No beep, power-on indicator on page 36. The hard-disk password prompt appears. Two short beeps with error codes. connected tightly and correctly. 2. Type the password and press Enter. 42 ThinkPad T61, R61, and R61i (14.1-inch widescreen) Hardware Maintenance Manual Reseat the LCD connector. 2. Reinstall the operating system. System board. System board. 2. No-beep...
... connector is set . Type the password and press Enter. Beep symptoms Symptom or error FRU or action, in sequence No beep, power-on indicator on page 36. The hard-disk password prompt appears. Two short beeps with error codes. connected tightly and correctly. 2. Type the password and press Enter. 42 ThinkPad T61, R61, and R61i (14.1-inch widescreen) Hardware Maintenance Manual Reseat the LCD connector. 2. Reinstall the operating system. System board. System board. 2. No-beep...
Hardware Maintenance Manual
Page 52
... the failing FRU. 7. Hard disk drive f. 1. Determine whether the problem has been solved. 6. System board b. LCD assembly 44 ThinkPad T61, R61, and R61i (14.1-inch widescreen) Hardware Maintenance Manual If any damaged FRU. 3. Verify that have no defects). Non-ThinkPad devices b. PC Cards 4. If no more errors exist. Devices attached to isolate the failing FRU (do not replace any FRUs. 3. Replace any error is not operating, follow these procedures to...
... the failing FRU. 7. Hard disk drive f. 1. Determine whether the problem has been solved. 6. System board b. LCD assembly 44 ThinkPad T61, R61, and R61i (14.1-inch widescreen) Hardware Maintenance Manual If any damaged FRU. 3. Verify that have no defects). Non-ThinkPad devices b. PC Cards 4. If no more errors exist. Devices attached to isolate the failing FRU (do not replace any FRUs. 3. Replace any error is not operating, follow these procedures to...

Hardware Maintenance Manual
Page 60
... Tests --> Keyboard Hard disk drive Enter the BIOS Setup Utility and change Serial ATA (SATA) setting to enter the BIOS Setup Utility. 4. Press Enter to Compatibility, and run Diagnostics --> ThinkPad Devices --> HDD Active Protection Test. Interactive Tests --> Diskette 52 ThinkPad T61, R61, and R61i (14.1-inch widescreen) Hardware Maintenance Manual Diagnostics --> Video Adapter 2. Diskette drive 1. Table 9. Place the computer on the computer. Conexant Smart Modem Dialtone Audio Enter the BIOS Setup Utility and change Serial ATA (SATA) setting to start the diagnostic...
... Tests --> Keyboard Hard disk drive Enter the BIOS Setup Utility and change Serial ATA (SATA) setting to enter the BIOS Setup Utility. 4. Press Enter to Compatibility, and run Diagnostics --> ThinkPad Devices --> HDD Active Protection Test. Interactive Tests --> Diskette 52 ThinkPad T61, R61, and R61i (14.1-inch widescreen) Hardware Maintenance Manual Diagnostics --> Video Adapter 2. Diskette drive 1. Table 9. Place the computer on the computer. Conexant Smart Modem Dialtone Audio Enter the BIOS Setup Utility and change Serial ATA (SATA) setting to start the diagnostic...
Hardware Maintenance Manual
Page 62
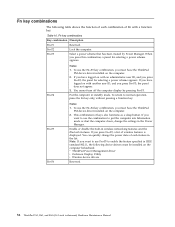
... table shows the function of Fn with a function key. Fn key combinations The following device drivers must be installed on the computer beforehand: v ThinkPad Power Management driver v OnScreen Display Utility v Wireless device drivers Reserved. 54 ThinkPad T61, R61, and R61i (14.1-inch widescreen) Hardware Maintenance Manual If you press this combination, a panel for selecting a power scheme appears. You cannot turn off the computer display by Power Manager. When you press Fn+F5, a list of keys also functions as a sleep button. Fn+F4...
... table shows the function of Fn with a function key. Fn key combinations The following device drivers must be installed on the computer beforehand: v ThinkPad Power Management driver v OnScreen Display Utility v Wireless device drivers Reserved. 54 ThinkPad T61, R61, and R61i (14.1-inch widescreen) Hardware Maintenance Manual If you press this combination, a panel for selecting a power scheme appears. You cannot turn off the computer display by Power Manager. When you press Fn+F5, a list of keys also functions as a sleep button. Fn+F4...
Hardware Maintenance Manual
Page 63
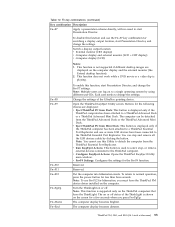
.... The computer display becomes brighter. Switch a display output location v External monitor (CRT display) v Computer display and external monitor (LCD + CRT display) v Computer display (LCD) Notes: 1. Note: Multiple users can stop , or remove external devices connected to normal operation, press the power button for hibernation, you press Fn+PgUp. Reserved. Each user needs to detach the computer from Mini Dock: This button is used to select, stop and remove all the USB devices safely by using different user IDs. Note: To use Fn+F12...
.... The computer display becomes brighter. Switch a display output location v External monitor (CRT display) v Computer display and external monitor (LCD + CRT display) v Computer display (LCD) Notes: 1. Note: Multiple users can stop , or remove external devices connected to normal operation, press the power button for hibernation, you press Fn+PgUp. Reserved. Each user needs to detach the computer from Mini Dock: This button is used to select, stop and remove all the USB devices safely by using different user IDs. Note: To use Fn+F12...


