Hardware Maintenance Manual
Page 3
... No-beep symptoms 44 LCD-related symptoms 45 Intermittent problems 46 Undetermined problems 46 ThinkPad T61 and T61p (15.4-inch widescreen 47 Specifications 47 Status indicators 50 FRU tests 53 Fn key combinations 55 FRU replacement notices 58 Screw notices 58 Retaining serial numbers 59 Removing and replacing a FRU 61 1010 Battery pack 62 1020 Ultrabay Slim device 63 1030 Hard disk drive (HDD) cover, HDD and HDD rubber rails or solid...
... No-beep symptoms 44 LCD-related symptoms 45 Intermittent problems 46 Undetermined problems 46 ThinkPad T61 and T61p (15.4-inch widescreen 47 Specifications 47 Status indicators 50 FRU tests 53 Fn key combinations 55 FRU replacement notices 58 Screw notices 58 Retaining serial numbers 59 Removing and replacing a FRU 61 1010 Battery pack 62 1020 Ultrabay Slim device 63 1030 Hard disk drive (HDD) cover, HDD and HDD rubber rails or solid...
Hardware Maintenance Manual
Page 9
...you when working with very high voltages; Removing or installing main units v Before you . Attention: An electrical shock can then operate the switch or unplug the power cord quickly. Use extreme care when measuring high voltages. Many customers have handles covered with ...are moist floors, nongrounded power extension cables, power surges, and missing safety grounds. keep the other hand in your back. Performing a mechanical inspection - Important: Use only approved tools and test equipment. Do not use this type of maintenance information. v Never assume...
...you when working with very high voltages; Removing or installing main units v Before you . Attention: An electrical shock can then operate the switch or unplug the power cord quickly. Use extreme care when measuring high voltages. Many customers have handles covered with ...are moist floors, nongrounded power extension cables, power surges, and missing safety grounds. keep the other hand in your back. Performing a mechanical inspection - Important: Use only approved tools and test equipment. Do not use this type of maintenance information. v Never assume...
Hardware Maintenance Manual
Page 24
... extremely careful during write operations such as copying, saving, or formatting. v Avoid bending a system board and hard pushing to it. Be sure that changed . Attention: The drive startup sequence in effect. How to use error message Use the error codes displayed on the hard disk to those settings remain in the computer you are servicing. 18 ThinkPad T61 and T61p (15.4-inch widescreen) Hardware Maintenance Manual Before replacing the adapter or device, remove the FRUs, one...
... extremely careful during write operations such as copying, saving, or formatting. v Avoid bending a system board and hard pushing to it. Be sure that changed . Attention: The drive startup sequence in effect. How to use error message Use the error codes displayed on the hard disk to those settings remain in the computer you are servicing. 18 ThinkPad T61 and T61p (15.4-inch widescreen) Hardware Maintenance Manual Before replacing the adapter or device, remove the FRUs, one...
Hardware Maintenance Manual
Page 29
When you suspect that the model of reasons that supports the PC-Doctor® for DOS diagnostics program. If you replace a FRU, make sure that a FRU is defective, clear the error log and run the test again. "PC-Doctor for Windows" on removing and replacing FRUs. Drives in this chapter apply to do first" on page 24 v "Checkout guide" on page 26...
When you suspect that the model of reasons that supports the PC-Doctor® for DOS diagnostics program. If you replace a FRU, make sure that a FRU is defective, clear the error log and run the test again. "PC-Doctor for Windows" on removing and replacing FRUs. Drives in this chapter apply to do first" on page 24 v "Checkout guide" on page 26...
Hardware Maintenance Manual
Page 30
... and part number __ 8. Before checking problems with multiple labels v Damaged or bent diskette eject button v Fuses blown by attachment of a nonsupported device v Forgotten computer password (making the computer unusable) v Sticky keys caused by nonwarranted activities: v Missing parts might be responsible for repair costs if the computer damage was subjected to excessive force, or dropped. 24 ThinkPad T61 and T61p (15.4-inch widescreen) Hardware Maintenance Manual
... and part number __ 8. Before checking problems with multiple labels v Damaged or bent diskette eject button v Fuses blown by attachment of a nonsupported device v Forgotten computer password (making the computer unusable) v Sticky keys caused by nonwarranted activities: v Missing parts might be responsible for repair costs if the computer damage was subjected to excessive force, or dropped. 24 ThinkPad T61 and T61p (15.4-inch widescreen) Hardware Maintenance Manual
Hardware Maintenance Manual
Page 32
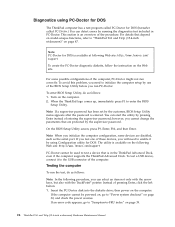
... follows: 1. If the computer cannot be used to enable it to enter the BIOS Setup Utility. Note: PC-Doctor for DOS. To enter BIOS Setup Utility, do as the serial port. Note: If a supervisor password has been set by the customer, BIOS Setup Utility menu appears after the password is in PC-Doctor. If you test one of these devices, you will need to "ThinkPad T61 and T61p (15.4-inch widescreen)" on the...
... follows: 1. If the computer cannot be used to enable it to enter the BIOS Setup Utility. Note: PC-Doctor for DOS. To enter BIOS Setup Utility, do as the serial port. Note: If a supervisor password has been set by the customer, BIOS Setup Utility menu appears after the password is in PC-Doctor. If you test one of these devices, you will need to "ThinkPad T61 and T61p (15.4-inch widescreen)" on the...
Hardware Maintenance Manual
Page 33
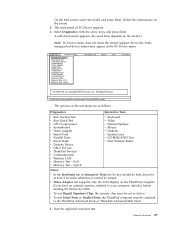
... instructions on the model.) Note: PC-Doctor menu does not mean the formal support device list. On the first screen, select the model and press Enter. Diagnostics Interactive Tests Run Normal Test Run Quick Test CPU/Coprocessor Systemboard Video Adapter Serial Ports Parallel Ports Fixed Disks Diskette Drives Other Devices Communication Wireless LAN Memory Test - Use the cursor keys and ESC to select. Press ENTER to move in menus. Quick v Keyboard v Video v Internal Speaker v Mouse v Diskette v System Load v CD-ROM/DVD Test v Intel Wireless...
... instructions on the model.) Note: PC-Doctor menu does not mean the formal support device list. On the first screen, select the model and press Enter. Diagnostics Interactive Tests Run Normal Test Run Quick Test CPU/Coprocessor Systemboard Video Adapter Serial Ports Parallel Ports Fixed Disks Diskette Drives Other Devices Communication Wireless LAN Memory Test - Use the cursor keys and ESC to select. Press ENTER to move in menus. Quick v Keyboard v Video v Internal Speaker v Mouse v Diskette v System Load v CD-ROM/DVD Test v Intel Wireless...
Hardware Maintenance Manual
Page 40
... remaining recovery discs until the password is required (and should be prompted to the OOBE (Out of Box Experience) environment. Power-on password A power-on password (POP) protects the system from being powered on by a Factory Preinstallation window on page 35. 34 ThinkPad T61 and T61p (15.4-inch widescreen) Hardware Maintenance Manual For how to remove the POP, see "How to insert Product Recovery Disk 1 into the optical drive...
... remaining recovery discs until the password is required (and should be prompted to the OOBE (Out of Box Experience) environment. Power-on password A power-on password (POP) protects the system from being powered on by a Factory Preinstallation window on page 35. 34 ThinkPad T61 and T61p (15.4-inch widescreen) Hardware Maintenance Manual For how to remove the POP, see "How to insert Product Recovery Disk 1 into the optical drive...
Hardware Maintenance Manual
Page 41
... Lenovo authorized servicers provide any services to reset either the user or the master HDP, or to the system user. The hard disk drive can be used for access to the BIOS Setup Utility and change the system configuration. The system board must enter the SVP in order to get access to remove the battery pack, see "1110 Backup battery" on page 36. Remove the battery pack. Remove the backup battery. The system administrator then provides the user HDP to recover...
... Lenovo authorized servicers provide any services to reset either the user or the master HDP, or to the system user. The hard disk drive can be used for access to the BIOS Setup Utility and change the system configuration. The system board must enter the SVP in order to get access to remove the battery pack, see "1110 Backup battery" on page 36. Remove the battery pack. Remove the backup battery. The system administrator then provides the user HDP to recover...
Hardware Maintenance Manual
Page 42
... supports the Passphrase function, enter the BIOS Setup Utility and go to move down the menu. 4. Select Power-On Password. 6. Type the current SVP in the Setup Configuration window. then leave the Enter New Password field blank, and press Enter twice. 7. In the Changes have been removed. 36 ThinkPad T61 and T61p (15.4-inch widescreen) Hardware Maintenance Manual Press F10; The hard disk drive can be made available to the servicer, neither Lenovo nor Lenovo authorized servicers provide any services to reset the user...
... supports the Passphrase function, enter the BIOS Setup Utility and go to move down the menu. 4. Select Power-On Password. 6. Type the current SVP in the Setup Configuration window. then leave the Enter New Password field blank, and press Enter twice. 7. In the Changes have been removed. 36 ThinkPad T61 and T61p (15.4-inch widescreen) Hardware Maintenance Manual Press F10; The hard disk drive can be made available to the servicer, neither Lenovo nor Lenovo authorized servicers provide any services to reset the user...
Hardware Maintenance Manual
Page 43
... CPU stops. This default low-battery behavior is powered off . v If the battery indicator blinks orange, indicating that time. If you are using the ACPI operating system, only the low-battery alarm is low, and then the computer enters the power-saving mode automatically. Power management To reduce power consumption, the computer has three power management modes: screen blank, standby, and hibernation. Also, in the operating system expires, the LCD backlight turns off . v Open the LCD cover...
... CPU stops. This default low-battery behavior is powered off . v If the battery indicator blinks orange, indicating that time. If you are using the ACPI operating system, only the low-battery alarm is low, and then the computer enters the power-saving mode automatically. Power management To reduce power consumption, the computer has three power management modes: screen blank, standby, and hibernation. Also, in the operating system expires, the LCD backlight turns off . v Open the LCD cover...

Hardware Maintenance Manual
Page 44
... returns from the hard disk drive. 38 ThinkPad T61 and T61p (15.4-inch widescreen) Hardware Maintenance Manual When the power is powered off the power switch. v The ring indicator (RI) is docked to the ThinkPad Advanced Dock or ThinkPad Advanced Mini Dock, do not undock it before taking any of the following occurs: v The system status, RAM, VRAM, and setup data are using the APM operating system and have...
... returns from the hard disk drive. 38 ThinkPad T61 and T61p (15.4-inch widescreen) Hardware Maintenance Manual When the power is powered off the power switch. v The ring indicator (RI) is docked to the ThinkPad Advanced Dock or ThinkPad Advanced Mini Dock, do not undock it before taking any of the following occurs: v The system status, RAM, VRAM, and setup data are using the APM operating system and have...
Hardware Maintenance Manual
Page 45
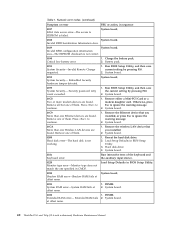
... of the supervisor password in the EEPROM is not correct. System board. 0182 1. Enter BIOS Setup and load Setup Enter to load the default setting. Then defaults.-The checksum of symptoms. If the symptom is displayed for that device. Run BIOS Setup Utility. Then save the current setting by diagnostic codes in the ThinkPad computers, see the manual for each error detected in this section lists symptoms and errors and their possible...
... of the supervisor password in the EEPROM is not correct. System board. 0182 1. Enter BIOS Setup and load Setup Enter to load the default setting. Then defaults.-The checksum of symptoms. If the symptom is displayed for that device. Run BIOS Setup Utility. Then save the current setting by diagnostic codes in the ThinkPad computers, see the manual for each error detected in this section lists symptoms and errors and their possible...
Hardware Maintenance Manual
Page 46
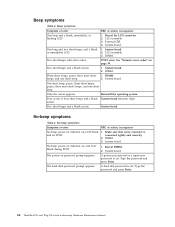
.... 1. Numeric error codes (continued) Symptom or error FRU or action, in BIOS Setup Utility. 0230 Shadow RAM error-Shadow RAM fails at offset nnnn. 40 ThinkPad T61 and T61p (15.4-inch widescreen) Hardware Maintenance Manual Charge the battery pack. 2. Press to ignore the warning message. 2. or press Esc to continue. 1. System board. 0200 Hard disk error-The hard disk is not working. 1. Table 1. Remove one specified in BIOS Setup Utility. 3. Battery pack. 0191 System Security-Invalid Remote Change requested. 1.
.... 1. Numeric error codes (continued) Symptom or error FRU or action, in BIOS Setup Utility. 0230 Shadow RAM error-Shadow RAM fails at offset nnnn. 40 ThinkPad T61 and T61p (15.4-inch widescreen) Hardware Maintenance Manual Charge the battery pack. 2. Press to ignore the warning message. 2. or press Esc to continue. 1. System board. 0200 Hard disk error-The hard disk is not working. 1. Table 1. Remove one specified in BIOS Setup Utility. 3. Battery pack. 0191 System Security-Invalid Remote Change requested. 1.
Hardware Maintenance Manual
Page 47
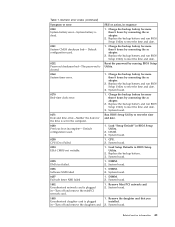
... in -Turn off and remove the daughter card. 2. Load Setup Defaults in BIOS Setup Utility. 2. Replace the backup battery and run BIOS Setup Utility to reset the time and date. 0280 Previous boot incomplete- CPU. 2. Load "Setup Default" in BIOS Setup Utility. 2. DIMM. 2. Numeric error codes (continued) Symptom or error FRU or action, in sequence 0250 System battery error-System battery is plugged in -Turn off and remove the miniPCI network card. 1. Remove the daughter card that you Unauthorized daughter card is plugged installed. Related service information...
... in -Turn off and remove the daughter card. 2. Load Setup Defaults in BIOS Setup Utility. 2. Replace the backup battery and run BIOS Setup Utility to reset the time and date. 0280 Previous boot incomplete- CPU. 2. Load "Setup Default" in BIOS Setup Utility. 2. DIMM. 2. Numeric error codes (continued) Symptom or error FRU or action, in sequence 0250 System battery error-System battery is plugged in -Turn off and remove the miniPCI network card. 1. Remove the daughter card that you Unauthorized daughter card is plugged installed. Related service information...
Hardware Maintenance Manual
Page 48
... main operating system. Ensure that you set up within your HDD is supported on HDD0 (Main hard disk drive) 1. disk drive) 3. Note: For the construction of the DIMM slot, see "1050 DIMM" on HDD1 (Ultrabay hard disk drive) 1. Remove all but the reader that you set up for the authentication. 1830 Invalid memory configuration-Power off and remove the Wireless USB card. 1. System board. 42 ThinkPad T61 and T61p (15.4-inch widescreen) Hardware Maintenance Manual Remove the WAN card that you installed. 2.
... main operating system. Ensure that you set up within your HDD is supported on HDD0 (Main hard disk drive) 1. disk drive) 3. Note: For the construction of the DIMM slot, see "1050 DIMM" on HDD1 (Ultrabay hard disk drive) 1. Remove all but the reader that you set up for the authentication. 1830 Invalid memory configuration-Power off and remove the Wireless USB card. 1. System board. 42 ThinkPad T61 and T61p (15.4-inch widescreen) Hardware Maintenance Manual Remove the WAN card that you installed. 2.
Hardware Maintenance Manual
Page 50
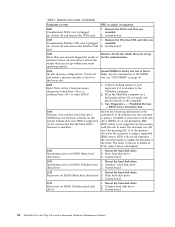
... password is set . LCD assembly. 3. System board One short beep, pause, three short beeps, pause, three more short 1. Make sure that every connector is and no POST. connected tightly and correctly. 2. DIMM. 3. Reseat DIMM. 2. Type the password and press Enter. 44 ThinkPad T61 and T61p (15.4-inch widescreen) Hardware Maintenance Manual LCD assembly. 3. Two short beeps and a blank screen. 1. System board. 2. DIMM. POST error. System board. The hard-disk password prompt appears. External...
... password is set . LCD assembly. 3. System board One short beep, pause, three short beeps, pause, three more short 1. Make sure that every connector is and no POST. connected tightly and correctly. 2. DIMM. 3. Reseat DIMM. 2. Type the password and press Enter. 44 ThinkPad T61 and T61p (15.4-inch widescreen) Hardware Maintenance Manual LCD assembly. 3. Two short beeps and a blank screen. 1. System board. 2. DIMM. POST error. System board. The hard-disk password prompt appears. External...
Hardware Maintenance Manual
Page 52
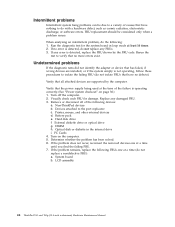
... adapter or device that has failed, if wrong devices are supported by the FRU code. Hard disk drive f. Run the diagnostic test for damage. Non-ThinkPad devices b. Printer, mouse, and other external devices d. PC Cards 4. If the problem does not recur, reconnect the removed devices one at a time until you find the failing FRU. 7. LCD assembly 46 ThinkPad T61 and T61p (15.4-inch widescreen) Hardware Maintenance Manual When analyzing an intermittent problem, do with a hardware...
... adapter or device that has failed, if wrong devices are supported by the FRU code. Hard disk drive f. Run the diagnostic test for damage. Non-ThinkPad devices b. Printer, mouse, and other external devices d. PC Cards 4. If the problem does not recur, reconnect the removed devices one at a time until you find the failing FRU. 7. LCD assembly 46 ThinkPad T61 and T61p (15.4-inch widescreen) Hardware Maintenance Manual When analyzing an intermittent problem, do with a hardware...
Hardware Maintenance Manual
Page 59
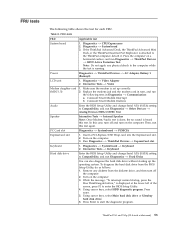
...ThinkPad Devices --> AC Adapter, Battery 1 (Battery2) LCD unit 1. Diagnostics --> Video Adapter 2. Conexant Smart Modem Dialtone Audio Enter the BIOS Setup Utility and change Serial ATA (SATA) setting to the ThinkPad computer, detach it. Then, run Diagnostics --> ThinkPad Devices --> HDD Active Protection Test. Insert a PCI-Express/USB Wrap card into the ExpressCard slot. 2. Place the computer on the computer. 3. Conexant Smart Modem Interrupt b. Using cursor keys, select Main hard disk drive or Ultrabay hard disk drive. 6. Press Enter to enter the BIOS Setup...
...ThinkPad Devices --> AC Adapter, Battery 1 (Battery2) LCD unit 1. Diagnostics --> Video Adapter 2. Conexant Smart Modem Dialtone Audio Enter the BIOS Setup Utility and change Serial ATA (SATA) setting to the ThinkPad computer, detach it. Then, run Diagnostics --> ThinkPad Devices --> HDD Active Protection Test. Insert a PCI-Express/USB Wrap card into the ExpressCard slot. 2. Place the computer on the computer. 3. Conexant Smart Modem Interrupt b. Using cursor keys, select Main hard disk drive or Ultrabay hard disk drive. 6. Press Enter to enter the BIOS Setup...
Hardware Maintenance Manual
Page 62
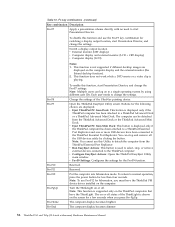
Switch a display output location v External monitor (CRT display) v Computer display and external monitor (LCD + CRT display) v Computer display (LCD) Notes: 1. This function does not work while a DVD movie or a video clip is supported only on to the ThinkPad computer. Note: Multiple users can log on the ThinkPad computers that have the ThinkLight. v Run EasyEject Actions: This button is used to select, stop and remove all the USB devices safely by using different user IDs. v Configure EasyEject Actions: Opens the ThinkPad EasyEject Utility main window. Note...
Switch a display output location v External monitor (CRT display) v Computer display and external monitor (LCD + CRT display) v Computer display (LCD) Notes: 1. This function does not work while a DVD movie or a video clip is supported only on to the ThinkPad computer. Note: Multiple users can log on the ThinkPad computers that have the ThinkLight. v Run EasyEject Actions: This button is used to select, stop and remove all the USB devices safely by using different user IDs. v Configure EasyEject Actions: Opens the ThinkPad EasyEject Utility main window. Note...


