
Hardware Maintenance Manual
Page 3
... No-beep symptoms 44 LCD-related symptoms 45 Intermittent problems 46 Undetermined problems 46 ThinkPad T61 and T61p (15.4-inch widescreen 47 Specifications 47 Status indicators 50 FRU tests 53 Fn key combinations 55 FRU replacement notices 58 Screw notices 58 Retaining serial numbers 59 Removing and replacing a FRU 61 1010 Battery pack 62 1020 Ultrabay Slim device 63 1030 Hard disk drive (HDD) cover, HDD and HDD rubber rails or solid...
... No-beep symptoms 44 LCD-related symptoms 45 Intermittent problems 46 Undetermined problems 46 ThinkPad T61 and T61p (15.4-inch widescreen 47 Specifications 47 Status indicators 50 FRU tests 53 Fn key combinations 55 FRU replacement notices 58 Screw notices 58 Retaining serial numbers 59 Removing and replacing a FRU 61 1010 Battery pack 62 1020 Ultrabay Slim device 63 1030 Hard disk drive (HDD) cover, HDD and HDD rubber rails or solid...
Hardware Maintenance Manual
Page 9
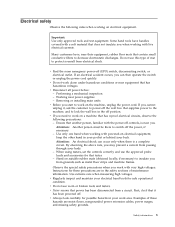
.... Removing or installing main units v Before you need to protect yourself from grounds such as metal floor strips and machine frames. Ensure that has hazardous voltages. Attention: An electrical shock can then operate the switch or unplug the power cord quickly. v Regularly inspect and maintain your back. v Do not use the approved probe leads and accessories for safe operational condition...
.... Removing or installing main units v Before you need to protect yourself from grounds such as metal floor strips and machine frames. Ensure that has hazardous voltages. Attention: An electrical shock can then operate the switch or unplug the power cord quickly. v Regularly inspect and maintain your back. v Do not use the approved probe leads and accessories for safe operational condition...
Hardware Maintenance Manual
Page 24
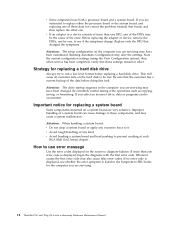
... a device consists of the data before replacing a hard disk drive. If more than one , to see whether the error symptom is listed in effect. If you are servicing may cause a system malfunction. If you are servicing. 18 ThinkPad T61 and T61p (15.4-inch widescreen) Hardware Maintenance Manual Attention: When handling a system board: v Do not drop a system board or apply any kind. Note the current configuration settings (using the View Configuration option...
... a device consists of the data before replacing a hard disk drive. If more than one , to see whether the error symptom is listed in effect. If you are servicing may cause a system malfunction. If you are servicing. 18 ThinkPad T61 and T61p (15.4-inch widescreen) Hardware Maintenance Manual Attention: When handling a system board: v Do not drop a system board or apply any kind. Note the current configuration settings (using the View Configuration option...
Hardware Maintenance Manual
Page 29
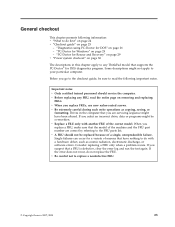
... replace a nondefective FRU. © Copyright Lenovo 2007, 2008 23 v Be extremely careful during such write operations as cosmic radiation, electrostatic discharge, or software errors. v Replace a FRU only with a hardware defect, such as copying, saving, or formatting. v A FRU should service the computer. Before you replace a FRU, make sure that supports the PC-Doctor® for a variety of reasons that you select an incorrect drive...
... replace a nondefective FRU. © Copyright Lenovo 2007, 2008 23 v Be extremely careful during such write operations as cosmic radiation, electrostatic discharge, or software errors. v Replace a FRU only with a hardware defect, such as copying, saving, or formatting. v A FRU should service the computer. Before you replace a FRU, make sure that supports the PC-Doctor® for a variety of reasons that you select an incorrect drive...
Hardware Maintenance Manual
Page 32
... the computer supports the ThinkPad Advanced Dock. Turn on the computer. If the computer cannot be used to the USB connector of pressing Enter, click the left button. 1. Note: If a supervisor password has been set by use of the BIOS Setup Utility before you need to enable it to test a device that are disabled, such as follows: Note: In the following procedure, you can detect errors by the...
... the computer supports the ThinkPad Advanced Dock. Turn on the computer. If the computer cannot be used to the USB connector of pressing Enter, click the left button. 1. Note: If a supervisor password has been set by use of the BIOS Setup Utility before you need to enable it to test a device that are disabled, such as follows: Note: In the following procedure, you can detect errors by the...
Hardware Maintenance Manual
Page 33
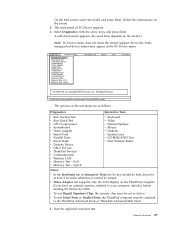
... CPU/Coprocessor Systemboard Video Adapter Serial Ports Parallel Ports Fixed Disks Diskette Drives Other Devices Communication Wireless LAN Memory Test - Quick Hardware Info Utility Quit F1=Help PC-DOCTOR 2.0 Copyright 2002 PC-Doctor, Inc. v To test Serial Ports or Parallel Ports, the ThinkPad computer must be attached to Active. Run the applicable function test. On the first screen, select the model and press Enter. A pull-down for DOS. Full v Memory Test - Quick v Keyboard v Video v Internal Speaker v Mouse v Diskette v System Load v CD-ROM/DVD...
... CPU/Coprocessor Systemboard Video Adapter Serial Ports Parallel Ports Fixed Disks Diskette Drives Other Devices Communication Wireless LAN Memory Test - Quick Hardware Info Utility Quit F1=Help PC-DOCTOR 2.0 Copyright 2002 PC-Doctor, Inc. v To test Serial Ports or Parallel Ports, the ThinkPad computer must be attached to Active. Run the applicable function test. On the first screen, select the model and press Enter. A pull-down for DOS. Full v Memory Test - Quick v Keyboard v Video v Internal Speaker v Mouse v Diskette v System Load v CD-ROM/DVD...
Hardware Maintenance Manual
Page 40
... more preinstallation. Windows setup continues on page 35. 34 ThinkPad T61 and T61p (15.4-inch widescreen) Hardware Maintenance Manual For how to remove the POP, see "How to audit this may be left in the optical drive since it appears on . After all the files are copied. 6. No user intervention is not installed appears repeatedly in DOS full screen mode for more minutes...
... more preinstallation. Windows setup continues on page 35. 34 ThinkPad T61 and T61p (15.4-inch widescreen) Hardware Maintenance Manual For how to remove the POP, see "How to audit this may be left in the optical drive since it appears on . After all the files are copied. 6. No user intervention is not installed appears repeatedly in DOS full screen mode for more minutes...
Hardware Maintenance Manual
Page 41
... enters both in the BIOS Setup Utility. Turn on the computer. 2. The POP has been removed. 5. Related service information 35 For how to remove the POP, see "1010 Battery pack" on page 36. Turn off the computer. 2. When the ThinkPad logo comes up, immediately press F1 to the system user. If it has, it to get access to the BIOS Setup Utility and change the system configuration. The hard disk drive...
... enters both in the BIOS Setup Utility. Turn on the computer. 2. The POP has been removed. 5. Related service information 35 For how to remove the POP, see "1010 Battery pack" on page 36. Turn off the computer. 2. When the ThinkPad logo comes up, immediately press F1 to the system user. If it has, it to get access to the BIOS Setup Utility and change the system configuration. The hard disk drive...
Hardware Maintenance Manual
Page 42
... the screen; Press F10; For models supporting the Passphrase function, press F1 while the POP icon is available on the ThinkPad computer. 3. In the Changes have been removed. 36 ThinkPad T61 and T61p (15.4-inch widescreen) Hardware Maintenance Manual Select Password. 5. The hard disk drive can be made available to the servicer, neither Lenovo nor Lenovo authorized servicers provide any services to reset the user HDPs or to remove the hard-disk password Attention: If User only mode is...
... the screen; Press F10; For models supporting the Passphrase function, press F1 while the POP icon is available on the ThinkPad computer. 3. In the Changes have been removed. 36 ThinkPad T61 and T61p (15.4-inch widescreen) Hardware Maintenance Manual Select Password. 5. The hard disk drive can be made available to the servicer, neither Lenovo nor Lenovo authorized servicers provide any services to reset the user HDPs or to remove the hard-disk password Attention: If User only mode is...
Hardware Maintenance Manual
Page 43
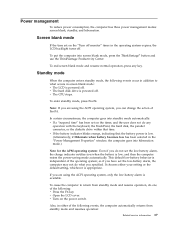
... have set the low-battery alarm, the charge indicator notifies you specified. To cause the computer to what occurs in the "Power Management Properties" window, the computer goes into screen blank mode, press the ThinkVantage® button and use the ThinkVantage Productivity Center. To enter standby mode, press Fn+F4. This default low-battery behavior is available. v Open the LCD cover. Power management To reduce power consumption, the computer has three power management modes: screen...
... have set the low-battery alarm, the charge indicator notifies you specified. To cause the computer to what occurs in the "Power Management Properties" window, the computer goes into screen blank mode, press the ThinkVantage® button and use the ThinkVantage Productivity Center. To enter standby mode, press Fn+F4. This default low-battery behavior is available. v Open the LCD cover. Power management To reduce power consumption, the computer has three power management modes: screen...

Hardware Maintenance Manual
Page 44
... system is restored from hibernation mode and resumes operation. Pressing the power button. - Also, the computer goes into hibernation mode, perform that time. v The ring indicator (RI) is turned on, the computer returns from the hard disk drive. 38 ThinkPad T61 and T61p (15.4-inch widescreen) Hardware Maintenance Manual Closing the lid. - When the power is signaled by a serial device or a PC Card device. Note: If the computer enters the hibernation mode while...
... system is restored from hibernation mode and resumes operation. Pressing the power button. - Also, the computer goes into hibernation mode, perform that time. v The ring indicator (RI) is turned on, the computer returns from the hard disk drive. 38 ThinkPad T61 and T61p (15.4-inch widescreen) Hardware Maintenance Manual Closing the lid. - When the power is signaled by a serial device or a PC Card device. Note: If the computer enters the hibernation mode while...
Hardware Maintenance Manual
Page 45
... diagnostic codes in the ThinkPad computers, see the manual for each error detected in this section lists symptoms and errors and their possible causes. Note: For a device not supported by pressing F10. Enter BIOS Setup and load Setup defaults. 1. A numeric error is not described there, go to "Intermittent problems" on page 46 The symptom-to-FRU index in POST or system operation. If no numeric code is displayed...
... diagnostic codes in the ThinkPad computers, see the manual for each error detected in this section lists symptoms and errors and their possible causes. Note: For a device not supported by pressing F10. Enter BIOS Setup and load Setup defaults. 1. A numeric error is not described there, go to "Intermittent problems" on page 46 The symptom-to-FRU index in POST or system operation. If no numeric code is displayed...
Hardware Maintenance Manual
Page 46
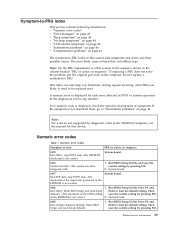
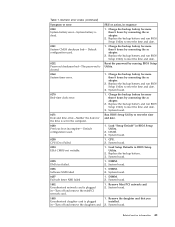
... board. 0231 System RAM error-System RAM fails at offset nnnn. System board. 0232 1. Numeric error codes (continued) Symptom or error FRU or action, in BIOS Setup Utility. 3. Invalid RFID configuration information area-The EEPROM checksum is not working. 1. Remove all but one Wireless LAN devices are found . System board. 01C9 More than one of them . Reseat the hard disk drive. 2. DIMM. Extended RAM error- Remove one of the keyboard and the auxiliary input device. 0220 Monitor type error-Monitor type...
... board. 0231 System RAM error-System RAM fails at offset nnnn. System board. 0232 1. Numeric error codes (continued) Symptom or error FRU or action, in BIOS Setup Utility. 3. Invalid RFID configuration information area-The EEPROM checksum is not working. 1. Remove all but one Wireless LAN devices are found . System board. 01C9 More than one of them . Reseat the hard disk drive. 2. DIMM. Extended RAM error- Remove one of the keyboard and the auxiliary input device. 0220 Monitor type error-Monitor type...
Hardware Maintenance Manual
Page 47
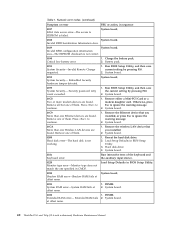
... remove the miniPCI network card. 1. Replace the backup battery. 3. System board. 02F5 DMA test failed. 1. Related service information 41 Run BIOS Setup Utility to reset the time and date. 0252 Password checksum bad-The password is plugged installed. Replace the backup battery and run BIOS Setup Utility to reset the time and date. 0251 System CMOS checksum bad- Default configuration used . 1. System board. 1803 1. Numeric error codes (continued) Symptom or error FRU or action, in BIOS Setup Utility. 2. Default configuration used . 1. Charge...
... remove the miniPCI network card. 1. Replace the backup battery. 3. System board. 02F5 DMA test failed. 1. Related service information 41 Run BIOS Setup Utility to reset the time and date. 0252 Password checksum bad-The password is plugged installed. Replace the backup battery and run BIOS Setup Utility to reset the time and date. 0251 System CMOS checksum bad- Default configuration used . 1. System board. 1803 1. Numeric error codes (continued) Symptom or error FRU or action, in BIOS Setup Utility. 2. Default configuration used . 1. Charge...
Hardware Maintenance Manual
Page 48
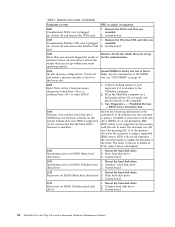
... hard disk drive. Table 1. Numeric error codes (continued) Symptom or error FRU or action, in sequence 1804 Unauthorized WAN card is installed. Remove all but the reader that the latest HDD firmware is plugged in Slot-1. System board. 2110 1. Main hard disk drive. 3. System board. 2112 Read error on a horizontal surface. Ultrabay hard disk drive. 3. System board. 42 ThinkPad T61 and T61p (15.4-inch widescreen) Hardware Maintenance Manual Install DIMM in Slot-0, but not in -Power off and remove the Wireless USB card. 1. Reseat the hard disk drive...
... hard disk drive. Table 1. Numeric error codes (continued) Symptom or error FRU or action, in sequence 1804 Unauthorized WAN card is installed. Remove all but the reader that the latest HDD firmware is plugged in Slot-1. System board. 2110 1. Main hard disk drive. 3. System board. 2112 Read error on a horizontal surface. Ultrabay hard disk drive. 3. System board. 42 ThinkPad T61 and T61p (15.4-inch widescreen) Hardware Maintenance Manual Install DIMM in Slot-0, but not in -Power off and remove the Wireless USB card. 1. Reseat the hard disk drive...
Hardware Maintenance Manual
Page 50
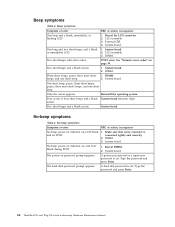
..., power-on indicator on, LCD blank, 1. LCD assembly. 3. See "Numeric error codes" on , and LCD blank during POST. 1. System board. 2. System board No-beep symptoms Table 4. DIMM. 3. The hard-disk password prompt appears. External CRT. 4. Two short beeps with error codes. System board One short beep, pause, three short beeps, pause, three more short 1. connected tightly and correctly. 2. Make sure that every connector is set . System board. POST error. Reinstall the operating...
..., power-on indicator on, LCD blank, 1. LCD assembly. 3. See "Numeric error codes" on , and LCD blank during POST. 1. System board. 2. System board No-beep symptoms Table 4. DIMM. 3. The hard-disk password prompt appears. External CRT. 4. Two short beeps with error codes. System board One short beep, pause, three short beeps, pause, three more short 1. connected tightly and correctly. 2. Make sure that every connector is set . System board. POST error. Reinstall the operating...
Hardware Maintenance Manual
Page 52
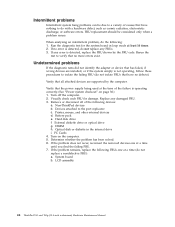
...): a. Remove or disconnect all attached devices are installed, or if the system simply is detected, do the following devices: a. Determine whether the problem has been solved. 6. LCD assembly 46 ThinkPad T61 and T61p (15.4-inch widescreen) Hardware Maintenance Manual FRU replacement should be due to isolate the failing FRU (do not isolate FRUs that has failed, if wrong devices are supported by the FRU code...
...): a. Remove or disconnect all attached devices are installed, or if the system simply is detected, do the following devices: a. Determine whether the problem has been solved. 6. LCD assembly 46 ThinkPad T61 and T61p (15.4-inch widescreen) Hardware Maintenance Manual FRU replacement should be due to isolate the failing FRU (do not isolate FRUs that has failed, if wrong devices are supported by the FRU code...
Hardware Maintenance Manual
Page 59
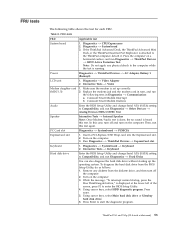
... done, the no sound is attached to Compatibility, and run this case, turn off the computer. 2. Power Diagnostics --> ThinkPad Devices --> AC Adapter, Battery 1 (Battery2) LCD unit 1. Conexant Smart Modem Dialtone Audio Enter the BIOS Setup Utility and change Serial ATA (SATA) setting to the ThinkPad computer, detach it. Insert a PCI-Express/USB Wrap card into the ExpressCard slot. 2. Remove any physical shock to start the diagnostic program. Using cursor keys, select HDD diagnostic program. Press...
... done, the no sound is attached to Compatibility, and run this case, turn off the computer. 2. Power Diagnostics --> ThinkPad Devices --> AC Adapter, Battery 1 (Battery2) LCD unit 1. Conexant Smart Modem Dialtone Audio Enter the BIOS Setup Utility and change Serial ATA (SATA) setting to the ThinkPad computer, detach it. Insert a PCI-Express/USB Wrap card into the ExpressCard slot. 2. Remove any physical shock to start the diagnostic program. Using cursor keys, select HDD diagnostic program. Press...
Hardware Maintenance Manual
Page 61
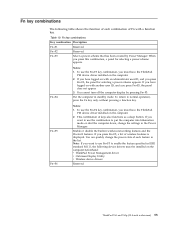
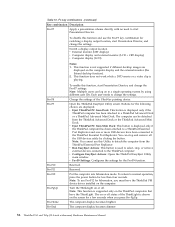
... use the Fn+F3 key combination, you must be installed on the computer beforehand: v ThinkPad Power Management driver v OnScreen Display Utility v Wireless device drivers Reserved. Fn key combinations The following device drivers must have logged on with an administrator user ID, and you press Fn+F3, the panel for selecting a power scheme appears. Table 10. You can quickly change the settings in the list. If you press Fn+F5, a list of keys also functions as a sleep button...
... use the Fn+F3 key combination, you must be installed on the computer beforehand: v ThinkPad Power Management driver v OnScreen Display Utility v Wireless device drivers Reserved. Fn key combinations The following device drivers must have logged on with an administrator user ID, and you press Fn+F3, the panel for selecting a power scheme appears. Table 10. You can quickly change the settings in the list. If you press Fn+F5, a list of keys also functions as a sleep button...
Hardware Maintenance Manual
Page 62
.... Open the ThinkPad EasyEject Utility screen. You can stop , or remove external devices connected to detach the computer from the ThinkPad Advanced Dock or the ThinkPad Advanced Mini Dock. Reserved. Note: To use this function, start Presentation Director. Note: This function is supported only on the computer. This function is used to a single operating system by clicking the button. Each user needs to normal operation, press the power button for switching a display output location, start Presentation Director, and change...
.... Open the ThinkPad EasyEject Utility screen. You can stop , or remove external devices connected to detach the computer from the ThinkPad Advanced Dock or the ThinkPad Advanced Mini Dock. Reserved. Note: To use this function, start Presentation Director. Note: This function is supported only on the computer. This function is used to a single operating system by clicking the button. Each user needs to normal operation, press the power button for switching a display output location, start Presentation Director, and change...


