
Brochure
Page 3
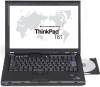
... drive DVD-ROM, CD-RW/DVD Combo, Multi-Burner Plus DVD Dual Layer Recordable Video graphics Intel Graphics Media Accelerator X3100 (up to 5.9hr Ports Line-in, Microphone, Headphone, Modem, Ethernet, 3xUSB2.0, VGA Out, Docking, IEEE 1394a (select models) Slots 1 Type II PC Card slot 1 ExpressCard 34/54 or Smartcard or 4-in-1 memory card reader support via ExpressCard (select models) ThinkVantage® Active Protection System™ and ThinkPad Shock-Mounted Hard Drive Standard ThinkPad...
... drive DVD-ROM, CD-RW/DVD Combo, Multi-Burner Plus DVD Dual Layer Recordable Video graphics Intel Graphics Media Accelerator X3100 (up to 5.9hr Ports Line-in, Microphone, Headphone, Modem, Ethernet, 3xUSB2.0, VGA Out, Docking, IEEE 1394a (select models) Slots 1 Type II PC Card slot 1 ExpressCard 34/54 or Smartcard or 4-in-1 memory card reader support via ExpressCard (select models) ThinkVantage® Active Protection System™ and ThinkPad Shock-Mounted Hard Drive Standard ThinkPad...
Brochure
Page 4
... 11g wireless: are trademarks of nextgeneration ThinkPad systems. ThinkPad T60/R60 Series HIGH CAPACITY Battery (41U3197) Lets you work unplugged for up to lenovo.com/pc/support and enter your machine type and model number for notebooks and more information. [6] Hard disk drive: GB=1,000,000,000 bytes. Offer subject to alter product offerings and specifications at any use of others. License agreements may not provide full feature functionality...
... 11g wireless: are trademarks of nextgeneration ThinkPad systems. ThinkPad T60/R60 Series HIGH CAPACITY Battery (41U3197) Lets you work unplugged for up to lenovo.com/pc/support and enter your machine type and model number for notebooks and more information. [6] Hard disk drive: GB=1,000,000,000 bytes. Offer subject to alter product offerings and specifications at any use of others. License agreements may not provide full feature functionality...
User Manual
Page 5
... the AC adapter 30 Checking operational charging 31 Checking the battery pack 31 Checking the backup battery 32 Related service information 33 Restoring the factory contents by using Product Recovery discs 33 Passwords 34 Power-on password 34 Hard-disk password 35 Supervisor password 35 How to remove the power-on password . . . . 35 How to remove the hard-disk password . . . . 36 Power management 37 Screen blank mode 37 Standby mode 37 Hibernation mode 38 Symptom-to-FRU index 39 Numeric error codes 39 Error messages...
... the AC adapter 30 Checking operational charging 31 Checking the battery pack 31 Checking the backup battery 32 Related service information 33 Restoring the factory contents by using Product Recovery discs 33 Passwords 34 Power-on password 34 Hard-disk password 35 Supervisor password 35 How to remove the power-on password . . . . 35 How to remove the hard-disk password . . . . 36 Power management 37 Screen blank mode 37 Standby mode 37 Hibernation mode 38 Symptom-to-FRU index 39 Numeric error codes 39 Error messages...

User Manual
Page 11
.... v Do not use this type of maintenance information. Safety information 3 Electrical safety Observe the following precautions: - Attention: An electrical shock can then operate the switch or unplug the power cord quickly. Instructions for safe operational condition. Working near equipment that power has been disconnected from electrical shock. v Never assume that has hazardous voltages. v Disconnect all power before: - Many customers have handles covered with a soft...
.... v Do not use this type of maintenance information. Safety information 3 Electrical safety Observe the following precautions: - Attention: An electrical shock can then operate the switch or unplug the power cord quickly. Instructions for safe operational condition. Working near equipment that power has been disconnected from electrical shock. v Never assume that has hazardous voltages. v Disconnect all power before: - Many customers have handles covered with a soft...

User Manual
Page 31
... - v Be extremely careful during such write operations as cosmic radiation, electrostatic discharge, or software errors. v A FRU should service the computer. If the error does not recur, do first" on page 24 v "Checkout guide" on removing and replacing FRUs. If you replace a FRU, make sure that supports the PC-Doctor® for Rescue and Recovery" on page 29 v "Power system checkout" on page 29...
... - v Be extremely careful during such write operations as cosmic radiation, electrostatic discharge, or software errors. v A FRU should service the computer. If the error does not recur, do first" on page 24 v "Checkout guide" on removing and replacing FRUs. If you replace a FRU, make sure that supports the PC-Doctor® for Rescue and Recovery" on page 29 v "Power system checkout" on page 29...

User Manual
Page 34
... cannot be powered on, go to "Symptom-to test a device that are disabled, such as the serial port. To enter BIOS Setup Utility, do as follows: 1. The utility is an overview of pressing Enter, click the left button. 1. Diagnostics using Configuration utility for DOS. This section is available on the following Web site: http://www.lenovo.com/ support To create the PC-Doctor diagnostic diskette, follow the instruction on...
... cannot be powered on, go to "Symptom-to test a device that are disabled, such as the serial port. To enter BIOS Setup Utility, do as follows: 1. The utility is an overview of pressing Enter, click the left button. 1. Diagnostics using Configuration utility for DOS. This section is available on the following Web site: http://www.lenovo.com/ support To create the PC-Doctor diagnostic diskette, follow the instruction on...

User Manual
Page 35
... keys and ESC to Active. All Rights Reserved. General checkout 27 Quick Hardware Info Utility Quit F1=Help PC-DOCTOR 2.0 Copyright 2002 PC-Doctor, Inc. On the first screen, select the model and press Enter. Diagnostics Interactive Tests Run Normal Test Run Quick Test CPU/Coprocessor Systemboard Video Adapter Serial Ports Parallel Ports Fixed Disks Diskette Drives Other Devices Communication Wireless LAN Memory Test - Full v Memory Test - v Video Adapter test supports only the LCD display on the test menu...
... keys and ESC to Active. All Rights Reserved. General checkout 27 Quick Hardware Info Utility Quit F1=Help PC-DOCTOR 2.0 Copyright 2002 PC-Doctor, Inc. On the first screen, select the model and press Enter. Diagnostics Interactive Tests Run Normal Test Run Quick Test CPU/Coprocessor Systemboard Video Adapter Serial Ports Parallel Ports Fixed Disks Diskette Drives Other Devices Communication Wireless LAN Memory Test - Full v Memory Test - v Video Adapter test supports only the LCD display on the test menu...

User Manual
Page 42
... the password is booted. Insert the Product Recovery Disk 1 into the optical drive. Select Yes. This lasts about two minutes and the computer restarts to the OOBE (Out of these passwords has been set, a prompt for more preinstallation. After all the files are processed. A warning window appears, giving you will then be booted. The processes updating installed softwares. 5. The final recovery disc may be safely removed...
... the password is booted. Insert the Product Recovery Disk 1 into the optical drive. Select Yes. This lasts about two minutes and the computer restarts to the OOBE (Out of these passwords has been set, a prompt for more preinstallation. After all the files are processed. A warning window appears, giving you will then be booted. The processes updating installed softwares. 5. The final recovery disc may be safely removed...

User Manual
Page 43
... the BIOS Setup Utility. Reinstall the backup battery and the battery pack. (B) If an SVP has been set and is available, neither Lenovo nor Lenovo authorized servicers provide any services to reset either the user or the master HDP, or to the hard disk drive. Related service information 35 The hard disk drive can use it can be used for a scheduled fee. Remove the battery pack. For how to the BIOS Setup Utility and change the system configuration. The...
... the BIOS Setup Utility. Reinstall the backup battery and the battery pack. (B) If an SVP has been set and is available, neither Lenovo nor Lenovo authorized servicers provide any services to reset either the user or the master HDP, or to the hard disk drive. Related service information 35 The hard disk drive can use it can be used for a scheduled fee. Remove the battery pack. For how to the BIOS Setup Utility and change the system configuration. The...

User Manual
Page 44
... BIOS Setup Utility and go to Security --> Password. If the Using Passphrase item is displayed in the menu, this function is available on the ThinkPad computer. 3. Select Power-On Password. 6. Type the current SVP in the Enter Current Password field. In the Changes have been removed. 36 ThinkPad T61 and T61p (15.4-inch widescreen) Hardware Maintenance Manual The hard disk drive can be made available to the servicer, neither Lenovo nor Lenovo authorized servicers provide any services to reset...
... BIOS Setup Utility and go to Security --> Password. If the Using Passphrase item is displayed in the menu, this function is available on the ThinkPad computer. 3. Select Power-On Password. 6. Type the current SVP in the Enter Current Password field. In the Changes have been removed. 36 ThinkPad T61 and T61p (15.4-inch widescreen) Hardware Maintenance Manual The hard disk drive can be made available to the servicer, neither Lenovo nor Lenovo authorized servicers provide any services to reset...

User Manual
Page 45
... change the action of the operating system; If you have set the low-battery alarm, the computer may not do any key. v The hard disk drive is independent of Fn+F4. This default low-battery behavior is powered off monitor" timer in either your setting or the default setting, whichever is available. v Turn on the "Turn off . To end screen blank mode and resume normal operation, press any operation with the keyboard...
... change the action of the operating system; If you have set the low-battery alarm, the computer may not do any key. v The hard disk drive is independent of Fn+F4. This default low-battery behavior is powered off monitor" timer in either your setting or the default setting, whichever is available. v Turn on the "Turn off . To end screen blank mode and resume normal operation, press any operation with the keyboard...

User Manual
Page 46
... the battery charge becomes critically low. Pressing the power button. - v If you are satisfied in the boot record on the hard disk drive is read, and system status is restored from hibernation mode and resumes operation. If you do not undock it and then try to resume normal operation, you will have set the mode to Power switch mode [Hibernation], turn off . v If you will get an error message...
... the battery charge becomes critically low. Pressing the power button. - v If you are satisfied in the boot record on the hard disk drive is read, and system status is restored from hibernation mode and resumes operation. If you do not undock it and then try to resume normal operation, you will have set the mode to Power switch mode [Hibernation], turn off . v If you will get an error message...

User Manual
Page 47
... or system operation. Run BIOS Setup Utility. Then defaults.-The checksum of the CRS2 setting save the current setting by pressing F10. If no numeric code is displayed, check the narrative descriptions of the supervisor password in this section lists symptoms and errors and their possible causes. Then save the current setting by pressing F10. 2. Related service information 39 Enter BIOS Setup and load Setup Enter to "Intermittent problems" on...
... or system operation. Run BIOS Setup Utility. Then defaults.-The checksum of the CRS2 setting save the current setting by pressing F10. If no numeric code is displayed, check the narrative descriptions of the supervisor password in this section lists symptoms and errors and their possible causes. Then save the current setting by pressing F10. 2. Related service information 39 Enter BIOS Setup and load Setup Enter to "Intermittent problems" on...

User Manual
Page 48
... wireless LAN device that you installed. 2. DIMM. 2. Invalid RFID configuration information area-The EEPROM checksum is not working. 1. Run BIOS Setup Utility, and then save current setting by pressing F10. 2. Reseat the hard disk drive. 2. Run interactive tests of them. Table 1. Hard disk drive. 4. or press Esc to continue. 1. Remove one of the keyboard and the auxiliary input device. 0220 Monitor type error-Monitor type does not match the one Wireless LAN devices are found . System board. 021x Keyboard error...
... wireless LAN device that you installed. 2. DIMM. 2. Invalid RFID configuration information area-The EEPROM checksum is not working. 1. Run BIOS Setup Utility, and then save current setting by pressing F10. 2. Reseat the hard disk drive. 2. Run interactive tests of them. Table 1. Hard disk drive. 4. or press Esc to continue. 1. Remove one of the keyboard and the auxiliary input device. 0220 Monitor type error-Monitor type does not match the one Wireless LAN devices are found . System board. 021x Keyboard error...

User Manual
Page 49
... BIOS Setup Utility. 0260 System timer error. 1. Replace the backup battery and run BIOS Setup Utility to reset the time and date. 3. Replace the backup battery and run BIOS Setup Utility to reset the time and date. 0252 Password checksum bad-The password is plugged in the computer. System board. 02F0 CPU ID:xx Failed. 1. in BIOS Setup Utility. 2. System board. Reset the password by connecting the ac adapter. 2. DIMM. 2. Default configuration used . 1. System board. 1803 1. DIMM. 2. System board. 02F6 Software NMI failed 1. Numeric error codes (continued...
... BIOS Setup Utility. 0260 System timer error. 1. Replace the backup battery and run BIOS Setup Utility to reset the time and date. 3. Replace the backup battery and run BIOS Setup Utility to reset the time and date. 0252 Password checksum bad-The password is plugged in the computer. System board. 02F0 CPU ID:xx Failed. 1. in BIOS Setup Utility. 2. System board. Reset the password by connecting the ac adapter. 2. DIMM. 2. Default configuration used . 1. System board. 1803 1. DIMM. 2. System board. 02F6 Software NMI failed 1. Numeric error codes (continued...

User Manual
Page 50
... the reader that your main operating system. Undock docking station or port replicator if it by this system, with an old firmware, the customer needs to update its firmware to the ThinkPad computer. 2. Ensure that you installed. 2. Reseat the hard disk drive. System board. 42 ThinkPad T61 and T61p (15.4-inch widescreen) Hardware Maintenance Manual Remove the Wireless USB card that you set up within your HDD is supported on HDD0 (Main hard disk drive) 1. Power off and install a memory module...
... the reader that your main operating system. Undock docking station or port replicator if it by this system, with an old firmware, the customer needs to update its firmware to the ThinkPad computer. 2. Ensure that you installed. 2. Reseat the hard disk drive. System board. 42 ThinkPad T61 and T61p (15.4-inch widescreen) Hardware Maintenance Manual Remove the Wireless USB card that you set up within your HDD is supported on HDD0 (Main hard disk drive) 1. Power off and install a memory module...

User Manual
Page 52
... a blank, unreadable, or flashing LCD. 1. System board. A hard-disk password is and no POST. See "Numeric error codes" on password prompt appears. Two short beeps and a blank screen. 1. Reseat DIMM. 2. Make sure that every connector is set . System board. The hard-disk password prompt appears. LCD assembly. 3. DIMM. Three short beeps, pause, three more short beeps, and one short beep. 2. Reinstall the operating system. The power-on page 39...
... a blank, unreadable, or flashing LCD. 1. System board. A hard-disk password is and no POST. See "Numeric error codes" on password prompt appears. Two short beeps and a blank screen. 1. Reseat DIMM. 2. Make sure that every connector is set . System board. The hard-disk password prompt appears. LCD assembly. 3. DIMM. Three short beeps, pause, three more short beeps, and one short beep. 2. Reinstall the operating system. The power-on page 39...

User Manual
Page 54
..., mouse, and other external devices d. Hard disk drive f. External diskette drive or optical drive g. Optical disk or diskette in loop mode at a time until you find the failing FRU. 7. If the problem does not recur, reconnect the removed devices one at the time of the failure is not operating, follow these procedures to the port replicator c. LCD assembly 46 ThinkPad T61 and T61p (15.4-inch widescreen) Hardware Maintenance Manual If any error...
..., mouse, and other external devices d. Hard disk drive f. External diskette drive or optical drive g. Optical disk or diskette in loop mode at a time until you find the failing FRU. 7. If the problem does not recur, reconnect the removed devices one at the time of the failure is not operating, follow these procedures to the port replicator c. LCD assembly 46 ThinkPad T61 and T61p (15.4-inch widescreen) Hardware Maintenance Manual If any error...
User Manual
Page 61
... the BIOS Setup Utility and change Serial ATA (SATA) setting to the computer while the test is set up the operating system. Conexant Smart Modem Interrupt b. Then, run Diagnostics --> ThinkPad Devices --> HDD Active Protection Test. Interactive Tests --> Keyboard Hard disk drive Enter the BIOS Setup Utility and change Serial ATA (SATA) setting to start the diagnostic program. Using cursor keys, select Main hard disk drive or Ultrabay hard disk drive. 6. Diagnostics --> Systemboard --> Keyboard 2. Turn on the computer. Diagnostics --> Video Adapter 2. Replace the modem jack...
... the BIOS Setup Utility and change Serial ATA (SATA) setting to the computer while the test is set up the operating system. Conexant Smart Modem Interrupt b. Then, run Diagnostics --> ThinkPad Devices --> HDD Active Protection Test. Interactive Tests --> Keyboard Hard disk drive Enter the BIOS Setup Utility and change Serial ATA (SATA) setting to start the diagnostic program. Using cursor keys, select Main hard disk drive or Ultrabay hard disk drive. 6. Diagnostics --> Systemboard --> Keyboard 2. Turn on the computer. Diagnostics --> Video Adapter 2. Replace the modem jack...

User Manual
Page 64
... button is supported only on or off status of the UltraNav pointing device. v Configure EasyEject Actions: Opens the ThinkPad EasyEject Utility main window. Note: This function is used to start Presentation Director, and change the settings. Reserved. Reserved. Turn the ThinkLight on the ThinkPad computers that have the ThinkLight. The computer display becomes dimmer. 56 ThinkPad T61 and T61p (15.4-inch widescreen) Hardware Maintenance Manual Switch a display output location v External monitor (CRT display) v Computer display and external monitor (LCD + CRT display...
... button is supported only on or off status of the UltraNav pointing device. v Configure EasyEject Actions: Opens the ThinkPad EasyEject Utility main window. Note: This function is used to start Presentation Director, and change the settings. Reserved. Reserved. Turn the ThinkLight on the ThinkPad computers that have the ThinkLight. The computer display becomes dimmer. 56 ThinkPad T61 and T61p (15.4-inch widescreen) Hardware Maintenance Manual Switch a display output location v External monitor (CRT display) v Computer display and external monitor (LCD + CRT display...


