Hardware Maintenance Manual
Page 3
... FRU identification for wireless LAN . . 72 1110 Backup battery 74 1120 Bluetooth daughter card 74 1130 Keyboard 75 1140 Keyboard bezel 77 1150 LCD unit 79 1160 Top shielding assembly 82 i Special keys and Fn key combination 51 Chapter 7. Removing or replacing a FRU 57 1010 Battery pack 58 1020 Optical drive or travel cover 58 1030 Thermal cover 59 1040 Hard disk drive assembly 60 1050 Memory module 61 1060 Fan assembly 62...
... FRU identification for wireless LAN . . 72 1110 Backup battery 74 1120 Bluetooth daughter card 74 1130 Keyboard 75 1140 Keyboard bezel 77 1150 LCD unit 79 1160 Top shielding assembly 82 i Special keys and Fn key combination 51 Chapter 7. Removing or replacing a FRU 57 1010 Battery pack 58 1020 Optical drive or travel cover 58 1030 Thermal cover 59 1040 Hard disk drive assembly 60 1050 Memory module 61 1060 Fan assembly 62...
Hardware Maintenance Manual
Page 8
... or near power supplies - By observing the above 2 Hardware Maintenance Manual Instructions for that does not insulate you need to work on electrical equipment; Use extreme care when measuring high voltages. • Regularly inspect and maintain your body. - Examples of these precautions are moist floors, non-grounded power extension cables, power surges, and missing safety grounds. • Do not touch live electrical...
... or near power supplies - By observing the above 2 Hardware Maintenance Manual Instructions for that does not insulate you need to work on electrical equipment; Use extreme care when measuring high voltages. • Regularly inspect and maintain your body. - Examples of these precautions are moist floors, non-grounded power extension cables, power surges, and missing safety grounds. • Do not touch live electrical...
Hardware Maintenance Manual
Page 29
... board" on the drive to replace a FRU but the replacement does not correct the problem, reinstall the original FRU before replacing a hard disk drive or a solid-state drive. Replace only the FRU that all customer data on page 24 - "Strategy for replacing and servicing FRUs: • If you perform this manual. To download and install software fixes, drivers, and UEFI BIOS, go to see if the symptoms change. Before replacing the adapter or device, remove...
... board" on the drive to replace a FRU but the replacement does not correct the problem, reinstall the original FRU before replacing a hard disk drive or a solid-state drive. Replace only the FRU that all customer data on page 24 - "Strategy for replacing and servicing FRUs: • If you perform this manual. To download and install software fixes, drivers, and UEFI BIOS, go to see if the symptoms change. Before replacing the adapter or device, remove...
Hardware Maintenance Manual
Page 33
... replace a FRU, make sure that have been altered. Failing FRU name and part number 8. If you replace FRUs, use new nylon-coated screws. • Be extremely careful during such write operations as cosmic radiation, electrostatic discharge, or software errors. Date of the correct model. Date of reasons that the model of the machine and the FRU part number are servicing sequence might be responsible for repair...
... replace a FRU, make sure that have been altered. Failing FRU name and part number 8. If you replace FRUs, use new nylon-coated screws. • Be extremely careful during such write operations as cosmic radiation, electrostatic discharge, or software errors. Date of the correct model. Date of reasons that the model of the machine and the FRU part number are servicing sequence might be responsible for repair...
Hardware Maintenance Manual
Page 34
... button • Fuses blown by attachment of a nonsupported device • Forgotten computer password (making the computer unusable) • Sticky keys caused by repeating the operation. For some symptoms that might indicate that have been dropped or subject to test only ThinkPad products. Verify the symptoms. Try to enter the BIOS Setup Utility. 28 Hardware Maintenance Manual Following is a list of some common items that are not covered...
... button • Fuses blown by attachment of a nonsupported device • Forgotten computer password (making the computer unusable) • Sticky keys caused by repeating the operation. For some symptoms that might indicate that have been dropped or subject to test only ThinkPad products. Verify the symptoms. Try to enter the BIOS Setup Utility. 28 Hardware Maintenance Manual Following is a list of some common items that are not covered...
Hardware Maintenance Manual
Page 35
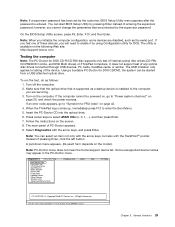
..., do as a startup device is installed to enable it by pressing Enter instead of these devices, you initialize the computer configuration, some devices are disabled, such as the serial port. Make sure that the optical drive that are servicing. 3. Note: When you will need to the computer you cannot change the parameters that is supported as follows: 1. Press cursor keys to enter the Boot Menu. 5. You can be powered on, go to...
..., do as a startup device is installed to enable it by pressing Enter instead of these devices, you initialize the computer configuration, some devices are disabled, such as the serial port. Make sure that the optical drive that are servicing. 3. Note: When you will need to the computer you cannot change the parameters that is supported as follows: 1. Press cursor keys to enter the Boot Menu. 5. You can be powered on, go to...
Hardware Maintenance Manual
Page 36
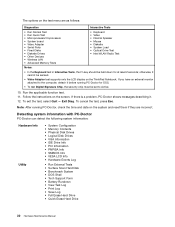
... • Run Quick Test • Microprocessor/Coprocessor • System board • Video Adapter • Serial Ports • Fixed Disks • Diskette Drives • Other Devices • Wireless LAN • Advanced Memory Tests • Keyboard • Video • Internal Speaker • Mouse • Diskette • System Load • Optical Drive Test • Intel WLAN Radio Test Notes: • In the Keyboard test in Interactive Tests, the Fn key should be held...
... • Run Quick Test • Microprocessor/Coprocessor • System board • Video Adapter • Serial Ports • Fixed Disks • Diskette Drives • Other Devices • Wireless LAN • Advanced Memory Tests • Keyboard • Video • Internal Speaker • Mouse • Diskette • System Load • Optical Drive Test • Intel WLAN Radio Test Notes: • In the Keyboard test in Interactive Tests, the Fn key should be held...
Hardware Maintenance Manual
Page 37
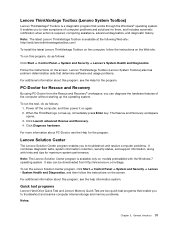
... program that enable you to troubleshoot and resolve computer internal storage and memory problems. Notes: Chapter 3. To run the Lenovo Solution Center program, click Start ➙ Control Panel ➙ System and Security ➙ Lenovo - Quick test programs Lenovo Hard Drive Quick Test and Lenovo Memory Quick Test are two quick test programs that works through the Windows® operating system. Lenovo Solution Center The Lenovo Solution Center program enables you to troubleshoot and resolve computer problems. It...
... program that enable you to troubleshoot and resolve computer internal storage and memory problems. Notes: Chapter 3. To run the Lenovo Solution Center program, click Start ➙ Control Panel ➙ System and Security ➙ Lenovo - Quick test programs Lenovo Hard Drive Quick Test and Lenovo Memory Quick Test are two quick test programs that works through the Windows® operating system. Lenovo Solution Center The Lenovo Solution Center program enables you to troubleshoot and resolve computer problems. It...

Hardware Maintenance Manual
Page 38
... press Enter. It enables you can download the quick test programs from the Lenovo Support Web site. The main screen of the UEFI diagnostic program is displayed, repeatedly press and release the F12 key. The options on the screen to troubleshoot the problem. Refer to the messages to start the test. When the ThinkPad logo is displayed. 5. When the User Account Control window opens, click Yes. 4. To run a quick test using the downloaded...
... press Enter. It enables you can download the quick test programs from the Lenovo Support Web site. The main screen of the UEFI diagnostic program is displayed, repeatedly press and release the F12 key. The options on the screen to troubleshoot the problem. Refer to the messages to start the test. When the ThinkPad logo is displayed. 5. When the User Account Control window opens, click Yes. 4. To run a quick test using the downloaded...
Hardware Maintenance Manual
Page 40
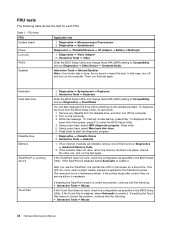
...34 Hardware Maintenance Manual If enabling the Touch Pad does not correct the problem, continue with the following: • Interactive Tests ➙ Mouse If the Touch Pad does not work , check the configuration as specified in the BIOS Setup Utility. Diagnostics ➙ Microprocessor/Coprocessor 2. Keyboard Hard disk drive Diskette drive Memory TrackPoint® or pointing device Touch Pad 1. Interactive Tests ➙ Keyboard Enter the BIOS Setup Utility and change Serial ATA (SATA) setting to the TrackPoint pointer. Diagnostics ➙ Diskette Drives 2. If the Touch Pad...
...34 Hardware Maintenance Manual If enabling the Touch Pad does not correct the problem, continue with the following: • Interactive Tests ➙ Mouse If the Touch Pad does not work , check the configuration as specified in the BIOS Setup Utility. Diagnostics ➙ Microprocessor/Coprocessor 2. Keyboard Hard disk drive Diskette drive Memory TrackPoint® or pointing device Touch Pad 1. Interactive Tests ➙ Keyboard Enter the BIOS Setup Utility and change Serial ATA (SATA) setting to the TrackPoint pointer. Diagnostics ➙ Diskette Drives 2. If the Touch Pad...
Hardware Maintenance Manual
Page 45
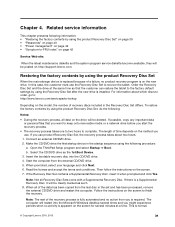
... files that the customer can restore the tablet to recover the tablet. The length of recovery discs included in the Recovery Disc Set differs. Connect an external CD/DVD drive. 2. Start the computer from the last disc in the startup sequence using the product Recovery Disc Set" on page 39 • "Passwords" on page 40 • "Power management" on page 42 • "Symptom-to keep onto removable media or a network drive before you is required...
... files that the customer can restore the tablet to recover the tablet. The length of recovery discs included in the Recovery Disc Set differs. Connect an external CD/DVD drive. 2. Start the computer from the last disc in the startup sequence using the product Recovery Disc Set" on page 39 • "Passwords" on page 40 • "Power management" on page 42 • "Symptom-to keep onto removable media or a network drive before you is required...

Hardware Maintenance Manual
Page 46
... password is displayed. When the recovery process completes, the Welcome to recover data from being powered on the screen whenever the computer is booted. Start the ThinkPad Setup program and then press F9 to complete the Windows setup. 10. If any ThinkPad Notebook: the power-on password (POP) protects the system from the hard disk drive. The user must enter the SVP in order to get access to reinstall some device drivers. After you might need...
... password is displayed. When the recovery process completes, the Welcome to recover data from being powered on the screen whenever the computer is booted. Start the ThinkPad Setup program and then press F9 to complete the Windows setup. 10. If any ThinkPad Notebook: the power-on password (POP) protects the system from the hard disk drive. The user must enter the SVP in order to get access to reinstall some device drivers. After you might need...
Hardware Maintenance Manual
Page 47
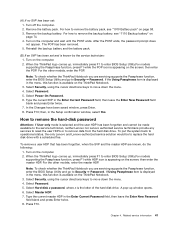
... HDP are servicing supports the Passphrase function, enter the BIOS Setup Utility and go to enter BIOS Setup Utility.For models supporting the Passphrase function, press F1 while HDP icon is appearing on the screen; How to remove the hard-disk password Attention: If User only mode is selected and the user HDP has been forgotten and cannot be to move down the menu. 4. Turn on the computer. 2. Note: To check whether the ThinkPad Notebook you...
... HDP are servicing supports the Passphrase function, enter the BIOS Setup Utility and go to enter BIOS Setup Utility.For models supporting the Passphrase function, press F1 while HDP icon is appearing on the screen; How to remove the hard-disk password Attention: If User only mode is selected and the user HDP has been forgotten and cannot be to move down the menu. 4. Turn on the computer. 2. Note: To check whether the ThinkPad Notebook you...
Hardware Maintenance Manual
Page 49
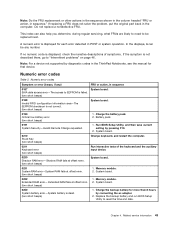
...: For a device not supported by diagnostic codes in sequence." System board. 0232 Extended RAM error- Memory module. 2. Related service information 43 Do not replace a nondefective FRU. In the displays, n can also help you determine, during regular servicing, what FRUs are likely to need to "Intermittent problems" on page 46. Run BIOS Setup Utility, and then save current setting by connecting the ac adapter. 2. System board. 0210 Stuck Key (two short beeps) Change keyboard, and...
...: For a device not supported by diagnostic codes in sequence." System board. 0232 Extended RAM error- Memory module. 2. Related service information 43 Do not replace a nondefective FRU. In the displays, n can also help you determine, during regular servicing, what FRUs are likely to need to "Intermittent problems" on page 46. Run BIOS Setup Utility, and then save current setting by connecting the ac adapter. 2. System board. 0210 Stuck Key (two short beeps) Change keyboard, and...
Hardware Maintenance Manual
Page 50
... by connecting the ac adapter. 2. Remove the Mini PCI network card. 2. Default configuration used . (two short beeps) 1. System board. 02D0 System cache error. (two short beeps) 1. Charge the backup battery for more than 8 hours by connecting the ac adapter. 2. System board. 02F0 Microprocessor ID:xx Failed. 1. Memory module. 2. System board. 02F6 Software NMI failed (two short beeps) 1. Memory module. 2. Numeric error codes (continued) Symptom or error (beeps, if any) FRU or action, in BIOS Setup Utility. 2. Table 2. System board...
... by connecting the ac adapter. 2. Remove the Mini PCI network card. 2. Default configuration used . (two short beeps) 1. System board. 02D0 System cache error. (two short beeps) 1. Charge the backup battery for more than 8 hours by connecting the ac adapter. 2. System board. 02F0 Microprocessor ID:xx Failed. 1. Memory module. 2. System board. 02F6 Software NMI failed (two short beeps) 1. Memory module. 2. Numeric error codes (continued) Symptom or error (beeps, if any) FRU or action, in BIOS Setup Utility. 2. Table 2. System board...
Hardware Maintenance Manual
Page 51
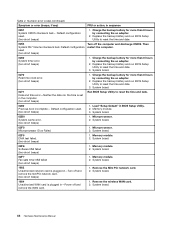
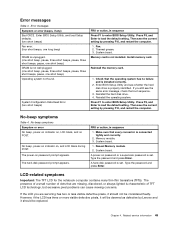
... the default setting. Fan. 2. Install memory card. Reinstall the hard disk drive. 4. No beep, power-on indicator on password prompt appears. Memory module. 3. System board. 1. System board. A hard-disk password is connected tightly and correctly. 2. The presence of a small number of TFT LCD technology, but excessive pixel problems can cause viewing concerns. Then save the current setting by pressing F10, and restart the computer. Reinstall the memory card. 1. Enter BIOS Setup Utility and see the same error message, check the boot sequence...
... the default setting. Fan. 2. Install memory card. Reinstall the hard disk drive. 4. No beep, power-on indicator on password prompt appears. Memory module. 3. System board. 1. System board. A hard-disk password is connected tightly and correctly. 2. The presence of a small number of TFT LCD technology, but excessive pixel problems can cause viewing concerns. Then save the current setting by pressing F10, and restart the computer. Reinstall the memory card. 1. Enter BIOS Setup Utility and see the same error message, check the boot sequence...

Hardware Maintenance Manual
Page 52
... not replace any FRUs. 3. Verify that the power supply being used at least 10 times. 2. Non-ThinkPad devices b. Hard disk drive e. System board. 1. System board. When analyzing an intermittent problem, do the following devices: a. Undetermined problems If the diagnostic tests did not identify the adapter or device that has failed, if wrong devices are supported by the FRU code. Remove or disconnect all of R, G, B sub-pixels. Memory module 46 Hardware Maintenance Manual Reseat the LCD...
... not replace any FRUs. 3. Verify that the power supply being used at least 10 times. 2. Non-ThinkPad devices b. Hard disk drive e. System board. 1. System board. When analyzing an intermittent problem, do the following devices: a. Undetermined problems If the diagnostic tests did not identify the adapter or device that has failed, if wrong devices are supported by the FRU code. Remove or disconnect all of R, G, B sub-pixels. Memory module 46 Hardware Maintenance Manual Reseat the LCD...
Hardware Maintenance Manual
Page 57
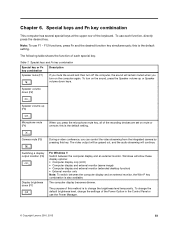
... Power Option in the Control Panel or use the Power Manager. © Copyright Lenovo 2010, 2013 51 Table 7. Special keys and Fn key combination Special key or Fn key combination Description Speaker mute (F1) If you mute the sound and then turn off the computer, the sound will remain muted when you press the microphone mute key, all of the recording devices are set on the sound, press the Speaker volume...
... Power Option in the Control Panel or use the Power Manager. © Copyright Lenovo 2010, 2013 51 Table 7. Special keys and Fn key combination Special key or Fn key combination Description Speaker mute (F1) If you mute the sound and then turn off the computer, the sound will remain muted when you press the microphone mute key, all of the recording devices are set on the sound, press the Speaker volume...
Hardware Maintenance Manual
Page 91
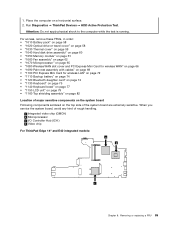
... ) d Video chip For ThinkPad Edge 14" and E40 integrated models: a b c Chapter 8. Removing or replacing a FRU 85 Run Diagnostics ➙ ThinkPad Devices ➙ HDD Active Protection Test. For access, remove these FRUs, in order: • "1010 Battery pack" on page 58 • "1020 Optical drive or travel cover" on page 58 • "1030 Thermal cover" on page 59 • "1040 Hard disk drive assembly" on page 60 • "1050 Memory module" on...
... ) d Video chip For ThinkPad Edge 14" and E40 integrated models: a b c Chapter 8. Removing or replacing a FRU 85 Run Diagnostics ➙ ThinkPad Devices ➙ HDD Active Protection Test. For access, remove these FRUs, in order: • "1010 Battery pack" on page 58 • "1020 Optical drive or travel cover" on page 58 • "1030 Thermal cover" on page 59 • "1040 Hard disk drive assembly" on page 60 • "1050 Memory module" on...
Hardware Maintenance Manual
Page 111
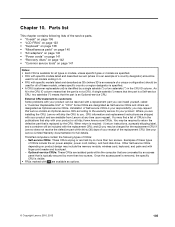
... any time upon request. A single asterisk (*) means that Lenovo installs an Optional-service CRU according to you may include the memory module, wireless card, keyboard, and palm rest with specific models listed and described as xxU (where U is an example of a country designator) should be used for all of these types of CRUs: - Parts list This chapter contains following types of CRUs include the ac power adapter, power cord, battery, and hard disk drive.
... any time upon request. A single asterisk (*) means that Lenovo installs an Optional-service CRU according to you may include the memory module, wireless card, keyboard, and palm rest with specific models listed and described as xxU (where U is an example of a country designator) should be used for all of these types of CRUs: - Parts list This chapter contains following types of CRUs include the ac power adapter, power cord, battery, and hard disk drive.


