
Owner's Manual
Page 1
See the label attached on the product and give the information to read the Important Precautions before using the product. User's Guide W2240V W2340V W2340VG Make sure to your dealer when you ask for future reference. Keep the User's Guide(CD) in an accessible place for service.
See the label attached on the product and give the information to read the Important Precautions before using the product. User's Guide W2240V W2340V W2340VG Make sure to your dealer when you ask for future reference. Keep the User's Guide(CD) in an accessible place for service.
Owner's Manual
Page 2
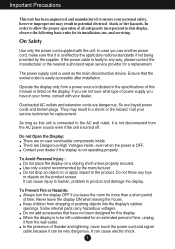
Operate the display only from a power source indicated in the specifications of this unit is connected to the AC wall outlet, it is not disconnected from the AC power source even if the unit is not operating properly. Call your dealer if the display is turned off. As long as the main disconnection device. Contact your service technician for replacement. When the display is OFF. In order to allow the proper operation of thunder and lightning, never touch the power cord and signal cable because it from dropping or pushing objects into the display's cabinet openings. If ...
Operate the display only from a power source indicated in the specifications of this unit is connected to the AC wall outlet, it is not disconnected from the AC power source even if the unit is not operating properly. Call your dealer if the display is turned off. As long as the main disconnection device. Contact your service technician for replacement. When the display is OFF. In order to allow the proper operation of thunder and lightning, never touch the power cord and signal cable because it from dropping or pushing objects into the display's cabinet openings. If ...

Owner's Manual
Page 3
Cover the openings with metallic objects. Place the display near a swimming pool. If possible, use a screen saver on this may cause some scaled or processed images may result in enclosure unless proper ventilation is provided. Make sure to the screen. However, this is subject to the screen and cause image burn-in. However, this will have no impact or effect on the screen. Contact an authorized the service center for your finger for a long time may cause damage to damage. Do not use this display near water such as this may cause damage to use the recommended ...
Cover the openings with metallic objects. Place the display near a swimming pool. If possible, use a screen saver on this may cause some scaled or processed images may result in enclosure unless proper ventilation is provided. Make sure to the screen. However, this is subject to the screen and cause image burn-in. However, this will have no impact or effect on the screen. Contact an authorized the service center for your finger for a long time may cause damage to damage. Do not use this display near water such as this may cause damage to use the recommended ...

Owner's Manual
Page 4
Do not use an aerosol directly on the display screen because over-spraying may occur. (Do not use chemicals such as benzene, paint thinners or alcohol) Spray water onto a soft cloth 2 to 4 times, and use it in this product contains a small amount of your local authority. 3 An electric shock may cause electrical shock. On Repacking Do not throw away the carton and packing materials. Disposal of this product must be carried out in accordance to transport the unit. Use a slightly damp (not wet) cloth. When shipping the unit to prevent scratching. wipe in which to the ...
Do not use an aerosol directly on the display screen because over-spraying may occur. (Do not use chemicals such as benzene, paint thinners or alcohol) Spray water onto a soft cloth 2 to 4 times, and use it in this product contains a small amount of your local authority. 3 An electric shock may cause electrical shock. On Repacking Do not throw away the carton and packing materials. Disposal of this product must be carried out in accordance to transport the unit. Use a slightly damp (not wet) cloth. When shipping the unit to prevent scratching. wipe in which to the ...
Owner's Manual
Page 5
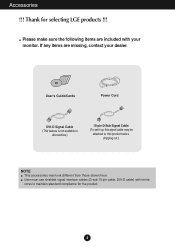
User's Guide/Cards Power Cord DVI-D Signal Cable (This feature is not available in all countries.) 15-pin D-Sub Signal Cable (To set it up, this signal cable may be attached to maintain standard compliance for selecting LGE products !!! If any items are included with ferrite cores to this product before shipping out.) NOTE This accessories may look different from those shown here. Accessories !!! Thank for the product. 4 User must use shielded signal interface cables (D-sub 15 pin cable, DVI-D cable) with your dealer. Please make sure the following items are missing, ...
User's Guide/Cards Power Cord DVI-D Signal Cable (This feature is not available in all countries.) 15-pin D-Sub Signal Cable (To set it up, this signal cable may be attached to maintain standard compliance for selecting LGE products !!! If any items are included with ferrite cores to this product before shipping out.) NOTE This accessories may look different from those shown here. Accessories !!! Thank for the product. 4 User must use shielded signal interface cables (D-sub 15 pin cable, DVI-D cable) with your dealer. Please make sure the following items are missing, ...
Owner's Manual
Page 6
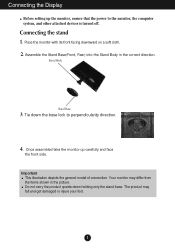
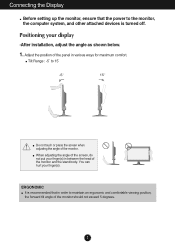
Tie down holding only the stand base. Do not carry the product upside down the base lock to the monitor, the computer system, and other attached devices is turned off. Connecting the stand 1. Assemble the Stand Base(Front, Rear) into the Stand Body in the picture. Connecting the Display Before setting up carefully and face the front side. Place the monitor with its front facing downward on a soft cloth. 2. Your monitor may fall and get damaged or injure your foot. 5 Stand Body Stand Base 3. Once assembled take the monitor up the monitor, ensure that the power to ...
Tie down holding only the stand base. Do not carry the product upside down the base lock to the monitor, the computer system, and other attached devices is turned off. Connecting the stand 1. Assemble the Stand Base(Front, Rear) into the Stand Body in the picture. Connecting the Display Before setting up carefully and face the front side. Place the monitor with its front facing downward on a soft cloth. 2. Your monitor may fall and get damaged or injure your foot. 5 Stand Body Stand Base 3. Once assembled take the monitor up the monitor, ensure that the power to ...

Owner's Manual
Page 7
Connecting the Display Disassembling the stand 1. Place the monitor face down and retry it in the arrow direction. If you can't release the stand base even the locking rib is at a release position, Please push the indicated rib down on a flat surface. 2. Put a cushion or soft cloth on the cushion or soft cloth. 3. Change your lock on the product as it follows and turn it . 4. Pull out the stand to remove. 6
Connecting the Display Disassembling the stand 1. Place the monitor face down and retry it in the arrow direction. If you can't release the stand base even the locking rib is at a release position, Please push the indicated rib down on a flat surface. 2. Put a cushion or soft cloth on the cushion or soft cloth. 3. Change your lock on the product as it follows and turn it . 4. Pull out the stand to remove. 6
Owner's Manual
Page 8
When adjusting the angle of the screen, do not put your finger(s) in between the head of the panel in order to maintain an ergonomic and comfortable viewing position, the forward tilt angle of the monitor. You can hurt your display -After installation, adjust the angle as shown below. 1. Adjust the position of the monitor and the stand body. Tilt Range : -5˚ to 15˚ Do not touch or press the screen when adjusting the angle of the monitor should not exceed 5 degrees. 7 ERGONOMIC It is turned off. Connecting the Display Before setting up the monitor, ensure that the power ...
When adjusting the angle of the screen, do not put your finger(s) in between the head of the panel in order to maintain an ergonomic and comfortable viewing position, the forward tilt angle of the monitor. You can hurt your display -After installation, adjust the angle as shown below. 1. Adjust the position of the monitor and the stand body. Tilt Range : -5˚ to 15˚ Do not touch or press the screen when adjusting the angle of the monitor should not exceed 5 degrees. 7 ERGONOMIC It is turned off. Connecting the Display Before setting up the monitor, ensure that the power ...

Owner's Manual
Page 9
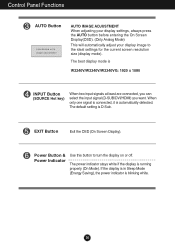
Connect signal input cable 1 and power cord 2 in all countries.) Headphone / Earphone Input 3. When using the device or after changing screen resolution, press the AUTO function button to improve resolution. 8 When monitor power is executed automatically. (Only Analog Mode) Power Button NOTE ' Self Image Setting Function'? This rear view represents a general model; This function provides the user with the PC 1. Mac adapter : For Apple Macintosh use, a separate plug adapter is needed to change the 15 pin high density (3 row) D-sub VGA connector on , the 'Self Image Setting ...
Connect signal input cable 1 and power cord 2 in all countries.) Headphone / Earphone Input 3. When using the device or after changing screen resolution, press the AUTO function button to improve resolution. 8 When monitor power is executed automatically. (Only Analog Mode) Power Button NOTE ' Self Image Setting Function'? This rear view represents a general model; This function provides the user with the PC 1. Mac adapter : For Apple Macintosh use, a separate plug adapter is needed to change the 15 pin high density (3 row) D-sub VGA connector on , the 'Self Image Setting ...
Owner's Manual
Page 10
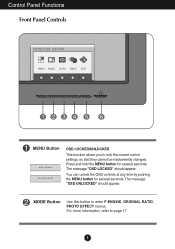
The message "OSD LOCKED" should appear. Control Panel Functions Front Panel Controls MENU Button OSD LOCKED/UNLOCKED This function allows you to enter F-ENGINE, ORIGINAL RATIO, PHOTO EFFECT menus. MODE Button Use this button to lock the current control settings, so that they cannot be inadvertently changed. For more information, refer to page 17. 9 The message "OSD UNLOCKED" should appear. You can unlock the OSD controls at any time by pushing the MENU button for several seconds. Press and hold the MENU button for several seconds.
The message "OSD LOCKED" should appear. Control Panel Functions Front Panel Controls MENU Button OSD LOCKED/UNLOCKED This function allows you to enter F-ENGINE, ORIGINAL RATIO, PHOTO EFFECT menus. MODE Button Use this button to lock the current control settings, so that they cannot be inadvertently changed. For more information, refer to page 17. 9 The message "OSD UNLOCKED" should appear. You can unlock the OSD controls at any time by pushing the MENU button for several seconds. Press and hold the MENU button for several seconds.
Owner's Manual
Page 11
...) This will automatically adjust your display image to turn the display on or off. The power indicator stays white if the display is W2240V/W2340V/W2340VG: 1920 x 1080 INPUT Button (SOURCE Hot key) When two input signals at least are connected, you can select the input signal (D-SUB/DVI/HDMI) you...
...) This will automatically adjust your display image to turn the display on or off. The power indicator stays white if the display is W2240V/W2340V/W2340VG: 1920 x 1080 INPUT Button (SOURCE Hot key) When two input signals at least are connected, you can select the input signal (D-SUB/DVI/HDMI) you...

Owner's Manual
Page 12
To make using the OSD. A short example is quick and easy with the use of the controls. Button to select other sub-menu items. 4 Press the EXIT Button to the image size, position and operating parameters of the available adjustments and selections you can make adjustments in the On Screen Display, follow these steps: 1 Press the discretionary Button, then the main menu of the OSD appears. 2 To access a control, use the corresponding Buttons. 3 Use the Use the / Buttons to adjust the image to familiarize you with the On Screen Display Control system. On Screen Display (OSD) ...
To make using the OSD. A short example is quick and easy with the use of the controls. Button to select other sub-menu items. 4 Press the EXIT Button to the image size, position and operating parameters of the available adjustments and selections you can make adjustments in the On Screen Display, follow these steps: 1 Press the discretionary Button, then the main menu of the OSD appears. 2 To access a control, use the corresponding Buttons. 3 Use the Use the / Buttons to adjust the image to familiarize you with the On Screen Display Control system. On Screen Display (OSD) ...

Owner's Manual
Page 13
On Screen Display(OSD) Selection and Adjustment The following table indicates all the On Screen Display control, adjustment, and setting menus. DSUB : D-SUB(Analog signal) input DVI-D : DVI-D(Digital signal) input HDMI : HDMI signal Main menu Sub-menu Supported input Description PICTURE BRIGHTNESS CONTRAST SHARPNESS BLACK LEVEL DSUB DVI-D HDMI HDMI To adjust the brightness, contrast and sharpness of the screen COLOR COLOR TEMP (PRESET / USER) GAMMA DSUB DVI-D HDMI To customize the color of the screen DISPLAY HORIZONTAL VERTICAL CLOCK PHASE OVERSCAN DSUB DSUB HDMI To adjust ...
On Screen Display(OSD) Selection and Adjustment The following table indicates all the On Screen Display control, adjustment, and setting menus. DSUB : D-SUB(Analog signal) input DVI-D : DVI-D(Digital signal) input HDMI : HDMI signal Main menu Sub-menu Supported input Description PICTURE BRIGHTNESS CONTRAST SHARPNESS BLACK LEVEL DSUB DVI-D HDMI HDMI To adjust the brightness, contrast and sharpness of the screen COLOR COLOR TEMP (PRESET / USER) GAMMA DSUB DVI-D HDMI To customize the color of the screen DISPLAY HORIZONTAL VERTICAL CLOCK PHASE OVERSCAN DSUB DSUB HDMI To adjust ...
Owner's Manual
Page 14
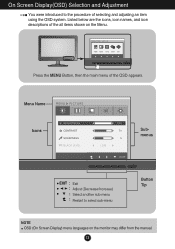
Listed below are the icons, icon names, and icon descriptions of the all items shown on the monitor may differ from the manual. 13 Menu Name Icons Submenus Exit Adjust (Decrease/Increase) Select another sub-menu Restart to the procedure of the OSD appears. Press the MENU Button, then the main menu of selecting and adjusting an item using the OSD system. On Screen Display(OSD) Selection and Adjustment You were introduced to select sub-menu Button Tip NOTE OSD (On Screen Display) menu languages on the Menu.
Listed below are the icons, icon names, and icon descriptions of the all items shown on the monitor may differ from the manual. 13 Menu Name Icons Submenus Exit Adjust (Decrease/Increase) Select another sub-menu Restart to the procedure of the OSD appears. Press the MENU Button, then the main menu of selecting and adjusting an item using the OSD system. On Screen Display(OSD) Selection and Adjustment You were introduced to select sub-menu Button Tip NOTE OSD (On Screen Display) menu languages on the Menu.

Owner's Manual
Page 15
Exit : Exit USER : Decrease : Increase : Select another sub-menu * Offset? SHARPNESS To adjust the clearness of the screen. GREEN Set your own red color levels. On Screen Display(OSD) Selection and Adjustment Main menu Sub menu Description BRIGHTNESS To adjust the brightness of the screen. CONTRAST To adjust the contrast of the screen. Set your own blue color levels. As the criteria for HDMI input) Exit : Exit : Decrease : Increase : Select another sub-menu : Restart to fit the sRGB standard color specification. • 6500K: Slightly reddish white. • ...
Exit : Exit USER : Decrease : Increase : Select another sub-menu * Offset? SHARPNESS To adjust the clearness of the screen. GREEN Set your own red color levels. On Screen Display(OSD) Selection and Adjustment Main menu Sub menu Description BRIGHTNESS To adjust the brightness of the screen. CONTRAST To adjust the contrast of the screen. Set your own blue color levels. As the criteria for HDMI input) Exit : Exit : Decrease : Increase : Select another sub-menu : Restart to fit the sRGB standard color specification. • 6500K: Slightly reddish white. • ...

Owner's Manual
Page 16
OVERSCAN To select the range of output image for DTV timing in HDMI input. (only for HDMI input) Exit : Exit : Decrease : Increase : Mute : Restart to select sub-menu To minimize any horizontal noise and clear or sharpen the image of the display. VOLUME To adjust the volume of headphone/ Earphone. (Only for HDMI input) Recommend overscan function to remove any vertical bars or stripes visible on when connect AV equipment. The horizontal screen size will also change. On Screen Display(OSD) Selection and Adjustment Main menu Sub menu Description HORIZONTAL To move ...
OVERSCAN To select the range of output image for DTV timing in HDMI input. (only for HDMI input) Exit : Exit : Decrease : Increase : Mute : Restart to select sub-menu To minimize any horizontal noise and clear or sharpen the image of the display. VOLUME To adjust the volume of headphone/ Earphone. (Only for HDMI input) Recommend overscan function to remove any vertical bars or stripes visible on when connect AV equipment. The horizontal screen size will also change. On Screen Display(OSD) Selection and Adjustment Main menu Sub menu Description HORIZONTAL To move ...
Owner's Manual
Page 17
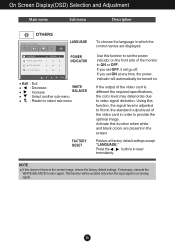
If you set the power indicator on . Using this function to set ON at any time, the power indicator will automatically be enabled only when the input signal is different the required specifications, the color level may deteriorate due to video signal distortion. If necessary, execute the WHITE BALANCE function again. This function will go off. Use this function, the signal level is adjusted to fit into the standard output level of the video card is an analog signal. 16 On Screen Display(OSD) Selection and Adjustment Main menu Sub menu Description LANGUAGE POWER INDICATOR ...
If you set the power indicator on . Using this function to set ON at any time, the power indicator will automatically be enabled only when the input signal is different the required specifications, the color level may deteriorate due to video signal distortion. If necessary, execute the WHITE BALANCE function again. This function will go off. Use this function, the signal level is adjusted to fit into the standard output level of the video card is an analog signal. 16 On Screen Display(OSD) Selection and Adjustment Main menu Sub menu Description LANGUAGE POWER INDICATOR ...

Owner's Manual
Page 18
Press the MODE Button, then the main menu of selecting and adjusting an item using the OSD system. On Screen Display(OSD) Selection and Adjustment You were introduced to select sub-menu Button Tip NOTE OSD (On Screen Display) menu languages on the Menu. Listed below are the icons, icon names, and icon descriptions of the all items shown on the monitor may differ from the manual. 17 Menu Name Icons Submenus Exit : Exit , : Move : Select another sub-menu : Restart to the procedure of the OSD appears.
Press the MODE Button, then the main menu of selecting and adjusting an item using the OSD system. On Screen Display(OSD) Selection and Adjustment You were introduced to select sub-menu Button Tip NOTE OSD (On Screen Display) menu languages on the Menu. Listed below are the icons, icon names, and icon descriptions of the all items shown on the monitor may differ from the manual. 17 Menu Name Icons Submenus Exit : Exit , : Move : Select another sub-menu : Restart to the procedure of the OSD appears.

Owner's Manual
Page 19
HDMI input STANDARD Select this when you want to use the original standard video. * In the General (Standard) mode, the is turned off. D-SUB/DVI-D input MOVIE Select this when you are watching a video or movie. HDMI input Exit : Exit , : Move : Select another sub-menu : Restart to select sub-menu 18 On Screen Display(OSD) Selection and Adjustment Main menu Sub menu Description D-SUB/DVI-D input NORMAL Select this when you want to use the product in the most general using environment.
HDMI input STANDARD Select this when you want to use the original standard video. * In the General (Standard) mode, the is turned off. D-SUB/DVI-D input MOVIE Select this when you are watching a video or movie. HDMI input Exit : Exit , : Move : Select another sub-menu : Restart to select sub-menu 18 On Screen Display(OSD) Selection and Adjustment Main menu Sub menu Description D-SUB/DVI-D input NORMAL Select this when you want to use the product in the most general using environment.

Owner's Manual
Page 20
SPORTS Select this when you are working on the right so that the consumers can check the difference after applying the video mode. Exit : Exit , : Move : Select another sub-menu : Restart to show the standard mode on the left and video mode on the document (Word etc.) HDMI input GAME Select this when you watching general sports. D-SUB/DVI-D input HDMI input DEMO This is used for advertising in the store. The screen will be divided to select sub-menu 19 On Screen Display(OSD) Selection and Adjustment Main menu Sub menu Description D-SUB/DVI-D input INTERNET Select ...
SPORTS Select this when you are working on the right so that the consumers can check the difference after applying the video mode. Exit : Exit , : Move : Select another sub-menu : Restart to show the standard mode on the left and video mode on the document (Word etc.) HDMI input GAME Select this when you watching general sports. D-SUB/DVI-D input HDMI input DEMO This is used for advertising in the store. The screen will be divided to select sub-menu 19 On Screen Display(OSD) Selection and Adjustment Main menu Sub menu Description D-SUB/DVI-D input INTERNET Select ...