
Owner's Manual
Page 2
... touch the power cord and signal cable because it is faulty in a shock or fire hazard. Call your service technician for an extended period of power supply you use another power cord, make sure that have in potential electrical shock or fire hazards. Contact your dealer if the display is OFF. The power supply cord is turned off. Overloaded AC outlets and extension cords are frayed power cords and broken plugs...
... touch the power cord and signal cable because it is faulty in a shock or fire hazard. Call your service technician for an extended period of power supply you use another power cord, make sure that have in potential electrical shock or fire hazards. Contact your dealer if the display is OFF. The power supply cord is turned off. Overloaded AC outlets and extension cords are frayed power cords and broken plugs...

Owner's Manual
Page 3
... On Installation Do not allow the release of heat generated during operation. Displays are not covered by placing the display on the screen. If possible, use a screen saver on this may cause damage to allow anything hard as Red, Green or Blue spots on the screen. Leaving a fixed image on the display performance. Otherwise, it with cloth or other material. Contact an authorized the service...
... On Installation Do not allow the release of heat generated during operation. Displays are not covered by placing the display on the screen. If possible, use a screen saver on this may cause damage to allow anything hard as Red, Green or Blue spots on the screen. Leaving a fixed image on the display performance. Otherwise, it with cloth or other material. Contact an authorized the service...
Owner's Manual
Page 6
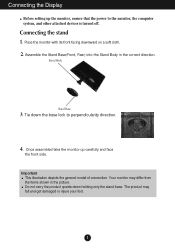
Stand Body Stand Base 3. Once assembled take the monitor up the monitor, ensure that the power to perpendicularity direction. 4. Assemble the Stand Base(Front, Rear) into the Stand Body in the picture. Tie down holding only the stand base. Do not carry the product upside down the base lock to the monitor, the computer system, and other attached devices is turned off. Your monitor may fall and get damaged or...
Stand Body Stand Base 3. Once assembled take the monitor up the monitor, ensure that the power to perpendicularity direction. 4. Assemble the Stand Base(Front, Rear) into the Stand Body in the picture. Tie down holding only the stand base. Do not carry the product upside down the base lock to the monitor, the computer system, and other attached devices is turned off. Your monitor may fall and get damaged or...

Owner's Manual
Page 7
Change your lock on a flat surface. 2. If you can't release the stand base even the locking rib is at a release position, Please push the indicated rib down on the cushion or soft cloth. 3. Place the monitor face down and retry it in the arrow direction. Put a cushion or soft cloth on the product as it follows and turn it . 4. Pull out the stand to remove. 6 Connecting the Display Disassembling the stand 1.
Change your lock on a flat surface. 2. If you can't release the stand base even the locking rib is at a release position, Please push the indicated rib down on the cushion or soft cloth. 3. Place the monitor face down and retry it in the arrow direction. Put a cushion or soft cloth on the product as it follows and turn it . 4. Pull out the stand to remove. 6 Connecting the Display Disassembling the stand 1.
Owner's Manual
Page 8
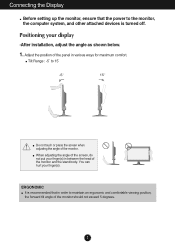
... your display -After installation, adjust the angle as shown below. 1. Connecting the Display Before setting up the monitor, ensure that the power to the monitor, the computer system, and other attached devices is recommended that in order to 15˚ Do not touch or press the screen when adjusting the angle of the monitor. When adjusting the angle of the monitor and the stand body. Adjust the position...
... your display -After installation, adjust the angle as shown below. 1. Connecting the Display Before setting up the monitor, ensure that the power to the monitor, the computer system, and other attached devices is recommended that in order to 15˚ Do not touch or press the screen when adjusting the angle of the monitor. When adjusting the angle of the monitor and the stand body. Adjust the position...

Owner's Manual
Page 9
...plug adapter is needed to improve resolution. 8 This function provides the user with the PC 1. A Connect DVI-D(Digital signal) Cable C Connect HDMI Cable B Connect D-sub(Analog signal) Cable NOTE This is a simplified representation of the signal cable. When using the device or after changing screen resolution, press the AUTO function button to change the 15 pin high density (3 row) D-sub VGA connector on , the 'Self Image Setting Function' is executed automatically. (Only Analog Mode) Power Button NOTE ' Self Image Setting Function'? When monitor power is turned on the supplied...
...plug adapter is needed to improve resolution. 8 This function provides the user with the PC 1. A Connect DVI-D(Digital signal) Cable C Connect HDMI Cable B Connect D-sub(Analog signal) Cable NOTE This is a simplified representation of the signal cable. When using the device or after changing screen resolution, press the AUTO function button to change the 15 pin high density (3 row) D-sub VGA connector on , the 'Self Image Setting Function' is executed automatically. (Only Analog Mode) Power Button NOTE ' Self Image Setting Function'? When monitor power is turned on the supplied...
Owner's Manual
Page 11
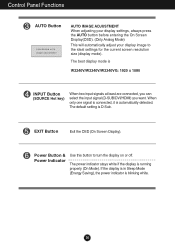
... AUTO IMAGE ADJUSTMENT When adjusting your display settings, always press the AUTO button before entering the On Screen Display(OSD). (Only Analog Mode) This will automatically adjust your display image to turn the display on or off. The default setting is running properly (On Mode). Power Button & Power Indicator Use this button to the ideal settings for the current screen resolution size (display mode). The best display mode is W2240V/W2340V/W2340VG: 1920 x 1080 INPUT Button (SOURCE Hot key) When two input signals at least are connected, you can select the input signal (D-SUB/DVI/HDMI...
... AUTO IMAGE ADJUSTMENT When adjusting your display settings, always press the AUTO button before entering the On Screen Display(OSD). (Only Analog Mode) This will automatically adjust your display image to turn the display on or off. The default setting is running properly (On Mode). Power Button & Power Indicator Use this button to the ideal settings for the current screen resolution size (display mode). The best display mode is W2240V/W2340V/W2340VG: 1920 x 1080 INPUT Button (SOURCE Hot key) When two input signals at least are connected, you can select the input signal (D-SUB/DVI/HDMI...

Owner's Manual
Page 13
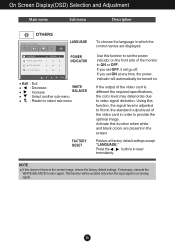
... DVI-D : DVI-D(Digital signal) input HDMI : HDMI signal Main menu Sub-menu Supported input Description PICTURE BRIGHTNESS CONTRAST SHARPNESS BLACK LEVEL DSUB DVI-D HDMI HDMI To adjust the brightness, contrast and sharpness of the screen COLOR COLOR TEMP (PRESET / USER) GAMMA DSUB DVI-D HDMI To customize the color of the screen DISPLAY HORIZONTAL VERTICAL CLOCK PHASE OVERSCAN DSUB DSUB HDMI To adjust the position of the screen To improve the clarity and stability of the screen VOLUME HDMI To adjust the volume OTHERS MODE LANGUAGE POWER INDICATOR WHITE BALANCE FACTORY RESET...
... DVI-D : DVI-D(Digital signal) input HDMI : HDMI signal Main menu Sub-menu Supported input Description PICTURE BRIGHTNESS CONTRAST SHARPNESS BLACK LEVEL DSUB DVI-D HDMI HDMI To adjust the brightness, contrast and sharpness of the screen COLOR COLOR TEMP (PRESET / USER) GAMMA DSUB DVI-D HDMI To customize the color of the screen DISPLAY HORIZONTAL VERTICAL CLOCK PHASE OVERSCAN DSUB DSUB HDMI To adjust the position of the screen To improve the clarity and stability of the screen VOLUME HDMI To adjust the volume OTHERS MODE LANGUAGE POWER INDICATOR WHITE BALANCE FACTORY RESET...

Owner's Manual
Page 15
... video signal, it is the darkest screen the monitor can set the offset level. BLUE Set your own green color levels. CONTRAST To adjust the contrast of the screen. On Screen Display(OSD) Selection and Adjustment Main menu Sub menu Description BRIGHTNESS To adjust the brightness of the screen. GREEN Set your own blue color levels. As the criteria for HDMI input) Exit : Exit : Decrease : Increase : Select another sub-menu : Restart to fit the sRGB standard color specification. • 6500K: Slightly reddish white...
... video signal, it is the darkest screen the monitor can set the offset level. BLUE Set your own green color levels. CONTRAST To adjust the contrast of the screen. On Screen Display(OSD) Selection and Adjustment Main menu Sub menu Description BRIGHTNESS To adjust the brightness of the screen. GREEN Set your own blue color levels. As the criteria for HDMI input) Exit : Exit : Decrease : Increase : Select another sub-menu : Restart to fit the sRGB standard color specification. • 6500K: Slightly reddish white...

Owner's Manual
Page 16
On Screen Display(OSD) Selection and Adjustment Main menu Sub menu Description HORIZONTAL To move image up and down. The horizontal screen size will also change. VOLUME To adjust the volume of output image for DTV timing in HDMI input. (only for HDMI input) Exit : Exit : Decrease : Increase : Mute : Restart to turn on the screen background. OVERSCAN To select the range of headphone/ Earphone. (Only for HDMI input) Recommend overscan function to select sub-menu 15 VERTICAL To...
On Screen Display(OSD) Selection and Adjustment Main menu Sub menu Description HORIZONTAL To move image up and down. The horizontal screen size will also change. VOLUME To adjust the volume of output image for DTV timing in HDMI input. (only for HDMI input) Exit : Exit : Decrease : Increase : Mute : Restart to turn on the screen background. OVERSCAN To select the range of headphone/ Earphone. (Only for HDMI input) Recommend overscan function to select sub-menu 15 VERTICAL To...
Owner's Manual
Page 17
... function again. If you set the power indicator on . Press the , buttons to provide the optimal image. On Screen Display(OSD) Selection and Adjustment Main menu Sub menu Description LANGUAGE POWER INDICATOR Exit : Exit : Decrease : Increase WHITE BALANCE : Select another sub-menu : Restart to video signal distortion. If the output of the video card in order to reset immediately. Use this does not improve the screen image, restore the factory default settings. This function will go...
... function again. If you set the power indicator on . Press the , buttons to provide the optimal image. On Screen Display(OSD) Selection and Adjustment Main menu Sub menu Description LANGUAGE POWER INDICATOR Exit : Exit : Decrease : Increase WHITE BALANCE : Select another sub-menu : Restart to video signal distortion. If the output of the video card in order to reset immediately. Use this does not improve the screen image, restore the factory default settings. This function will go...

Owner's Manual
Page 19
HDMI input STANDARD Select this when you are watching a video or movie. D-SUB/DVI-D input MOVIE Select this when you want to use the original standard video. * In the General (Standard) mode, the is turned off. On Screen Display(OSD) Selection and Adjustment Main menu Sub menu Description D-SUB/DVI-D input NORMAL Select this when you want to use the product in the most general using environment. HDMI input Exit : Exit , : Move : Select another sub-menu : Restart to select sub-menu 18
HDMI input STANDARD Select this when you are watching a video or movie. D-SUB/DVI-D input MOVIE Select this when you want to use the original standard video. * In the General (Standard) mode, the is turned off. On Screen Display(OSD) Selection and Adjustment Main menu Sub menu Description D-SUB/DVI-D input NORMAL Select this when you want to use the product in the most general using environment. HDMI input Exit : Exit , : Move : Select another sub-menu : Restart to select sub-menu 18

Owner's Manual
Page 21
Exit : Exit , : Move : Select another sub-menu : Restart to input image signal. On Screen Display(OSD) Selection and Adjustment Main menu Sub menu Description WIDE Switch to full screen mode according to select sub-menu 20 ORIGINAL Change the input image signal ratio to original. * This function works only if input resolution is lower than monitor ratio (16:9).
Exit : Exit , : Move : Select another sub-menu : Restart to input image signal. On Screen Display(OSD) Selection and Adjustment Main menu Sub menu Description WIDE Switch to full screen mode according to select sub-menu 20 ORIGINAL Change the input image signal ratio to original. * This function works only if input resolution is lower than monitor ratio (16:9).

Owner's Manual
Page 23
... OSD controls at any key on PC (video card) is out of the • Check and see if the power cord is connected display connected? Troubleshooting Check the following before calling for several seconds: the message "OSD UNLOCKED" will appear. 22 See the 'Specifications' section of the display. properly to turn on the screen? Check the signal cable and try moving the mouse or pressing any time by pushing the MENU button for service...
... OSD controls at any key on PC (video card) is out of the • Check and see if the power cord is connected display connected? Troubleshooting Check the following before calling for several seconds: the message "OSD UNLOCKED" will appear. 22 See the 'Specifications' section of the display. properly to turn on the screen? Check the signal cable and try moving the mouse or pressing any time by pushing the MENU button for service...

Owner's Manual
Page 24
... screen background, vertical bars or stripes are not clearly portrayed. • Press the AUTO button to automatically adjust your display image to the ideal setting. If the results are unsatisfactory, decrease the horizontal bars using the PHASE icon in the on screen display. • Check Control Panel --> Display --> Settings and adjust the display to the recommended resolution or adjust the display image to the ideal setting. IMPORTANT Check Control Panel --> Display --> Settings and see if the frequency or the resolution were changed...
... screen background, vertical bars or stripes are not clearly portrayed. • Press the AUTO button to automatically adjust your display image to the ideal setting. If the results are unsatisfactory, decrease the horizontal bars using the PHASE icon in the on screen display. • Check Control Panel --> Display --> Settings and adjust the display to the recommended resolution or adjust the display image to the ideal setting. IMPORTANT Check Control Panel --> Display --> Settings and see if the frequency or the resolution were changed...

Owner's Manual
Page 25
... also download the driver from the display driver CD (or diskette) that comes with your display. Troubleshooting Display image is incorrect G The screen color is mono or abnormal. • Check if the signal cable is properly connected and use a screwdriver to the recommend resolution. G The screen blinks. • Check if the screen is set to interlace mode and if yes, change it to fasten if necessary. • Make sure the video card is "0". • Check sound muted. • HDMI cable installed...
... also download the driver from the display driver CD (or diskette) that comes with your display. Troubleshooting Display image is incorrect G The screen color is mono or abnormal. • Check if the signal cable is properly connected and use a screwdriver to the recommend resolution. G The screen blinks. • Check if the screen is set to interlace mode and if yes, change it to fasten if necessary. • Make sure the video card is "0". • Check sound muted. • HDMI cable installed...

Owner's Manual
Page 26
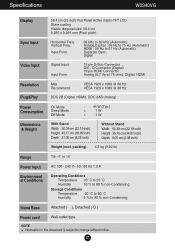
Specifications W2240V Display 54.6 cm (21.5 inch) Flat Panel Active matrix-TFT LCD Anti-Glare coating Visible diagonal size: 54.6 cm 0.248 x 0.248 mm (Pixel pitch) Sync Input Horizontal Freq. D Connector (Digital) 19 pin HDMI Connector Analog (0.7 Vp-p/ 75 ohm), Digital, HDMI Resolution Plug&Play Max Recommend VESA 1920 x 1080 @ 60 Hz VESA 1920 x 1080 @ 60 Hz DDC 2B (Digital, HDMI), DDC 2AB (Anlaog) Power Consumption Dimensions & Weight On Mode Sleep Mode Off Mode : 42 W (Typ.) ≤ 1 W ≤ 1 W With Stand Width 52...
Specifications W2240V Display 54.6 cm (21.5 inch) Flat Panel Active matrix-TFT LCD Anti-Glare coating Visible diagonal size: 54.6 cm 0.248 x 0.248 mm (Pixel pitch) Sync Input Horizontal Freq. D Connector (Digital) 19 pin HDMI Connector Analog (0.7 Vp-p/ 75 ohm), Digital, HDMI Resolution Plug&Play Max Recommend VESA 1920 x 1080 @ 60 Hz VESA 1920 x 1080 @ 60 Hz DDC 2B (Digital, HDMI), DDC 2AB (Anlaog) Power Consumption Dimensions & Weight On Mode Sleep Mode Off Mode : 42 W (Typ.) ≤ 1 W ≤ 1 W With Stand Width 52...

Owner's Manual
Page 27
Specifications W2340V Display 58.4 cm (23 inch) Flat Panel Active matrix-TFT LCD Anti-Glare coating Visible diagonal size: 58.4 cm 0.265 x 0.265 mm (Pixel pitch) Sync Input Horizontal Freq. Vertical Freq. Digital Video Input Signal Input Input Form 15 pin D-Sub Connector DVI - D Connector (Digital) 19 pin HDMI Connector Analog (0.7 Vp-p/ 75 ohm), Digital, HDMI Resolution Plug&Play Max Recommend VESA 1920 x 1080 @ 60 Hz VESA 1920 x 1080 @ 60 Hz DDC 2B (Digital, HDMI), DDC 2AB (Anlaog) Power Consumption On Mode Sleep Mode Off Mode : 44 W (Typ.) ≤ 1 W ≤...
Specifications W2340V Display 58.4 cm (23 inch) Flat Panel Active matrix-TFT LCD Anti-Glare coating Visible diagonal size: 58.4 cm 0.265 x 0.265 mm (Pixel pitch) Sync Input Horizontal Freq. Vertical Freq. Digital Video Input Signal Input Input Form 15 pin D-Sub Connector DVI - D Connector (Digital) 19 pin HDMI Connector Analog (0.7 Vp-p/ 75 ohm), Digital, HDMI Resolution Plug&Play Max Recommend VESA 1920 x 1080 @ 60 Hz VESA 1920 x 1080 @ 60 Hz DDC 2B (Digital, HDMI), DDC 2AB (Anlaog) Power Consumption On Mode Sleep Mode Off Mode : 44 W (Typ.) ≤ 1 W ≤...
Owner's Manual
Page 28
Digital Video Input Signal Input Input Form 15 pin D-Sub Connector DVI - Vertical Freq. D Connector (Digital) 19 pin HDMI Connector Analog (0.7 Vp-p/ 75 ohm), Digital, HDMI Resolution Plug&Play Max Recommend VESA 1920 x 1080 @ 60 Hz VESA 1920 x 1080 @ 60 Hz DDC 2B (Digital, HDMI), DDC 2AB (Anlaog) Power Consumption On Mode Sleep Mode Off Mode : 44 W (Typ.) ≤ 1 W ≤ 1 W Dimensions & Weight With Stand Width 56.38 cm (22.19 inch) Height 43.17 cm (16.99 inch) Depth 21.00 cm...
Digital Video Input Signal Input Input Form 15 pin D-Sub Connector DVI - Vertical Freq. D Connector (Digital) 19 pin HDMI Connector Analog (0.7 Vp-p/ 75 ohm), Digital, HDMI Resolution Plug&Play Max Recommend VESA 1920 x 1080 @ 60 Hz VESA 1920 x 1080 @ 60 Hz DDC 2B (Digital, HDMI), DDC 2AB (Anlaog) Power Consumption On Mode Sleep Mode Off Mode : 44 W (Typ.) ≤ 1 W ≤ 1 W Dimensions & Weight With Stand Width 56.38 cm (22.19 inch) Height 43.17 cm (16.99 inch) Depth 21.00 cm...

Owner's Manual
Page 29
Specifications Preset Modes (Resolution) D-SUB/DVI-D Timing Display Modes (Resolution) 1 720 x 400 2 640 x 480 3 640 x 480 4 800 x 600 5 800 x 600 6 1024 x 768 7 1024 x 768 8 1152 x 864 9 1280 x 1024 10 1280 x 1024 11 1680 x 1050 *12 1920 x 1080 Horizontal Freq. (kHz) 31.468 31.469 ...Mode HDMI Timing Display Modes (Resolution) 1 480P 2 576P 3 720P 4 720P 5 1080i 6 1080i 7 1080P 8 1080P Horizontal Freq. (kHz) 31.50 31.25 37.50 45.00 28.12 33.75 56.25 67.50 Vertical Freq. (Hz) 60 50 50 60 50 60 50 60 Indicator MODE On Mode Sleep Mode Off Mode LED Color White White Blinking...
Specifications Preset Modes (Resolution) D-SUB/DVI-D Timing Display Modes (Resolution) 1 720 x 400 2 640 x 480 3 640 x 480 4 800 x 600 5 800 x 600 6 1024 x 768 7 1024 x 768 8 1152 x 864 9 1280 x 1024 10 1280 x 1024 11 1680 x 1050 *12 1920 x 1080 Horizontal Freq. (kHz) 31.468 31.469 ...Mode HDMI Timing Display Modes (Resolution) 1 480P 2 576P 3 720P 4 720P 5 1080i 6 1080i 7 1080P 8 1080P Horizontal Freq. (kHz) 31.50 31.25 37.50 45.00 28.12 33.75 56.25 67.50 Vertical Freq. (Hz) 60 50 50 60 50 60 50 60 Indicator MODE On Mode Sleep Mode Off Mode LED Color White White Blinking...


