Owner's Manual (English)
Page 3
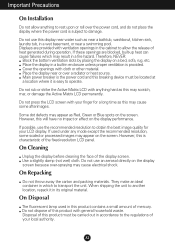
...the screen. On Cleaning Unplug the display before cleaning the face of your LCD display. Use a slightly damp (not wet) cloth. On Disposal The fluorescent lamp used under any mode except the recommended resolution, some afterimages. Important Precautions On Installation Do not allow the release of ...may appear on a bed, sofa, rug, etc. When shipping the unit to another location, repack it is characteristic of the fixed-resolution LCD panel. Place the display in a built-in its original material. Cover the openings with your finger for your local authority. Do not press...
...the screen. On Cleaning Unplug the display before cleaning the face of your LCD display. Use a slightly damp (not wet) cloth. On Disposal The fluorescent lamp used under any mode except the recommended resolution, some afterimages. Important Precautions On Installation Do not allow the release of ...may appear on a bed, sofa, rug, etc. When shipping the unit to another location, repack it is characteristic of the fixed-resolution LCD panel. Place the display in a built-in its original material. Cover the openings with your finger for your local authority. Do not press...
Owner's Manual (English)
Page 7
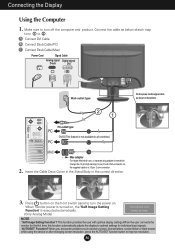
...(Only Analog Mode) NOTE ' Self Image Setting Function'? Insert the Cable Deco Cover in the Stand Body in the picture. Press button on . When monitor power is turned on, the 'Self Image Setting Function' is needed to change the 15 pin high density (3 row) D-sub VGA connector on the supplied... cable to turn the power on the front switch panel to improve resolution. Make sure to a 15 pin 2 row connector. 2. When you encounter problems such as shown in the correct direction. 3. Connect the cable as below...
...(Only Analog Mode) NOTE ' Self Image Setting Function'? Insert the Cable Deco Cover in the Stand Body in the picture. Press button on . When monitor power is turned on, the 'Self Image Setting Function' is needed to change the 15 pin high density (3 row) D-sub VGA connector on the supplied... cable to turn the power on the front switch panel to improve resolution. Make sure to a 15 pin 2 row connector. 2. When you encounter problems such as shown in the correct direction. 3. Connect the cable as below...

Owner's Manual (English)
Page 9
... display image to select or adjust functions in Sleep Mode (Energy Saving), this button to the display. The best display mode is: W1952TQ : 1440 x 900 W2252TQ : 1680 x 1050 Power Button Use this button to entering the On Screen Display(OSD). If the display is used when two computers are connected to... as blue when the display is D-Sub. Control Panel Functions Control Buttons Button ( ) Function Use these buttons to the ideal settings for the current screen resolution size (display mode). For more information, refer to page A17.
... display image to select or adjust functions in Sleep Mode (Energy Saving), this button to the display. The best display mode is: W1952TQ : 1440 x 900 W2252TQ : 1680 x 1050 Power Button Use this button to entering the On Screen Display(OSD). If the display is used when two computers are connected to... as blue when the display is D-Sub. Control Panel Functions Control Buttons Button ( ) Function Use these buttons to the ideal settings for the current screen resolution size (display mode). For more information, refer to page A17.
Owner's Manual (English)
Page 11
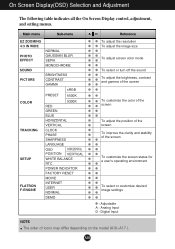
... HORIZONTAL VERTICAL CLOCK PHASE SHARPNESS LANGUAGE OSD HORIZONTAL POSITION VERTICAL WHITE BALANCE RTC POWER INDICATOR FACTORY RESET MOVIE INTERNET USER NORMAL DEMO To adjust the resolution To adjust the image size To adjust screen color mode To select or turn off the sound To adjust the brightness, contrast and gamma of...
... HORIZONTAL VERTICAL CLOCK PHASE SHARPNESS LANGUAGE OSD HORIZONTAL POSITION VERTICAL WHITE BALANCE RTC POWER INDICATOR FACTORY RESET MOVIE INTERNET USER NORMAL DEMO To adjust the resolution To adjust the image size To adjust screen color mode To select or turn off the sound To adjust the brightness, contrast and gamma of...
Owner's Manual (English)
Page 16
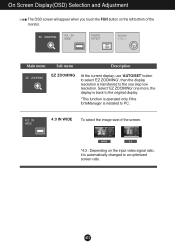
... SOUND Main menu Sub menu Description EZ ZOOMING At the current display, use 'AUTO/SET' button to select 'EZ ZOOMING', then the display resolution is transferred to the one more, the display is back to the original display. *This function is operated only if the forteManager is automatically ...changed to PC. 4:3 IN WIDE To select the image size of the monitor. A15 Select 'EZ ZOOMING' one step low resolution. On Screen Display(OSD) Selection and Adjustment The OSD screen will appear when you touch the FUN button on the input...
... SOUND Main menu Sub menu Description EZ ZOOMING At the current display, use 'AUTO/SET' button to select 'EZ ZOOMING', then the display resolution is transferred to the one more, the display is back to the original display. *This function is operated only if the forteManager is automatically ...changed to PC. 4:3 IN WIDE To select the image size of the monitor. A15 Select 'EZ ZOOMING' one step low resolution. On Screen Display(OSD) Selection and Adjustment The OSD screen will appear when you touch the FUN button on the input...
Owner's Manual (English)
Page 20
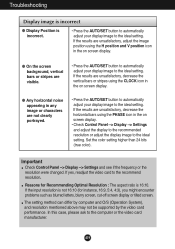
.... ● Any horizontal noise appearing in the on screen display. • Check Control Panel --> Display --> Settings and adjust the display to the recommended resolution or adjust the display image to the ideal setting. Set the color setting higher than 24 bits (true color). If the input... resolution is 16:10. The setting method can differ by computer and O/S (Operation System), and resolution mentioned above may not be supported by the video card performance. If yes, readjust the video card ...
.... ● Any horizontal noise appearing in the on screen display. • Check Control Panel --> Display --> Settings and adjust the display to the recommended resolution or adjust the display image to the ideal setting. Set the color setting higher than 24 bits (true color). If the input... resolution is 16:10. The setting method can differ by computer and O/S (Operation System), and resolution mentioned above may not be supported by the video card performance. If yes, readjust the video card ...
Owner's Manual (English)
Page 21
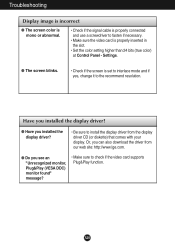
...if yes, change it to fasten if necessary. • Make sure the video card is properly connected and use a screwdriver to the recommend resolution. Have you installed the display driver? ● Have you installed the display driver? • Be sure to install the display driver from ...also download the driver from the display driver CD (or diskette) that comes with your display. Or, you see an "Unrecognized monitor, Plug&Play (VESA DDC) monitor found" message? • Make sure to check if the video card supports Plug&Play function. Troubleshooting Display image is incorrect &#...
...if yes, change it to fasten if necessary. • Make sure the video card is properly connected and use a screwdriver to the recommend resolution. Have you installed the display driver? ● Have you installed the display driver? • Be sure to install the display driver from ...also download the driver from the display driver CD (or diskette) that comes with your display. Or, you see an "Unrecognized monitor, Plug&Play (VESA DDC) monitor found" message? • Make sure to check if the video card supports Plug&Play function. Troubleshooting Display image is incorrect &#...
Owner's Manual (English)
Page 22
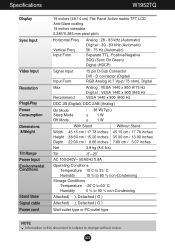
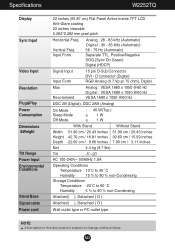
...15 pin D-Sub Connector DVI - Vertical Freq. A21 Specifications W1952TQ Display Sync Input Video Input Resolution Plug&Play Power Consumption Dimensions &Weight Tilt Range Power Input Environmental Conditions Stand Base Signal cable ...Power cord 19 inches (48.14 cm) Flat Panel Active matrix-TFT LCD Anti-Glare coating 19 inches viewable 0.285*0.285 mm pixel pitch Horizontal Freq. D connector (Digital.../ 17.78 inches Height 38.60 cm / 15.20 inches 35.30 cm / 13.90 inches Depth 22.00 cm / 8.66 inches 7.80 cm / 3.07 inches Net 3.9 kg (8.6 lbs) Tilt -5˚~...
...15 pin D-Sub Connector DVI - Vertical Freq. A21 Specifications W1952TQ Display Sync Input Video Input Resolution Plug&Play Power Consumption Dimensions &Weight Tilt Range Power Input Environmental Conditions Stand Base Signal cable ...Power cord 19 inches (48.14 cm) Flat Panel Active matrix-TFT LCD Anti-Glare coating 19 inches viewable 0.285*0.285 mm pixel pitch Horizontal Freq. D connector (Digital.../ 17.78 inches Height 38.60 cm / 15.20 inches 35.30 cm / 13.90 inches Depth 22.00 cm / 8.66 inches 7.80 cm / 3.07 inches Net 3.9 kg (8.6 lbs) Tilt -5˚~...
Owner's Manual (English)
Page 23
... 15 pin D-Sub Connector DVI - Specifications W2252TQ Display Sync Input Video Input Resolution Plug&Play Power Consumption Dimensions &Weight Tilt Range Power Input Environmental Conditions Stand Base Signal cable Power cord 22 inches (55.87 cm) Flat Panel Active matrix-TFT LCD Anti-Glare coating 22 inches viewable 0.282*0.282 mm pixel pitch ....90 cm / 20.43 inches 51.90 cm / 20.43 inches Height 42.70 cm / 16.81 inches 39.60 cm / 15.59 inches Depth 22.00 cm / 8.66 inches 7.90 cm / 3.11 inches Net 4.4 kg (9.7 lbs) Tilt -5˚~20˚ AC 100-240V~ 50/60Hz 1.0A Operating Conditions ...
... 15 pin D-Sub Connector DVI - Specifications W2252TQ Display Sync Input Video Input Resolution Plug&Play Power Consumption Dimensions &Weight Tilt Range Power Input Environmental Conditions Stand Base Signal cable Power cord 22 inches (55.87 cm) Flat Panel Active matrix-TFT LCD Anti-Glare coating 22 inches viewable 0.282*0.282 mm pixel pitch ....90 cm / 20.43 inches 51.90 cm / 20.43 inches Height 42.70 cm / 16.81 inches 39.60 cm / 15.59 inches Depth 22.00 cm / 8.66 inches 7.90 cm / 3.11 inches Net 4.4 kg (9.7 lbs) Tilt -5˚~20˚ AC 100-240V~ 50/60Hz 1.0A Operating Conditions ...
Owner's Manual (English)
Page 24
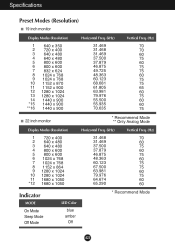
Specifications Preset Modes (Resolution) 19 inch monitor Display Modes (Resolution) 1 640 x 350 2 720 x 400 3 640 x 480 4 640 x 480 5 800 x 600 6 800 x 600 7 832 x 624 8 1024 x 768 9 1024 x 768 10 1152 x 870 11 1152 x 900 12 ... 70.635 Vertical Freq. (Hz) 70 70 60 75 60 75 75 60 75 75 65 60 75 60 60 75 22 inch monitor * Recommend Mode ** Only Analog Mode Display Modes (Resolution) 1 720 x 400 2 640 x 480 3 640 x 480 4 800 x 600 5 800 x 600 6 1024 x 768 7 1024 x 768 8 1152 x 864 9 1280 x 1024 10 1280 x 1024...
Specifications Preset Modes (Resolution) 19 inch monitor Display Modes (Resolution) 1 640 x 350 2 720 x 400 3 640 x 480 4 640 x 480 5 800 x 600 6 800 x 600 7 832 x 624 8 1024 x 768 9 1024 x 768 10 1152 x 870 11 1152 x 900 12 ... 70.635 Vertical Freq. (Hz) 70 70 60 75 60 75 75 60 75 75 65 60 75 60 60 75 22 inch monitor * Recommend Mode ** Only Analog Mode Display Modes (Resolution) 1 720 x 400 2 640 x 480 3 640 x 480 4 800 x 600 5 800 x 600 6 1024 x 768 7 1024 x 768 8 1152 x 864 9 1280 x 1024 10 1280 x 1024...


