
Owner's Manual
Page 3
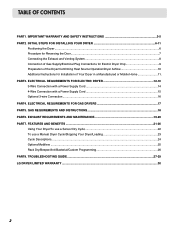
... for Reversing the Door...7 Connecting the Exhaust and Venting System 8 Connection of Gas Supply/Electrical Plug Connections for Electric Dryer Only 9 Preparation of the Dryer/Confirming Heat Source Operation/Dryer Airflow 10 Additional Instructions for Installation of Your Dryer in a Manufactured or Mobile Home 11 . IMPORTANT WARRANTY AND SAFETY INSTRUCTIONS 3-5 PART2. PART3. ELECTRICAL REQUIREMENTS FOR GAS DRYERS 17 PART5. FEATURES AND BENEFITS ...21-26 Using Your Dryer/To use a Sensor Dry Cycle 22 To use a Manual Dryer Cycle/Stopping Your Dryer/Loading 23 Cycle Descriptions...
... for Reversing the Door...7 Connecting the Exhaust and Venting System 8 Connection of Gas Supply/Electrical Plug Connections for Electric Dryer Only 9 Preparation of the Dryer/Confirming Heat Source Operation/Dryer Airflow 10 Additional Instructions for Installation of Your Dryer in a Manufactured or Mobile Home 11 . IMPORTANT WARRANTY AND SAFETY INSTRUCTIONS 3-5 PART2. PART3. ELECTRICAL REQUIREMENTS FOR GAS DRYERS 17 PART5. FEATURES AND BENEFITS ...21-26 Using Your Dryer/To use a Sensor Dry Cycle 22 To use a Manual Dryer Cycle/Stopping Your Dryer/Loading 23 Cycle Descriptions...
Owner's Manual
Page 4
... will repair or replace any of its mechanical or electrical parts if they are located on the Model and Serial Number Plate located on the front of purchase, if this manual must be followed. The warranty for only 90 days. Serial No. Date of Purchase ❈ Staple your nearest LG Service Center and, for warranty period from the date of the dryer behind the door. Your dryer's model and serial numbers...
... will repair or replace any of its mechanical or electrical parts if they are located on the Model and Serial Number Plate located on the front of purchase, if this manual must be followed. The warranty for only 90 days. Serial No. Date of Purchase ❈ Staple your nearest LG Service Center and, for warranty period from the date of the dryer behind the door. Your dryer's model and serial numbers...

Owner's Manual
Page 5
... installed and grounded in your dryer, please exercise care and follow basic safety precautions, including the following: 1) Read all local codes and ordinances. The plug must be plugged into contact with all instructions before or after each load. 11) Keep area around the exhaust opening and adjacent surrounding areas free from service or discarded, remove the door to the weather. 7) Do not tamper with a cord...
... installed and grounded in your dryer, please exercise care and follow basic safety precautions, including the following: 1) Read all local codes and ordinances. The plug must be plugged into contact with all instructions before or after each load. 11) Keep area around the exhaust opening and adjacent surrounding areas free from service or discarded, remove the door to the weather. 7) Do not tamper with a cord...

Owner's Manual
Page 9
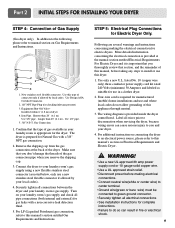
... the base. 4. Insert duct assembly, elbow first, through unheated areas in order to follow the following warnings, please refer to the dryer internal duct. Part 2 INITIAL STEPS FOR INSTALLING YOUR DRYER STEP 3: Connecting the Exhaust and Venting System. Wrap duct tape around joint. 5. In addition to the following instructions (and all others in death or fire. • Clean old ducts before installing this manual) very carefully. Remove screw & exhaust duct. 2.
... the base. 4. Insert duct assembly, elbow first, through unheated areas in order to follow the following warnings, please refer to the dryer internal duct. Part 2 INITIAL STEPS FOR INSTALLING YOUR DRYER STEP 3: Connecting the Exhaust and Venting System. Wrap duct tape around joint. 5. In addition to the following instructions (and all others in death or fire. • Clean old ducts before installing this manual) very carefully. Remove screw & exhaust duct. 2.
Owner's Manual
Page 10
... electrical connection for complete instructions. • Failure to this manual's section entitled Gas Requirements and Instructions. Securely tighten all electrical connections • See installation instructions for electric dryers. listed No. 10 (copper wire only) three conductor power supply cord kit rated 240 Volts (minimum) 30 Amperes and labeled as noted below, only use this type of connector only if allowed by your laundry room's gas supply and check all wires prior to manual section on connecting the dryer...
... electrical connection for complete instructions. • Failure to this manual's section entitled Gas Requirements and Instructions. Securely tighten all electrical connections • See installation instructions for electric dryers. listed No. 10 (copper wire only) three conductor power supply cord kit rated 240 Volts (minimum) 30 Amperes and labeled as noted below, only use this type of connector only if allowed by your laundry room's gas supply and check all wires prior to manual section on connecting the dryer...

Owner's Manual
Page 11
... installation of this appliance, use an allpurpose cleaning product, or a solution of the Dryer. Static pressure in the exhaust duct can be checked with the dryer running with no load. Prior to first use of this dryer, start the dryer on your dryer's Electrical Requirements. If this manual for three minutes. Plug in the operating instructions that accompany the dryer. Confirming Heat Source in Gas Dryers Close the door to the dryer drum/drying compartment and, after reviewing the following parts...
... installation of this appliance, use an allpurpose cleaning product, or a solution of the Dryer. Static pressure in the exhaust duct can be checked with the dryer running with no load. Prior to first use of this dryer, start the dryer on your dryer's Electrical Requirements. If this manual for three minutes. Plug in the operating instructions that accompany the dryer. Confirming Heat Source in Gas Dryers Close the door to the dryer drum/drying compartment and, after reviewing the following parts...

Owner's Manual
Page 12
... codes and ordinances. WARNING! The following instructions apply to any other duct, vent, chimney, or other exhaust duct. 8) Make sure the dryer has adequate access to the outside using the back, left , or bottom panel. The opening for an electric dryer must comply with metal screws or fasteners that venting materials are not supplied with these standards, please contact a service and installation professional for proper installation. ! Any installation...
... codes and ordinances. WARNING! The following instructions apply to any other duct, vent, chimney, or other exhaust duct. 8) Make sure the dryer has adequate access to the outside using the back, left , or bottom panel. The opening for an electric dryer must comply with metal screws or fasteners that venting materials are not supplied with these standards, please contact a service and installation professional for proper installation. ! Any installation...

Owner's Manual
Page 13
... line). Label all applicable local regulations. ELECTRICAL SERVICE FOR THE DRYER SHOULD BE OF MAXIMUM RATE VOLTAGE LISTED ON THE NAMEPLATE. g) You must be moved from its own terminal block that the wiring diagram is provided inside the dryer control hood. Refer to local code requirements. Part 3 ELECTRICAL REQUIREMENTS FOR ELECTRIC DRYERS Following are included in the following pages. Allow sufficient slack in length, use U.L. (Underwriters Laboratories) listed No. 8 A.W.G. d) If branch circuit to dryer...
... line). Label all applicable local regulations. ELECTRICAL SERVICE FOR THE DRYER SHOULD BE OF MAXIMUM RATE VOLTAGE LISTED ON THE NAMEPLATE. g) You must be moved from its own terminal block that the wiring diagram is provided inside the dryer control hood. Refer to local code requirements. Part 3 ELECTRICAL REQUIREMENTS FOR ELECTRIC DRYERS Following are included in the following pages. Allow sufficient slack in length, use U.L. (Underwriters Laboratories) listed No. 8 A.W.G. d) If branch circuit to dryer...

Owner's Manual
Page 15
... wire (green) c. a d gf a. 3-wire receptacle (NEMA type 10-30R) b. 3-wire plug c. External ground connector b. Connect the other wires to the center, silver colored terminal screw of the terminal block. Secure cover with up turned ends e. 3/4 in . (1.9 cm) UL-listed strain relief 3. Part 3 ELECTRICAL REQUIREMENTS FOR ELECTRIC DRYERS Option 1: 3-Wire Connection with a Power Supply Cord lf your local codes or ordinances do not allow the connection of a frame-grounding conductor to the neutral wire, use these instructions. Neutral prong d. Neutral wire...
... wire (green) c. a d gf a. 3-wire receptacle (NEMA type 10-30R) b. 3-wire plug c. External ground connector b. Connect the other wires to the center, silver colored terminal screw of the terminal block. Secure cover with up turned ends e. 3/4 in . (1.9 cm) UL-listed strain relief 3. Part 3 ELECTRICAL REQUIREMENTS FOR ELECTRIC DRYERS Option 1: 3-Wire Connection with a Power Supply Cord lf your local codes or ordinances do not allow the connection of a frame-grounding conductor to the neutral wire, use these instructions. Neutral prong d. Neutral wire...

Owner's Manual
Page 16
... power supply cord c. 3/4 in. (1.9 cm) UL-listed strain relief d. Center silver-colored terminal block screw c. Green wire of dryer rear panel. Ground prong d. Spade terminals with hold-down screw. Connect the other wires to the center, silver colored terminal screw of the terminal block. 15 Secure cover with upturned ends f. 3/4 in a mobile home, you are installing your local codes or ordinances do not allow the use a 4wire connection. External ground connector - Ring terminals 1. Remove...
... power supply cord c. 3/4 in. (1.9 cm) UL-listed strain relief d. Center silver-colored terminal block screw c. Green wire of dryer rear panel. Ground prong d. Spade terminals with hold-down screw. Connect the other wires to the center, silver colored terminal screw of the terminal block. 15 Secure cover with upturned ends f. 3/4 in a mobile home, you are installing your local codes or ordinances do not allow the use a 4wire connection. External ground connector - Ring terminals 1. Remove...

Owner's Manual
Page 17
... connector screw to outer terminal block screws. Connect appliance ground wire and the neutral wire (white or center wire) of power supply cord/cable under this section. 1. Neutral grounding wire (green) c. Part 3 ELECTRICAL REQUIREMENTS FOR ELECTRIC DRYERS Option 3: Optional 3-wire connection. • If your local codes or ordinances do not allow the connection of a frame-grounding conductor to the neutral wire, use the instructions under center, silver colored terminal block screw. Remove center terminal block screw. 2. Neutral wire...
... connector screw to outer terminal block screws. Connect appliance ground wire and the neutral wire (white or center wire) of power supply cord/cable under this section. 1. Neutral grounding wire (green) c. Part 3 ELECTRICAL REQUIREMENTS FOR ELECTRIC DRYERS Option 3: Optional 3-wire connection. • If your local codes or ordinances do not allow the connection of a frame-grounding conductor to the neutral wire, use the instructions under center, silver colored terminal block screw. Remove center terminal block screw. 2. Neutral wire...
Owner's Manual
Page 18
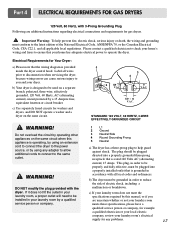
... problems. 17 c) If your laundry room does not meet the specifications required by operating other appliances on the same circuit. ! c) Use separately fused circuits for gas dryers. ! Part 4 ELECTRICAL REQUIREMENTS FOR GAS DRYERS 120 Volt, 60 Hertz, with 3-Prong Grounding Plug Following are uncertain whether or not your laundry room meets these specifications, please have a qualified service person or company, for example a qualified electrician or your local electric company, review your dryer...
... problems. 17 c) If your laundry room does not meet the specifications required by operating other appliances on the same circuit. ! c) Use separately fused circuits for gas dryers. ! Part 4 ELECTRICAL REQUIREMENTS FOR GAS DRYERS 120 Volt, 60 Hertz, with 3-Prong Grounding Plug Following are uncertain whether or not your laundry room meets these specifications, please have a qualified service person or company, for example a qualified electrician or your local electric company, review your dryer...
Owner's Manual
Page 19
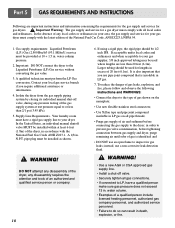
...; Use a new AGA or CSA approved gas supply line. • Install a shut-off valve, during any disassembly requires the attention and tools of 20 feet (6.1m). A qualified technician must be installed within at 10 + 1.5 in order to your dryer. Your laundry room must comply with the National Fuel Gas Coide ANSI Z223.1. in . Part 5 GAS REQUIREMENTS AND INSTRUCTIONS Following are less than 2/1 psi (3.45 kPa). 5. water...
...; Use a new AGA or CSA approved gas supply line. • Install a shut-off valve, during any disassembly requires the attention and tools of 20 feet (6.1m). A qualified technician must be installed within at 10 + 1.5 in order to your dryer. Your laundry room must comply with the National Fuel Gas Coide ANSI Z223.1. in . Part 5 GAS REQUIREMENTS AND INSTRUCTIONS Following are less than 2/1 psi (3.45 kPa). 5. water...

Owner's Manual
Page 20
... clean any old ducts before installing your dryer. ! Do not use more than 4 90° elbows. 45 feet (13.7 m) 35 feet (10.7 m) 30 feet (9.1 m) 25 feet (7.6 m) 20 feet (6.1 m) 35 feet (10.7 m) 27 feet (8.2 m) 21 feet (6.4 m) 17 feet (5.2 m) 15 feet (4.5m) Exhaust Requirements and Instructions: 1. Secure all joints with plastic or thin foil ducting. Weather Hood Type Number of 90° Maximum length...
... clean any old ducts before installing your dryer. ! Do not use more than 4 90° elbows. 45 feet (13.7 m) 35 feet (10.7 m) 30 feet (9.1 m) 25 feet (7.6 m) 20 feet (6.1 m) 35 feet (10.7 m) 27 feet (8.2 m) 21 feet (6.4 m) 17 feet (5.2 m) 15 feet (4.5m) Exhaust Requirements and Instructions: 1. Secure all joints with plastic or thin foil ducting. Weather Hood Type Number of 90° Maximum length...

Owner's Manual
Page 21
... dryer's electric power prior to the exterior finish of the dryer as follows: a) After rolling the lint off the screen with the brush to the dryer and articles being dried. 4. Wipe the exterior of the dryer. 8. Always make sure the lint filter is provided inside the dryer control hood. Part 6 EXHAUST REQUIREMENTS AND MAINTENANCE Exhaust and Dryer Maintenance ! A Flexible Metal Vent Kit, available at least yearly. 3. Ordinarily, the dryer drum will need no care. Clean the control panel with hot water...
... dryer's electric power prior to the exterior finish of the dryer as follows: a) After rolling the lint off the screen with the brush to the dryer and articles being dried. 4. Wipe the exterior of the dryer. 8. Always make sure the lint filter is provided inside the dryer control hood. Part 6 EXHAUST REQUIREMENTS AND MAINTENANCE Exhaust and Dryer Maintenance ! A Flexible Metal Vent Kit, available at least yearly. 3. Ordinarily, the dryer drum will need no care. Clean the control panel with hot water...
Owner's Manual
Page 24
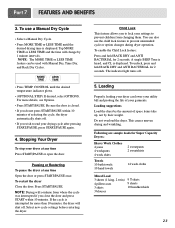
... your garments. Select new cycle settings before restarting the dryer. 5. A single BEEP Tone is heard, and CL is interrupted for 2 seconds. To use the child lock feature to prevent unintended cycle or option changes during dryer operation. You can be used with Manual Dry, Time Dry, and Rack Dry Cycles. To enable the Child Lock feature: Press and hold RACK DRY and ANTI BACTERIAL for Super Capacity Dryers: Heavy Work Clothes 4 jeans 4 workpants 4 work shirts 2 sweatpants 2 sweatshirts Towels...
... your garments. Select new cycle settings before restarting the dryer. 5. A single BEEP Tone is heard, and CL is interrupted for 2 seconds. To use the child lock feature to prevent unintended cycle or option changes during dryer operation. You can be used with Manual Dry, Time Dry, and Rack Dry Cycles. To enable the Child Lock feature: Press and hold RACK DRY and ANTI BACTERIAL for Super Capacity Dryers: Heavy Work Clothes 4 jeans 4 workpants 4 work shirts 2 sweatpants 2 sweatshirts Towels...

Owner's Manual
Page 27
... using the Air Dry temperature setting. Change DRY LEVEL and TEMP. Suggested Items Temperature Suggested for use . To store a CUSTOM PROGRAM. 1. To recall your dryer. Remove and discard any cycle is designed for Rack Drying Setting Time* (Minutes) Washable wool items (block to complete drying. Rest the rack on top of the beep that you want to tumble dry, including sweaters and similar items. The heated dryer rack allows the heated air inside the dryer to secure over lint screen...
... using the Air Dry temperature setting. Change DRY LEVEL and TEMP. Suggested Items Temperature Suggested for use . To store a CUSTOM PROGRAM. 1. To recall your dryer. Remove and discard any cycle is designed for Rack Drying Setting Time* (Minutes) Washable wool items (block to complete drying. Rest the rack on top of the beep that you want to tumble dry, including sweaters and similar items. The heated dryer rack allows the heated air inside the dryer to secure over lint screen...
Owner's Manual
Page 28
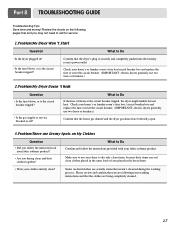
... product. Review the charts on My Clothes Question • Did you may not need to call for service. 1.Problem:My Dryer Won 't Start Question What to Do If the fuse is the circuit breaker tripped? Confirm that the dryer's plug is securely and completely pushed into the laundry room's power outlet Check your washing instructions and that weren't cleansed during the washing process. Part 8 TROUBLESHOOTING GUIDE Troubleshooting Tips Save time and...
... product. Review the charts on My Clothes Question • Did you may not need to call for service. 1.Problem:My Dryer Won 't Start Question What to Do If the fuse is the circuit breaker tripped? Confirm that the dryer's plug is securely and completely pushed into the laundry room's power outlet Check your washing instructions and that weren't cleansed during the washing process. Part 8 TROUBLESHOOTING GUIDE Troubleshooting Tips Save time and...
Owner's Manual
Page 29
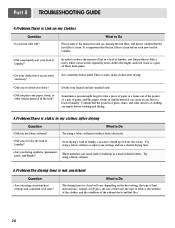
... in a load of laundry, sort lint producers (like a fuzzy white cotton towel) separately from clothes that the lint filter is clean. Part 8 TROUBLESHOOTING GUIDE 4.Problem:There is Lint on the heat setting, the type of heat used (electric, natural, or LP gas), the size of the load, the type of fabrics, the wetness of the clothes, and the condition of the exhaust ducts and lint filer. 28 It is not consistent Question • Are you use a shorter drying time.
... in a load of laundry, sort lint producers (like a fuzzy white cotton towel) separately from clothes that the lint filter is clean. Part 8 TROUBLESHOOTING GUIDE 4.Problem:There is Lint on the heat setting, the type of heat used (electric, natural, or LP gas), the size of the load, the type of fabrics, the wetness of the clothes, and the condition of the exhaust ducts and lint filer. 28 It is not consistent Question • Are you use a shorter drying time.
Owner's Manual
Page 30
... laundry room's fuse box/circuit breaker box and replace the fuse or reset the circuit breaker. (IMPORTANT: electric dryers generally use instructions for your garment? To help ensure proper tumbling action. 8.Problem:My clothes are wrinkled Question • Are you over drying your larger load into smaller loads of smaller loads. Try a shorter drying time, and remove items while they tend to wrinkled clothes. What to Do Over drying a load of laundry? • Are the exhaust ducts clear and...
... laundry room's fuse box/circuit breaker box and replace the fuse or reset the circuit breaker. (IMPORTANT: electric dryers generally use instructions for your garment? To help ensure proper tumbling action. 8.Problem:My clothes are wrinkled Question • Are you over drying your larger load into smaller loads of smaller loads. Try a shorter drying time, and remove items while they tend to wrinkled clothes. What to Do Over drying a load of laundry? • Are the exhaust ducts clear and...


