
Owner's Manual (English)
Page 3
... (CONTROL & SERVICE) PORT Serial port used for the RGB and DVI-D video inputs. 4 Optical Digital Audio Out Use this jack. 2 When using an adapter. Never attempt to an external amplifer. 5 RGB INPUT (PC) Analog PC input. They also accept TV Video from your set. 1 2 3 45 6 AUDIO IN (RGB/DVI) OPTICAL DIGITAL AUDIO OUT 1 HDMI IN 2 RGB IN (PC) COMPONENT IN Y AV-IN PB S-VIDEO VIDEO PR ANTENNA/ CABLE IN DVI-D IN (PC) L SERVICE ONLY RS-232C IN (CONTROL & SERVICE) R VIDEO (MONO) L AUDIO R AC IN AC IN AUDIO 7 8 9 1 Power Cord...
... (CONTROL & SERVICE) PORT Serial port used for the RGB and DVI-D video inputs. 4 Optical Digital Audio Out Use this jack. 2 When using an adapter. Never attempt to an external amplifer. 5 RGB INPUT (PC) Analog PC input. They also accept TV Video from your set. 1 2 3 45 6 AUDIO IN (RGB/DVI) OPTICAL DIGITAL AUDIO OUT 1 HDMI IN 2 RGB IN (PC) COMPONENT IN Y AV-IN PB S-VIDEO VIDEO PR ANTENNA/ CABLE IN DVI-D IN (PC) L SERVICE ONLY RS-232C IN (CONTROL & SERVICE) R VIDEO (MONO) L AUDIO R AC IN AC IN AUDIO 7 8 9 1 Power Cord...

Owner's Manual (English)
Page 7
... of the panel in a position to allow a free flow of the monitor and the stand body. PREPARATION POSITIONING YOUR DISPLAY I The image shown may be somewhat different from your set to any damage resulting from failure to follow these instructions. < Screw Mounting Interface Dimension > * 75mm x 75mm hole spacing * Wall mount interface(LG) : RW120 Warning: When adjusting the angle of the screen, do not meet VESA standards. -
... of the panel in a position to allow a free flow of the monitor and the stand body. PREPARATION POSITIONING YOUR DISPLAY I The image shown may be somewhat different from your set to any damage resulting from failure to follow these instructions. < Screw Mounting Interface Dimension > * 75mm x 75mm hole spacing * Wall mount interface(LG) : RW120 Warning: When adjusting the angle of the screen, do not meet VESA standards. -
Owner's Manual (English)
Page 11
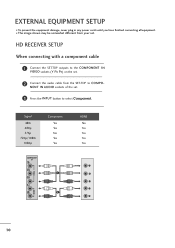
... IN AUDIO sockets of the set . I To prevent the equipment damage, never plug in any power cords until you have finished connecting all equipment. EXTERNAL EQUIPMENT SETUP I The image shown may be somewhat different from the SET-TOP to select Component. HD RECEIVER SETUP When connecting with a component cable 1 Connect the SET-TOP outputs to the COMPONENT IN VIDEO sockets (Y PB PR) on the set. 2 Connect the audio cable from your set . 3 Press the INPUT button to...
... IN AUDIO sockets of the set . I To prevent the equipment damage, never plug in any power cords until you have finished connecting all equipment. EXTERNAL EQUIPMENT SETUP I The image shown may be somewhat different from the SET-TOP to select Component. HD RECEIVER SETUP When connecting with a component cable 1 Connect the SET-TOP outputs to the COMPONENT IN VIDEO sockets (Y PB PR) on the set. 2 Connect the audio cable from your set . 3 Press the INPUT button to...
Owner's Manual (English)
Page 12
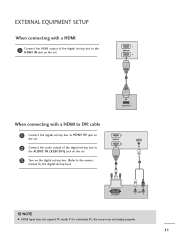
NOTE G HDMI Input does not support PC mode. If it is connected PC, the screen may not display properly. 11 EXTERNAL EQUIPMENT SETUP When connecting with a HDMI 1 Connect the HDMI output of the digital set-top box to the HDMI IN jack on the set. 1 HDMI IN 2 1 When connecting with a HDMI to DVI cable 1 Connect the digital set-top box to HDMI IN jack on the set. 2 Connect the audio output of the digital set-top box to the AUDIO IN (RGB/DVI) jack on the set. 3 Turn on...
NOTE G HDMI Input does not support PC mode. If it is connected PC, the screen may not display properly. 11 EXTERNAL EQUIPMENT SETUP When connecting with a HDMI 1 Connect the HDMI output of the digital set-top box to the HDMI IN jack on the set. 1 HDMI IN 2 1 When connecting with a HDMI to DVI cable 1 Connect the digital set-top box to HDMI IN jack on the set. 2 Connect the audio output of the digital set-top box to the AUDIO IN (RGB/DVI) jack on the set. 3 Turn on...

Owner's Manual (English)
Page 13
... on DVD player Y PB PR Y B-Y R-Y Y Cb Cr Y Pb Pr COMPONENT IN Y VIDEO PB 1 PR L R 2 AUDIO 12 Component Input ports To get better picture quality, connect a DVD player to select Component. 4 Press the PLAY button on the DVD. EXTERNAL EQUIPMENT SETUP DVD SETUP When connecting with a component cable 1 Connect the video output sockets (Y PB PR) of the DVD to the COMPONENT IN VIDEO sockets (Y PB PR) of the set. 2 Connect the audio cable from the DVD to COMPONENT IN AUDIO sockets of the set Y PB PR Video output ports on the screen.
... on DVD player Y PB PR Y B-Y R-Y Y Cb Cr Y Pb Pr COMPONENT IN Y VIDEO PB 1 PR L R 2 AUDIO 12 Component Input ports To get better picture quality, connect a DVD player to select Component. 4 Press the PLAY button on the DVD. EXTERNAL EQUIPMENT SETUP DVD SETUP When connecting with a component cable 1 Connect the video output sockets (Y PB PR) of the DVD to the COMPONENT IN VIDEO sockets (Y PB PR) of the set. 2 Connect the audio cable from the DVD to COMPONENT IN AUDIO sockets of the set Y PB PR Video output ports on the screen.

Owner's Manual (English)
Page 14
AV-IN S-VIDEO 1 2 S-VIDEO VIDEO L VIDEO (MONO) L AUDIO R R When connecting HDMI cable 1 Connect the HDMI output of the DVD to the AUDIO in put on the set . G If the DVD player does not support Auto HDMI, you need to connect a sperate audio cable. You do not need to set the DVD output resolution appropriately. 13 NOTE G HDMI supports video and audio. EXTERNAL EQUIPMENT SETUP When connecting S-Video 1 Connect the S-Video output of the DVD to the S-Video in put on the set. 2 Connect the audio output of the DVD to the HDMI IN jack on the set . 1 HDMI IN 2 1 !
AV-IN S-VIDEO 1 2 S-VIDEO VIDEO L VIDEO (MONO) L AUDIO R R When connecting HDMI cable 1 Connect the HDMI output of the DVD to the AUDIO in put on the set . G If the DVD player does not support Auto HDMI, you need to connect a sperate audio cable. You do not need to set the DVD output resolution appropriately. 13 NOTE G HDMI supports video and audio. EXTERNAL EQUIPMENT SETUP When connecting S-Video 1 Connect the S-Video output of the DVD to the S-Video in put on the set. 2 Connect the audio output of the DVD to the HDMI IN jack on the set . 1 HDMI IN 2 1 !
Owner's Manual (English)
Page 17
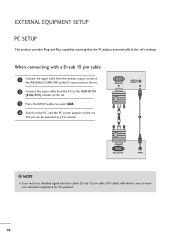
... (PC) AUDIO IN (RGB/DVI) 1 2 RGB OUTPUT AUDIO ! EXTERNAL EQUIPMENT SETUP PC SETUP This product provides Plug and Play capability, meaning that the PC adjusts automatically to the set can be operated as a PC monitor. NOTE G User must use shielded signal interface cables (D sub 15 pin cable, DVI cable) with a D-sub 15 pin cable 1 Connect the signal cable from the monitor output socket of the PERSONAL COMPUTER to the PC input socket of the set. 2 Connect the audio cable from...
... (PC) AUDIO IN (RGB/DVI) 1 2 RGB OUTPUT AUDIO ! EXTERNAL EQUIPMENT SETUP PC SETUP This product provides Plug and Play capability, meaning that the PC adjusts automatically to the set can be operated as a PC monitor. NOTE G User must use shielded signal interface cables (D sub 15 pin cable, DVI cable) with a D-sub 15 pin cable 1 Connect the signal cable from the monitor output socket of the PERSONAL COMPUTER to the PC input socket of the set. 2 Connect the audio cable from...

Owner's Manual (English)
Page 18
... LCD screen with the set has been preadjusted to obtain the best image quality for a long time as this will have no impact or effect on . This is normal, there is switched on the monitor performance. NOTE G If the set is cold, there may become permanently imprinted on the screen, like Red, Green or Blue spots. use the 1920x1080@60Hz video mode to the mode...
... LCD screen with the set has been preadjusted to obtain the best image quality for a long time as this will have no impact or effect on . This is normal, there is switched on the monitor performance. NOTE G If the set is cold, there may become permanently imprinted on the screen, like Red, Green or Blue spots. use the 1920x1080@60Hz video mode to the mode...
Owner's Manual (English)
Page 25
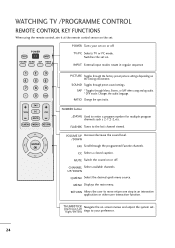
WATCHING TV /PROGRAMME CONTROL REMOTE CONTROL KEY FUNCTIONS When using analog audio. * DTV mode: Changes the audio language. TV/PC Selects TV or PC mode. INPUT External input modes rotate in an interactive application or other user interaction function. RATIO Change the spect ratio. POWER TV/PC INPUT PICTURE SOUND SAP RATIO POWER Turns your preference. 24 NUMBER button _(DASH) Used to the last channel viewed. FLASHBK Tunes to enter a program number for multiple program channels such s 2-1,2-2,etc. CHANNEL Select available channels. RETURN Allows the user to your set ...
WATCHING TV /PROGRAMME CONTROL REMOTE CONTROL KEY FUNCTIONS When using analog audio. * DTV mode: Changes the audio language. TV/PC Selects TV or PC mode. INPUT External input modes rotate in an interactive application or other user interaction function. RATIO Change the spect ratio. POWER TV/PC INPUT PICTURE SOUND SAP RATIO POWER Turns your preference. 24 NUMBER button _(DASH) Used to the last channel viewed. FLASHBK Tunes to enter a program number for multiple program channels such s 2-1,2-2,etc. CHANNEL Select available channels. RETURN Allows the user to your set ...
Owner's Manual (English)
Page 26
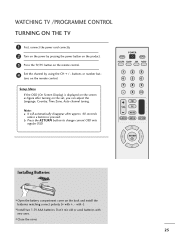
..., Time Zone, Auto channel tuning. tons on the remote control. 4 Set the channel by using the CH + / - It will automatically disappear after approx. 40 seconds unless a button is displayed on the screen as figure after turning on the back and install the batteries matching correct polarity (+ with new ones. with -). Setup Menu If the OSD (On Screen Display) is pressed. WATCHING TV /PROGRAMME CONTROL TURNING ON THE TV 1 First, connect the power cord correctly. 2 Turn...
..., Time Zone, Auto channel tuning. tons on the remote control. 4 Set the channel by using the CH + / - It will automatically disappear after approx. 40 seconds unless a button is displayed on the screen as figure after turning on the back and install the batteries matching correct polarity (+ with new ones. with -). Setup Menu If the OSD (On Screen Display) is pressed. WATCHING TV /PROGRAMME CONTROL TURNING ON THE TV 1 First, connect the power cord correctly. 2 Turn...

Owner's Manual (English)
Page 28
...menu screen. 27 Q.Menu Aspect Ratio Backlight Picture Mode Sound Mode Caption Multi Audio Sleep Timer CH Del/Add/Fav F 16:9 G 3 Vivid Standard Off English Off Add Close 1 Q.MENU 2 Display each menu. Make appropriate adjustments. • Press the RETURN button to move to a favorite channel, press the F A V (Favorite) button repeatedly. Q.Menu (Quick Menu) is shown in this manual. I Aspect Ratio: Selects your desired picture format. I Multi Audio: Changes the audio language (Digital signal). WATCHING TV /PROGRAMME CONTROL QUICK MENU / FAVORITE CHANNEL SETUP Your set...
...menu screen. 27 Q.Menu Aspect Ratio Backlight Picture Mode Sound Mode Caption Multi Audio Sleep Timer CH Del/Add/Fav F 16:9 G 3 Vivid Standard Off English Off Add Close 1 Q.MENU 2 Display each menu. Make appropriate adjustments. • Press the RETURN button to move to a favorite channel, press the F A V (Favorite) button repeatedly. Q.Menu (Quick Menu) is shown in this manual. I Aspect Ratio: Selects your desired picture format. I Multi Audio: Changes the audio language (Digital signal). WATCHING TV /PROGRAMME CONTROL QUICK MENU / FAVORITE CHANNEL SETUP Your set...

Owner's Manual (English)
Page 33
Q.Menu Aspect Ratio Backlight Picture Mode Sound Mode Caption Multi Audio Sleep Timer CH Del/Add/Fav F 16:9 G 3 Vivid Standard Off English Off Add Close Set By Program 4:3 Zoom2 Zoom1 16:9 Just Scan 1 RATIO Select the desired picture format. • Press the RETURN button to move to all manufacturers and is displayed on the screen for a long time, the image could become imprinted on your set. NOTE G If a fixed image is not covered...
Q.Menu Aspect Ratio Backlight Picture Mode Sound Mode Caption Multi Audio Sleep Timer CH Del/Add/Fav F 16:9 G 3 Vivid Standard Off English Off Add Close Set By Program 4:3 Zoom2 Zoom1 16:9 Just Scan 1 RATIO Select the desired picture format. • Press the RETURN button to move to all manufacturers and is displayed on the screen for a long time, the image could become imprinted on your set. NOTE G If a fixed image is not covered...

Owner's Manual (English)
Page 35
... picture quality at the factory and are preset for picture settings available in the user menus. You can use a preset, change each setting manually. I Vivid, Standard, Cinema, Sport, or G a m e Settings are not adjustable. • Press the RETURN button to move to the previous menu screen. 34 Q.Menu Aspect Ratio Backlight Picture Mode Sound Mode Caption Multi Audio Sleep Timer CH Del/Add/Fav 16:9 3 F Vivid G Standard Off English Off Add Close Vivid Game Standard Cinema Sport 1 PICTURE...
... picture quality at the factory and are preset for picture settings available in the user menus. You can use a preset, change each setting manually. I Vivid, Standard, Cinema, Sport, or G a m e Settings are not adjustable. • Press the RETURN button to move to the previous menu screen. 34 Q.Menu Aspect Ratio Backlight Picture Mode Sound Mode Caption Multi Audio Sleep Timer CH Del/Add/Fav 16:9 3 F Vivid G Standard Off English Off Add Close Vivid Game Standard Cinema Sport 1 PICTURE...
Owner's Manual (English)
Page 46
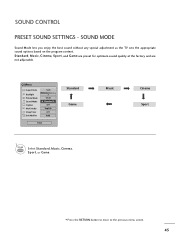
... menu screen. 45 SOUND MODE Sound Mode lets you enjoy the best sound without any special adjustment as the TV sets the appropriate sound options based on the program content. Q.Menu Aspect Ratio Backlight Picture Mode Sound Mode Caption Multi Audio Sleep Timer CH Del/Add/Fav 16:9 3 Vivid F Standard G Off English Off Add Close Standard Game 1 SOUND Select Standard, Music, Cinema, Sport, or Game. SOUND CONTROL PRESET SOUND SETTINGS - Standard, Music, Cinema, Sport, and Game are preset for optimum sound quality at the factory...
... menu screen. 45 SOUND MODE Sound Mode lets you enjoy the best sound without any special adjustment as the TV sets the appropriate sound options based on the program content. Q.Menu Aspect Ratio Backlight Picture Mode Sound Mode Caption Multi Audio Sleep Timer CH Del/Add/Fav 16:9 3 Vivid F Standard G Off English Off Add Close Standard Game 1 SOUND Select Standard, Music, Cinema, Sport, or Game. SOUND CONTROL PRESET SOUND SETTINGS - Standard, Music, Cinema, Sport, and Game are preset for optimum sound quality at the factory...
Owner's Manual (English)
Page 51
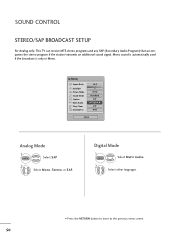
Digital Mode 1 Q.MENU Select Multi Audio. 2 Select other languages. • Press the RETURN button to move to the previous menu screen. 50 SOUND CONTROL STEREO/SAP BROADCAST SETUP For Analog only: This TV can receive MTS stereo programs and any SAP (Secondary Audio Program) that accompanies the stereo program if the station transmits an additional sound signal. Mono sound is automatically used if the broadcast is only in Mono. Q.Menu Aspect Ratio Backlight Picture Mode Sound Mode Caption Multi Audio Sleep Timer CH...
Digital Mode 1 Q.MENU Select Multi Audio. 2 Select other languages. • Press the RETURN button to move to the previous menu screen. 50 SOUND CONTROL STEREO/SAP BROADCAST SETUP For Analog only: This TV can receive MTS stereo programs and any SAP (Secondary Audio Program) that accompanies the stereo program if the station transmits an additional sound signal. Mono sound is automatically used if the broadcast is only in Mono. Q.Menu Aspect Ratio Backlight Picture Mode Sound Mode Caption Multi Audio Sleep Timer CH...
Owner's Manual (English)
Page 74
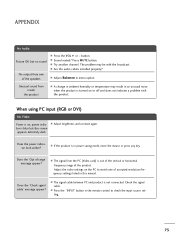
... signal cable between PC and product is turned on , power indic- When using PC input (RGB or DVI) No Video. Does the 'Out of the product. button. A Try another channel. Does the power indica- The problem may result in this manual. A Press the 'INPUT' button in the remote control to match one of accepted resolution/frequency settings listed in an unusual noise when the product is not connected. A Adjust Balance in power...
... signal cable between PC and product is turned on , power indic- When using PC input (RGB or DVI) No Video. Does the 'Out of the product. button. A Try another channel. Does the power indica- The problem may result in this manual. A Press the 'INPUT' button in the remote control to match one of accepted resolution/frequency settings listed in an unusual noise when the product is not connected. A Adjust Balance in power...

Owner's Manual (English)
Page 75
Screen color is not properly communicating with the product, or download it Did you install the driver? A Several pixels (red, green, white or black color) may have been damaged if there was fixed image on the display for the video card. A See if the video card resolution and frequency are supported by the product. Try installing the latest drivers for the product is not a malfunction of the LCD. Do thin...
Screen color is not properly communicating with the product, or download it Did you install the driver? A Several pixels (red, green, white or black color) may have been damaged if there was fixed image on the display for the video card. A See if the video card resolution and frequency are supported by the product. Try installing the latest drivers for the product is not a malfunction of the LCD. Do thin...
Owner's Manual (English)
Page 78
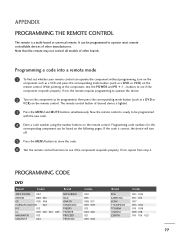
... ZENITH Codes 005 006 011 015 007 005 006 019 008 009 018 010 016 025 77 The remote control button of other brands. It can operate the component without programming, turn off. 5 Press the MENU button to store the code. 6 Test the remote control functions to be programmed with the new code. 4 Enter a code number using the number buttons on the remote control. APPENDIX PROGRAMMING THE REMOTE CONTROL The remote is lighted. 3 Press the MENU and MUTE buttons simultaneously...
... ZENITH Codes 005 006 011 015 007 005 006 019 008 009 018 010 016 025 77 The remote control button of other brands. It can operate the component without programming, turn off. 5 Press the MENU button to store the code. 6 Test the remote control functions to be programmed with the new code. 4 Enter a code number using the number buttons on the remote control. APPENDIX PROGRAMMING THE REMOTE CONTROL The remote is lighted. 3 Press the MENU and MUTE buttons simultaneously...
Owner's Manual (English)
Page 83
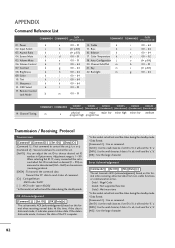
... 'a', 'b'. [OK] : Use the large character. Remote Control Lock Mode k a 00 ~ 01 14. Error Acknowledgement [Command2][ ][Set ID][ ][NG][Data][x] The set transmits ACK (acknowledgement) based on menu and as command. [Set ID] : Use the small character, if set ID number in Option menu. When selecting Set ID '0', every connected the set will send the 'a', 'b'. [NG] : Use the large character 82 Color Temperature k e 00 ~ 01 18. APPENDIX Command Reference List COMMAND1 COMMAND2...
... 'a', 'b'. [OK] : Use the large character. Remote Control Lock Mode k a 00 ~ 01 14. Error Acknowledgement [Command2][ ][Set ID][ ][NG][Data][x] The set transmits ACK (acknowledgement) based on menu and as command. [Set ID] : Use the small character, if set ID number in Option menu. When selecting Set ID '0', every connected the set will send the 'a', 'b'. [NG] : Use the large character 82 Color Temperature k e 00 ~ 01 18. APPENDIX Command Reference List COMMAND1 COMMAND2...
Owner's Manual (English)
Page 84
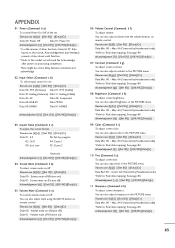
...][x] * In a like manner, if other functions transmit 'FF' data based on this format, Acknowledgement data feedback presents status about each function. * Note: In this model, set will send the Acknowledge after power on remote control. Input Select (Command: x b) To select input source for set . Transmission [x][b][ ][Set ID][ ][Data][Cr] Data 00: DTV (Antenna) Data 01: DTV (Cable) Data 10: Analog (Antenna) Data 11: Analog (Cable) Data 20: AV Data 40...
...][x] * In a like manner, if other functions transmit 'FF' data based on this format, Acknowledgement data feedback presents status about each function. * Note: In this model, set will send the Acknowledge after power on remote control. Input Select (Command: x b) To select input source for set . Transmission [x][b][ ][Set ID][ ][Data][Cr] Data 00: DTV (Antenna) Data 01: DTV (Cable) Data 10: Analog (Antenna) Data 11: Analog (Cable) Data 20: AV Data 40...


