
Owners Manual
Page 4
...Precautions 2 IMPORTANT SAFETY INSTRUCTIONS 3 Table of Contents 4 Front Panel Controls and Display Window 5 Remote Control Key Functions 6 Unpacking HDTV Receiver and Accessories/Connection Overview 7 Connection Panel 8 INSTALLATION Connections 9-16 Antenna Connections 9 Analog Monitor Connections 10 HD Monitor Component ...(YPbPr) Connections . . 11 HD Monitor RGB Connections 12 HD Monitor DVI-HDTV Connections 13 VCR Connections 14 Amplifier (Receiver) Connections 15 Setting the Display Format 16 MENU OPERATION Initial Settings 17 ...
...Precautions 2 IMPORTANT SAFETY INSTRUCTIONS 3 Table of Contents 4 Front Panel Controls and Display Window 5 Remote Control Key Functions 6 Unpacking HDTV Receiver and Accessories/Connection Overview 7 Connection Panel 8 INSTALLATION Connections 9-16 Antenna Connections 9 Analog Monitor Connections 10 HD Monitor Component ...(YPbPr) Connections . . 11 HD Monitor RGB Connections 12 HD Monitor DVI-HDTV Connections 13 VCR Connections 14 Amplifier (Receiver) Connections 15 Setting the Display Format 16 MENU OPERATION Initial Settings 17 ...

Owners Manual
Page 5
... and then use the SELECT button to normal viewing by pressing the EXIT button. POWER Turns the HDTV Receiver on the screen. If the SELECT button is turned off . Standby indicator Lights when the HDTV Receiver is pressed while you to navigate on-screen menus and to adjust the system settings and...
... and then use the SELECT button to normal viewing by pressing the EXIT button. POWER Turns the HDTV Receiver on the screen. If the SELECT button is turned off . Standby indicator Lights when the HDTV Receiver is pressed while you to navigate on-screen menus and to adjust the system settings and...

Owners Manual
Page 6
...already in a menu. STATION Brings up the Program Guide. Component Control Buttons Provides control for multiple pro- POWER Turns the HDTV Receiver ON and OFF. FREEZE Freezes the current image. Reinstall cover. SELECT ( ) Completes the channel number input and promptly tunes to ...the HDTV Receiver. This button is not available. SIGNAL Shows the signal strength of the remote sensor. Remote Control Key Functions STB Sets ...
...already in a menu. STATION Brings up the Program Guide. Component Control Buttons Provides control for multiple pro- POWER Turns the HDTV Receiver ON and OFF. FREEZE Freezes the current image. Reinstall cover. SELECT ( ) Completes the channel number input and promptly tunes to ...the HDTV Receiver. This button is not available. SIGNAL Shows the signal strength of the remote sensor. Remote Control Key Functions STB Sets ...

Owners Manual
Page 7
...YPbPr Component jacks carry only the picture signals, not the sound. Component Out Jacks and Cables Component Cables are used to connect the HDTV Receiver to control many other devices. Batteries To install the batteries, slide open the battery compartment and insert the two AA batteries ... be programmed to an industry standard YPbPr compatible HD Monitor (green for Y, blue for Pb, and red for left audio). Unpacking HDTV Receiver and Accessories/Connection Overview Make sure you have received all the accessories listed below with the Receiver are the following accessories. Included...
...YPbPr Component jacks carry only the picture signals, not the sound. Component Out Jacks and Cables Component Cables are used to connect the HDTV Receiver to control many other devices. Batteries To install the batteries, slide open the battery compartment and insert the two AA batteries ... be programmed to an industry standard YPbPr compatible HD Monitor (green for Y, blue for Pb, and red for left audio). Unpacking HDTV Receiver and Accessories/Connection Overview Make sure you have received all the accessories listed below with the Receiver are the following accessories. Included...
Owners Manual
Page 8
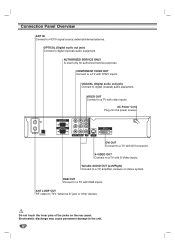
... (Left/Right) Connect to a TV with RGB inputs. RGB OUT Connect to a TV, amplifier, receiver or stereo system. Electrostatic discharge may cause permanent damage to HDTV signal source; Connection Panel Overview ANT IN Connect to the unit. 8 OPTICAL (Digital audio out jack) Connect to a TV with DVI connector.
... (Left/Right) Connect to a TV with RGB inputs. RGB OUT Connect to a TV, amplifier, receiver or stereo system. Electrostatic discharge may cause permanent damage to HDTV signal source; Connection Panel Overview ANT IN Connect to the unit. 8 OPTICAL (Digital audio out jack) Connect to a TV with DVI connector.

Owners Manual
Page 9
...you may need to install a 10 dB attenuator to the Antenna input "ANT IN" on the LST-3100A. INSTALLATION Connections Antenna Connections 1 Connect the "Antenna" to the "ANT IN" jack on the HDTV Receiver using an appropriate and properly aligned UHF/VHF RF terrestrial antenna. 9 If so, you need... to connect the antenna to an attenuator. The LST-3100A is a high performance, high-gain system intended for your local broadcast ...
...you may need to install a 10 dB attenuator to the Antenna input "ANT IN" on the LST-3100A. INSTALLATION Connections Antenna Connections 1 Connect the "Antenna" to the "ANT IN" jack on the HDTV Receiver using an appropriate and properly aligned UHF/VHF RF terrestrial antenna. 9 If so, you need... to connect the antenna to an attenuator. The LST-3100A is a high performance, high-gain system intended for your local broadcast ...
Owners Manual
Page 10
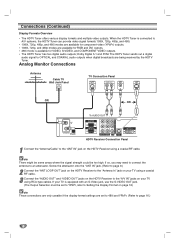
... Monitor Connections Antenna Cable TV Wall Jack Panel TV Connection Panel ANTENNA INPUT AUDIO INPUT VIDEO INPUT L R L S-VIDEO INPUT OR OR To AUDIO OUT HDTV Receiver Connection Panel 1 Connect the "Antenna/Cable" to the "A/V IN" jacks on your TV using a coaxial RF cable. If so, you may ... digital broadcasts are available for RGB and DVI outputs. • 480i mode is available for VIDEO, S-VIDEO, and COMPONENT VIDEO outputs. • The HDTV Tuner has two digital audio outputs; Screw the attenuator onto the "ANT IN" jack. (Refer to page 9.) 2 Connect the "ANT LOOP OUT" ...
... Monitor Connections Antenna Cable TV Wall Jack Panel TV Connection Panel ANTENNA INPUT AUDIO INPUT VIDEO INPUT L R L S-VIDEO INPUT OR OR To AUDIO OUT HDTV Receiver Connection Panel 1 Connect the "Antenna/Cable" to the "A/V IN" jacks on your TV using a coaxial RF cable. If so, you may ... digital broadcasts are available for RGB and DVI outputs. • 480i mode is available for VIDEO, S-VIDEO, and COMPONENT VIDEO outputs. • The HDTV Tuner has two digital audio outputs; Screw the attenuator onto the "ANT IN" jack. (Refer to page 9.) 2 Connect the "ANT LOOP OUT" ...

Owners Manual
Page 11
...set to YPbPr, refer to Setting the Display Format on page 16) 4 Connect the L/R "AUDIO OUT" jacks on the HDTV Receiver to the L/R "AUDIO IN" jacks on the HDTV Receiver using a coaxial RF cable. INSTALLATION Connections (Continued) HD Monitor Component (YPbPr) Connections Antenna Cable TV Wall Jack Panel ...HD Ready TV Connection Panel ANTENNA INPUT COMPONENT VIDEO INPUT AUDIO INPUT VIDEO INPUT Pr Pb Y L R OR To AUDIO OUT HDTV Receiver Connection Panel 1 Connect the "Antenna/Cable" to the "ANT IN" jack on your TV using RCA-type cables. (The Output Selection ...
...set to YPbPr, refer to Setting the Display Format on page 16) 4 Connect the L/R "AUDIO OUT" jacks on the HDTV Receiver to the L/R "AUDIO IN" jacks on the HDTV Receiver using a coaxial RF cable. INSTALLATION Connections (Continued) HD Monitor Component (YPbPr) Connections Antenna Cable TV Wall Jack Panel ...HD Ready TV Connection Panel ANTENNA INPUT COMPONENT VIDEO INPUT AUDIO INPUT VIDEO INPUT Pr Pb Y L R OR To AUDIO OUT HDTV Receiver Connection Panel 1 Connect the "Antenna/Cable" to the "ANT IN" jack on your TV using RCA-type cables. (The Output Selection ...

Owners Manual
Page 12
... on your TV using a coaxial RF cable. 3 Connect the "RGB OUT" jack on the HDTV Receiver to the "RGB IN" jack of your TV using RCAtype cables. Connections (Continued) HD ...HD Ready TV Connection Panel ANTENNA INPUT S-VIDEO INPUT RGB INPUT VIDEO INPUT AUDIO INPUT L R To AUDIO OUT HDTV Receiver Connection Panel 11 Connect the "Antenna/Cable" to the "ANT IN" jack on your TV using VGA... 12 If so, you may need to connect the antenna to the L/R "AUDIO IN" jacks on the HDTV Receiver using a coaxial RF cable. ote There might be some areas where the signal strength could be set to...
... on your TV using a coaxial RF cable. 3 Connect the "RGB OUT" jack on the HDTV Receiver to the "RGB IN" jack of your TV using RCAtype cables. Connections (Continued) HD ...HD Ready TV Connection Panel ANTENNA INPUT S-VIDEO INPUT RGB INPUT VIDEO INPUT AUDIO INPUT L R To AUDIO OUT HDTV Receiver Connection Panel 11 Connect the "Antenna/Cable" to the "ANT IN" jack on your TV using VGA... 12 If so, you may need to connect the antenna to the L/R "AUDIO IN" jacks on the HDTV Receiver using a coaxial RF cable. ote There might be some areas where the signal strength could be set to...

Owners Manual
Page 13
... could be set to DVI, refer to Setting the Display Format on page 16) 4 Connect the L/R "AUDIO OUT" jacks on the HDTV Receiver to the L/R "AUDIO IN" jacks on the HDTV Receiver using DVI-D may need to connect the antenna to an attenuator. Screw the attenuator onto the "ANT IN" jack. (Refer... Antenna Cable TV Wall Jack Panel OR HD Ready TV Connection Panel ANTENNA INPUT S-VIDEO INPUT VIDEO INPUT AUDIO INPUT L R DVI-HDTV INPUT To AUDIO OUT HDTV Receiver Connection Panel 11 Connect the "Antenna/Cable" to the "ANT IN" jack on your TV or monitor's user manual to find out if the...
... could be set to DVI, refer to Setting the Display Format on page 16) 4 Connect the L/R "AUDIO OUT" jacks on the HDTV Receiver to the L/R "AUDIO IN" jacks on the HDTV Receiver using DVI-D may need to connect the antenna to an attenuator. Screw the attenuator onto the "ANT IN" jack. (Refer... Antenna Cable TV Wall Jack Panel OR HD Ready TV Connection Panel ANTENNA INPUT S-VIDEO INPUT VIDEO INPUT AUDIO INPUT L R DVI-HDTV INPUT To AUDIO OUT HDTV Receiver Connection Panel 11 Connect the "Antenna/Cable" to the "ANT IN" jack on your TV or monitor's user manual to find out if the...
Owners Manual
Page 14
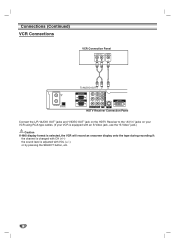
Connections (Continued) VCR Connections VCR Connection Panel AUDIO INPUT VIDEO INPUT L R L To AUDIO OUT HDTV Receiver Connection Panel Connect the L/R "AUDIO OUT" jacks and "VIDEO OUT" jack on the HDTV Receiver to the "A/V in" jacks on your VCR using RCA-type cables. (If your VCR is equipped with an S-Video jack, use the "S-Video" jack.) Caution If 480i display format is selected, the VCR will record an onscreen display onto the tape during recording if: the channel is changed with CH (+/-) the sound level is adjusted with VOL (+/-) or by pressing the SELECT button, etc. 14
Connections (Continued) VCR Connections VCR Connection Panel AUDIO INPUT VIDEO INPUT L R L To AUDIO OUT HDTV Receiver Connection Panel Connect the L/R "AUDIO OUT" jacks and "VIDEO OUT" jack on the HDTV Receiver to the "A/V in" jacks on your VCR using RCA-type cables. (If your VCR is equipped with an S-Video jack, use the "S-Video" jack.) Caution If 480i display format is selected, the VCR will record an onscreen display onto the tape during recording if: the channel is changed with CH (+/-) the sound level is adjusted with VOL (+/-) or by pressing the SELECT button, etc. 14

Owners Manual
Page 15
... jack on the front of the audio formats supported by your amplifier. Check the receiver manual and the logos on your HDTV Receiver (Dolby Digital). Use an optional digital (optical or coaxial) audio cable. INSTALLATION Connections (Continued) Amplifier (Receiver) ...Connections Amplifier (Receiver) Connection Panel OPTICAL COAXIAL DIGITAL INPUT R L AUDIO INPUT OR HDTV Receiver Connection Panel Connecting to an amplifier equipped with a multi-channel decoder (Dolby Digital™) Connect one or more of the ...
... jack on the front of the audio formats supported by your amplifier. Check the receiver manual and the logos on your HDTV Receiver (Dolby Digital). Use an optional digital (optical or coaxial) audio cable. INSTALLATION Connections (Continued) Amplifier (Receiver) ...Connections Amplifier (Receiver) Connection Panel OPTICAL COAXIAL DIGITAL INPUT R L AUDIO INPUT OR HDTV Receiver Connection Panel Connecting to an amplifier equipped with a multi-channel decoder (Dolby Digital™) Connect one or more of the ...
Owners Manual
Page 16
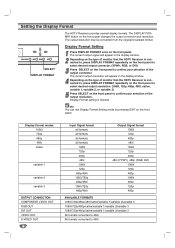
... once on the front panel. The current output signal will appear in the display window. 2 Depending on the type of monitor that the HDTV Receiver is connected to, press DISPLAY FORMAT repeatedly on the front panel to select desired output connector. (YPbPr, RGB, or DVI) 3 ...be converted from the original broadcast format. The current output resolution will appear in the display window. 4 Depending on the type of monitor that the HDTV Receiver is connected to, press DISPLAY FORMAT repeatedly on the front panel to select desired output resolution. (1080i, 720p, 480p, 480i, native, ...
... once on the front panel. The current output signal will appear in the display window. 2 Depending on the type of monitor that the HDTV Receiver is connected to, press DISPLAY FORMAT repeatedly on the front panel to select desired output connector. (YPbPr, RGB, or DVI) 3 ...be converted from the original broadcast format. The current output resolution will appear in the display window. 4 Depending on the type of monitor that the HDTV Receiver is connected to, press DISPLAY FORMAT repeatedly on the front panel to select desired output resolution. (1080i, 720p, 480p, 480i, native, ...

Owners Manual
Page 20
... viewing. 20 Setup Menu Options (Continued) Manual Channel Add/Delete This feature allows you how to navigate through the on-screen menus available on the HDTV Receiver. 1 Press MENU to display the on-screen menu. 2 Select the SETUP menu using 3 / 4 then press (SELECT) or 2 to move to the second level. 3 Select...
... viewing. 20 Setup Menu Options (Continued) Manual Channel Add/Delete This feature allows you how to navigate through the on-screen menus available on the HDTV Receiver. 1 Press MENU to display the on-screen menu. 2 Select the SETUP menu using 3 / 4 then press (SELECT) or 2 to move to the second level. 3 Select...

Owners Manual
Page 21
... repeatedly. • When multiple audio tracks are cases where the TV station does not send, or sends wrong date and/or time information causing the HDTV Receiver to set using signals transmitted by broadcaster, you can select one of SELECT the other languages with the Audio Language menu. 1 Follow Steps 1-2 as...
... repeatedly. • When multiple audio tracks are cases where the TV station does not send, or sends wrong date and/or time information causing the HDTV Receiver to set using signals transmitted by broadcaster, you can select one of SELECT the other languages with the Audio Language menu. 1 Follow Steps 1-2 as...
Owners Manual
Page 24
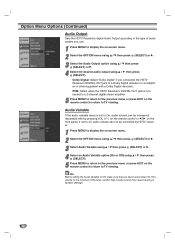
...EXIT on the front panel. Dolby Digital: Select "Dolby Digital" if you have turned down the TV's volume to the minimum. PCM: Select when the HDTV Receiver's DIGITAL OUT jack is set to off, audio volume can be controlled by pressing VOL (+/-) on the remote control or 1 / 2 on the ...3 / 4 then press (SELECT) or 2. 4 Select an Audio Variable option (On or Off) using 3 / 4 then press (SELECT). Option Menu Options (Continued) Audio Output Sets the HDTV Receiver's digital Audio Output according to the type of audio system you use. 1 Press MENU to display the on the remote control to return to...
...EXIT on the front panel. Dolby Digital: Select "Dolby Digital" if you have turned down the TV's volume to the minimum. PCM: Select when the HDTV Receiver's DIGITAL OUT jack is set to off, audio volume can be controlled by pressing VOL (+/-) on the remote control or 1 / 2 on the ...3 / 4 then press (SELECT) or 2. 4 Select an Audio Variable option (On or Off) using 3 / 4 then press (SELECT). Option Menu Options (Continued) Audio Output Sets the HDTV Receiver's digital Audio Output according to the type of audio system you use. 1 Press MENU to display the on the remote control to return to...

Owners Manual
Page 38
...8226; The volume of analog audio out on the front panel) Use VOL +/- You can not be adjusted on the remote control. MUTE (on the HDTV Receiver. STB TV VCR DVD AUX STB MODE POWER Normal Operation TV/INPUT ez ADD * - (dash) button AUDIO CC SIGNAL Number buttons SELECT MUTE... FREEZEGUIDSE URF HELP Channel Selection You can select a channel as shown below. on the remote control or 3 / 4 on the front panel to cycle the HDTV Receiver through your location. on the remote control or 1 / 2 on the front panel) Use CH +/- For example, if the DTV Receiver is tuned ...
...8226; The volume of analog audio out on the front panel) Use VOL +/- You can not be adjusted on the remote control. MUTE (on the HDTV Receiver. STB TV VCR DVD AUX STB MODE POWER Normal Operation TV/INPUT ez ADD * - (dash) button AUDIO CC SIGNAL Number buttons SELECT MUTE... FREEZEGUIDSE URF HELP Channel Selection You can select a channel as shown below. on the remote control or 3 / 4 on the front panel to cycle the HDTV Receiver through your location. on the remote control or 1 / 2 on the front panel) Use CH +/- For example, if the DTV Receiver is tuned ...
Owners Manual
Page 39
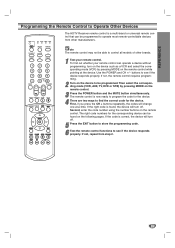
... STB MODE POWER TV/INPUT ez ADD AUDIO CC * SIGNAL MUTE SELECT FLASHBK PG UP PG DN RATIO FREEZE SURF HELP PROGRAM STATION GUIDE The HDTV Receiver remote control is a multi-brand or universal remote control that can be programmed to operate most remote-controllable devices from step 2. 39
... STB MODE POWER TV/INPUT ez ADD AUDIO CC * SIGNAL MUTE SELECT FLASHBK PG UP PG DN RATIO FREEZE SURF HELP PROGRAM STATION GUIDE The HDTV Receiver remote control is a multi-brand or universal remote control that can be programmed to operate most remote-controllable devices from step 2. 39

Owners Manual
Page 42
...signal. You forgot your antenna input, location, and signal strength. The antenna signal strength may not be set to connections on the HDTV Receiver. Make sure the proper aspect ratio is not muted. Fragmented picture and unclear sound. Check the signal strength and adjust the antenna...location and direction. For more information about connections, please refer to the YPbPr position (see page 16). For example, Video 1 or 2. If HDTV Receiver is selected on . Point the remote control on the remote sensor on pages 9-14. The remote control does not work properly. Otherwise,...
...signal. You forgot your antenna input, location, and signal strength. The antenna signal strength may not be set to connections on the HDTV Receiver. Make sure the proper aspect ratio is not muted. Fragmented picture and unclear sound. Check the signal strength and adjust the antenna...location and direction. For more information about connections, please refer to the YPbPr position (see page 16). For example, Video 1 or 2. If HDTV Receiver is selected on . Point the remote control on the remote sensor on pages 9-14. The remote control does not work properly. Otherwise,...

Owners Manual
Page 43
...: 2-69, Cable: 1-135 ATSC ANT Input ANT IN (1) (ATSC-8VSB over Terrestrial or QAM over cable) ANT Loop Out Out To TV (1) DVI Output DVI-HDTV Out (1), DVI-D Single Link connector 1080i, 720p, 480p digital RGB Component Video Output Component Out (1 Set), Typical RCA type Jack connectors 1080i, 720p, 480p, 480i...
...: 2-69, Cable: 1-135 ATSC ANT Input ANT IN (1) (ATSC-8VSB over Terrestrial or QAM over cable) ANT Loop Out Out To TV (1) DVI Output DVI-HDTV Out (1), DVI-D Single Link connector 1080i, 720p, 480p digital RGB Component Video Output Component Out (1 Set), Typical RCA type Jack connectors 1080i, 720p, 480p, 480i...