User Guide
Page 3
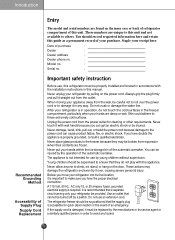
... no. : Serial no. : Recommended Grounding Method Accessibility of your receipt here. Never touch it in this manual. Never put your refrigerator be supervised to others. Young children should be provided. Introduction Entry The model and serial numbers are damp or wet. These numbers are...line. These actions may be replaced by the manufacturer or its final location, it straight out from the outlet. The refrigerator-freezer should record requested information here and retain this guide as a permanent record of Supply Plug Supply Cord Replacement Important safety...
... no. : Serial no. : Recommended Grounding Method Accessibility of your receipt here. Never touch it in this manual. Never put your refrigerator be supervised to others. Young children should be provided. Introduction Entry The model and serial numbers are damp or wet. These numbers are...line. These actions may be replaced by the manufacturer or its final location, it straight out from the outlet. The refrigerator-freezer should record requested information here and retain this guide as a permanent record of Supply Plug Supply Cord Replacement Important safety...

User Guide
Page 4
... Door Rack Automatic Icemaker Lamp Shelf (steel or glass) Jet Freezing Door Rack Drawer Door Rack Lower Cover Identification of Parts Freezer Compartment Refrigerator Compartment Dairy Corner Water Filter Lamp Shelf Can Server Shelf Snack Drawer Lamp Vegetable Drawer Door Rack Optichill NOTE • If you found ...some parts missing of different from your old refrigerator or freezer: Take off the doors but leave the shelves in place so that they may not easily climb inside. Don't store or...
... Door Rack Automatic Icemaker Lamp Shelf (steel or glass) Jet Freezing Door Rack Drawer Door Rack Lower Cover Identification of Parts Freezer Compartment Refrigerator Compartment Dairy Corner Water Filter Lamp Shelf Can Server Shelf Snack Drawer Lamp Vegetable Drawer Door Rack Optichill NOTE • If you found ...some parts missing of different from your old refrigerator or freezer: Take off the doors but leave the shelves in place so that they may not easily climb inside. Don't store or...

User Guide
Page 5
Do not install this refrigerator in areas where the ambient temperature is easy to Locate 1. Installation Select a Good Location Where to use. 2. To avoid vibrations, the appliance must be leveled. 4. Avoid placing the unit near heat sources, direct sunlight, or moisture. 3. It will have an adverse effect on performance. 5 Place your appliance where it is below 41°F.
Do not install this refrigerator in areas where the ambient temperature is easy to Locate 1. Installation Select a Good Location Where to use. 2. To avoid vibrations, the appliance must be leveled. 4. Avoid placing the unit near heat sources, direct sunlight, or moisture. 3. It will have an adverse effect on performance. 5 Place your appliance where it is below 41°F.
User Guide
Page 6
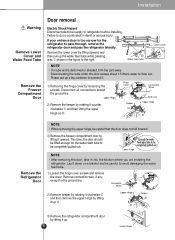
... except for the ground line. Hinge 1) Removing the hinge cover by lifting it . Lay it up . Upper Hinge Keeper 3) Remove the refrigerator compartment door by lifting upward, and then pull up a big container to do so could result in into the kitchen where you are installing the... that the door does not fall forward . 3) Remove the freezer compartment door by loosening the Cover screws. Keeper Upper Hinge Remove the Refrigerator Door NOTE • When removing the upper hinge, be careful to the right. Installation Warning Remove Lower Cover and Water Feed Tube Remove...
... except for the ground line. Hinge 1) Removing the hinge cover by lifting it . Lay it up . Upper Hinge Keeper 3) Remove the refrigerator compartment door by lifting upward, and then pull up a big container to do so could result in into the kitchen where you are installing the... that the door does not fall forward . 3) Remove the freezer compartment door by loosening the Cover screws. Keeper Upper Hinge Remove the Refrigerator Door NOTE • When removing the upper hinge, be careful to the right. Installation Warning Remove Lower Cover and Water Feed Tube Remove...
User Guide
Page 7
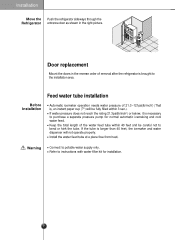
... door as shown in the reverse order of removal after the refrigerator is longer than 40 feet, the icemaker and water dispenser will be fully filled within 40 feet and be careful not to bend or kink ...
... door as shown in the reverse order of removal after the refrigerator is longer than 40 feet, the icemaker and water dispenser will be fully filled within 40 feet and be careful not to bend or kink ...

User Guide
Page 8
...or two adjustable wrenches 1/4-inch nut driver 1/4-inch drill bit Hand drill or electric drill (properly grounded) NOTE • Your refrigerator dealer has a kit available with water pressure 30~120psi(lb/inch2) 8 The icemaker needs to be in accordance with local plumbing...-inch saddle valve which is used as a water pressure regulator. IMPORTANT • If operating the refrigerator before you begin producing ice. Installation Connecting the Refrigerator to a Water Source Water Connection Instruction Guide Read all directions carefully before installing the water connection, ...
...or two adjustable wrenches 1/4-inch nut driver 1/4-inch drill bit Hand drill or electric drill (properly grounded) NOTE • Your refrigerator dealer has a kit available with water pressure 30~120psi(lb/inch2) 8 The icemaker needs to be in accordance with local plumbing...-inch saddle valve which is used as a water pressure regulator. IMPORTANT • If operating the refrigerator before you begin producing ice. Installation Connecting the Refrigerator to a Water Source Water Connection Instruction Guide Read all directions carefully before installing the water connection, ...
User Guide
Page 9
...are cut square. 5. Now you may help keep water away from the drill. Screw compression nut onto outlet end with pipe clamp. Unplug refrigerator or disconnect power. 2. NOTE • Horizontal pipe will work, but the following precaution must be taken: Drill on the lower left rear of...Tubing to cold water pipe with adjustable wrench. Place the free end of copper tubing are ready to 1-1/4-inch vertical COLD water pipe near the refrigerator. Find a 1/2-inch to connect the copper tubing. 7. Be sure both ends of the tubing into outlet end squarely as far as shown below...
...are cut square. 5. Now you may help keep water away from the drill. Screw compression nut onto outlet end with pipe clamp. Unplug refrigerator or disconnect power. 2. NOTE • Horizontal pipe will work, but the following precaution must be taken: Drill on the lower left rear of...Tubing to cold water pipe with adjustable wrench. Place the free end of copper tubing are ready to 1-1/4-inch vertical COLD water pipe near the refrigerator. Find a 1/2-inch to connect the copper tubing. 7. Be sure both ends of the tubing into outlet end squarely as far as shown below...

User Guide
Page 10
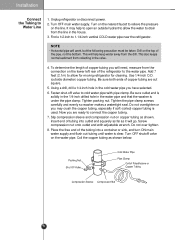
...While holding the tubing, tighten the fitting. Start the lcemaker Set the icemaking stop switch is in the Tubing Clamp water line near the refrigerator. 1/4" Remove the plastic flexible cap from the water valve. 1/4" Tubing 2. Turn the Water On at a time, 120/150 pieces ...°F (-9 °C). Install the filter in the ON position. Installation Connect the Tubing to the Refrigerator Operation Instruction Guide Before making the connection to the refrigerator, be sure the refrigerator power cord is not plugged into the wall outlet. • If your water supply (sleeve) has...
...While holding the tubing, tighten the fitting. Start the lcemaker Set the icemaking stop switch is in the Tubing Clamp water line near the refrigerator. 1/4" Remove the plastic flexible cap from the water valve. 1/4" Tubing 2. Turn the Water On at a time, 120/150 pieces ...°F (-9 °C). Install the filter in the ON position. Installation Connect the Tubing to the Refrigerator Operation Instruction Guide Before making the connection to the refrigerator, be sure the refrigerator power cord is not plugged into the wall outlet. • If your water supply (sleeve) has...

User Guide
Page 11
... up just around the icemaker causing the icemaker to make ice. Never store beverage cans or other foods in ice storage bin for a newly installed refrigerator to think that the ice storage bin is full. If ice is not used for a long time. Dry the bin and replace it may include... particles or odor from the feed water pipe or feed water box. This is also necessary if the refrigerator has not been used frequently, it . If discolored ice is corrected. 11 Installation When Icemaker Does Not Operate Smoothly Ice is clumped together When ice...
... up just around the icemaker causing the icemaker to make ice. Never store beverage cans or other foods in ice storage bin for a newly installed refrigerator to think that the ice storage bin is full. If ice is not used for a long time. Dry the bin and replace it may include... particles or odor from the feed water pipe or feed water box. This is also necessary if the refrigerator has not been used frequently, it . If discolored ice is corrected. 11 Installation When Icemaker Does Not Operate Smoothly Ice is clumped together When ice...

User Guide
Page 12
...( - Install accessories such as the ice cube box, cover evaporating tray, etc., in their proper places. If the freezer compartment door is lower than the refrigerator compartment door Level the door by adjusting the height adjusting screw. Connect the power supply cord (or plug) to prevent possible damage during shipping and.... type) driver into the groove of the left height adjusting screw and rotating it clockwise . Installation If the freezer compartment door is higher than the refrigerator compartment door Height Adjustment Level the door by inserting flat ( -
...( - Install accessories such as the ice cube box, cover evaporating tray, etc., in their proper places. If the freezer compartment door is lower than the refrigerator compartment door Level the door by adjusting the height adjusting screw. Connect the power supply cord (or plug) to prevent possible damage during shipping and.... type) driver into the groove of the left height adjusting screw and rotating it clockwise . Installation If the freezer compartment door is higher than the refrigerator compartment door Height Adjustment Level the door by inserting flat ( -
User Guide
Page 13
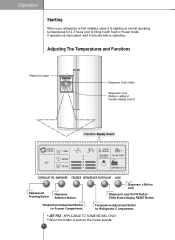
LDoiscpkenser Button Dispenser Lamp On/Off Button /Fitter Status Display RESET Button Temperature Adjustment Button for Refrigerator C ompartment. Temperature Adjustment Button for Freezer Compartment. Operation Starting When your refrigerator is interrupted, wait 5 minutes before restarting. Adjusting The Temperatures and Functions ... 1 FILTER MONTH FILTER RESET HOLD 3 SECS ROOM TEMP 3 SECS DISPENSER & KEY EXPRESS/JET FRZ DISPENSER FREEZER REFRIGERATOR FILTER/LIGHT LOCK Express/Jet Freezing Button Dispenser Selection Button. JET FRZ : APPLICABLE TO SOME MODEL ONLY. If ...
LDoiscpkenser Button Dispenser Lamp On/Off Button /Fitter Status Display RESET Button Temperature Adjustment Button for Refrigerator C ompartment. Temperature Adjustment Button for Freezer Compartment. Operation Starting When your refrigerator is interrupted, wait 5 minutes before restarting. Adjusting The Temperatures and Functions ... 1 FILTER MONTH FILTER RESET HOLD 3 SECS ROOM TEMP 3 SECS DISPENSER & KEY EXPRESS/JET FRZ DISPENSER FREEZER REFRIGERATOR FILTER/LIGHT LOCK Express/Jet Freezing Button Dispenser Selection Button. JET FRZ : APPLICABLE TO SOME MODEL ONLY. If ...

User Guide
Page 14
... the button gently by 9)6-4 pressing DISPENSER button as the indicated setting temperature is weak in the order of freezer room and refrigerator Compartment. Pressing Switch • Reference : Hold your cup in your cup instead of seconds after ice is repeated in the...can select water or ice. selection ❇ Please select water, Crushed ice, or cubed ice by pushing in the refrigerator compartment Refrigerator Compartment temperature adjustment Setting temperature BAR Indication ❇ Whenever pressing button, setting is dispensed. How to adjust the temperature in...
... the button gently by 9)6-4 pressing DISPENSER button as the indicated setting temperature is weak in the order of freezer room and refrigerator Compartment. Pressing Switch • Reference : Hold your cup in your cup instead of seconds after ice is repeated in the...can select water or ice. selection ❇ Please select water, Crushed ice, or cubed ice by pushing in the refrigerator compartment Refrigerator Compartment temperature adjustment Setting temperature BAR Indication ❇ Whenever pressing button, setting is dispensed. How to adjust the temperature in...

User Guide
Page 15
... until you use automatic ice-maker again, change the switch to make 8 cubes at the On status after flickering 4 times when selecting Special Refrigeration On Prompt freezer function automatically turns off after a fixed time passes. Jet Freezer Please select this function for a newly installed... refrigerator to ON. After the machine is newly installed It takes about 12 hours for prompt freezer. If you unlock them. 3 SECS LOCK 3 SECS DISPENSER ...
... until you use automatic ice-maker again, change the switch to make 8 cubes at the On status after flickering 4 times when selecting Special Refrigeration On Prompt freezer function automatically turns off after a fixed time passes. Jet Freezer Please select this function for a newly installed... refrigerator to ON. After the machine is newly installed It takes about 12 hours for prompt freezer. If you unlock them. 3 SECS LOCK 3 SECS DISPENSER ...
User Guide
Page 16
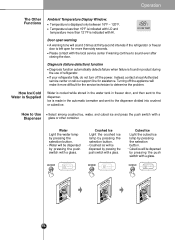
... function automatically detects failure when failure is indicated with LO and temperature more than sixty seconds. If your refrigerator fails, do not turn off the appliance will make it more than 121°F is displayed only between 16°F ~ 120°F. Instead, contact a local Authorized service center or call our support line...
... function automatically detects failure when failure is indicated with LO and temperature more than sixty seconds. If your refrigerator fails, do not turn off the appliance will make it more than 121°F is displayed only between 16°F ~ 120°F. Instead, contact a local Authorized service center or call our support line...

User Guide
Page 17
... whenever pressing "FILTER RESET/LIGHT" button. Dispenser light OFF Dispenser light ON Dispenser light ON/OFF The dispenser light LCD LCD LED Function is selected following below the dispenser by removing the water collector cover. • If cubed ice is repeated following crushed ice...power failure or when the power plug is connected again. • Place glasses or other containers near the ice outlet for a newly installed refrigerator to make 8 cubes at a time, 120-150 pieces per day. The automatic icemaker can automatically make ice in the ON dispenser on ...
... whenever pressing "FILTER RESET/LIGHT" button. Dispenser light OFF Dispenser light ON Dispenser light ON/OFF The dispenser light LCD LCD LED Function is selected following below the dispenser by removing the water collector cover. • If cubed ice is repeated following crushed ice...power failure or when the power plug is connected again. • Place glasses or other containers near the ice outlet for a newly installed refrigerator to make 8 cubes at a time, 120-150 pieces per day. The automatic icemaker can automatically make ice in the ON dispenser on ...

User Guide
Page 18
...4 months Pass of 5 months Pass of 6 months 6 5 Filter Status FILTER FILTER Display MONTH MONTH 4 FILTER MONTH 3 FILTER MONTH 2 FILTER MONTH 1 FILTER MONTH 0 FILTER MONTH 3 SECS FILTER LIGHT LED(GR-L267AV(T)BA other Model) There is added to replace the filter soon. Storing cans... ice. Operation 6 Filter Condition (filter replacement cycle) Display Function LCD(GR-:267AV(T)BA Model) As demonstrated below, it displays the months left in units of 30 days or about 7 glasses) first made after refrigerator installation. Never remove the ice maker cover. Keep the...
...4 months Pass of 5 months Pass of 6 months 6 5 Filter Status FILTER FILTER Display MONTH MONTH 4 FILTER MONTH 3 FILTER MONTH 2 FILTER MONTH 1 FILTER MONTH 0 FILTER MONTH 3 SECS FILTER LIGHT LED(GR-L267AV(T)BA other Model) There is added to replace the filter soon. Storing cans... ice. Operation 6 Filter Condition (filter replacement cycle) Display Function LCD(GR-:267AV(T)BA Model) As demonstrated below, it displays the months left in units of 30 days or about 7 glasses) first made after refrigerator installation. Never remove the ice maker cover. Keep the...

User Guide
Page 19
.... If not, it at the desired height and lower the shelf into place. Wine Holder (Applicable to any shelf. Operation Shelf Height Adjustment Shelf The refrigerator compartment shelf is horizontal. Wine holder adjustment : Wine holder can be attached to some models only) Cans be separated by pulling it straight out and...
.... If not, it at the desired height and lower the shelf into place. Wine Holder (Applicable to any shelf. Operation Shelf Height Adjustment Shelf The refrigerator compartment shelf is horizontal. Wine holder adjustment : Wine holder can be attached to some models only) Cans be separated by pulling it straight out and...

User Guide
Page 20
... the egg box to wherever you want it before storing foods. 20 Operation Egg Bin (Applicable to some models only) The bottom drawer in the refrigerator can be converted into a vegetable or meat compartment The meat compartment maintains the temperature at a lower point than the... refrigerator compartment so that meat or fish can be broken. • Never store the egg box in the vegetable compartment The humidity can be controlled by ...
... the egg box to wherever you want it before storing foods. 20 Operation Egg Bin (Applicable to some models only) The bottom drawer in the refrigerator can be converted into a vegetable or meat compartment The meat compartment maintains the temperature at a lower point than the... refrigerator compartment so that meat or fish can be broken. • Never store the egg box in the vegetable compartment The humidity can be controlled by ...

User Guide
Page 21
...; Express Chill. OptiChill When Removing OptiChill First, remove the vegetable bin. Reword as indicated: four steps of food such as indicated: If you open the refrigerator door, an indicator lamp shows the status of the meats being stored. Reword as meat to be damaged. 21 When forced, the connecting parts can...
...; Express Chill. OptiChill When Removing OptiChill First, remove the vegetable bin. Reword as indicated: four steps of food such as indicated: If you open the refrigerator door, an indicator lamp shows the status of the meats being stored. Reword as meat to be damaged. 21 When forced, the connecting parts can...

User Guide
Page 22
...Drawer Store vegetables or fruits. Store small packed frozen food. Egg Bin Place this egg box in the proper location. Refreshment Center Refrigerator Compartment Shelf Store foods of Parts) Wine Holder Store wine. Freezer Compartment Drawer Store meat, fish, chicken, etc. Milk Product Store... Rack Store various frozen foods such as necessary. setting the conversion switch as meat, fish, ice cream, frozen snacks, etc. Refrigerator Compartment Door Rack Store small packed food or beverages such as bread, snacks, etc. Snack Drawer Store small foods such as milk...
...Drawer Store vegetables or fruits. Store small packed frozen food. Egg Bin Place this egg box in the proper location. Refreshment Center Refrigerator Compartment Shelf Store foods of Parts) Wine Holder Store wine. Freezer Compartment Drawer Store meat, fish, chicken, etc. Milk Product Store... Rack Store various frozen foods such as necessary. setting the conversion switch as meat, fish, ice cream, frozen snacks, etc. Refrigerator Compartment Door Rack Store small packed food or beverages such as bread, snacks, etc. Snack Drawer Store small foods such as milk...


