User Guide
Page 2
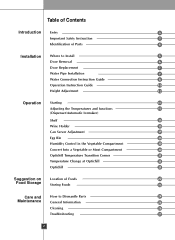
... Safety Instruction 3 Identification of Parts 4 Installation Where to Install 5 Door Removal 6 Door Replacement 7 Water Pipe Installation 7 Water Connection Instruction Guide 8 Operation Instruction Guide 10 Height Adjustment 12 Operation Starting 13 Adjusting the Temperatures and functions 13 (Dispenser/Automatic Icemaker) Shelf 19 Wine Holder 19 Can Server Adjustment 19 Egg Bin 20 Humidity Control in the Vegetable Compartment 20 Convert Into a Vegetable or Meat Compartment 20 Optichill Temperature Transition Corner 21 Temperature Change at Optichill...
... Safety Instruction 3 Identification of Parts 4 Installation Where to Install 5 Door Removal 6 Door Replacement 7 Water Pipe Installation 7 Water Connection Instruction Guide 8 Operation Instruction Guide 10 Height Adjustment 12 Operation Starting 13 Adjusting the Temperatures and functions 13 (Dispenser/Automatic Icemaker) Shelf 19 Wine Holder 19 Can Server Adjustment 19 Egg Bin 20 Humidity Control in the Vegetable Compartment 20 Convert Into a Vegetable or Meat Compartment 20 Optichill Temperature Transition Corner 21 Temperature Change at Optichill...
User Guide
Page 3
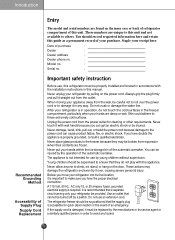
Staple your refrigerator into its service agent or a similarly qualified person in operation, do not play with the installation instructions in the event of the automatic icemaker. Date of purchase : Dealer : Dealer address : Dealer phone no. : Model no. : Serial no. : Recommended Grounding Method Accessibility of Supply Plug Supply Cord Replacement Important safety instruction Before use, this refrigerator must be replaced by the manufacturer or its final location, it...
Staple your refrigerator into its service agent or a similarly qualified person in operation, do not play with the installation instructions in the event of the automatic icemaker. Date of purchase : Dealer : Dealer address : Dealer phone no. : Model no. : Serial no. : Recommended Grounding Method Accessibility of Supply Plug Supply Cord Replacement Important safety instruction Before use, this refrigerator must be replaced by the manufacturer or its final location, it...

User Guide
Page 4
... children may not easily climb inside. Before you found some parts missing of different from your old refrigerator or freezer: Take off the doors but leave the shelves in other appliance. Door Rack Automatic Icemaker Lamp Shelf (steel or glass) Jet Freezing Door Rack Drawer Door Rack Lower Cover Identification of Parts Freezer Compartment Refrigerator Compartment Dairy Corner Water Filter Lamp Shelf Can Server Shelf Snack Drawer Lamp Vegetable Drawer Door Rack Optichill NOTE •...
... children may not easily climb inside. Before you found some parts missing of different from your old refrigerator or freezer: Take off the doors but leave the shelves in other appliance. Door Rack Automatic Icemaker Lamp Shelf (steel or glass) Jet Freezing Door Rack Drawer Door Rack Lower Cover Identification of Parts Freezer Compartment Refrigerator Compartment Dairy Corner Water Filter Lamp Shelf Can Server Shelf Snack Drawer Lamp Vegetable Drawer Door Rack Optichill NOTE •...
User Guide
Page 6
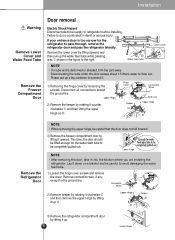
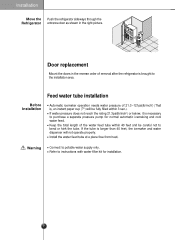
... upward. Installation Warning Remove Lower Cover and Water Feed Tube Remove the Freezer Compartment Door Door removal Electric Shock Hazard Disconnect electrical supply to flow out. Remove the lower cover by lifting it up a big container to avoid damaging the water feed tube. 1) Loosen the hinge cover screws and remove the cover. Hinge 1) Removing the hinge cover by lifting it up the water feed tube while pressing area shown in the figure to pass through, remove the refrigerator door and...
... upward. Installation Warning Remove Lower Cover and Water Feed Tube Remove the Freezer Compartment Door Door removal Electric Shock Hazard Disconnect electrical supply to flow out. Remove the lower cover by lifting it up a big container to avoid damaging the water feed tube. 1) Loosen the hinge cover screws and remove the cover. Hinge 1) Removing the hinge cover by lifting it up the water feed tube while pressing area shown in the figure to pass through, remove the refrigerator door and...
User Guide
Page 7
... 3 4 5 Max Door replacement Mount the doors in the right picture. Feed water tube installation Before Installation Automatic icemaker operation needs water pressure of removal after the refrigerator is longer than 40 feet, the icemaker and water dispenser will be fully filled within 40 feet and be careful not to bend or kink the tube. If the tube is brought to the installation area. Refer to instructions with water filter kit for normal automatic icemaking and cool water feed. Installation Move...
... 3 4 5 Max Door replacement Mount the doors in the right picture. Feed water tube installation Before Installation Automatic icemaker operation needs water pressure of removal after the refrigerator is longer than 40 feet, the icemaker and water dispenser will be fully filled within 40 feet and be careful not to bend or kink the tube. If the tube is brought to the installation area. Refer to instructions with water filter kit for normal automatic icemaking and cool water feed. Installation Move...

User Guide
Page 8
Installation Connecting the Refrigerator to a Water Source Water Connection Instruction Guide Read all directions carefully before installing the water connection, turn icemaker to the OFF position to prevent operation without water. • All installations must be connected to a cold water line with water pressure 30~120psi(lb/inch2) 8 Before purchasing, make sure a saddle-type valve complies with your icemaker to begin . Do not use a piercing-type or 3/16-inch saddle valve which is used as a water pressure regulator. Cold Water Supply The icemaker water valve contains a flow washer...
Installation Connecting the Refrigerator to a Water Source Water Connection Instruction Guide Read all directions carefully before installing the water connection, turn icemaker to the OFF position to prevent operation without water. • All installations must be connected to a cold water line with water pressure 30~120psi(lb/inch2) 8 Before purchasing, make sure a saddle-type valve complies with your icemaker to begin . Do not use a piercing-type or 3/16-inch saddle valve which is used as a water pressure regulator. Cold Water Supply The icemaker water valve contains a flow washer...
User Guide
Page 9
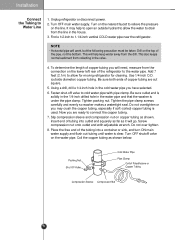
... pipe clamp. Coil the copper tubing as it will need, measure from collecting in the water pipe and that the washer is clear. Unplug refrigerator or disconnect power. 2. Turn OFF main water supply. Turn on the top of the pipe, not the bottom. This also keeps normal sediment from the connection on the line. Fasten shut-off valve to drain from the drill. Tighten...
... pipe clamp. Coil the copper tubing as it will need, measure from collecting in the water pipe and that the washer is clear. Unplug refrigerator or disconnect power. 2. Turn OFF main water supply. Turn on the top of the pipe, not the bottom. This also keeps normal sediment from the connection on the line. Fasten shut-off valve to drain from the drill. Tighten...

User Guide
Page 10
... hear a noise when ice drips into the connection as far as shown. 3. Push the refrigerator back to circumstance, including ambient temperature, door openings, freezer load.etc. Start the lcemaker Set the icemaking stop switch is normal to operate until it does not vibrate against the back of the refrigerator or against the wall. Compression Nut 1. NOTE • It is in the Tubing Clamp water line near the refrigerator. 1/4" Remove the...
... hear a noise when ice drips into the connection as far as shown. 3. Push the refrigerator back to circumstance, including ambient temperature, door openings, freezer load.etc. Start the lcemaker Set the icemaking stop switch is normal to operate until it does not vibrate against the back of the refrigerator or against the wall. Compression Nut 1. NOTE • It is in the Tubing Clamp water line near the refrigerator. 1/4" Remove the...

User Guide
Page 11
... the icemaker causing the icemaker to make ice. This is also necessary if the refrigerator has not been used frequently, it . Never store beverage cans or other foods in ice storage bin for a long time. The unit is dispensed, contact an Authorized Service Center immediately. Shake the bin occasionally to cause the ice to the ice maker must be adjusted. Installation When Icemaker Does Not Operate Smoothly Ice is...
... the icemaker causing the icemaker to make ice. This is also necessary if the refrigerator has not been used frequently, it . Never store beverage cans or other foods in ice storage bin for a long time. The unit is dispensed, contact an Authorized Service Center immediately. Shake the bin occasionally to cause the ice to the ice maker must be adjusted. Installation When Icemaker Does Not Operate Smoothly Ice is...

User Guide
Page 12
... plug) to prevent possible damage during shipping and clean your appliance thoroughly. 2. If door height the doors do not close smoothly by adjusting the height adjusting screw. Install accessories such as the ice cube box, cover evaporating tray, etc., in their proper places. type) driver into the groove of the right height adjusting screw and rotating it clockwise . Installation If the freezer compartment door is higher than the refrigerator compartment door Height Adjustment Level the door...
... plug) to prevent possible damage during shipping and clean your appliance thoroughly. 2. If door height the doors do not close smoothly by adjusting the height adjusting screw. Install accessories such as the ice cube box, cover evaporating tray, etc., in their proper places. type) driver into the groove of the right height adjusting screw and rotating it clockwise . Installation If the freezer compartment door is higher than the refrigerator compartment door Height Adjustment Level the door...
User Guide
Page 13
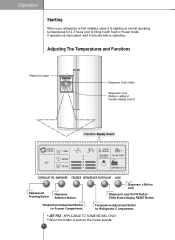
... Status Display RESET Button Temperature Adjustment Button for Refrigerator C ompartment. Operation Starting When your refrigerator is first installed, allow it to stabilize at normal operating temperatures for 2-3 hours prior to filling it with fresh or frozen foods. Adjusting The Temperatures and Functions ICEBEAM COOLING CUBE 5 WATER 4 OFF CRUSH 3 2 1 FILTER MONTH FILTER RESET HOLD 3 SECS ROOM TEMP 3 SECS DISPENSER & KEY EXPRESS/JET FRZ DISPENSER FREEZER REFRIGERATOR FILTER/LIGHT LOCK Express/Jet Freezing Button Dispenser Selection Button. JET FRZ : APPLICABLE TO SOME MODEL...
... Status Display RESET Button Temperature Adjustment Button for Refrigerator C ompartment. Operation Starting When your refrigerator is first installed, allow it to stabilize at normal operating temperatures for 2-3 hours prior to filling it with fresh or frozen foods. Adjusting The Temperatures and Functions ICEBEAM COOLING CUBE 5 WATER 4 OFF CRUSH 3 2 1 FILTER MONTH FILTER RESET HOLD 3 SECS ROOM TEMP 3 SECS DISPENSER & KEY EXPRESS/JET FRZ DISPENSER FREEZER REFRIGERATOR FILTER/LIGHT LOCK Express/Jet Freezing Button Dispenser Selection Button. JET FRZ : APPLICABLE TO SOME MODEL...

User Guide
Page 15
... This button stops operation of water supplied to the ice maker needs to ON. Contact the service center. ❈ If ice is produced when ice made drops into the ice storage bin. Take the ice storage bin out and discard all the ice then dry it and place it may vary by circumstance, including ambient temperature, door opening, freezer load. If you don't want to use automatic ice-maker again, change the switch to adjusted. NOTE...
... This button stops operation of water supplied to the ice maker needs to ON. Contact the service center. ❈ If ice is produced when ice made drops into the ice storage bin. Take the ice storage bin out and discard all the ice then dry it and place it may vary by circumstance, including ambient temperature, door opening, freezer load. If you don't want to use automatic ice-maker again, change the switch to adjusted. NOTE...
User Guide
Page 16
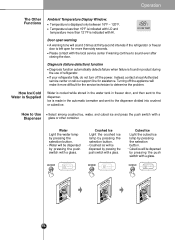
... door. How Ice/Cold Water is Supplied Water is left open warning A warning tone will be dispensed by pressing the push switch with a glass. How to Use Dispenser Select among crushed ice, water, and cubed ice and press the push switch with the local service center if warning continue to determine the problem. Please contact with a glass or other container. Turning off the power. Cubed Ice Light the cubed ice lamp by pressing the selection button...
... door. How Ice/Cold Water is Supplied Water is left open warning A warning tone will be dispensed by pressing the push switch with a glass. How to Use Dispenser Select among crushed ice, water, and cubed ice and press the push switch with the local service center if warning continue to determine the problem. Please contact with a glass or other container. Turning off the power. Cubed Ice Light the cubed ice lamp by pressing the selection button...

User Guide
Page 17
... is dropped into the ice storage bin. If you want to use the icemaker, turn the icemaker switch to be some left over water or ice to OFF. After the machine is powered again, crushed ice will be heard 5 seconds after releasing your glass near the ice outlet otherwise ice is full. If dispenser light continuously turns on and off automatically by circumstance, including ambient temperature, door openings, freezer load. This quantity...
... is dropped into the ice storage bin. If you want to use the icemaker, turn the icemaker switch to be some left over water or ice to OFF. After the machine is powered again, crushed ice will be heard 5 seconds after releasing your glass near the ice outlet otherwise ice is full. If dispenser light continuously turns on and off automatically by circumstance, including ambient temperature, door openings, freezer load. This quantity...

User Guide
Page 18
... replace the filter, press and hold the lock button more than 3seconds. Cautions Throw away the ice (about 20 pieces) and water (about 28,000 seconds of using water filter. Children may hinder ice from when the refrigerator power usage is used for the water filter cartridge on Water filter needs replacement once six months or about 7 glasses) first made after refrigerator installation. Never remove the ice maker cover. A glass too close to misread the bin level and stop producing ice...
... replace the filter, press and hold the lock button more than 3seconds. Cautions Throw away the ice (about 20 pieces) and water (about 28,000 seconds of using water filter. Children may hinder ice from when the refrigerator power usage is used for the water filter cartridge on Water filter needs replacement once six months or about 7 glasses) first made after refrigerator installation. Never remove the ice maker cover. A glass too close to misread the bin level and stop producing ice...
User Guide
Page 24
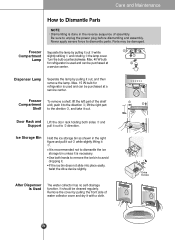
... power plug before dismantling and assembly. Parts may be cleaned regularly. If the ice bin does not slide into place easily, twist the drive device slightly. Turn the bulb counterclockwise. EXPRESS/JET FRZ DISPENSER FREEZER REFRIGERATER FILTER/LIGHT LOCK 1 2 Door Rack and Lift the door rack holding both hands to remove the ice bin to avoid dropping it . After Dispenser Is Used The water collector has no self-drainage function. Freezer Compartment Shelf...
... power plug before dismantling and assembly. Parts may be cleaned regularly. If the ice bin does not slide into place easily, twist the drive device slightly. Turn the bulb counterclockwise. EXPRESS/JET FRZ DISPENSER FREEZER REFRIGERATER FILTER/LIGHT LOCK 1 2 Door Rack and Lift the door rack holding both hands to remove the ice bin to avoid dropping it . After Dispenser Is Used The water collector has no self-drainage function. Freezer Compartment Shelf...
User Guide
Page 25
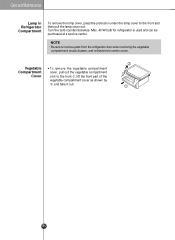
Max. 40 W bulb for refrigerator is used and can be purchased at a service center. Turn the bulb counterclockwise. Care and Maintenance Lamp in Refrigerator Compartment To remove the lamp cover, press the protrusion under the lamp cover to remove parts from the refrigerator door when removing the vegetable compartment, snack drawer, and refreshment center cover. NOTE • Be sure to the front and then pull the lamp cover out. Vegetable...
Max. 40 W bulb for refrigerator is used and can be purchased at a service center. Turn the bulb counterclockwise. Care and Maintenance Lamp in Refrigerator Compartment To remove the lamp cover, press the protrusion under the lamp cover to remove parts from the refrigerator door when removing the vegetable compartment, snack drawer, and refreshment center cover. NOTE • Be sure to the front and then pull the lamp cover out. Vegetable...
User Guide
Page 26
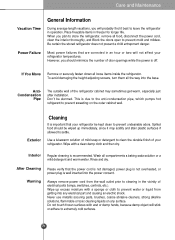
... Vacation Time General Information During average length vacations, you will probably find it may sometimes get warm, especially just after installation. However, you plan to store the refrigerator, remove all the way into the power consent. To avoid damaging the height adjusting screws, turn them all food, disconnect the power cord, clean the interior thoroughly, and Block the doors open to prevent undesirable odors. This...
... Vacation Time General Information During average length vacations, you will probably find it may sometimes get warm, especially just after installation. However, you plan to store the refrigerator, remove all the way into the power consent. To avoid damaging the height adjusting screws, turn them all food, disconnect the power cord, clean the interior thoroughly, and Block the doors open to prevent undesirable odors. This...
User Guide
Page 27
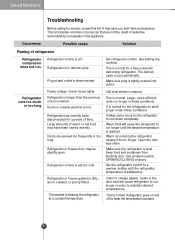
... desired temperatures. Warm air entering the refrigerator causes it to a warmer setting until the desired temperature is normal. Make sure the refrigerator is in this list. Refrigerator is level. Plug at a constant temperature. The defrost cycle occurs periodically. It is disconnected. It takes some hours for service, review this appliance. Open the door less often. Doors are not the result of refrigerator Refrigerator compressor does not run longer. See setting the controls. Power outage. Refrigerator is set too cold. Refrigerator control...
... desired temperatures. Warm air entering the refrigerator causes it to a warmer setting until the desired temperature is normal. Make sure the refrigerator is in this list. Refrigerator is level. Plug at a constant temperature. The defrost cycle occurs periodically. It is disconnected. It takes some hours for service, review this appliance. Open the door less often. Doors are not the result of refrigerator Refrigerator compressor does not run longer. See setting the controls. Power outage. Refrigerator is set too cold. Refrigerator control...

User Guide
Page 31
... cold water line which supplies water to infrequent use, temperature fluctuations and/or power outrages. Dispenser will not dispense ice. Draw and discard 7 glasses of the bin. Sound of water This sound is normally made when ice maker is supplied with the dispenser. Please have been used with water after dropping supply the automatically made by the ice maker should operate. Use the dispenser often so that are closed . Household water line valve is jammed. Refrigerator or freezer door is not making any ice. Remove...
... cold water line which supplies water to infrequent use, temperature fluctuations and/or power outrages. Dispenser will not dispense ice. Draw and discard 7 glasses of the bin. Sound of water This sound is normally made when ice maker is supplied with the dispenser. Please have been used with water after dropping supply the automatically made by the ice maker should operate. Use the dispenser often so that are closed . Household water line valve is jammed. Refrigerator or freezer door is not making any ice. Remove...


