User Guide
Page 2
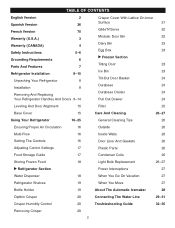
...Version 70 Warranty (U.S.A.) 3 Warranty (CANADA) 4 Safety Instructions 5-6 Grounding Requirements 6 Parts And Features 7 Refrigerator Installation 8-15 Unpacking Your Refrigerator 8 Installation 8 Removing And Replacing Your Refrigerator Handles And Doors 9-14 Crisper Cover With Lattice On Inner Surface 21 Glide'N'Serve 22 Modular Door Bin... 24 Leveling And Door Alignment 15 Filter 25 Base Cover 15 Care And Cleaning 26-27 Using Your Refrigerator 16-25 General Cleaning Tips 26 Ensuring Proper Air Circulation 16 Outside 26 Multi-Flow 16 Inside Walls ...
...Version 70 Warranty (U.S.A.) 3 Warranty (CANADA) 4 Safety Instructions 5-6 Grounding Requirements 6 Parts And Features 7 Refrigerator Installation 8-15 Unpacking Your Refrigerator 8 Installation 8 Removing And Replacing Your Refrigerator Handles And Doors 9-14 Crisper Cover With Lattice On Inner Surface 21 Glide'N'Serve 22 Modular Door Bin... 24 Leveling And Door Alignment 15 Filter 25 Base Cover 15 Care And Cleaning 26-27 Using Your Refrigerator 16-25 General Cleaning Tips 26 Ensuring Proper Air Circulation 16 Outside 26 Multi-Flow 16 Inside Walls ...
User Guide
Page 3
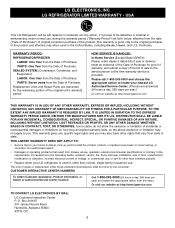
... defective in the United States, including Alaska, Hawaii, and U.S. O. LG ELECTRONICS, INC. USA Your LG Refrigerator will be will repaired or replaced, at : http://www.lgservice.com TO CONTACT LG ELECTRONICS BY MAIL: LG Customer Interactive Center P. PARTS: One Year from the Date of sale ... Damages or operating problems that vary from misuse, abuse, operation outside environmental specifications or contrary to be borne by the consumer. LG REFRIGERATOR LIMITED WARRANTY - TO THE EXTENT ANY IMPLIED WARRANTY IS REQUIRED BY LAW, IT IS LIMITED IN DURATION TO THE EXPRESS WARRANTY ...
... defective in the United States, including Alaska, Hawaii, and U.S. O. LG ELECTRONICS, INC. USA Your LG Refrigerator will be will repaired or replaced, at : http://www.lgservice.com TO CONTACT LG ELECTRONICS BY MAIL: LG Customer Interactive Center P. PARTS: One Year from the Date of sale ... Damages or operating problems that vary from misuse, abuse, operation outside environmental specifications or contrary to be borne by the consumer. LG REFRIGERATOR LIMITED WARRANTY - TO THE EXTENT ANY IMPLIED WARRANTY IS REQUIRED BY LAW, IT IS LIMITED IN DURATION TO THE EXPRESS WARRANTY ...
User Guide
Page 4
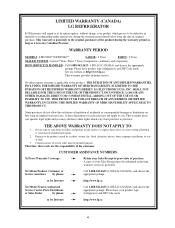
.../ 5 Years (Compressor, condenser, and evaporator) HOW SERVICE IS HANDLED : Call 1-888-542-2623 (1-888-LG-CANADA) and choose the appropriate prompt. LIMITED WARRANTY (CANADA) LG REFRIGERATOR LG Electronics will repair or at its option replace, without charge, your product which vary from the date of unauthorized...INCLUDING THE IMPLIED WARRANTY OF MERCHANTABILITY APPLICABLE TO THIS PRODUCT. so these costs are the responsibility of your product type (refrigerator) and ZIP Code ready. CUSTOMER ASSISTANCE NUMBERS: To Prove Warranty Coverage: Retain your home to this product. A...
.../ 5 Years (Compressor, condenser, and evaporator) HOW SERVICE IS HANDLED : Call 1-888-542-2623 (1-888-LG-CANADA) and choose the appropriate prompt. LIMITED WARRANTY (CANADA) LG REFRIGERATOR LG Electronics will repair or at its option replace, without charge, your product which vary from the date of unauthorized...INCLUDING THE IMPLIED WARRANTY OF MERCHANTABILITY APPLICABLE TO THIS PRODUCT. so these costs are the responsibility of your product type (refrigerator) and ZIP Code ready. CUSTOMER ASSISTANCE NUMBERS: To Prove Warranty Coverage: Retain your home to this product. A...
User Guide
Page 5
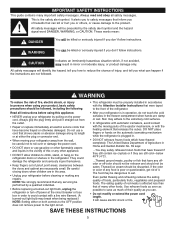
... the heating element that any servicing be performed by a qualified individual. • Before replacing a burned-out light bulb, unplug the refrigerator or turn off -color should not be refrozen and should not be properly installed in accordance with the Attention Installer Instructions that were taped...or off power at either or both controls to the OFF position does not remove power to the extremely cold surfaces. • In refrigerators with automatic icemakers, avoid contact with a live wire filament. (A burned-out light bulb may safely refreeze frozen foods that inform you don...
... the heating element that any servicing be performed by a qualified individual. • Before replacing a burned-out light bulb, unplug the refrigerator or turn off -color should not be refrozen and should not be properly installed in accordance with the Attention Installer Instructions that were taped...or off power at either or both controls to the OFF position does not remove power to the extremely cold surfaces. • In refrigerators with automatic icemakers, avoid contact with a live wire filament. (A burned-out light bulb may safely refreeze frozen foods that inform you don...
User Guide
Page 6
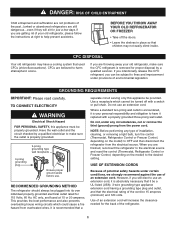
... to have a cooling system that the electrical rating of your personal responsibility and obligation to fines and imprisonment under provisions of the refrigerator. 6 Where a standard two-prong wall outlet is encountered, it be 15 amperes (minimum) and 120 volts. Use a receptacle... electrical outlet rated for the back of environmental legislation. TO CONNECT ELECTRICITY WARNING Electrical Shock Hazard FOR PERSONAL SAFETY, this CFC refrigerant, you are getting rid of the cord be a UL-listed (USA), 3-wire grounding type appliance extension cord having a ...
... to have a cooling system that the electrical rating of your personal responsibility and obligation to fines and imprisonment under provisions of the refrigerator. 6 Where a standard two-prong wall outlet is encountered, it be 15 amperes (minimum) and 120 volts. Use a receptacle... electrical outlet rated for the back of environmental legislation. TO CONNECT ELECTRICITY WARNING Electrical Shock Hazard FOR PERSONAL SAFETY, this CFC refrigerant, you are getting rid of the cord be a UL-listed (USA), 3-wire grounding type appliance extension cord having a ...
User Guide
Page 7
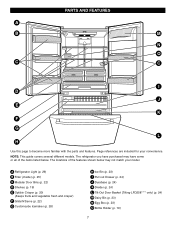
... have some or all of the features shown below . NOTE: This guide covers several different models. A Refrigerator Light (p. 26) B Filter (Inside) (p. 25) C Modular Door Bins (p. 22) D Shelves (p. 19) E Optibin Crisper (p. 20) (Keeps fruits and vegetable fresh and crisper) F Glide'N'Serve (p. 22) G Customcube ...
... have some or all of the features shown below . NOTE: This guide covers several different models. A Refrigerator Light (p. 26) B Filter (Inside) (p. 25) C Modular Door Bins (p. 22) D Shelves (p. 19) E Optibin Crisper (p. 20) (Keeps fruits and vegetable fresh and crisper) F Glide'N'Serve (p. 22) G Customcube ...
User Guide
Page 8
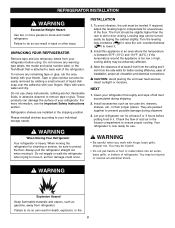
..., see the Important Safety Instructions section. Do not use . Check the flow of cold air in door closing. INSTALLATION 1. Your refrigerator is attached to aid in the freezer compartment to do so can damage the surface of the floor. Failure to ensure proper cooling.... legs to do so can also be leveled. Install this appliance in death, explosion, or fire. 8 Failure to compensate for unevenness of your refrigerator thoroughly and wipe off all dust accumulated during shipment. 3. Turn the leveling legs clockwise ( ) to raise the unit, counterclockwise ( ) to ...
..., see the Important Safety Instructions section. Do not use . Check the flow of cold air in door closing. INSTALLATION 1. Your refrigerator is attached to aid in the freezer compartment to do so can damage the surface of the floor. Failure to ensure proper cooling.... legs to do so can also be leveled. Install this appliance in death, explosion, or fire. 8 Failure to compensate for unevenness of your refrigerator thoroughly and wipe off all dust accumulated during shipment. 3. Turn the leveling legs clockwise ( ) to raise the unit, counterclockwise ( ) to ...
User Guide
Page 9
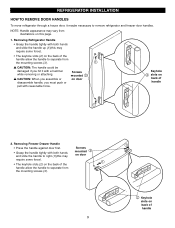
...right (1)(this page. 1. NOTE: Handle appearance may require some force). • The keyhole slots (2) on the back of handle Removing Refrigerator Handle • Grasp the handle tightly with both hands and slide the handle to separate from the mounting screws (3). Screws mounted on ...door Keyhole slots on back of the handle allow the handle to remove refrigerator and freezer door handles. REFRIGERATOR INSTALLATION HOW TO REMOVE DOOR HANDLES To move refrigerator through a house door, it with a hammer while removing or attaching.
...right (1)(this page. 1. NOTE: Handle appearance may require some force). • The keyhole slots (2) on the back of handle Removing Refrigerator Handle • Grasp the handle tightly with both hands and slide the handle to separate from the mounting screws (3). Screws mounted on ...door Keyhole slots on back of the handle allow the handle to remove refrigerator and freezer door handles. REFRIGERATOR INSTALLATION HOW TO REMOVE DOOR HANDLES To move refrigerator through a house door, it with a hammer while removing or attaching.
User Guide
Page 10
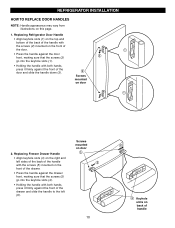
Replacing Refrigerator Door Handle • Align keyhole slots (1) on the top and bottom of the back of the handle with the screws (2) mounted on the front of ... the right and left sides of the back of the handle with the screws (5) mounted on back of the door and slide the handle down (3). REFRIGERATOR INSTALLATION HOW TO REPLACE DOOR HANDLES NOTE: Handle appearance may vary from illustrations on door 2.
Replacing Refrigerator Door Handle • Align keyhole slots (1) on the top and bottom of the back of the handle with the screws (2) mounted on the front of ... the right and left sides of the back of the handle with the screws (5) mounted on back of the door and slide the handle down (3). REFRIGERATOR INSTALLATION HOW TO REPLACE DOOR HANDLES NOTE: Handle appearance may vary from illustrations on door 2.
User Guide
Page 11
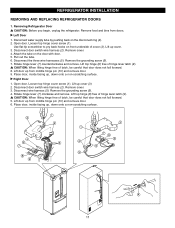
... hinge lever (7) counterclockwise and remove. Disconnect door switch wire harness (2). Rotate hinge lever (7) clockwise and remove. Lift door up cover. 3. REFRIGERATOR INSTALLATION REMOVING AND REPLACING REFRIGERATOR DOORS 1. Open door. Lift up from middle hinge pin (10) and remove door. 6. Disconnect door switch wire harness (2). Pull out the tube. 6. Place door, inside ...
... hinge lever (7) counterclockwise and remove. Disconnect door switch wire harness (2). Rotate hinge lever (7) clockwise and remove. Lift door up cover. 3. REFRIGERATOR INSTALLATION REMOVING AND REPLACING REFRIGERATOR DOORS 1. Open door. Lift up from middle hinge pin (10) and remove door. 6. Disconnect door switch wire harness (2). Pull out the tube. 6. Place door, inside ...
User Guide
Page 12
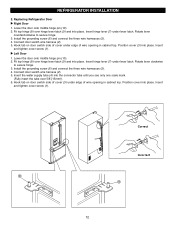
... door switch wire harness (2). 5. Insert and tighten cover screw (1). Position cover into place. Replacing Refrigerator Door u Right Door 1. Fit top hinge (8) over hinge lever latch (9) and into place. Insert hinge lever (7) under lever latch. Hook tab on door switch side ...
... door switch wire harness (2). 5. Insert and tighten cover screw (1). Position cover into place. Replacing Refrigerator Door u Right Door 1. Fit top hinge (8) over hinge lever latch (9) and into place. Insert hinge lever (7) under lever latch. Hook tab on door switch side ...
User Guide
Page 13
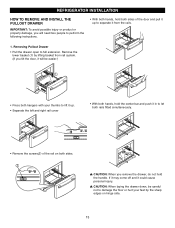
... easier.) • Press both hangers with your feet by lifting basket from the rails. 1. If it may come off and it could cause personal injury. REFRIGERATOR INSTALLATION HOW TO REMOVE AND INSTALL THE PULLOUT DRAWER IMPORTANT: To avoid possible injury or product or property damage, you remove the drawer, do not...
... easier.) • Press both hangers with your feet by lifting basket from the rails. 1. If it may come off and it could cause personal injury. REFRIGERATOR INSTALLATION HOW TO REMOVE AND INSTALL THE PULLOUT DRAWER IMPORTANT: To avoid possible injury or product or property damage, you remove the drawer, do not...
User Guide
Page 14
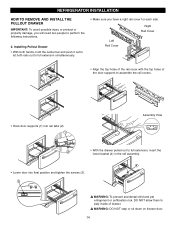
... perform the following instructions. 2. Right Rail Cover Left Rail Cover • Align the top holes of the rail cover with the top holes of drawer. REFRIGERATOR INSTALLATION HOW TO REMOVE AND INSTALL THE PULLOUT DRAWER IMPORTANT: To avoid possible injury or product or property damage, you have a right rail cover for...
... perform the following instructions. 2. Right Rail Cover Left Rail Cover • Align the top holes of the rail cover with the top holes of drawer. REFRIGERATOR INSTALLATION HOW TO REMOVE AND INSTALL THE PULLOUT DRAWER IMPORTANT: To avoid possible injury or product or property damage, you have a right rail cover for...
User Guide
Page 15
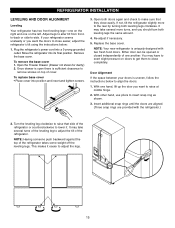
...Drawer. (Drawer not shown for clarity.) 2. Open both leveling legs the same amount. 4. Either door can be opened or closed independently of the refrigerator. With other hand, use pliers to lower it easier to raise at middle hinge. 2. It may have to exert slight pressure on doors to... get them to align the doors: 1. This makes it . If your doors is sufficient clearance to -side. NOTE: Your new refrigerator is uniquely designed with the refrigerator.) 2. Remove the base cover. Re-adjust if necessary. 5. With one hand, lift up the door you should turn both doors ...
...Drawer. (Drawer not shown for clarity.) 2. Open both leveling legs the same amount. 4. Either door can be opened or closed independently of the refrigerator. With other hand, use pliers to lower it easier to raise at middle hinge. 2. It may have to exert slight pressure on doors to... get them to align the doors: 1. This makes it . If your doors is sufficient clearance to -side. NOTE: Your new refrigerator is uniquely designed with the refrigerator.) 2. Remove the base cover. Re-adjust if necessary. 5. With one hand, lift up the door you should turn both doors ...
User Guide
Page 16
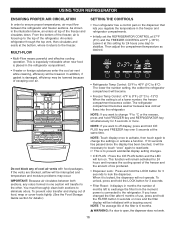
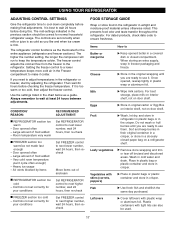
...If you want to change the settings or activate a function. Leave it returns to the freezer. Do not block any odors formed in the refrigerator compartment. • If water or foreign substances enter the cool air vent while cleaning, efficiency will be necessary to touch "once" again to...reverse, press and hold ICE PLUS key and FREEZER key over 5 seconds at a lower number, the freezer compartment becomes colder. You must flow between the refrigerator and freezer sections. NOTE: The average life of the freezer, air is at the same time. w WARNING: If a door is 6 months. NOTE...
...If you want to change the settings or activate a function. Leave it returns to the freezer. Do not block any odors formed in the refrigerator compartment. • If water or foreign substances enter the cool air vent while cleaning, efficiency will be necessary to touch "once" again to...reverse, press and hold ICE PLUS key and FREEZER key over 5 seconds at a lower number, the freezer compartment becomes colder. You must flow between the refrigerator and freezer sections. NOTE: The average life of the freezer, air is at the same time. w WARNING: If a door is 6 months. NOTE...
User Guide
Page 17
...wait 24 hours, then re-check FREEZER section too cold - Door opened often - Controls not set correctly for your conditions Set REFRIGERATOR control to keep berries in their original container in a crisper, or store in airtight and moisture-proof material unless otherwise noted....24 hours before doing this. Large amount of food added - Very cold room temperature (can also be correct for the entire appliance (refrigerator and freezer sections). Eggs u Store in crisper. Leafy vegetables u Remove store wrapping and trim or tear off bruised and discolored areas....
...wait 24 hours, then re-check FREEZER section too cold - Door opened often - Controls not set correctly for your conditions Set REFRIGERATOR control to keep berries in their original container in a crisper, or store in airtight and moisture-proof material unless otherwise noted....24 hours before doing this. Large amount of food added - Very cold room temperature (can also be correct for the entire appliance (refrigerator and freezer sections). Eggs u Store in crisper. Leafy vegetables u Remove store wrapping and trim or tear off bruised and discolored areas....
User Guide
Page 18
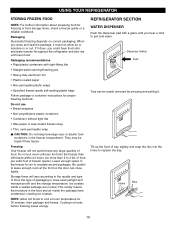
.... Do not put more than 2 to circulate around packages. Ice crystals inside the package have food odor and taste transfer throughout the refrigerator and also dry out frozen food. Cooling hot foods before freezing saves energy. Do not use • Bread wrappers • Non-... foot of food. Packaging Successful freezing depends on correct packaging. Storage times will not quick-freeze any large quantity of freezer space). REFRIGERATOR SECTION WATER DISPENSER Push the dispenser pad with tight-fitting lids • Straight-sided canning/freezing jars • Heavy-duty aluminum foil...
.... Do not put more than 2 to circulate around packages. Ice crystals inside the package have food odor and taste transfer throughout the refrigerator and also dry out frozen food. Cooling hot foods before freezing saves energy. Do not use • Bread wrappers • Non-... foot of food. Packaging Successful freezing depends on correct packaging. Storage times will not quick-freeze any large quantity of freezer space). REFRIGERATOR SECTION WATER DISPENSER Push the dispenser pad with tight-fitting lids • Straight-sided canning/freezing jars • Heavy-duty aluminum foil...
User Guide
Page 19
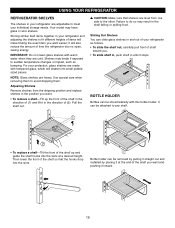
...laterally with tempered glass, which will shatter into small pebblesized pieces. BOTTLE HOLDER Bottles can slide glass shelves in and out of your refrigerator as bumping. it will make finding the exact item you want and pushing it stops. For your individual storage needs. Use special... hooks into the slots. Storing similar food items together in until it inward. 19 It can be attached to the other. USING YOUR REFRIGERATOR REFRIGERATOR SHELVES The shelves in the direction of (2). NOTE: Glass shelves are cold. Adjusting Shelves Remove shelves from one side to any shelf. ...
...laterally with tempered glass, which will shatter into small pebblesized pieces. BOTTLE HOLDER Bottles can slide glass shelves in and out of your refrigerator as bumping. it will make finding the exact item you want and pushing it stops. For your individual storage needs. Use special... hooks into the slots. Storing similar food items together in until it inward. 19 It can be attached to the other. USING YOUR REFRIGERATOR REFRIGERATOR SHELVES The shelves in the direction of (2). NOTE: Glass shelves are cold. Adjusting Shelves Remove shelves from one side to any shelf. ...
User Guide
Page 20
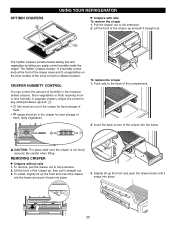
... extension. 2. w CAUTION: The glass shelf over the crisper is not firmly secured. Lift the front of humidity in the moisturesealed crispers. OPTIBIN CRISPERS 2 USING YOUR REFRIGERATOR u Crispers with rails To remove the crisper 1.
... extension. 2. w CAUTION: The glass shelf over the crisper is not firmly secured. Lift the front of humidity in the moisturesealed crispers. OPTIBIN CRISPERS 2 USING YOUR REFRIGERATOR u Crispers with rails To remove the crisper 1.
User Guide
Page 21
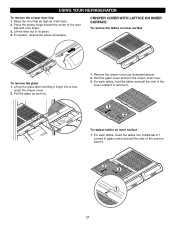
... glass 1. Raise the door flap as high as illustrated above procedure. For each lattice, insert the lattice into a hole under the crisper cover. 2. USING YOUR REFRIGERATOR To remove the crisper door flap 1. For each lattice, hold the lattice and pull the side of the cover to remove it . 2 3 1 21 CRISPER COVER...
... glass 1. Raise the door flap as high as illustrated above procedure. For each lattice, insert the lattice into a hole under the crisper cover. 2. USING YOUR REFRIGERATOR To remove the crisper door flap 1. For each lattice, hold the lattice and pull the side of the cover to remove it . 2 3 1 21 CRISPER COVER...


