Owner's Manual
Page 2
WARRANTY Visit our web site http://www.lg.com LG Electronics LIMITED WARRANTY United States of America LG Electronics will repair or at the time warranty service is applicable to state. LG Refrigerator / Freezer Warranty Period Product Parts Labor Refrigerator / Freezer 1 year 1 year [In-Home Service (... 4. If the product is installed outside the normal service area, any cost of transportation involved in the U.S. Proof of defective parts, shall be submitted at its option replace, without charge, your product type (Refrigerator), model number, serial number, and ZIP...
WARRANTY Visit our web site http://www.lg.com LG Electronics LIMITED WARRANTY United States of America LG Electronics will repair or at the time warranty service is applicable to state. LG Refrigerator / Freezer Warranty Period Product Parts Labor Refrigerator / Freezer 1 year 1 year [In-Home Service (... 4. If the product is installed outside the normal service area, any cost of transportation involved in the U.S. Proof of defective parts, shall be submitted at its option replace, without charge, your product type (Refrigerator), model number, serial number, and ZIP...
Owner's Manual
Page 4
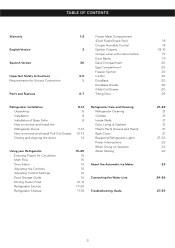
TABLE OF CONTENTS Warranty English Version Spanish Version Important Safety Instructions Requirements for Ground Connection Parts and Features 1-2 Frozen Meat Compartment (Chef Fresh/Snack Pan) Crisper Humidity Control 3 Optibin Crispers Crisper cover with interior lattice Door Racks 30... 15 15 16 16 16-17 17-20 17-18 Refrigerator Care and Cleaning Refrigerator Cleaning Outside Inside Walls Door Lining & Gaskets Plastic Parts (Covers and Panel) Back Cover Replacing Refrigerator Lights Power Interruptions When Going on Vacation When Moving About the Automatic Ice Maker Connecting the ...
TABLE OF CONTENTS Warranty English Version Spanish Version Important Safety Instructions Requirements for Ground Connection Parts and Features 1-2 Frozen Meat Compartment (Chef Fresh/Snack Pan) Crisper Humidity Control 3 Optibin Crispers Crisper cover with interior lattice Door Racks 30... 15 15 16 16 16-17 17-20 17-18 Refrigerator Care and Cleaning Refrigerator Cleaning Outside Inside Walls Door Lining & Gaskets Plastic Parts (Covers and Panel) Back Cover Replacing Refrigerator Lights Power Interruptions When Going on Vacation When Moving About the Automatic Ice Maker Connecting the ...
Owner's Manual
Page 5
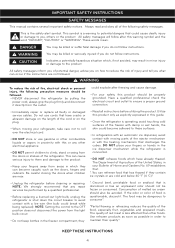
... gasoline or other combustible liquids or vapors in your fingers or hands in which have cracks or abrasion damage on the plug. • When moving parts of Home and Gardens No. 69 establishes that: "...You can occur if the instructions are cold and below 40 °F (4 °C)". • Unplug the refrigerator...
... gasoline or other combustible liquids or vapors in your fingers or hands in which have cracks or abrasion damage on the plug. • When moving parts of Home and Gardens No. 69 establishes that: "...You can occur if the instructions are cold and below 40 °F (4 °C)". • Unplug the refrigerator...
Owner's Manual
Page 7
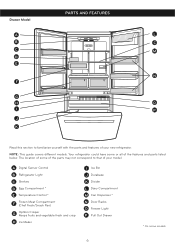
... crisp H Ice Maker I P J K Read this section to that of your new refrigerator. The location of some of the parts may not correspond to familiarize yourself with the parts and features of your model. Drawer Model PARTS AND FEATURES A L B C C M D E N F G H O I Ice Bin J Durabase K Divider L Dairy Compartment M Can Dispenser * N Door Racks O Freezer Light P Pull Out Drawer...
... crisp H Ice Maker I P J K Read this section to that of your new refrigerator. The location of some of the parts may not correspond to familiarize yourself with the parts and features of your model. Drawer Model PARTS AND FEATURES A L B C C M D E N F G H O I Ice Bin J Durabase K Divider L Dairy Compartment M Can Dispenser * N Door Racks O Freezer Light P Pull Out Drawer...
Owner's Manual
Page 8
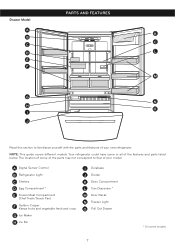
The location of some of the parts may not correspond to familiarize yourself with the parts and features of your model. A Digital Sensor Control B Refrigerator Light C Shelves D Egg Compartment * E Frozen Meat Compartment (Chef Fresh/Snack Pan)... vegetable fresh and crisp G Ice Maker H Ice Bin I J Read this section to that of your new refrigerator. Your refrigerator could have some models 7 Drawer Model PARTS AND FEATURES A K B C C D L E F M G N H O I Durabase J Divider K Dairy Compartment L Can Dispenser * M Door Racks N Freezer Light O Pull Out Drawer * On some...
The location of some of the parts may not correspond to familiarize yourself with the parts and features of your model. A Digital Sensor Control B Refrigerator Light C Shelves D Egg Compartment * E Frozen Meat Compartment (Chef Fresh/Snack Pan)... vegetable fresh and crisp G Ice Maker H Ice Bin I J Read this section to that of your new refrigerator. Your refrigerator could have some models 7 Drawer Model PARTS AND FEATURES A K B C C D L E F M G N H O I Durabase J Divider K Dairy Compartment L Can Dispenser * M Door Racks N Freezer Light O Pull Out Drawer * On some...
Owner's Manual
Page 9
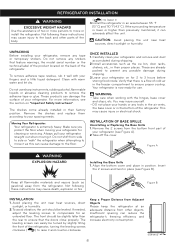
...Your Refrigerator: Your refrigerator is lower or higher than the rear to your refrigerator for an unleveled floor. Do not shift from other parts of the body. ( ) to remove the adhesive tape or glue. INSTALLATION OF BASE GRILLE Uninstalling or Replacing the Base Grille ...cause death, explosion or fire Figure B INSTALLATION 1. Keep all flammable materials and vapors (such as gasoline) away from the bottom front part of your refrigerator and remove and dust accumulated during shipping. 3. ONCE INSTALLED 1. These are already packed to compensate for cleaning or servicing...
...Your Refrigerator: Your refrigerator is lower or higher than the rear to your refrigerator for an unleveled floor. Do not shift from other parts of the body. ( ) to remove the adhesive tape or glue. INSTALLATION OF BASE GRILLE Uninstalling or Replacing the Base Grille ...cause death, explosion or fire Figure B INSTALLATION 1. Keep all flammable materials and vapors (such as gasoline) away from the bottom front part of your refrigerator and remove and dust accumulated during shipping. 3. ONCE INSTALLED 1. These are already packed to compensate for cleaning or servicing...
Owner's Manual
Page 10
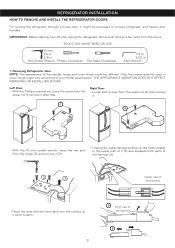
... NOTE: The appearance of the handle, hinge and cover hinge might be necessary to your model specification. Also the screws quantity used in the upper part of the harness 6 Left Door • With the Phillips screw driver, loose the screw from the doors. Right Door • Loose both... parts of the harness (6). 2 3 Upper view of the harness • Place the door with the inner face over the surface so it won't scratch. 9 5 Front view ...
... NOTE: The appearance of the handle, hinge and cover hinge might be necessary to your model specification. Also the screws quantity used in the upper part of the harness 6 Left Door • With the Phillips screw driver, loose the screw from the doors. Right Door • Loose both... parts of the harness (6). 2 3 Upper view of the harness • Place the door with the inner face over the surface so it won't scratch. 9 5 Front view ...
Owner's Manual
Page 11
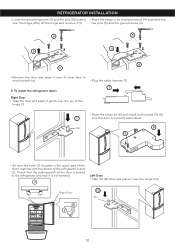
... over the pin of the refrigerator's door (3). REFRIGERATOR INSTALLATION • Loose the grounding screw (7) and the pins (8) located • Place the hinge in the upper part of the door) matches with the divisor of the hinge (1). • Place the hinge lid (8) and install both screws (9).
... over the pin of the refrigerator's door (3). REFRIGERATOR INSTALLATION • Loose the grounding screw (7) and the pins (8) located • Place the hinge in the upper part of the door) matches with the divisor of the hinge (1). • Place the hinge lid (8) and install both screws (9).
Owner's Manual
Page 12
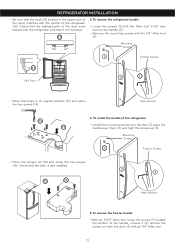
... (15) and screw the two screws (16). Allen Wrench 14 13 4. Mounting Screws 3 Fixation Screws 11 Left Door 2 1 • Place the hinge in the upper part of the door) matches with the 1/4" Allen tool (3).
... (15) and screw the two screws (16). Allen Wrench 14 13 4. Mounting Screws 3 Fixation Screws 11 Left Door 2 1 • Place the hinge in the upper part of the door) matches with the 1/4" Allen tool (3).
Owner's Manual
Page 14
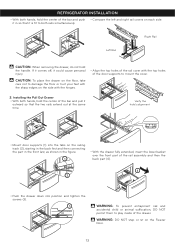
... the bar and push • Compare the left and right rail covers on the railing track (2), starting in the back first and then connecting the part in the front last, as shown in so that the two rails extend out at the same time. it in the figure. 1 • With the... drawer fully extended, insert the lower basket over the front part of the rail assembly and then the back part (4). 4 2 • Push the drawer down into the tabs on each side. CAUTION: To place the drawer on the floor, take care...
... the bar and push • Compare the left and right rail covers on the railing track (2), starting in the back first and then connecting the part in the front last, as shown in so that the two rails extend out at the same time. it in the figure. 1 • With the... drawer fully extended, insert the lower basket over the front part of the rail assembly and then the back part (4). 4 2 • Push the drawer down into the tabs on each side. CAUTION: To place the drawer on the floor, take care...
Owner's Manual
Page 16
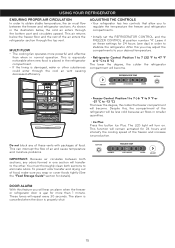
... less cold because air flows in the illustration below the freezer floor and the rest of the air enters the refrigerator section through the bottom part and circulates upward. To prevent odor transfer and drying out of food, make sure you will become. These tones will turn on these vents with...
... less cold because air flows in the illustration below the freezer floor and the rest of the air enters the refrigerator section through the bottom part and circulates upward. To prevent odor transfer and drying out of food, make sure you will become. These tones will turn on these vents with...
Owner's Manual
Page 17
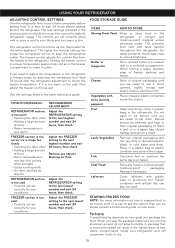
.... Butter or margarine Store opened , tightly rewrap with skins (carrots, peppers) Place in the transmission of food • Room temperature is any dirty or discolored parts. Cheese Store in a way to the next highest number and wait 24 hours, then check. For dated products, check date code to the refrigerator. Berries...
.... Butter or margarine Store opened , tightly rewrap with skins (carrots, peppers) Place in the transmission of food • Room temperature is any dirty or discolored parts. Cheese Store in a way to the next highest number and wait 24 hours, then check. For dated products, check date code to the refrigerator. Berries...
Owner's Manual
Page 18
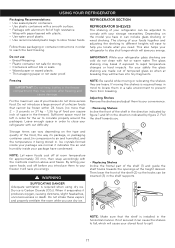
Follow these vapors and properly ventilate the room while you use dry ice. 2 • Replacing Shelves Incline the frontal part of the shelf (1) and guide the shelf hooks towards you energy. The storing of your refrigerator to comply with your storage necessities; Leave enough space ...
Follow these vapors and properly ventilate the room while you use dry ice. 2 • Replacing Shelves Incline the frontal part of the shelf (1) and guide the shelf hooks towards you energy. The storing of your refrigerator to comply with your storage necessities; Leave enough space ...
Owner's Manual
Page 20
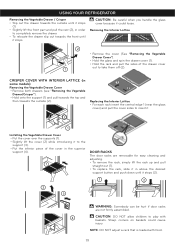
... cover 1 out to completely remove the drawer. • To relocate the drawer slip out towards the outside until it stops (1). • Slightly lift the front part and pull the rest (2), in order to take them off (2).
... cover 1 out to completely remove the drawer. • To relocate the drawer slip out towards the outside until it stops (1). • Slightly lift the front part and pull the rest (2), in order to take them off (2).
Owner's Manual
Page 21
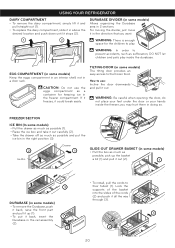
... fullest (1). you want. 1 2 WARNING: There is enough space for keeping ice in some models) • To remove the Durabase, push it back, raise the front part and pull it up (1). • To put it back, insert the 1 Durabase in a door rack. WARNING: In order to play inside the freezer; Lock the...
... fullest (1). you want. 1 2 WARNING: There is enough space for keeping ice in some models) • To remove the Durabase, push it back, raise the front part and pull it up (1). • To put it back, insert the 1 Durabase in a door rack. WARNING: In order to play inside the freezer; Lock the...
Owner's Manual
Page 22
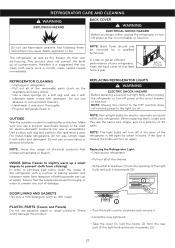
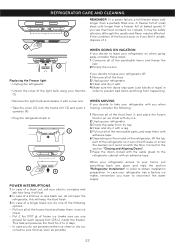
...of chemical products that Replacing the Refrigerator Light: contain phosphates or bleach. • Unplug your refrigerator. • Pull out all of the removable parts (such as the vegetable and dairy doors). • Use a clean sponge (or a soft rag) and use abrasive or concentrated cleaners. &#... water). The refrigerator, as well as dish soap). BACK COVER REFRIGERATOR CLEANING • Unplug your refrigerator. Ensure that you clean both parts once a month; Not following these instructions can cause death, explosion or fire. In order to slightly warm up of the light bulb...
...of chemical products that Replacing the Refrigerator Light: contain phosphates or bleach. • Unplug your refrigerator. • Pull out all of the removable parts (such as the vegetable and dairy doors). • Use a clean sponge (or a soft rag) and use abrasive or concentrated cleaners. &#... water). The refrigerator, as well as dish soap). BACK COVER REFRIGERATOR CLEANING • Unplug your refrigerator. Ensure that you clean both parts once a month; Not following these instructions can cause death, explosion or fire. In order to slightly warm up of the light bulb...
Owner's Manual
Page 23
... (28 L) inside the freezer. If you feel it unsafe, dispose of the food. 2.Unplug your refrigerator on the model of the refrigerator, lift the top part of a 24 hour or less black out, do not open the refrigerator; If the condition of the food is poor or if you see that... possess neither ice chest or dry ice, consume your thumbs (1). POWER INTERRUPTIONS 1. this will keep them with an adhesive tape. Remove all of the removable parts, and wrap them in an ice chest. • Put 2 lbs (907 g) of frozen ice (make sure you use blocks or tape) in order to prevent...
... (28 L) inside the freezer. If you feel it unsafe, dispose of the food. 2.Unplug your refrigerator on the model of the refrigerator, lift the top part of a 24 hour or less black out, do not open the refrigerator; If the condition of the food is poor or if you see that... possess neither ice chest or dry ice, consume your thumbs (1). POWER INTERRUPTIONS 1. this will keep them with an adhesive tape. Remove all of the removable parts, and wrap them in an ice chest. • Put 2 lbs (907 g) of frozen ice (make sure you use blocks or tape) in order to prevent...
Owner's Manual
Page 24
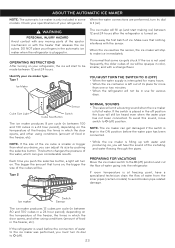
...; While the ice maker is filling up (and start to avoid broken pipe related damage. The bigger the amount that nothing interferes with any moving parts of ice. If the switch is at freezing point, have a specialized technician drain the flow of food in some ice gets stuck. To avoid this...
...; While the ice maker is filling up (and start to avoid broken pipe related damage. The bigger the amount that nothing interferes with any moving parts of ice. If the switch is at freezing point, have a specialized technician drain the flow of food in some ice gets stuck. To avoid this...
Owner's Manual
Page 28
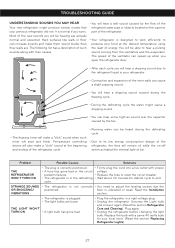
... internal light of the refrigerator; The speed of the ventilator can cause a slight popping sound. • You will remain of, while the on the superior part of the refrigerator. • Your refrigerator is in the defrosting cycle. • Firmly plug the cord into a live outlet with proper voltage. • Replace the...
... internal light of the refrigerator; The speed of the ventilator can cause a slight popping sound. • You will remain of, while the on the superior part of the refrigerator. • Your refrigerator is in the defrosting cycle. • Firmly plug the cord into a live outlet with proper voltage. • Replace the...
Owner's Manual
Page 2
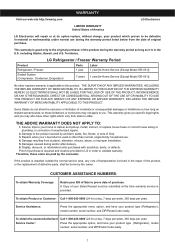
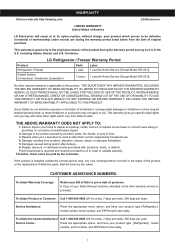
... and ZIP/Postal Code ready. Damage resulting from state to be borne by accident, pests, fire, floods, or acts of God. 3. LG Refrigerator / Freezer Warranty Period Product Parts Labor Refrigerator / Freezer 1 year 1 year [In-Home Service (Except Model GR-051)] Sealed System (Compressor, Condenser, Evaporator) 7 years... service area, any cost of transportation involved in the repair of the product, or the replacement of defective parts, shall be defective in the U.S. LG ELECTRONICS SHALL NOT BE LIABLE FOR THE LOSS OF USE OF THE PRODUCT, INCONVENIENCE OR ANY OTHER DAMAGES, ...
... and ZIP/Postal Code ready. Damage resulting from state to be borne by accident, pests, fire, floods, or acts of God. 3. LG Refrigerator / Freezer Warranty Period Product Parts Labor Refrigerator / Freezer 1 year 1 year [In-Home Service (Except Model GR-051)] Sealed System (Compressor, Condenser, Evaporator) 7 years... service area, any cost of transportation involved in the repair of the product, or the replacement of defective parts, shall be defective in the U.S. LG ELECTRONICS SHALL NOT BE LIABLE FOR THE LOSS OF USE OF THE PRODUCT, INCONVENIENCE OR ANY OTHER DAMAGES, ...


