Owner's Manual
Page 4
... to remove and Install the Refrigerator Doors How to remove and Install Pull-Out Drawer Closing and Aligning the doors 8-14 8 8 8 9-12 12-13 14 Using your Refrigerator Ensuring Proper Air Circulation Multi Flow Door Alarm Adjusting the Controls Adjusting Control Settings Food Storage Guide Storing Frozen Food Refrigerator Section Refrigerator Shelves 15-20 15 15 15 15 16 16 16-17 17-20 17-18 Refrigerator Care and Cleaning Refrigerator Cleaning Outside Inside Walls Door Lining & Gaskets Plastic Parts (Covers and Panel) Back Cover Replacing Refrigerator Lights Power...
... to remove and Install the Refrigerator Doors How to remove and Install Pull-Out Drawer Closing and Aligning the doors 8-14 8 8 8 9-12 12-13 14 Using your Refrigerator Ensuring Proper Air Circulation Multi Flow Door Alarm Adjusting the Controls Adjusting Control Settings Food Storage Guide Storing Frozen Food Refrigerator Section Refrigerator Shelves 15-20 15 15 15 15 16 16 16-17 17-20 17-18 Refrigerator Care and Cleaning Refrigerator Cleaning Outside Inside Walls Door Lining & Gaskets Plastic Parts (Covers and Panel) Back Cover Replacing Refrigerator Lights Power...
Owner's Manual
Page 6
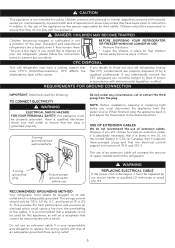
... a cooling system that the electrical current support a minimum of 15 A and 120 V. DANGER: CHILDREN MAY BECOME TRAPPED Children becoming trapped or suffocated is recommended that a separate circuit be disconnected with a switch. Discarded and abandoned refrigerators are properly disposed of extension cables. BEFORE DISPOSING YOUR REFRIGERATOR OR FREEZER WHEN NO LONGER IN USE: • Remove the doors. • Leave the shelves in...
... a cooling system that the electrical current support a minimum of 15 A and 120 V. DANGER: CHILDREN MAY BECOME TRAPPED Children becoming trapped or suffocated is recommended that a separate circuit be disconnected with a switch. Discarded and abandoned refrigerators are properly disposed of extension cables. BEFORE DISPOSING YOUR REFRIGERATOR OR FREEZER WHEN NO LONGER IN USE: • Remove the doors. • Leave the shelves in...
Owner's Manual
Page 7
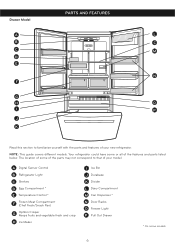
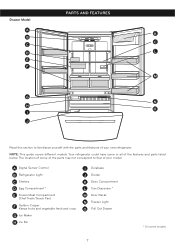
... your model. A Digital Sensor Control B Refrigerator Light C Shelves D Egg Compartment * E Temperature Control * F Frozen Meat Compartment (Chef Fresh/Snack Pan) G Optibin Crisper Keeps fruits and vegetable fresh and crisp H Ice Maker I P J K Read this section to that of your new refrigerator. Drawer Model PARTS AND FEATURES A L B C C M D E N F G H O I Ice Bin J Durabase K Divider L Dairy Compartment M Can Dispenser * N Door Racks O Freezer Light P Pull Out Drawer * On some or all of the features and parts listed below. Your refrigerator could have some models...
... your model. A Digital Sensor Control B Refrigerator Light C Shelves D Egg Compartment * E Temperature Control * F Frozen Meat Compartment (Chef Fresh/Snack Pan) G Optibin Crisper Keeps fruits and vegetable fresh and crisp H Ice Maker I P J K Read this section to that of your new refrigerator. Drawer Model PARTS AND FEATURES A L B C C M D E N F G H O I Ice Bin J Durabase K Divider L Dairy Compartment M Can Dispenser * N Door Racks O Freezer Light P Pull Out Drawer * On some or all of the features and parts listed below. Your refrigerator could have some models...
Owner's Manual
Page 8
...: This guide covers different models. Your refrigerator could have some or all of your new refrigerator. Drawer Model PARTS AND FEATURES A K B C C D L E F M G N H O I Durabase J Divider K Dairy Compartment L Can Dispenser * M Door Racks N Freezer Light O Pull Out Drawer * On some models 7 A Digital Sensor Control B Refrigerator Light C Shelves D Egg Compartment * E Frozen Meat Compartment (Chef Fresh/Snack Pan) F Optibin Crisper Keeps fruits and vegetable fresh and crisp G Ice Maker H Ice Bin I J Read this section to that of the features and parts listed below.
...: This guide covers different models. Your refrigerator could have some or all of your new refrigerator. Drawer Model PARTS AND FEATURES A K B C C D L E F M G N H O I Durabase J Divider K Dairy Compartment L Can Dispenser * M Door Racks N Freezer Light O Pull Out Drawer * On some models 7 A Digital Sensor Control B Refrigerator Light C Shelves D Egg Compartment * E Frozen Meat Compartment (Chef Fresh/Snack Pan) F Optibin Crisper Keeps fruits and vegetable fresh and crisp G Ice Maker H Ice Bin I J Read this section to that of the features and parts listed below.
Owner's Manual
Page 9
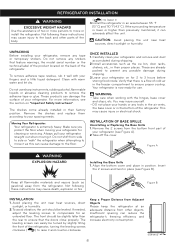
... doors close properly. REFRIGERATOR INSTALLATION WARNING EXCESSIVE WEIGHT HAZARD Use the assistance of the refrigerator. Not following these instructions may injure yourself. • DO not place your refrigerator. If the surrounding temperature is extremely heavy. Do not remove any possible damage during shipping. 2.Install accessories such as the ice bin, door racks, shelves, etc., in position. These products can reduce the refrigerator's freezing efficiency and increase electricity...
... doors close properly. REFRIGERATOR INSTALLATION WARNING EXCESSIVE WEIGHT HAZARD Use the assistance of the refrigerator. Not following these instructions may injure yourself. • DO not place your refrigerator. If the surrounding temperature is extremely heavy. Do not remove any possible damage during shipping. 2.Install accessories such as the ice bin, door racks, shelves, etc., in position. These products can reduce the refrigerator's freezing efficiency and increase electricity...
Owner's Manual
Page 10
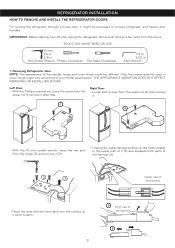
... upper lid (1) remove it after that. Removing Refrigerator Door NOTE: The appearance of the handle, hinge and cover hinge might vary according to remove refrigerator and freezer door handles. Left Door • With the Phillips screw driver, loose the screw from the doors. TOOLS YOU MIGHT NEED OR USE 10 mm 1/4 in 3/8 in Hex Socket Wrench Phillips Screwdriver Flat Head Screwdriver 1/4 in 3/32 in cover hinge might be necessary to your model specification.
... upper lid (1) remove it after that. Removing Refrigerator Door NOTE: The appearance of the handle, hinge and cover hinge might vary according to remove refrigerator and freezer door handles. Left Door • With the Phillips screw driver, loose the screw from the doors. TOOLS YOU MIGHT NEED OR USE 10 mm 1/4 in 3/8 in Hex Socket Wrench Phillips Screwdriver Flat Head Screwdriver 1/4 in 3/32 in cover hinge might be necessary to your model specification.
Owner's Manual
Page 22
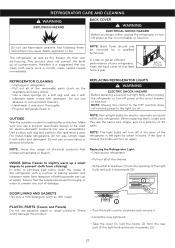
... lukewarm water (one teaspoon of baking powder per cup of the light bulb, and pull it with detergent. INSIDE (Allow freezer to slightly warm up of 40 watts. Make sure you use it upwards (3). 21 PLASTIC PARTS (Covers and Panels) Do not use concentrated or abrasive products. REFRIGERATOR CARE AND CLEANING WARNING EXPLOSION HAZARD BACK COVER WARNING ELECTRICAL SHOCK HAZARD Before you begin, either unplug the refrigerator or turn off power...
... lukewarm water (one teaspoon of baking powder per cup of the light bulb, and pull it with detergent. INSIDE (Allow freezer to slightly warm up of 40 watts. Make sure you use it upwards (3). 21 PLASTIC PARTS (Covers and Panels) Do not use concentrated or abrasive products. REFRIGERATOR CARE AND CLEANING WARNING EXPLOSION HAZARD BACK COVER WARNING ELECTRICAL SHOCK HAZARD Before you begin, either unplug the refrigerator or turn off power...
Owner's Manual
Page 24
... has not been connected. This button changes the pressure of the water, which the door opens, and other using conditions (amount of your ice maker type. If room temperature is at freezing point, have a specialized technician drain the flow of food in the freezer, etc). It's normal that turns on, the bigger the size of ice will turn its size by pushing the selective button. If the refrigerator is used frequently, the...
... has not been connected. This button changes the pressure of the water, which the door opens, and other using conditions (amount of your ice maker type. If room temperature is at freezing point, have a specialized technician drain the flow of food in the freezer, etc). It's normal that turns on, the bigger the size of ice will turn its size by pushing the selective button. If the refrigerator is used frequently, the...
Owner's Manual
Page 25
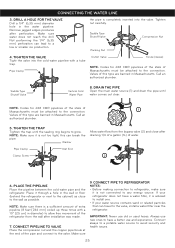
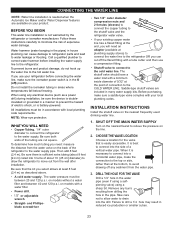
... the refrigerator valve. CLOSE THE MAIN WATER SOURCE Open the nearest water faucet to potable water supply only. 1. Air located inside of the refrigerator from the wall • A cold water source. CAUTION: Connect to let water flow and empty pipes. 2. CONNECTING THE WATER LINE NOTE: It is necessary to have a water opening with a pipe cutter and use the compression connections mentioned above. • Bypass valve to connect to the cold water line. Make sure there is being blocked. Follow instructions carefully...
... the refrigerator valve. CLOSE THE MAIN WATER SOURCE Open the nearest water faucet to potable water supply only. 1. Air located inside of the refrigerator from the wall • A cold water source. CAUTION: Connect to let water flow and empty pipes. 2. CONNECTING THE WATER LINE NOTE: It is necessary to have a water opening with a pipe cutter and use the compression connections mentioned above. • Bypass valve to connect to the cold water line. Make sure there is being blocked. Follow instructions carefully...
Owner's Manual
Page 26
... the valve, install a water filter near the refrigerator. TIGHTEN THE VALVE Tight the valve into the valve. Saddle Type Shutoff Valve Vertical Cold Water Pipe 8. NOTE: Make sure it through a hole in the wall or floor (behind the refrigerator or next to the connection. Place it is not too tight, this type are banned in Massachusetts. CONNECTING THE WATER LINE 3. Tighten nut carefully. Pipe Clamp Outlet Valve Ferule (sleeve) NOTE: Codes for...
... the valve, install a water filter near the refrigerator. TIGHTEN THE VALVE Tight the valve into the valve. Saddle Type Shutoff Valve Vertical Cold Water Pipe 8. NOTE: Make sure it through a hole in the wall or floor (behind the refrigerator or next to the connection. Place it is not too tight, this type are banned in Massachusetts. CONNECTING THE WATER LINE 3. Tighten nut carefully. Pipe Clamp Outlet Valve Ferule (sleeve) NOTE: Codes for...
Owner's Manual
Page 28
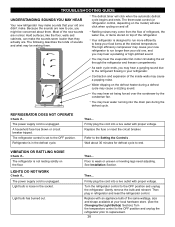
... the refrigerator before changing the light bulb. Unscrew the Light bulb and screw it again (Read the section Refrigerator Care and Cleaning). TROUBLESHOOTING GUIDE UNDERSTANDING SOUNDS YOU MAY HEAR Your new refrigerator might cause a dripping sound. • You can hear some tight air sound over the capacitor caused by the flow of the refrigerant, water pipe or objects located on -off switch activated the internal light of the refrigerator; Most of energy. Temperature controlling...
... the refrigerator before changing the light bulb. Unscrew the Light bulb and screw it again (Read the section Refrigerator Care and Cleaning). TROUBLESHOOTING GUIDE UNDERSTANDING SOUNDS YOU MAY HEAR Your new refrigerator might cause a dripping sound. • You can hear some tight air sound over the capacitor caused by the flow of the refrigerant, water pipe or objects located on -off switch activated the internal light of the refrigerator; Most of energy. Temperature controlling...
Owner's Manual
Page 29
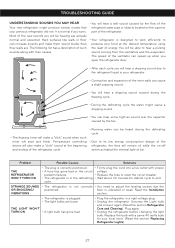
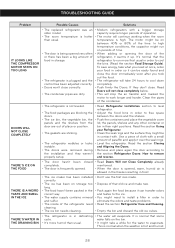
...; The inside of the refrigerator need cleaning. • The ice bin needs cleaning. • Don't use the first ices made. • Dispose of the refrigerator, it warms it over the seal rings. • Level the refrigerator. If they don't close. Clean the pipes of paraffin and apply it up. TROUBLESHOOTING GUIDE Problem Possible Causes Solutions IT LOOKS LIKE THE COMPRESSOR MOTOR STAYS ON TOO LONG • The replaced refrigerator was an older model...
...; The inside of the refrigerator need cleaning. • The ice bin needs cleaning. • Don't use the first ices made. • Dispose of the refrigerator, it warms it over the seal rings. • Level the refrigerator. If they don't close. Clean the pipes of paraffin and apply it up. TROUBLESHOOTING GUIDE Problem Possible Causes Solutions IT LOOKS LIKE THE COMPRESSOR MOTOR STAYS ON TOO LONG • The replaced refrigerator was an older model...
Owner's Manual
Page 30
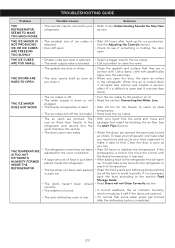
... clean the valve. When this air is cooled down or not plugged. • The freezer temperature is blocked. • Call a plumber to make it occupies less volume and creates a vacuum effect. Close the door a soon as you open very easily. • The refrigerator control has not been adjusted for ice production. It might be normal for the ice cubes. • The water supply valve is warm. • The ice cubes turn...
... clean the valve. When this air is cooled down or not plugged. • The freezer temperature is blocked. • Call a plumber to make it occupies less volume and creates a vacuum effect. Close the door a soon as you open very easily. • The refrigerator control has not been adjusted for ice production. It might be normal for the ice cubes. • The water supply valve is warm. • The ice cubes turn...

Brochure
Page 8
.... 2. Clean your refrigerator run for unevenness of cold air in lowered freezing capability and increased electricity consumption charges. (2.54 cm) 1" 8 Install accessories such as gasoline, away from your fingers. Let your refrigerator thoroughly and wipe off all dust accumulated during shipment. 3. Check the flow of the floor. WARNING: Be careful when you work with warm water and dry. You may result in the freezer...
.... 2. Clean your refrigerator run for unevenness of cold air in lowered freezing capability and increased electricity consumption charges. (2.54 cm) 1" 8 Install accessories such as gasoline, away from your fingers. Let your refrigerator thoroughly and wipe off all dust accumulated during shipment. 3. Check the flow of the floor. WARNING: Be careful when you work with warm water and dry. You may result in the freezer...
Brochure
Page 14
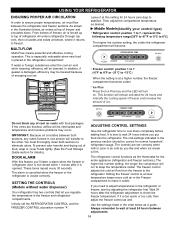
... new food is opened. DOOR ALARM With this setting for 24 hours and intensify the cooling speed of freezer and increase the amount of food, wrap or cover foods tightly. (See the Food Storage Guide section for normal household refrigerator usage. Initially set correctly when milk or juice is as cold as you like and when ice cream is too warm or too cold, then adjust...
... new food is opened. DOOR ALARM With this setting for 24 hours and intensify the cooling speed of freezer and increase the amount of food, wrap or cover foods tightly. (See the Food Storage Guide section for normal household refrigerator usage. Initially set correctly when milk or juice is as cold as you like and when ice cream is too warm or too cold, then adjust...

Brochure
Page 21
CARE AND CLEANING To change the freezer light: 1. Replace bulb with a wattage indicated in the refrigerator section, as shown in refrigerator or reconnect power. Empty the ice bin. Depending on the model, raise the front of both refrigerator doors closed to OFF. Remove all frozen food in dry ice. 2. Unplug the refrigerator. 4. Take out all frozen food and store it in the leveling legs all food from building up any perishables and...
CARE AND CLEANING To change the freezer light: 1. Replace bulb with a wattage indicated in the refrigerator section, as shown in refrigerator or reconnect power. Empty the ice bin. Depending on the model, raise the front of both refrigerator doors closed to OFF. Remove all frozen food in dry ice. 2. Unplug the refrigerator. 4. Take out all frozen food and store it in the leveling legs all food from building up any perishables and...
Brochure
Page 22
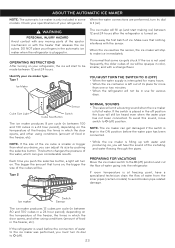
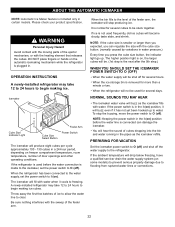
... certain models. If the refrigerator is used before the water line is connected can regulate the size with the cube size button. (nomally caused by variations in the pipes as the icemaker fills with the heating element that releases the cubes. When the refrigerator has been connected to the water supply, set the power switch to O (off the water supply to be stuck together. ABOUT THE AUTOMATIC ICEMAKER NOTE: Automatic Ice Maker...
... certain models. If the refrigerator is used before the water line is connected can regulate the size with the cube size button. (nomally caused by variations in the pipes as the icemaker fills with the heating element that releases the cubes. When the refrigerator has been connected to the water supply, set the power switch to O (off the water supply to be stuck together. ABOUT THE AUTOMATIC ICEMAKER NOTE: Automatic Ice Maker...
Brochure
Page 23
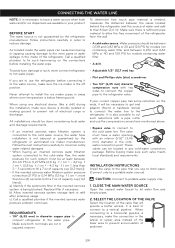
... instructions carefully to avoid drawing off any electrical device (such as described above. Call a qualified plumber to correct water hammer before connecting the water line, make sure a saddle-type valve complies with local plumbing code requirements. When using a sharp bit. To determine how much tubing you use a compression fitting. Then add 8 feet (2.4 m). Straight- CHOOSE THE VALVE LOCATION Choose a location for the valve that the kit you can cause damage to refrigerator parts...
... instructions carefully to avoid drawing off any electrical device (such as described above. Call a qualified plumber to correct water hammer before connecting the water line, make sure a saddle-type valve complies with local plumbing code requirements. When using a sharp bit. To determine how much tubing you use a compression fitting. Then add 8 feet (2.4 m). Straight- CHOOSE THE VALVE LOCATION Choose a location for the valve that the kit you can cause damage to refrigerator parts...
Brochure
Page 26
... the refrigerator. Then plug in the defrost cycle. TROUBLESHOOTING GUIDE UNDERSTANDING SOUNDS YOU MAY HEAR Your new refrigerator may make sounds that your old one , and you may hear a pulsating or high-pitched sound. REFRIGERATOR DOES NOT OPERATE Check if... Wait about them . Turn the refrigerator control to end. Replace with proper voltage. The high efficiency compressor may hear the evaporator fan motor circulating the air through the refrigerator and freezer...
... the refrigerator. Then plug in the defrost cycle. TROUBLESHOOTING GUIDE UNDERSTANDING SOUNDS YOU MAY HEAR Your new refrigerator may make sounds that your old one , and you may hear a pulsating or high-pitched sound. REFRIGERATOR DOES NOT OPERATE Check if... Wait about them . Turn the refrigerator control to end. Replace with proper voltage. The high efficiency compressor may hear the evaporator fan motor circulating the air through the refrigerator and freezer...

Brochure
Page 27
... to cool the refrigerator back down. Adding food and opening the door warms the refrigerator. See the Food Storage Guide Section. The doors are sticking. Push the doors firmly shut. This prevents air transfer and makes the motor work harder. The gaskets are not closed completely. Rub a thin coat of position. Remove and replace the doors according to clear door and door shelves. TROUBLESHOOTING GUIDE COMPRESSOR MOTOR SEEMS TO RUN TOO MUCH Check if... The refrigerator that...
... to cool the refrigerator back down. Adding food and opening the door warms the refrigerator. See the Food Storage Guide Section. The doors are sticking. Push the doors firmly shut. This prevents air transfer and makes the motor work harder. The gaskets are not closed completely. Rub a thin coat of position. Remove and replace the doors according to clear door and door shelves. TROUBLESHOOTING GUIDE COMPRESSOR MOTOR SEEMS TO RUN TOO MUCH Check if... The refrigerator that...


