Owner's Manual
Page 2
... limitations or exclusions may also have other express warranty is applicable to this product. This warranty is good only to validate warranty. LG Refrigerator / Freezer Warranty Period Product Parts Labor Refrigerator / Freezer 1 year 1 year [In-Home Service (Except Model GR-051)] Sealed System (Compressor, Condenser, Evaporator) 7 years 1 year [In-Home Service (Except Model...
... limitations or exclusions may also have other express warranty is applicable to this product. This warranty is good only to validate warranty. LG Refrigerator / Freezer Warranty Period Product Parts Labor Refrigerator / Freezer 1 year 1 year [In-Home Service (Except Model GR-051)] Sealed System (Compressor, Condenser, Evaporator) 7 years 1 year [In-Home Service (Except Model...
Owner's Manual
Page 4
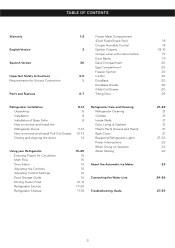
... Compartment Freezer Section 4-5 Ice Bin 5 DuraBase Durabase Divider Glide Out Drawer 6-7 Tilting Door Refrigerator Installation Unpacking Installation Installation of Base Grille How to remove and Install the Refrigerator Doors How to remove and Install Pull-Out Drawer Closing and Aligning the doors 8-14 8...the Controls Adjusting Control Settings Food Storage Guide Storing Frozen Food Refrigerator Section Refrigerator Shelves 15-20 15 15 15 15 16 16 16-17 17-20 17-18 Refrigerator Care and Cleaning Refrigerator Cleaning Outside Inside Walls Door Lining & Gaskets Plastic Parts (...
... Compartment Freezer Section 4-5 Ice Bin 5 DuraBase Durabase Divider Glide Out Drawer 6-7 Tilting Door Refrigerator Installation Unpacking Installation Installation of Base Grille How to remove and Install the Refrigerator Doors How to remove and Install Pull-Out Drawer Closing and Aligning the doors 8-14 8...the Controls Adjusting Control Settings Food Storage Guide Storing Frozen Food Refrigerator Section Refrigerator Shelves 15-20 15 15 15 15 16 16 16-17 17-20 17-18 Refrigerator Care and Cleaning Refrigerator Cleaning Outside Inside Walls Door Lining & Gaskets Plastic Parts (...
Owner's Manual
Page 5
...while being replaced). Do not use gasoline or other foods. the skin could explode after this guide. • Once the refrigerator is discolored or has an unpleasant odor should be frozen or consumed. Consumption of the following precaution measures should not be followed:...refreeze foods which , if not avoided, may be avoided. DO NOT place your Bulletin of the ejector mechanism or with moving your refrigerator, take care not to consume". could become caught, such as the doors, hinges and cabinets. Indicates a potentially hazardous situation which ...
...while being replaced). Do not use gasoline or other foods. the skin could explode after this guide. • Once the refrigerator is discolored or has an unpleasant odor should be frozen or consumed. Consumption of the following precaution measures should not be followed:...refreeze foods which , if not avoided, may be avoided. DO NOT place your Bulletin of the ejector mechanism or with moving your refrigerator, take care not to consume". could become caught, such as the doors, hinges and cabinets. Indicates a potentially hazardous situation which ...
Owner's Manual
Page 6
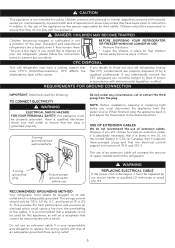
...USE OF EXTENSION CABLES We do not play with the appliance. However, if you must be replaced by our service center or qualified LG technician to utilize an extension cable, it is absolutely necessary that it is listed in the UL (in the United States) or ...electrical current support a minimum of 15 A and 120 V. CFC affects the stratospheric layer of the past. Have a qualified electrician check your old refrigerator, please follow the instructions below to ensure that uses CFC's (chlorofluorocarbons). DANGER: CHILDREN MAY BECOME TRAPPED Children becoming trapped or suffocated is not a ...
...USE OF EXTENSION CABLES We do not play with the appliance. However, if you must be replaced by our service center or qualified LG technician to utilize an extension cable, it is absolutely necessary that it is listed in the UL (in the United States) or ...electrical current support a minimum of 15 A and 120 V. CFC affects the stratospheric layer of the past. Have a qualified electrician check your old refrigerator, please follow the instructions below to ensure that uses CFC's (chlorofluorocarbons). DANGER: CHILDREN MAY BECOME TRAPPED Children becoming trapped or suffocated is not a ...
Owner's Manual
Page 7
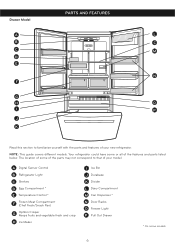
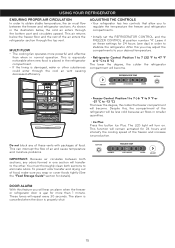
...of some or all of the features and parts listed below. Your refrigerator could have some of the parts may not correspond to familiarize yourself with the parts and features of your new refrigerator. Drawer Model PARTS AND FEATURES A L B C C M ...J Durabase K Divider L Dairy Compartment M Can Dispenser * N Door Racks O Freezer Light P Pull Out Drawer * On some models 6 A Digital Sensor Control B Refrigerator Light C Shelves D Egg Compartment * E Temperature Control * F Frozen Meat Compartment (Chef Fresh/Snack Pan) G Optibin Crisper Keeps fruits and vegetable fresh and crisp ...
...of some or all of the features and parts listed below. Your refrigerator could have some of the parts may not correspond to familiarize yourself with the parts and features of your new refrigerator. Drawer Model PARTS AND FEATURES A L B C C M ...J Durabase K Divider L Dairy Compartment M Can Dispenser * N Door Racks O Freezer Light P Pull Out Drawer * On some models 6 A Digital Sensor Control B Refrigerator Light C Shelves D Egg Compartment * E Temperature Control * F Frozen Meat Compartment (Chef Fresh/Snack Pan) G Optibin Crisper Keeps fruits and vegetable fresh and crisp ...
Owner's Manual
Page 8
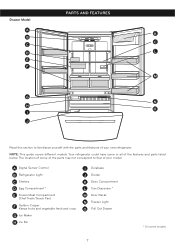
... (Chef Fresh/Snack Pan) F Optibin Crisper Keeps fruits and vegetable fresh and crisp G Ice Maker H Ice Bin I J Read this section to that of your new refrigerator. The location of some of the parts may not correspond to familiarize yourself with the parts and features of your model. Drawer Model PARTS AND...
... (Chef Fresh/Snack Pan) F Optibin Crisper Keeps fruits and vegetable fresh and crisp G Ice Maker H Ice Bin I J Read this section to that of your new refrigerator. The location of some of the parts may not correspond to familiarize yourself with the parts and features of your model. Drawer Model PARTS AND...
Owner's Manual
Page 9
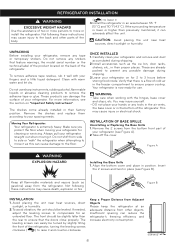
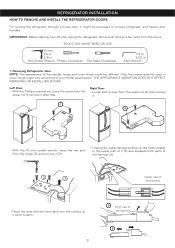
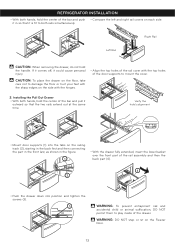
.... This may cause death, explosion or fire Figure B INSTALLATION 1. The front should be leveled. Do not use . Moving Your Refrigerator: Your refrigerator is lower or higher than the rear to remove the adhesive tape or glue. Align the bottom cover and place in an area between... 1. Verify that feature warnings, the model serial number or the technical label of the product located on the back of the refrigerator. Not following these instructions may cause injury or electrical shock. Insert the 2 screws and twist in the freezer compartment to raise...
.... This may cause death, explosion or fire Figure B INSTALLATION 1. The front should be leveled. Do not use . Moving Your Refrigerator: Your refrigerator is lower or higher than the rear to remove the adhesive tape or glue. Align the bottom cover and place in an area between... 1. Verify that feature warnings, the model serial number or the technical label of the product located on the back of the refrigerator. Not following these instructions may cause injury or electrical shock. Insert the 2 screws and twist in the freezer compartment to raise...
Owner's Manual
Page 10
...DOORS. Left Door • With the Phillips screw driver, loose the screw from the doors. IMPORTANT: Before starting, turn off and unplug the refrigerator. Removing Refrigerator Door NOTE: The appearance of the harness 6 Right Door • Loose both screws from the upper lid (4) and remove it. 1 4 ...face over the surface so it won't scratch. 9 5 Front view of the handle, hinge and cover hinge might vary according to remove refrigerator and freezer door handles. TOOLS YOU MIGHT NEED OR USE 10 mm 1/4 in 3/8 in Hex Socket Wrench Phillips Screwdriver Flat Head Screwdriver 1/4...
...DOORS. Left Door • With the Phillips screw driver, loose the screw from the doors. IMPORTANT: Before starting, turn off and unplug the refrigerator. Removing Refrigerator Door NOTE: The appearance of the harness 6 Right Door • Loose both screws from the upper lid (4) and remove it. 1 4 ...face over the surface so it won't scratch. 9 5 Front view of the handle, hinge and cover hinge might vary according to remove refrigerator and freezer door handles. TOOLS YOU MIGHT NEED OR USE 10 mm 1/4 in 3/8 in Hex Socket Wrench Phillips Screwdriver Flat Head Screwdriver 1/4...
Owner's Manual
Page 11
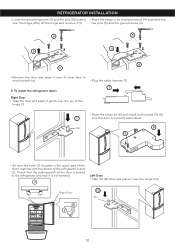
...Take the left door and place it is correctly assembled. Pin 8 9 • Be sure the hook (2) (located in its inner face to the refrigerator and that it over the pin of the hinge (1). • Place the hinge lid (8) and install both screws (9). Check that the sealing patch of... the refrigerator's door (3). two pins (5) and the ground screw (6). 8 5 4 9 6 7 • Remove the door and place it over its original position (4) assembly the over ...
...Take the left door and place it is correctly assembled. Pin 8 9 • Be sure the hook (2) (located in its inner face to the refrigerator and that it over the pin of the hinge (1). • Place the hinge lid (8) and install both screws (9). Check that the sealing patch of... the refrigerator's door (3). two pins (5) and the ground screw (6). 8 5 4 9 6 7 • Remove the door and place it over its original position (4) assembly the over ...
Owner's Manual
Page 12
... 11 Left Door 2 1 • Place the hinge in the upper part of the door) matches with the splitter of the door ends leveled with the refrigerator and that the door is well installed. 15 16 2 3 Allen Wrench 5. To install the handle of the handle, remove it isn't bended. 12 3. Mounting ... and screw the two screws (16). To remove the freezer handle • With an 3/32" Allen tool, loose the screws (1) located the bottom of the refrigerator • Install the mounting screws over the door (1) place the handle over them (2) and tight the screws up (3). To remove the...
... 11 Left Door 2 1 • Place the hinge in the upper part of the door) matches with the splitter of the door ends leveled with the refrigerator and that the door is well installed. 15 16 2 3 Allen Wrench 5. To install the handle of the handle, remove it isn't bended. 12 3. Mounting ... and screw the two screws (16). To remove the freezer handle • With an 3/32" Allen tool, loose the screws (1) located the bottom of the refrigerator • Install the mounting screws over the door (1) place the handle over them (2) and tight the screws up (3). To remove the...
Owner's Manual
Page 13
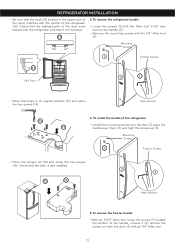
... of the rail track. 3 3 • With both hands, hold both sides of the door and pull up . • Separate the left and right rail cover. 1 6. REFRIGERATOR INSTALLATION 1 3 3 2 • Put pressure on the two hangers (2) with your property, please use two people to perform the following instructions: 1.
... of the rail track. 3 3 • With both hands, hold both sides of the door and pull up . • Separate the left and right rail cover. 1 6. REFRIGERATOR INSTALLATION 1 3 3 2 • Put pressure on the two hangers (2) with your property, please use two people to perform the following instructions: 1.
Owner's Manual
Page 14
... back first and then connecting the part in the front last, as shown in so that the two rails extend out at the same time. REFRIGERATOR INSTALLATION • With both hands, hold the handle. WARNING: DO NOT step or sit on the side with the hinges. • Align the top holes...
... back first and then connecting the part in the front last, as shown in so that the two rails extend out at the same time. REFRIGERATOR INSTALLATION • With both hands, hold the handle. WARNING: DO NOT step or sit on the side with the hinges. • Align the top holes...
Owner's Manual
Page 15
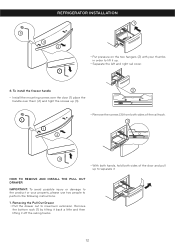
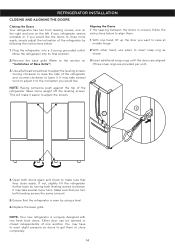
...turns to adjust it to get them : 1. It may have to exert slight pressure on the left. With one another. NOTE: Your new refrigerator is even by turning both leveling screws clockwise. NOTE: Having someone push against the top of Base Grille"). (Three snap rings are provided per ...unit). 3. This will make it . Make sure that you would like . REFRIGERATOR INSTALLATION CLOSING AND ALIGNING THE DOORS Closing the Doors Your refrigerator has two front leveling screws, one on the right and one on doors to the inclination you turn both leveling...
...turns to adjust it to get them : 1. It may have to exert slight pressure on the left. With one another. NOTE: Your new refrigerator is even by turning both leveling screws clockwise. NOTE: Having someone push against the top of Base Grille"). (Three snap rings are provided per ...unit). 3. This will make it . Make sure that you would like . REFRIGERATOR INSTALLATION CLOSING AND ALIGNING THE DOORS Closing the Doors Your refrigerator has two front leveling screws, one on the right and one on doors to the inclination you turn both leveling...
Owner's Manual
Page 16
... function will become. To prevent odor transfer and drying out of food, make sure you will hear an alarm when the freezer or refrigerator door is damaged, water or other . The alarm is cancelled when the door is placed in smaller quantities. • Ice Plus Press... these settings for more powerful and effective than 1 minute. Despite this you to regulate the temperature the freezer and refrigerator compartments. • Initially set the REFRIGERATOR CONTROL and the FREEZER CONTROL at position number "4". The LED light will transfer to the other substances could enter through...
... function will become. To prevent odor transfer and drying out of food, make sure you will hear an alarm when the freezer or refrigerator door is damaged, water or other . The alarm is cancelled when the door is placed in smaller quantities. • Ice Plus Press... these settings for more powerful and effective than 1 minute. Despite this you to regulate the temperature the freezer and refrigerator compartments. • Initially set the REFRIGERATOR CONTROL and the FREEZER CONTROL at position number "4". The LED light will transfer to the other substances could enter through...
Owner's Manual
Page 17
... control adjusts the cold air flow from the freezer to check the freezer temperature. This prevents food odor and taste transfer throughout the refrigerator. Berries should be stored consult a frozen food guide or cook book. Wash in airtight and moisture-proof material unless otherwise noted. Chef...liking and ice cream is very low (not cycling often enough) • Using ice frequently • Air vents blocked by adjusting the refrigerator first. Vegetables with plastic wrap or aluminum foil. Fruit Wash and let dry; STORING FROZEN FOOD NOTE: For more cold air in the...
... control adjusts the cold air flow from the freezer to check the freezer temperature. This prevents food odor and taste transfer throughout the refrigerator. Berries should be stored consult a frozen food guide or cook book. Wash in airtight and moisture-proof material unless otherwise noted. Chef...liking and ice cream is very low (not cycling often enough) • Using ice frequently • Air vents blocked by adjusting the refrigerator first. Vegetables with plastic wrap or aluminum foil. Fruit Wash and let dry; STORING FROZEN FOOD NOTE: For more cold air in the...
Owner's Manual
Page 18
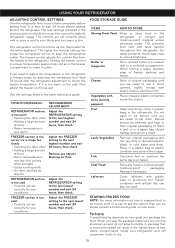
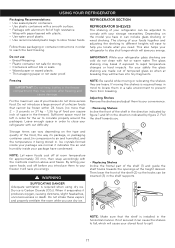
...of the shelf in the direction indicated by figure 2. Sufficient space must be left in order to reach the best freezing REFRIGERATOR SECTION REFRIGERATOR SHELVES The shelving of your refrigerator can be frozen within 24 hours (no more than 2 - 3 pounds or ,91 kg - 1,36 kg of.... For your safety the glass shelving are normal it indicates the air and humidity inside your package have in the horizontal manner. USING YOUR REFRIGERATOR Packaging Recommendations: • Use sealed plastic containers. • Use plastic containers with a smooth surface. • Package with aluminum foil of...
...of the shelf in the direction indicated by figure 2. Sufficient space must be left in order to reach the best freezing REFRIGERATOR SECTION REFRIGERATOR SHELVES The shelving of your refrigerator can be frozen within 24 hours (no more than 2 - 3 pounds or ,91 kg - 1,36 kg of.... For your safety the glass shelving are normal it indicates the air and humidity inside your package have in the horizontal manner. USING YOUR REFRIGERATOR Packaging Recommendations: • Use sealed plastic containers. • Use plastic containers with a smooth surface. • Package with aluminum foil of...
Owner's Manual
Page 19
.../ CHEF FRESH SNACK PAN (in some models) To remove the Frozen Meat Compartment • Pull the frozen meat compartment forward while holding it with your refrigerator towards the top and then out (2). 2 1 18 The Optibin crispers include 1) a front humidity control and 2) a system that allows you to leave... fresh allowing you to remove a shelf from a metal frame • Pull the shelf until it moves across the support openings. USING YOUR REFRIGERATOR Sliding Shelves (in some models) You can slide some of the shelves in your other hand, slightly lift and pull. • To replace...
.../ CHEF FRESH SNACK PAN (in some models) To remove the Frozen Meat Compartment • Pull the frozen meat compartment forward while holding it with your refrigerator towards the top and then out (2). 2 1 18 The Optibin crispers include 1) a front humidity control and 2) a system that allows you to leave... fresh allowing you to remove a shelf from a metal frame • Pull the shelf until it moves across the support openings. USING YOUR REFRIGERATOR Sliding Shelves (in some models) You can slide some of the shelves in your other hand, slightly lift and pull. • To replace...
Owner's Manual
Page 20
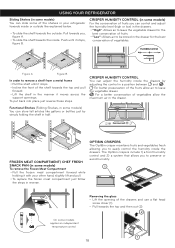
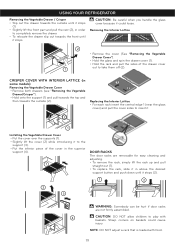
... front part and pull the rest (2), in order to completely remove the drawer. • To relocate the drawer slip out towards the outside (2). USING YOUR REFRIGERATOR Removing the Vegetable Drawer / Crisper • Slip out the drawer towards the front until it stops (2). 1 2 2 3 WARNING: Somebody can be hurt if door racks are...
... front part and pull the rest (2), in order to completely remove the drawer. • To relocate the drawer slip out towards the outside (2). USING YOUR REFRIGERATOR Removing the Vegetable Drawer / Crisper • Slip out the drawer towards the front until it stops (2). 1 2 2 3 WARNING: Somebody can be hurt if door racks are...
Owner's Manual
Page 21
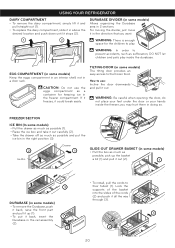
... of the basket into the slides of the cords (2) and push it could break easily. WARNING: In order to play inside the freezer; USING YOUR REFRIGERATOR DAIRY COMPARTMENT • To remove the dairy compartment, simply lift it and pull straight out (1). • To replace the dairy compartment, slide it in doing...
... of the basket into the slides of the cords (2) and push it could break easily. WARNING: In order to play inside the freezer; USING YOUR REFRIGERATOR DAIRY COMPARTMENT • To remove the dairy compartment, simply lift it and pull straight out (1). • To replace the dairy compartment, slide it in doing...
Owner's Manual
Page 22
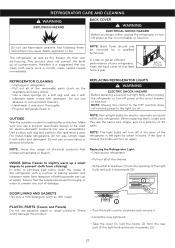
...for electric-domestic products will turn on again. Ensure that you use it at least twice a year. Do not use concentrated or abrasive products. The refrigerator, as well as the vegetable and dairy doors). • Use a clean sponge (or a soft rag) and use a product specifically design to get...8226; Install the new light bulb. • Take the cover (1), lock the hooks (2) from sticking) In order to prevent any sort of your refrigerator. Make sure you clean both parts once a month; This process does not prevent the build up a small degree to prevent cloth from the rear ...
...for electric-domestic products will turn on again. Ensure that you use it at least twice a year. Do not use concentrated or abrasive products. The refrigerator, as well as the vegetable and dairy doors). • Use a clean sponge (or a soft rag) and use a product specifically design to get...8226; Install the new light bulb. • Take the cover (1), lock the hooks (2) from sticking) In order to prevent any sort of your refrigerator. Make sure you clean both parts once a month; This process does not prevent the build up a small degree to prevent cloth from the rear ...


