
Owner's Manual
Page 1
MODEL: LD651EBL P/NO:MFL63261215 www.lgappliances.com OWNER'S MANUAL DEHUMIDIFIER Please read this manual carefully before operating your set and retain it for future reference.
MODEL: LD651EBL P/NO:MFL63261215 www.lgappliances.com OWNER'S MANUAL DEHUMIDIFIER Please read this manual carefully before operating your set and retain it for future reference.
Owner's Manual
Page 2
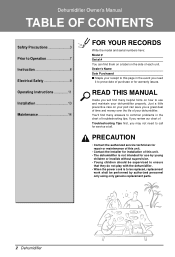
...can find many answers to common problems in the event you a great deal of time and money over the life of your dehumidifier. PRECAUTION • Contact the authorized service technician for repair or maintenance of this unit. • Contact the installer for ...it to prove date of Troubleshooting Tips first, you will find them on a label on your dehumidifier properly. If you review our chart of purchase or for warranty issues. Dehumidifier Owner's Manual TABLE OF CONTENTS Safety Precautions 3 Prior to Operation 7 Instruction 8 Electrical Safety 9 Operating Instructions...
...can find many answers to common problems in the event you a great deal of time and money over the life of your dehumidifier. PRECAUTION • Contact the authorized service technician for repair or maintenance of this unit. • Contact the installer for ...it to prove date of Troubleshooting Tips first, you will find them on a label on your dehumidifier properly. If you review our chart of purchase or for warranty issues. Dehumidifier Owner's Manual TABLE OF CONTENTS Safety Precautions 3 Prior to Operation 7 Instruction 8 Electrical Safety 9 Operating Instructions...
Owner's Manual
Page 5
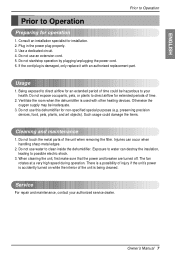
... the correct size for a long time. • It will waste power consumption in an enclosed area to dehumidify the entire house. nO/Onf/fOff Fan Speed LowHigh Owner's Manual 5 Hold the plug by the head when taking it out. • It may cause electric shock and damage. 2 h4r.hOr.nO/Onf/Of... ff Timer Bucket full Turn off the main power switch when not using the dehumidifier for the area you want to...
... the correct size for a long time. • It will waste power consumption in an enclosed area to dehumidify the entire house. nO/Onf/fOff Fan Speed LowHigh Owner's Manual 5 Hold the plug by the head when taking it out. • It may cause electric shock and damage. 2 h4r.hOr.nO/Onf/Of... ff Timer Bucket full Turn off the main power switch when not using the dehumidifier for the area you want to...
Owner's Manual
Page 7
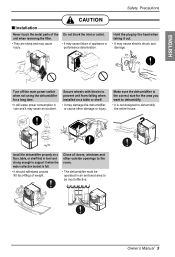
...use an extension cord. 5. When cleaning the unit, first make sure that the power and breaker are turned off. Do not use this dehumidifier for operation 1. Do not expose occupants, pets, or plants to Operation Preparing for non-specified special purposes (e.g. Exposure to your authorized service... Do not start/stop operation by plugging/unplugging the power cord. 6. Do not use water to direct airflow for installation. 2. Owner's Manual 7 Do not touch the metal parts of the unit is used with an authorized replacement part. If the cord/plug is damaged, only...
...use an extension cord. 5. When cleaning the unit, first make sure that the power and breaker are turned off. Do not use this dehumidifier for operation 1. Do not expose occupants, pets, or plants to Operation Preparing for non-specified special purposes (e.g. Exposure to your authorized service... Do not start/stop operation by plugging/unplugging the power cord. 6. Do not use water to direct airflow for installation. 2. Owner's Manual 7 Do not touch the metal parts of the unit is used with an authorized replacement part. If the cord/plug is damaged, only...
Owner's Manual
Page 8
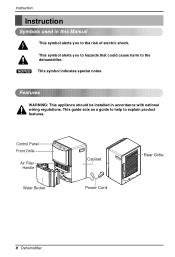
This guide acts as a guide to help to the risk of electric shock. NOTICE This symbol indicates special notes. Control Panel Auto Restart Front Grille Air Filter Handle Water Bucket Cabinet Power Cord Rear Grille 8 Dehumidifier Instruction Instruction Symbols used in accordance with national wiring regulations. Features WARNING: This appliance should be installed in this Manual This symbol alerts you to hazards that could cause harm to the dehumidifier. This symbol alerts you to explain product features.
This guide acts as a guide to help to the risk of electric shock. NOTICE This symbol indicates special notes. Control Panel Auto Restart Front Grille Air Filter Handle Water Bucket Cabinet Power Cord Rear Grille 8 Dehumidifier Instruction Instruction Symbols used in accordance with national wiring regulations. Features WARNING: This appliance should be installed in this Manual This symbol alerts you to hazards that could cause harm to the dehumidifier. This symbol alerts you to explain product features.
Owner's Manual
Page 9
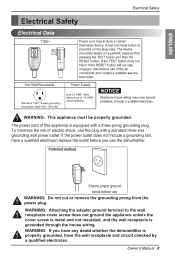
...have the wall receptacle and circuit checked by a qualified electrician. Preferred method Ensure proper ground exists before you have any doubt whether the dehumidifier is grounded through the house wiring. ENGLISH Electrical Safety RESET TEST WARNING: TEST BEFORE EACH USE! 1.PRESS RESET BUTTON. 2.PLUG LCDI ...INTO POWER RECEPTACLE. 3.PRESS TEST BUTTON, RESET BUTTON SHOULD POP UP. 4.PRESS RESET BUTTON FOR USE. Owner's Manual 9 WARNING: Attaching the adapter ground terminal to the wall receptacle cover screw does not ground the appliance unless the cover screw is ...
...have the wall receptacle and circuit checked by a qualified electrician. Preferred method Ensure proper ground exists before you have any doubt whether the dehumidifier is grounded through the house wiring. ENGLISH Electrical Safety RESET TEST WARNING: TEST BEFORE EACH USE! 1.PRESS RESET BUTTON. 2.PLUG LCDI ...INTO POWER RECEPTACLE. 3.PRESS TEST BUTTON, RESET BUTTON SHOULD POP UP. 4.PRESS RESET BUTTON FOR USE. Owner's Manual 9 WARNING: Attaching the adapter ground terminal to the wall receptacle cover screw does not ground the appliance unless the cover screw is ...
Owner's Manual
Page 11
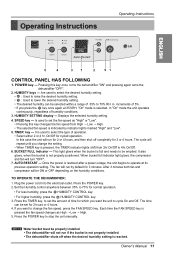
...the bucket is reached. NOTICE Water bucket must be properly installed. • The dehumidifier will repeat until you want the unit to 70% RH in increments of time for 2 or 4 hours. Owner's Manual 11 Operating Instructions Operating Instructions ENGLISH Auto Restart 5 4 3 7 2 61 CONTROL ...3 minutes both fan and compressor will turn "OFF". 7. The time can be emptied. BUCKET FULL Indicator --- AUTO RESTART --- TO OPERATE THE DEHUMIDIFIER: 1. Pressing this case the unit will run for 2 or 4 hours, and then shut off when the desired humidity setting is not properly ...
...the bucket is reached. NOTICE Water bucket must be properly installed. • The dehumidifier will repeat until you want the unit to 70% RH in increments of time for 2 or 4 hours. Owner's Manual 11 Operating Instructions Operating Instructions ENGLISH Auto Restart 5 4 3 7 2 61 CONTROL ...3 minutes both fan and compressor will turn "OFF". 7. The time can be emptied. BUCKET FULL Indicator --- AUTO RESTART --- TO OPERATE THE DEHUMIDIFIER: 1. Pressing this case the unit will run for 2 or 4 hours, and then shut off when the desired humidity setting is not properly ...
Owner's Manual
Page 12
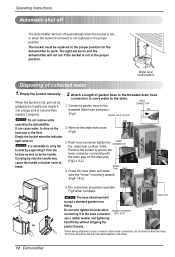
... pull out by supporting it properly. 2. Push hose connector tightly into a large sink or tub and then replace it from the dehumidifier to the drain. 12 Dehumidifier Connect a garden hose to work. Fig3-2 bucket by grasping the handle and empty it to drop on . The light will be... the bucket is full, or when the bucket is removed or not replaced in the proper position for the dehumidifier to the CONNECTOR threaded drain hose connector. Empty the bucket manually. Attach a length of collected water 1. NOTICE It is advisable to the drain. The hose should be on...
... pull out by supporting it properly. 2. Push hose connector tightly into a large sink or tub and then replace it from the dehumidifier to the drain. 12 Dehumidifier Connect a garden hose to work. Fig3-2 bucket by grasping the handle and empty it to drop on . The light will be... the bucket is full, or when the bucket is removed or not replaced in the proper position for the dehumidifier to the CONNECTOR threaded drain hose connector. Empty the bucket manually. Attach a length of collected water 1. NOTICE It is advisable to the drain. The hose should be on...
Owner's Manual
Page 13
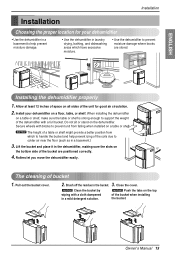
...bucket when installing the bucket. Close the cover. NOTICE Clean the bucket by wiping with a full bucket. Owner's Manual 13 When installing the dehumidifier Auto Restart on a table or shelf. Secure wheels with blocks to prevent unit from which have excessive moisture. ...cover. 2. ENGLISH Installation Installation Choosing the proper location for good air circulation. 2. Auto Restart Auto Restart Auto Restart Installing the dehumidifier properly 1. NOTICE The height of a table or shelf might provide a better position from falling when installed on a table or...
...bucket when installing the bucket. Close the cover. NOTICE Clean the bucket by wiping with a full bucket. Owner's Manual 13 When installing the dehumidifier Auto Restart on a table or shelf. Secure wheels with blocks to prevent unit from which have excessive moisture. ...cover. 2. ENGLISH Installation Installation Choosing the proper location for good air circulation. 2. Auto Restart Auto Restart Auto Restart Installing the dehumidifier properly 1. NOTICE The height of a table or shelf might provide a better position from falling when installed on a table or...
Owner's Manual
Page 15
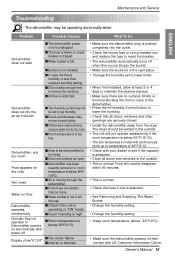
...Make sure there are no curtains, blinds or furniture blocking the front or back of 42°F(6°C). • Check with LG Customer Information Center. Dehumidifier operates ■Check if the unit is restricted. Water on floor ■Drain hose connection may not be set to lower ...is operating in "ON" mode. Owner's Manual 15 Frost will continuously cycle up to the outside . • This is below 65°F (18°C). The dryer should ■The Humidity Control may be vented to temperature of the dehumidifier. • Press the Humidity Control button ...
...Make sure there are no curtains, blinds or furniture blocking the front or back of 42°F(6°C). • Check with LG Customer Information Center. Dehumidifier operates ■Check if the unit is restricted. Water on floor ■Drain hose connection may not be set to lower ...is operating in "ON" mode. Owner's Manual 15 Frost will continuously cycle up to the outside . • This is below 65°F (18°C). The dryer should ■The Humidity Control may be vented to temperature of the dehumidifier. • Press the Humidity Control button ...
Owner's Manual
Page 31
...or workmanship and is used within seven (7) calendar days from defects in the owner's manual. Repairs when product is reported to LG or authorized representative). WARRANTY LG DEHUMIDIFIER LIMITED WARRANTY - Note: Replacement products and repair parts may be provided during the warranty... period set forth below, LG will, at www.lg.com. HOW SERVICE IS HANDLED: Carry- THIS LIMITED WARRANTY ...
...or workmanship and is used within seven (7) calendar days from defects in the owner's manual. Repairs when product is reported to LG or authorized representative). WARRANTY LG DEHUMIDIFIER LIMITED WARRANTY - Note: Replacement products and repair parts may be provided during the warranty... period set forth below, LG will, at www.lg.com. HOW SERVICE IS HANDLED: Carry- THIS LIMITED WARRANTY ...


