

Owner's Manual
Page 2
...use by young children or invalids without supervision. • Young children should be supervised to ensure that they do not play with the dehumidifier. • When the power cord is not intended for warranty issues. PRECAUTION • Contact the authorized service technician for repair or maintenance...use and maintain your part can find many helpful hints on your dehumidifier properly. You'll find them on a label on the side of your dehumidifier. If you may not need to this unit. • The dehumidifier is to be replaced, replacement work shall be performed by authorized...
...use by young children or invalids without supervision. • Young children should be supervised to ensure that they do not play with the dehumidifier. • When the power cord is not intended for warranty issues. PRECAUTION • Contact the authorized service technician for repair or maintenance...use and maintain your part can find many helpful hints on your dehumidifier properly. You'll find them on a label on the side of your dehumidifier. If you may not need to this unit. • The dehumidifier is to be replaced, replacement work shall be performed by authorized...
Owner's Manual
Page 4
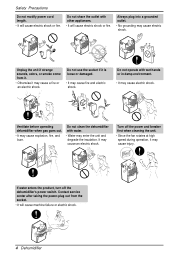
... fire or an electric shock. Safety Precautions Do not modify power cord length. • It will cause machine failure or electric shock. 4 Dehumidifier If water enters the product, turn off the power and breaker first when cleaning the unit. • Since the fan rotates at high speed...it may cause an electric shock. Do not operate with other appliances. • It will cause electric shock or fire. Turn off the dehumidifier's power switch. Ventilate before operating defumidifier when gas goes out. • It may cause electric shock. Contact service center after taking the ...
... fire or an electric shock. Safety Precautions Do not modify power cord length. • It will cause machine failure or electric shock. 4 Dehumidifier If water enters the product, turn off the power and breaker first when cleaning the unit. • Since the fan rotates at high speed...it may cause an electric shock. Do not operate with other appliances. • It will cause electric shock or fire. Turn off the dehumidifier's power switch. Ventilate before operating defumidifier when gas goes out. • It may cause electric shock. Contact service center after taking the ...
Owner's Manual
Page 5
... correct size for a long time. • It will waste power consumption in an enclosed area to be most effective. Make sure the dehumidifier is level and strong enough to dehumidify the entire house. ENERGY STAR ENERGY STAR Owner's Manual 5 Do not block the inlet or outlet. • It may cause failure of... by the head when taking it when the water collection bucket is not designed to support it out. • It may cause injury. Install the dehumidifier properly on a table or shelf. • It may cause an accident. Close all doors, windows and other outside openings to...
... correct size for a long time. • It will waste power consumption in an enclosed area to be most effective. Make sure the dehumidifier is level and strong enough to dehumidify the entire house. ENERGY STAR ENERGY STAR Owner's Manual 5 Do not block the inlet or outlet. • It may cause failure of... by the head when taking it when the water collection bucket is not designed to support it out. • It may cause injury. Install the dehumidifier properly on a table or shelf. • It may cause an accident. Close all doors, windows and other outside openings to...
Owner's Manual
Page 6
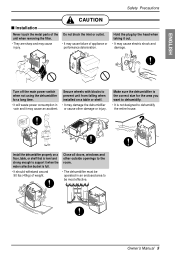
...direct air flow. • This could cause coils to frost. Always insert the filter securely. Clean it will cause failure. 6 Dehumidifier Be sure to replace the bucket properly after emptying to clean. Safety Precautions s Operation Use a soft cloth to prevent water from ...collecting on the floor. • The appearance of the dehumidifier may deteriorate, change color, or develop surface flaws. • Otherwise, it will continuously cycle up down temperature 42°F(6°C) •...
...direct air flow. • This could cause coils to frost. Always insert the filter securely. Clean it will cause failure. 6 Dehumidifier Be sure to replace the bucket properly after emptying to clean. Safety Precautions s Operation Use a soft cloth to prevent water from ...collecting on the floor. • The appearance of the dehumidifier may deteriorate, change color, or develop surface flaws. • Otherwise, it will continuously cycle up down temperature 42°F(6°C) •...
Owner's Manual
Page 7
...oxygen supply may be hazardous to direct airflow for installation. 2. Service For repair and maintenance, contact your health. Do not use this dehumidifier for extended periods of time could damage the items. Cleaning and maintenance 1. When cleaning the unit, first make sure that the power ...and breaker are turned off. Being exposed to your authorized service dealer. Ventilate the room when the dehumidifier is accidently turned on while the interior of the unit when removing the filter. Injuries can destroy the insulation, leading to Operation ...
...oxygen supply may be hazardous to direct airflow for installation. 2. Service For repair and maintenance, contact your health. Do not use this dehumidifier for extended periods of time could damage the items. Cleaning and maintenance 1. When cleaning the unit, first make sure that the power ...and breaker are turned off. Being exposed to your authorized service dealer. Ventilate the room when the dehumidifier is accidently turned on while the interior of the unit when removing the filter. Injuries can destroy the insulation, leading to Operation ...
Owner's Manual
Page 8
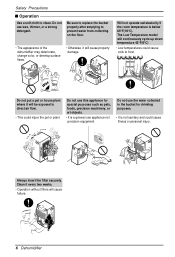
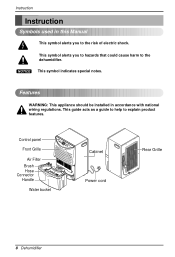
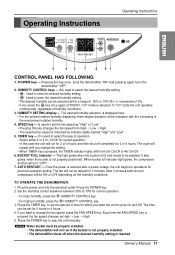
...you to the risk of electric shock. NOTICE This symbol indicates special notes. This guide acts as a guide to help to the dehumidifier. Control panel Front Grille 2 h4r.hOr.nO/Onf/Of ff Timer Fan Speed LoHwigh Auto Restart CHounmtriodlity Bucket full Air Filter Brush ...Hose Connector Handle Water bucket Cabinet Power cord Rear Grille 8 Dehumidifier Features WARNING: This appliance should be installed in this Manual This symbol alerts you to hazards that could cause harm to explain ...
...you to the risk of electric shock. NOTICE This symbol indicates special notes. This guide acts as a guide to help to the dehumidifier. Control panel Front Grille 2 h4r.hOr.nO/Onf/Of ff Timer Fan Speed LoHwigh Auto Restart CHounmtriodlity Bucket full Air Filter Brush ...Hose Connector Handle Water bucket Cabinet Power cord Rear Grille 8 Dehumidifier Features WARNING: This appliance should be installed in this Manual This symbol alerts you to hazards that could cause harm to explain ...
Owner's Manual
Page 9
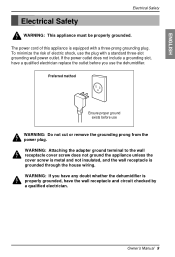
... the risk of this appliance is grounded through the house wiring. WARNING: If you have any doubt whether the dehumidifier is properly grounded, have a qualified electrician replace the outlet before use the dehumidifier. ENGLISH Electrical Safety Electrical Safety WARNING: This appliance must be properly grounded. Owner's Manual 9 WARNING: Attaching the adapter ground...
... the risk of this appliance is grounded through the house wiring. WARNING: If you have any doubt whether the dehumidifier is properly grounded, have a qualified electrician replace the outlet before use the dehumidifier. ENGLISH Electrical Safety Electrical Safety WARNING: This appliance must be properly grounded. Owner's Manual 9 WARNING: Attaching the adapter ground...
Owner's Manual
Page 10
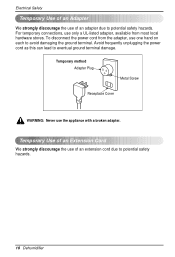
... local hardware stores. For temporary connections, use only a UL-listed adapter, available from the adapter, use one hand on each to potential safety hazards. 10 Dehumidifier Avoid frequently unplugging the power cord as this can lead to potential safety hazards. Electrical Safety Temporary Use of an Adapter We strongly discourage the...
... local hardware stores. For temporary connections, use only a UL-listed adapter, available from the adapter, use one hand on each to potential safety hazards. 10 Dehumidifier Avoid frequently unplugging the power cord as this can lead to potential safety hazards. Electrical Safety Temporary Use of an Adapter We strongly discourage the...
Owner's Manual
Page 11
...RH in increments of 5%. • If you want the unit to operate at 35%RH, "On" mode is not properly installed. • The dehumidifier shuts off completely for cycled operation. Is used to select the desired humidity setting. • : Used to raise the desired humidity setting. • :...bucket must be ON or OFF depending on the humidity conditions. After 3 minutes both fan and compressor will be properly installed. • The dehumidifier will run if the bucket is selected. Are used to change the setting. • When TIMER key is pressed, the TIMER indicator lights ...
...RH in increments of 5%. • If you want the unit to operate at 35%RH, "On" mode is not properly installed. • The dehumidifier shuts off completely for cycled operation. Is used to select the desired humidity setting. • : Used to raise the desired humidity setting. • :...bucket must be ON or OFF depending on the humidity conditions. After 3 minutes both fan and compressor will be properly installed. • The dehumidifier will run if the bucket is selected. Are used to change the setting. • When TIMER key is pressed, the TIMER indicator lights ...
Owner's Manual
Page 12
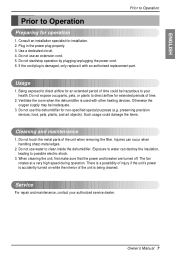
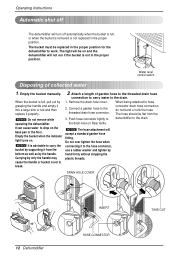
... or the floor. It can cause water to drop on Rear Grille. Connect a garden hose to hose 2. Push hose connector tightly to dehumidifier to the drain. 1. Remove the drain-hole cover. connector drain hose connection, do not bend or kink the hose. The light will ... the proper position. NOTICE Do not remove while operating the dehumidifier. Attach a length of collected water 1. NOTICE The hose attachment will turn off The dehumidifier will accept a standard garden hose fitting. DRAIN HOLE COVER 12 Dehumidifier INSERT HOSE-CONNECTOR TAKE OUT Empty the bucket when the indicator...
... or the floor. It can cause water to drop on Rear Grille. Connect a garden hose to hose 2. Push hose connector tightly to dehumidifier to the drain. 1. Remove the drain-hole cover. connector drain hose connection, do not bend or kink the hose. The light will ... the proper position. NOTICE Do not remove while operating the dehumidifier. Attach a length of collected water 1. NOTICE The hose attachment will turn off The dehumidifier will accept a standard garden hose fitting. DRAIN HOLE COVER 12 Dehumidifier INSERT HOSE-CONNECTOR TAKE OUT Empty the bucket when the indicator...
Owner's Manual
Page 13
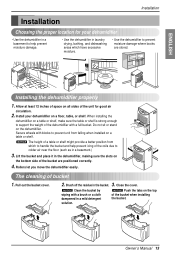
...PAOUWTOERRESTABRFUUTCLLKET ENERGY STAR 12" The cleaning of the bucket when installing the bucket. Brush off the residue in the dehumidifier, making sure the slots on the bottom side of a table or shelf might provide a better position from falling....ahOnr.ntOl/yOnOf/fOnf.f 4 h2rh. Lift the bucket and place it in the bucket. 3. When installing the dehumidifier on the dehumidifier. ENGLISH Installation Installation Choosing the proper location for good air circulation. 2. HCUOMNIDTIRTOYL HAuUCTmBOoUinRdFCPEtUKirSOtLoETyWLATl RETR BuckEeNtERfGuYllSTAR Co4nhs2rt.ahOnr.ntOl/yOnOf...
...PAOUWTOERRESTABRFUUTCLLKET ENERGY STAR 12" The cleaning of the bucket when installing the bucket. Brush off the residue in the dehumidifier, making sure the slots on the bottom side of a table or shelf might provide a better position from falling....ahOnr.ntOl/yOnOf/fOnf.f 4 h2rh. Lift the bucket and place it in the bucket. 3. When installing the dehumidifier on the dehumidifier. ENGLISH Installation Installation Choosing the proper location for good air circulation. 2. HCUOMNIDTIRTOYL HAuUCTmBOoUinRdFCPEtUKirSOtLoETyWLATl RETR BuckEeNtERfGuYllSTAR Co4nhs2rt.ahOnr.ntOl/yOnOf...
Owner's Manual
Page 14
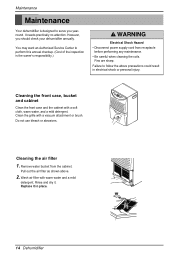
...cleaning the coils. It needs practically no attention. However, you yearround. You may want an Authorized Service Center to serve you should check your dehumidifier annually. Failure to follow the above . 2. Do not use bleach or abrasives. 2 h4r.hOr.nO/Onf/Of ff Timer Fan Speed LoHwigh...Auto Restart CHounmtriodlity Bucket full Cleaning the air filter 1. Pull out the air filter as shown above precautions could result in place. 14 Dehumidifier Cleaning the front case, bucket and cabinet Clean the front case and the cabinet with a vacuum attachment or brush. Wash air filter with...
...cleaning the coils. It needs practically no attention. However, you yearround. You may want an Authorized Service Center to serve you should check your dehumidifier annually. Failure to follow the above . 2. Do not use bleach or abrasives. 2 h4r.hOr.nO/Onf/Of ff Timer Fan Speed LoHwigh...Auto Restart CHounmtriodlity Bucket full Cleaning the air filter 1. Pull out the air filter as shown above precautions could result in place. 14 Dehumidifier Cleaning the front case, bucket and cabinet Clean the front case and the cabinet with a vacuum attachment or brush. Wash air filter with...
Owner's Manual
Page 15
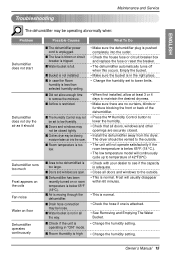
...;F(6°C) • Check with your dealer to see if the capacity is too large. s Room Humidity is high • Make sure the dehumidifier plug is attached. • See Removing and Emptying The Water Bucket. • Change the humidity setting. • Change the humidity setting. ...Frost will continuously cycle up to temperature of the dehumidifier. • Press the Humidity Control button to low Humidity. s In case the Room humidity is too low. s Room temperature is less ...
...;F(6°C) • Check with your dealer to see if the capacity is too large. s Room Humidity is high • Make sure the dehumidifier plug is attached. • See Removing and Emptying The Water Bucket. • Change the humidity setting. • Change the humidity setting. ...Frost will continuously cycle up to temperature of the dehumidifier. • Press the Humidity Control button to low Humidity. s In case the Room humidity is too low. s Room temperature is less ...
Owner's Manual
Page 32
... so these costs are Carry-in material or workmanship under normal use . 4. LG Dehumidifier Warranty Period Components Parts Labor All Parts 1 Years 1 Years Compressor 5 Years 1 Years Dehumidifier(s) are paid by the owner. To obtain the nearest Authorized Service Center: Call 1-888-LG-CANADA (542-2623) Press the appropriate menu option, have your product model...
... so these costs are Carry-in material or workmanship under normal use . 4. LG Dehumidifier Warranty Period Components Parts Labor All Parts 1 Years 1 Years Compressor 5 Years 1 Years Dehumidifier(s) are paid by the owner. To obtain the nearest Authorized Service Center: Call 1-888-LG-CANADA (542-2623) Press the appropriate menu option, have your product model...


