
Service Manual
Page 1
website http://www.lgservice.com LG LG Room Air Conditioner SERVICE MANUAL MODEL: ACQ058PL KG5200ER LW5200ER WG5200ER WG6000R KG6000R M5404R WG5200R M6004R HBLG6000R HBLG5200E ACQ052PK LW7000R WM-5031 LW050CE LWJ0515PAG LW5200R CAUTION • BEFORE SERVICING THE UNIT, READ THE SAFETY PRECAUTIONS IN THIS MANUAL. • ONLY FOR AUTHORIZED SERVICE PERSONNEL.
website http://www.lgservice.com LG LG Room Air Conditioner SERVICE MANUAL MODEL: ACQ058PL KG5200ER LW5200ER WG5200ER WG6000R KG6000R M5404R WG5200R M6004R HBLG6000R HBLG5200E ACQ052PK LW7000R WM-5031 LW050CE LWJ0515PAG LW5200R CAUTION • BEFORE SERVICING THE UNIT, READ THE SAFETY PRECAUTIONS IN THIS MANUAL. • ONLY FOR AUTHORIZED SERVICE PERSONNEL.
Service Manual
Page 3
...WG5200ER, LW5200ER, HBLG5200E, LWC051JGMK2 KG5200ER ACQ058PL COOLING CAPACITY (BTU/h) 5,200 LW050CE 5,050 WG5200R ACQ052PK M5404R WM5031 LWJ0515PAG LW5200R 5,250 WG6000R M6004R KG6000R HBLG6000R 6,000 LW7000R 76,000 POWER SUPPLY (Phase, V, Hz) 1ø, 115V, 60HZ INPUT (W) 470/480 520 540 620 720 OPERATING CURRENT ... conductor (green or green and yellow) is found, replace all Mode [except POWER OFF]. 4. PREFACE This service manual provides various service information, including the mechanical and electrical parts, etc. Unplug the power cord and connect a jumper between...
...WG5200ER, LW5200ER, HBLG5200E, LWC051JGMK2 KG5200ER ACQ058PL COOLING CAPACITY (BTU/h) 5,200 LW050CE 5,050 WG5200R ACQ052PK M5404R WM5031 LWJ0515PAG LW5200R 5,250 WG6000R M6004R KG6000R HBLG6000R 6,000 LW7000R 76,000 POWER SUPPLY (Phase, V, Hz) 1ø, 115V, 60HZ INPUT (W) 470/480 520 540 620 720 OPERATING CURRENT ... conductor (green or green and yellow) is found, replace all Mode [except POWER OFF]. 4. PREFACE This service manual provides various service information, including the mechanical and electrical parts, etc. Unplug the power cord and connect a jumper between...

Service Manual
Page 6
... unit from the bottom. Remove the cabinet. (Refer to control board. (See Figure 1) 3. Figure 1 Figure 2 2.1.2 CABINET 1. 2. Replace the grille by placing the tabs in this manual or inside control board.) Figure 3 Figure 4 Figure 5 -6- Re-install by referring to circuit diagram on page 9 for servicing. Using a screwdriver, remove the screw that secure...
... unit from the bottom. Remove the cabinet. (Refer to control board. (See Figure 1) 3. Figure 1 Figure 2 2.1.2 CABINET 1. 2. Replace the grille by placing the tabs in this manual or inside control board.) Figure 3 Figure 4 Figure 5 -6- Re-install by referring to circuit diagram on page 9 for servicing. Using a screwdriver, remove the screw that secure...
Owners Manual
Page 2
... P'urchas_ IIi Staple your receipt to this Ipagle in the ewat yo_=need i_ to p_ove _te ,of purchase or for warranty issues, READ THiS MANUAL Inside you may rlo¢ r_ed to, ca[I for • Contact an Authorized _r_ Center for repair or maintenance of this un_ Call i-_,-243_00 to...
... P'urchas_ IIi Staple your receipt to this Ipagle in the ewat yo_=need i_ to p_ove _te ,of purchase or for warranty issues, READ THiS MANUAL Inside you may rlo¢ r_ed to, ca[I for • Contact an Authorized _r_ Center for repair or maintenance of this un_ Call i-_,-243_00 to...
Owners Manual
Page 3
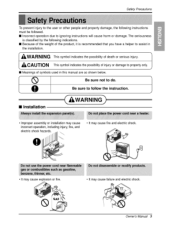
The seriousness is classified by the following instructions must be folllowed. [] incorrect operation due to ignoring instructions willl cause harm or damage. Owner_ Manual 3 Be sure not to follow t [] Installation . "/ q Be sure to do. To prevent iniury to the user or other _op_e and property ...the weight of the product, it is re_mmended that you have a helper to assist in the installation. [] Meanings of symbols us_ in this manual are as shown below. improper assemNy or installation may cause failure and ,ele_ric sho_. It may cause fire and electric shock. , It may ...
The seriousness is classified by the following instructions must be folllowed. [] incorrect operation due to ignoring instructions willl cause harm or damage. Owner_ Manual 3 Be sure not to follow t [] Installation . "/ q Be sure to do. To prevent iniury to the user or other _op_e and property ...the weight of the product, it is re_mmended that you have a helper to assist in the installation. [] Meanings of symbols us_ in this manual are as shown below. improper assemNy or installation may cause failure and ,ele_ric sho_. It may cause fire and electric shock. , It may ...

Owners Manual
Page 5
... may cause injury, . _ may cause failure of machine • It is damaged, it damag_ could result in the air conditioner falling out of injury_ Owner_ Manual 5 Leaving it must _ repaired or repEaced immediately. . It will cause failure of appliance or accident. • If the outer case is not: designed to _ol...
... may cause injury, . _ may cause failure of machine • It is damaged, it damag_ could result in the air conditioner falling out of injury_ Owner_ Manual 5 Leaving it must _ repaired or repEaced immediately. . It will cause failure of appliance or accident. • If the outer case is not: designed to _ol...
Owners Manual
Page 7
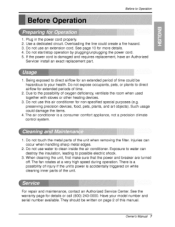
... details or call ,(800), 243-000& Have your health, Do, not expose occupants, pets, or plants to direct airflow for more detaii]s. 4. Owner_ Manual 7 Iao not use this manual. i' 2. IIfthe power cord is a consumer comfort appliance, not a precision climate control system. 1. Do not touch the metal parts of the unit. For repair...
... details or call ,(800), 243-000& Have your health, Do, not expose occupants, pets, or plants to direct airflow for more detaii]s. 4. Owner_ Manual 7 Iao not use this manual. i' 2. IIfthe power cord is a consumer comfort appliance, not a precision climate control system. 1. Do not touch the metal parts of the unit. For repair...
Owners Manual
Page 9
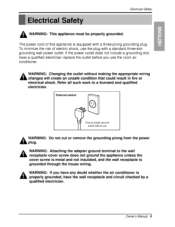
... a qualified electrician. Changing the outlet without making the appropriate wiring changes will create an uncle condition that could result in fire or electrical shock. Owner_ Manual 9 ElectricalSafety WARNING: This appliance must be pro_rly grounded. The power cord of electric shock, use the room air conditioner,. W'ARNING: If you use the plug...
... a qualified electrician. Changing the outlet without making the appropriate wiring changes will create an uncle condition that could result in fire or electrical shock. Owner_ Manual 9 ElectricalSafety WARNING: This appliance must be pro_rly grounded. The power cord of electric shock, use the room air conditioner,. W'ARNING: If you use the plug...
Owners Manual
Page 13
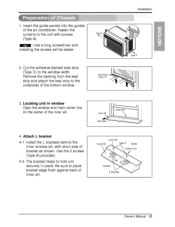
... into the guides of inner sill. Be sure to place, bracket edge flush against back of the air conditioner. A Inside ,CenCeLr ime O{_id,e ILBracket Owne, s Manual 13 1.
... into the guides of inner sill. Be sure to place, bracket edge flush against back of the air conditioner. A Inside ,CenCeLr ime O{_id,e ILBracket Owne, s Manual 13 1.
Owners Manual
Page 15
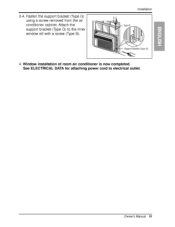
Fasten the support bracket (Type G) using a screw removed from the air conditioner cabinet. Owner_ Manual 15 3-4. Attach the support bracket (Type G) to the inner window sili with a screw (Type B)_ Installation 4 Window installation of room air conditioner is now completed,, S_ ELEi'CTRICAL DATA for attaching power cord to electrical outlet.
Fasten the support bracket (Type G) using a screw removed from the air conditioner cabinet. Owner_ Manual 15 3-4. Attach the support bracket (Type G) to the inner window sili with a screw (Type B)_ Installation 4 Window installation of room air conditioner is now completed,, S_ ELEi'CTRICAL DATA for attaching power cord to electrical outlet.
Owners Manual
Page 17
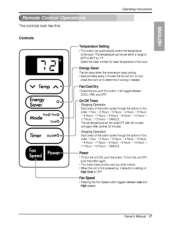
... order: 1 Hour _, 2 Hours _, 3 Hours _ 4 Hours ....5 Hours .._..6..H..ours-_,7Hours 8Hours 9Hours lOHours .... 11 Hours ....12 Hours CANCLE - push the b_on oTo turn me un_ ON. Owne, s Manual 17 To turn me unit OFF, push me room air b determine if cooling is first powered up it will be raised 2°F after 30 minutes...
... order: 1 Hour _, 2 Hours _, 3 Hours _ 4 Hours ....5 Hours .._..6..H..ours-_,7Hours 8Hours 9Hours lOHours .... 11 Hours ....12 Hours CANCLE - push the b_on oTo turn me un_ ON. Owne, s Manual 17 To turn me unit OFF, push me room air b determine if cooling is first powered up it will be raised 2°F after 30 minutes...
Owners Manual
Page 19
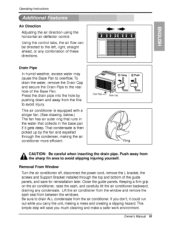
... base pan if it could run out while you much cl!eaning and make a safer work environment. Be careful when inserting the drain pipe. Owne s Manual 19 This air conditioner is then picked up by pushing down and away from between the windows. Removal From Window Turn the air conditioner df...
... base pan if it could run out while you much cl!eaning and make a safer work environment. Be careful when inserting the drain pipe. Owne s Manual 19 This air conditioner is then picked up by pushing down and away from between the windows. Removal From Window Turn the air conditioner df...
Owners Manual
Page 21
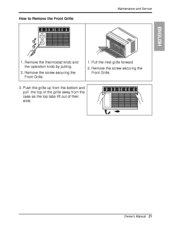
Remove the screw securing the Front Gdlle. 1,.PuIll the inliet grille forward 2 Remove the screw securing the Front Gri]lle. 3. Push the gri!le up, from the bosom and pull the top, of the grille, away from the case as the top tabs I[_ out of their slots. Owner_ Manual 21 Remo_e the thermostat knob and the operation knob by pulling. 2. How to Remove the Front Grille Maintenanceand Service 1.
Remove the screw securing the Front Gdlle. 1,.PuIll the inliet grille forward 2 Remove the screw securing the Front Gri]lle. 3. Push the gri!le up, from the bosom and pull the top, of the grille, away from the case as the top tabs I[_ out of their slots. Owner_ Manual 21 Remo_e the thermostat knob and the operation knob by pulling. 2. How to Remove the Front Grille Maintenanceand Service 1.
Owners Manual
Page 23
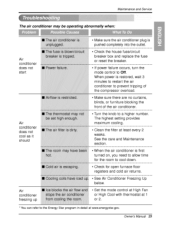
... cond_i_ b_oner freezing up, • Make sure the air conditioner plug is pushed completely into the outlet. Clean the filter at least every 2 weeks. Owne, t"s Manual 23 Check the, house fuse/circuit breaker box and replace the fuse or resiet the breaker.
... cond_i_ b_oner freezing up, • Make sure the air conditioner plug is pushed completely into the outlet. Clean the filter at least every 2 weeks. Owne, t"s Manual 23 Check the, house fuse/circuit breaker box and replace the fuse or resiet the breaker.


